Introduction
Cyber operations is about the configuration, defense, and attack of real systems. This text focuses on systems that were deployed between 2011 and 2017.
To configure, attack, and defend systems, a testing laboratory is required. Such a laboratory must not only allow systems to be built and run but must provide a way to segregate them from the wider Internet; after all, older systems are known to be vulnerable to public exploits. One excellent solution is virtualization. A range of virtualization solutions exists; two commonly deployed solutions are VMWare and VirtualBox. This chapter begins with an introduction to these virtualization solutions.
The chapter describes the major Windows desktop and server operating systems released between 2011 and 2017; it also includes major releases from the CentOS, OpenSuSE, Ubuntu, and Mint Linux distributions. The Notes and References section provides download locations for the various Linux distributions. This chapter shows how to build virtual machines running these operating systems.
A functioning computer system is more than just its operating system though; its entire ecosystem of installed applications must be considered. Desktop systems generally include a browser as well as plugins for various kinds of active web content. This chapter shows how to install three commonly used programs: Firefox, Java, and Adobe Flash Player on Windows and Linux workstations. The Notes and References lists download locations for these tools.
One advantage of modern operating systems and many major software packages is that they automatically download and install the latest security patches, often without user interaction. In almost every circumstance, this is a good thing. To keep test systems at a preferred patch level, this functionality must be controlled or disabled.
When this chapter is complete, the reader will have set up and configured a fully functional testing laboratory that can be used to run Windows and Linux virtual machines as they were deployed on a selected date between 2011 and 2017.
Virtualization Tools
A good testing laboratory needs a wide range of systems. Rather than use dedicated hardware for each system, it is much simpler to build systems using virtualization. Two of the most common tools for operating system virtualization are VMWare Workstation and VirtualBox, while other choices include ProxMox, Hyper-V, Parallels, QEMU, and Xen. This book focuses solely on the first two of these. VMWare Workstation is a long-standing, solid commercial product that runs on Windows and Linux; it has a free version called VMWare Player with reduced functionality. VirtualBox is a free, open source alternative; it runs on Windows Linux, Macintosh, and Solaris. In its current version, it is comparable to VMWare Workstation in functionality.
VMWare Workstation
The simplest way to learn about VMWare Workstation is to dive right in by installing and running a guest operating system.
Installing a VMWare Guest
Grab the install disc for a Linux distribution or a Windows system, and save that .iso file in some convenient location.1 Launch VMWare Workstation. If the home tab appears, select “Create a New Virtual Machine”; if it does not, then the same option is available from the File menu.
VMWare Workstation begins the process of creating a new virtual machine by presenting the user with the “New Virtual Machine Wizard.” The “Typical” configuration is usually sufficient. The first question is the location of the install media; provide the location of the saved .iso file for the “Installer disc image file (iso).” In most, though not all cases, VMWare Workstation recognizes the operating system on the disc image. When VMWare Workstation moves to install a recognized operating system, it uses “Easy Install” and makes several choices for the user. This automated process is often convenient, however it precludes the user from choosing some things, like the system partition table or the precise collection of installed software; this can occasionally cause difficulty later.
When VMWare Workstation is installing a Windows system, it provides a dialog box that allows the user to enter the Windows product key, the precise version of Windows (e.g., Windows 8 Professional), and the new system’s user and password. When a Linux system like CentOS is being installed, VMWare instead asks for information about a system user: the user’s full name, the username, and the password for that user. The same password for the user is also used for the root account on the system. In either case, VMWare Workstation then asks for both the name of the virtual machine and the location in which it will be stored. The VMWare Workstation name is separate and distinct from any host name of the system; it is used solely by VMWare Workstation to generate the names of the files that comprise the virtual machine and will appear as the machine’s title within VMWare Workstation. When selecting the location of those files, note that there are many files for each virtual machine, so it is a very good idea to store each system in its own separate directory.
VMWare Workstation asks for the size of the virtual hard disk; it also provides the option to split the virtual disk into smaller files. The rationale for this question is the limitation of some file systems, including FAT32. The FAT32 file system remains commonly used on flash drives, even though files in FAT32 are limited to less than 4GB in size. A virtual machine with a hard drive of 4GB or more could not be copied onto such a flash drive. When VMWare Workstation uses a split virtual disk, each file is no more than 2GB in size.
Be sure that your host has sufficient memory for all the running guests.
Before creating the virtual machine, VMWare Workstation allows the hardware to be customized. Settings that can be modified include the system’s memory, the number of network cards it possesses, and installed peripherals like a CD/DVD or a USB controller.
When the choices have been made, VMWare Workstation installs the operating system.
Managing VMWare Guests
Once the guest operating system is installed, the guest will reboot. Interact with the guest as any other system; log on, providing the password selected during the installation process. The guest responds as if it were the only system currently running.
One issue that may arise is control of the keyboard and the mouse. This is not usually a problem, as VMWare installs VMWare Tools on the guest as part of the installation process after the system first boots. (On Windows systems, this requires a reboot of the guest.) In general, the keyboard combination CTRL+ALT, when pressed inside a guest, returns control of the keyboard and the mouse to the host.
Another problematic keyboard combination is CTRL+ALT+DEL. On a Windows host, that combination will be intercepted by the host operating system. To send that combination to the guest, use CTRL+ALT+INSERT instead.
Once the guest is running, it can be powered down from within the guest. VMWare Workstation provides the ability to shut down or restart the guest from VMWare Workstation itself. It also provides the ability to suspend the guest, essentially pausing it. This can be convenient when the current state of the system is critical.
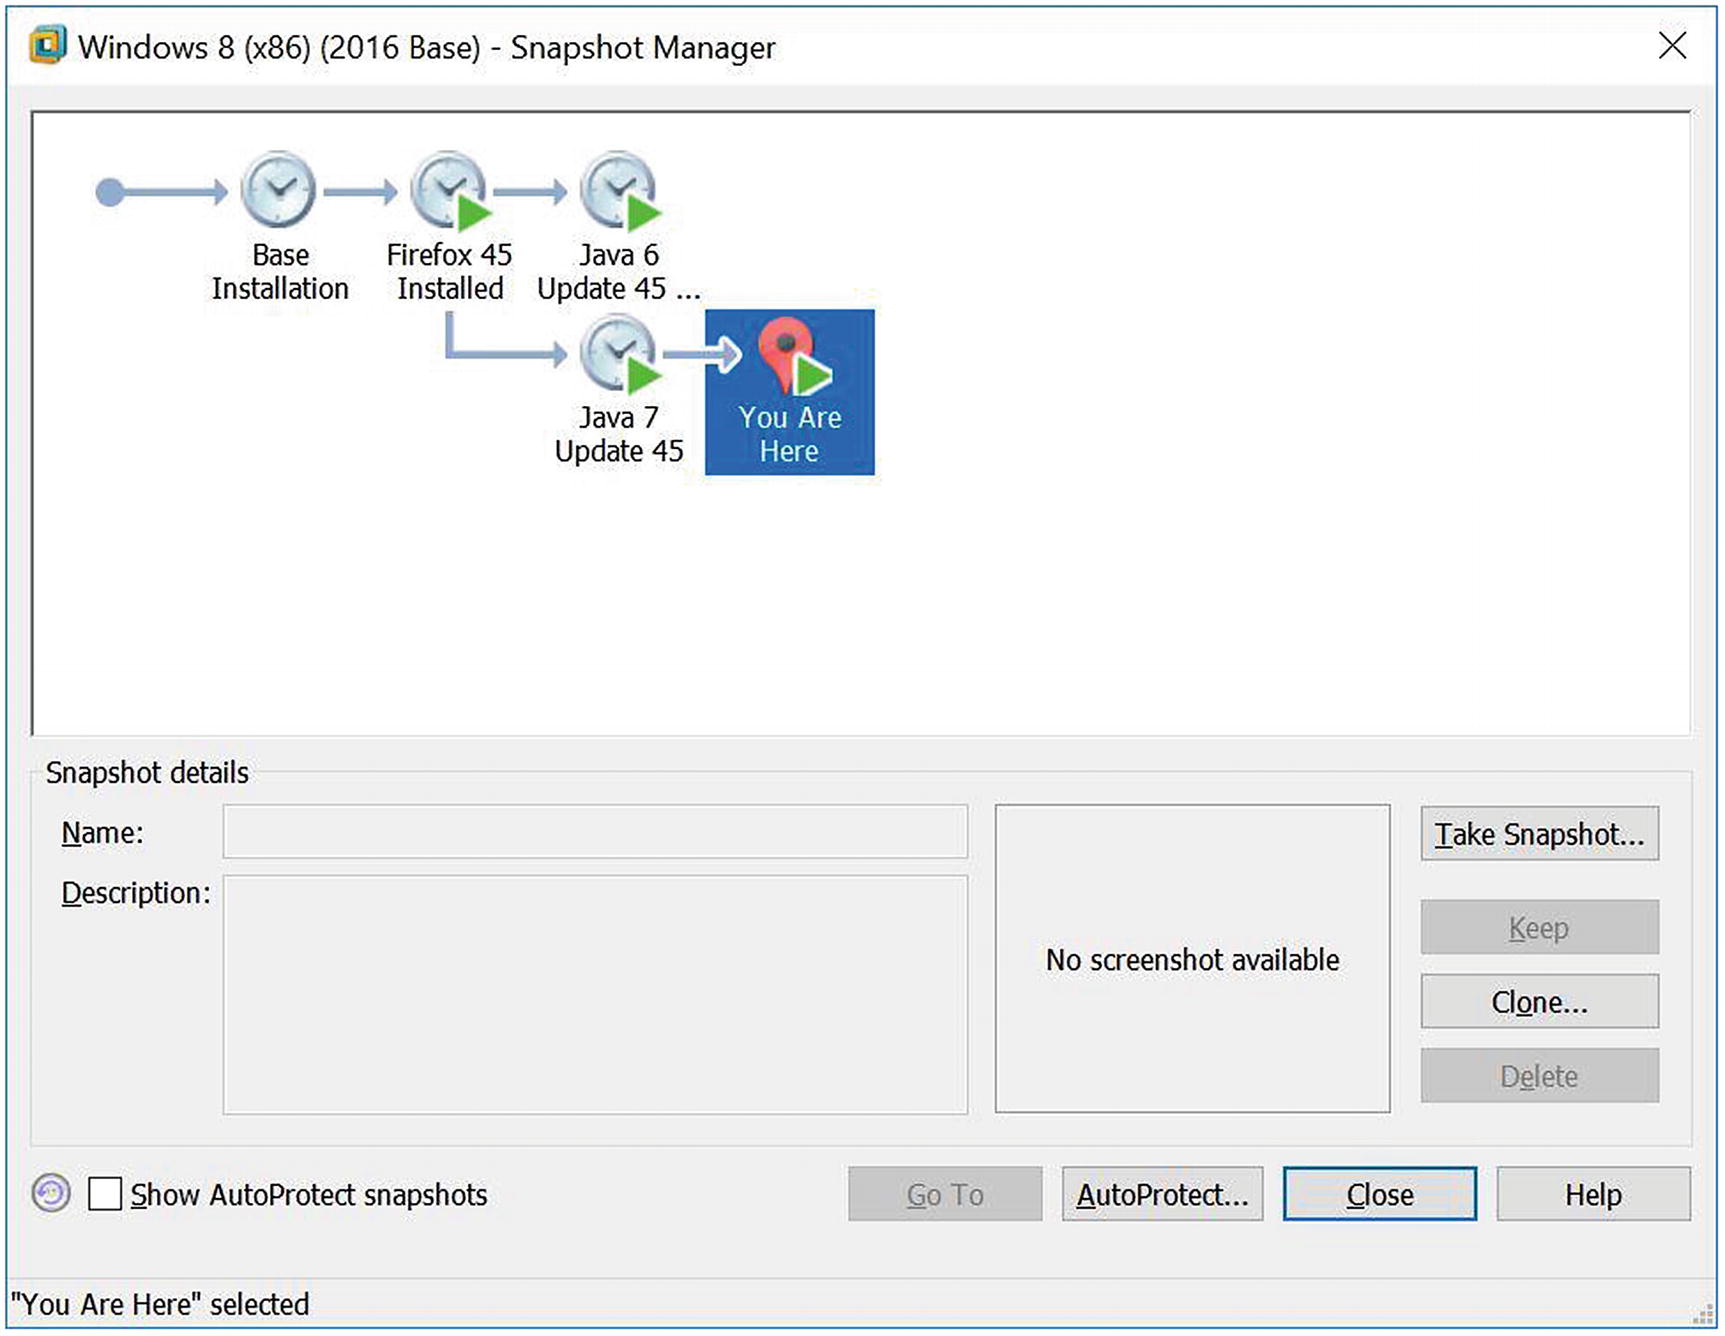
VMWare Workstation 12.1 Snapshot Manager
Once a virtual machine has been created, it can be copied and moved by copying and moving the underlying files. When a moved or copied virtual machine is started for the first time, VMWare Workstation will prompt the user, warning that the virtual machine may have been moved or copied and asking the user to select either “I moved it” or “I copied it.” One of the core differences between these two options is the MAC address of the guest. If the user selects “I moved it,” then the guest MAC address remains unchanged, but if “I copied it” is selected, then the guest’s MAC address is modified. If this were not done, then the original system and its duplicate would have the same MAC address on the network, which is a recipe for amusing network mayhem if both are run at the same time.
Networking in VMWare
It can be connected directly to the host’s physical network (bridged). In this mode, it acts as another system on the host’s network.
It can be connected to the host’s physical network via network address translation (NAT). In this case the guest can make outbound connections to the physical network, but inbound connections reach the guest only if explicitly allowed by port forwarding.
It can be connected to a host-only network, which only allows network connections to/from other adapters on the host-only network, including the host.
It can be connected to a different virtual network (VMNet2 - VMNet7 or VMNet9 - VMNet19). All the adapters connected to the same virtual network can communicate with each other and with the host but cannot directly communicate with other guests or with systems on the physical network.
The configuration of a network adapter can be changed from the Settings dialog box for the virtual machine; that dialog box can be accessed by navigating the VMWare Workstation menu through VM ➤ Settings. From the Hardware tab, select Network Adapter to modify the settings.
The settings for each network are controlled through the Virtual Network Editor; it can be launched by navigating the VMWare Workstation Menu through Edit ➤ Virtual Network Editor. Because this tool affects the networking on the host, it may require elevated privileges on a Windows host. This tool configures the network type, its assigned address range, and its subnet mask. It also controls whether VMWare Workstation should act as a DHCP server on that network, and if it is a NAT network, any port forwarding.
The address of the host on each network can be found by using command-line tools on the host. In its default configuration, a Windows host should have Ethernet adapters for both the VMNet1 (host-only) and the VMNet8 (NAT) networks; their addresses can be found using ipconfig.
VMWare Tools
To improve the interaction between the guest and the host, some modification of the guest is required. In VMWare Workstation, this is done by VMWare Tools. If VMWare Workstation recognized the operating system during the install, then VMWare Tools is installed on the guest as part of the “Easy Install” process. For some Linux distributions, VMWare Tools must be manually installed after the guest operating system is running.
One feature provided by VMWare Tools is that it enables copying and pasting between guests and the host. It allows for drag and drop, so that files from the host can be dragged and dropped onto a guest (and vice versa) where they will be copied. Both features can be disabled; navigate to Virtual Machine Settings from the main menu through VM ➤ Settings, then from the Options tab select Guest Isolation.
VMWare Workstation can adjust the screen size of a guest with VMWare Tools. The user can resize the VMWare Workstation application, and the size and screen resolution of the guest will be adjusted accordingly. VMWare Tools also enables “Unity Mode.” In unity mode, the background of the guest is not shown at all; instead its windows are shown in the host as if they were natively hosted windows.
VMWare Tools enables the use of shared folders. A shared folder is a folder on the host operating system that also exists (at a different mount point) in the guest. This feature is enabled and controlled through Virtual Machine Settings (VM ➤ Settings) in the Options Tab, under Shared Folders. To enable a shared folder, determine how long the shared folder should be enabled (permanently, or until the next guest reboot). The Add button will start the Add Shared Folder Wizard. Select a directory on the host, say D:\Shared, and then a name for the share- say shared. On a Linux system, that folder will be mounted in the file system at /mnt/hgfs/shared. Here /mnt is the usual location for external file systems, hgfs stands for host-guest-file-system, and shared is the name of the share that was created. If the guest is a Windows system rather than a Linux system, the process is similar, though the shared folder appears as \\vmware-host\Shared Folders\shared if automatic drive mapping is not selected, and as E:\shared if it is.
VirtualBox
One of the big advantages of VirtualBox over VMWare Workstation is that VirtualBox is a free, open source product. There was a time when VMWare Workstation had significantly more features than VirtualBox, but today they are comparable. The current downside of VirtualBox is that configuring a system to run in VirtualBox requires more manual effort.
Installing a VirtualBox Guest
The simplest way to learn to use VirtualBox is to dive right in and install a guest.
The process begins when the user presses the “New” button on the main menu. VirtualBox presents a dialog box, asking for the name and type of the system. Like VMWare Workstation, the host name is used solely by VirtualBox itself. VirtualBox asks the user to select the amount of memory that the virtual machine will use and the size of the guest system’s hard drive. The user can choose from a range of virtual hard disk formats, including VDI; the VirtualBox disk image; and VMDK, the format used by VMWare. One important difference between the formats is that though VMDK files can be split into smaller 2GB files to enable them to be stored on FAT32 partitions, VDI files cannot be so split. Both VDI and VMDK files can be dynamically allocated, meaning that the file(s) containing the hard drive only contains data for the parts of the hard disk that had been used. Finally, VirtualBox asks for the final size of the hard disk as well as the location on the host where the file(s) would be stored.
Unlike VMWare Workstation, at this point the guest has not yet been installed; indeed, the user is yet to even provide the location of the install media to VirtualBox. However, when the virtual machine is first started, VirtualBox asks the user for the location of a startup disk. This can be a physical disk in the form of a CD/DVD; it can also be an .iso image file. The VirtualBox guest will then boot from the install media as if it were a physical device. The user must complete the install process manually. This provides more control than VMWare Workstation, but it requires more manual intervention.
Managing VirtualBox Guests
Once the guest is running, users interact with it as if it were a physical machine. The keyboard and mouse are directed to the guest as if it were any other application. To manually change whether the host or the guest receives keyboard input, press the host key, which by default is the CTRL key on the right side of the keyboard. To change the host key, from the Oracle VM VirtualBox Manager navigate the main menu through File ➤ Preferences. Select Input from the left menu, then the Virtual Machine tab. The first displayed option is for the Host Key Combination.
To send the CTRL+ALT+DEL combination to a guest, use HOST+DEL (=RCTRL+DEL by default); like the host key itself, this key combination can be changed in the same preferences menu.

Managing snapshots in VirtualBox 5.0.32
The process of copying and moving VirtualBox virtual machines depends on whether the copied guest will be used on the same host. To create a copy of a virtual machine for use on the same host, begin with a powered down virtual machine. From VirtualBox Manager, select the virtual machine, then navigate the main menu through Machine ➤ Clone. Provide a new name for the system and choose whether the new guest will have a different MAC address than the original guest; clearly this is required if both guests are to run at the same time on the same network. There are two types of clones: one where the original system is duplicated (full clone) and one where only the changes are recorded (linked clone). The clone can include all or none of the snapshots taken of the original guest.

Changing the MAC address of a guest in VirtualBox 5.0.32
Networking in VirtualBox
The adapter can be connected to the host via network address translation (NAT). Unless changed manually, the first adapter connected to a NAT network will receive an address in 10.0.2.0/24, the second in 10.0.3.0/24, and so on. Though they can make outbound connections to the physical network, adapters connected via NAT cannot communicate with each other.
The adapter can be connected to the host via NAT Network. To create a NAT Network, from the main menu for the VirtualBox Manager navigate File ➤ Preferences (Figure 1-4). Select Network from the left, then the NAT Networks tab. Use the green icon to the right to create a new NAT network, then use the screwdriver to set its properties. Key properties to set are the Network Name and its address range. By default, the first created network is named “NatNetwork,” runs on 10.0.2.0/24, and has a DHCP server.
Guest adapters can be connected to any existing NAT Network. These adapters can communicate with others on the same NAT Network as well as make outbound connections to the physical network through a gateway at the .1 address.

Creating a NAT Network in VirtualBox 5.0.32
The adapter can be bridged to the same network as the host, and so act as another system on the physical network.
The adapter can be connected to a host-only network. Adapters on this network can communicate with other adapters on the host-only network and with the host. The host usually has address 192.168.56.1 with other adapters in the range 192.168.56.0/24. By default, VirtualBox runs a DHCP server, giving out addresses in the range 192.168.56.101 - 192.168.56.254.
The adapter can be connected to an internal network. All adapters connected to an internal network with the same name can communicate with each other, but not to adapters connected to internal networks with different names. Adapters on an internal network cannot communicate with the host.
VirtualBox Guest Additions
Some features of VirtualBox require software to be installed on the guest itself; these tools are called VirtualBox Guest Additions. VirtualBox Guest Additions improve how the host and guest share the keyboard and mouse; after installation users can use the mouse to switch between the guest and other applications on the host rather than use the HOST key.
The additions improve graphical performance in the guest, allowing the user to resize the window and having the guest automatically change its screen resolution to compensate. Another graphical improvement is called “Seamless Mode.” It is controlled from the guest’s VirtualBox main menu by navigating View ➤ Seamless Mode or via the shortcut key HOST+L. Once Seamless Mode is enabled, the guest’s background is disabled, and windows displayed by the guest instead appear to be natively displayed by the host.
VirtualBox Guest Additions provide ways the host and guest can share content. It provides the ability to drag and drop files between host and guest; it also provides the ability to share the clipboard so that data can be copied from the host then pasted to the guest and vice versa. Both features are controllable through the guest’s VirtualBox main menu, under the Devices heading. Access can be granted from the host to the guest, from the guest to the host, bidirectional, or none, which is the default.
Another way host and guest can share information after VirtualBox Guest Additions has been installed is through a shared folder. Configuration of shared folders is through the guest’s VirtualBox main menu, under the Devices heading. To create a shared folder, choose the folder path on the host and the folder name that will be used to identify it to the guest. Permanent shares persist after the virtual machine is stopped while shares marked as auto-mount will be mounted into the file system when the guest starts. In the case of Windows guests, they receive a drive letter; in the case of Linux guests they appear in the /media directory with a name formed by prefixing sf_ to the name of the share. Shares that are not automatically mounted can be found on a Windows guest as a networked file share in the location \\VBOXSVR.
Building Linux Systems
There are a wide range of Linux distributions that are deployed in significant numbers. CentOS is a freely available open source version of Red Hat’s commercial offerings, while OpenSuSE is a close relative of SuSE’s enterprise product. Ubuntu, developed by Canonical, is considered by many to be very end-user friendly. Mint is based on Ubuntu with different software choices, most notably a different desktop. Kali is a specialized, penetration testing distribution that makes an excellent platform to learn more about offense. Each of these Linux distributions can be installed as a virtual machine, either in VMWare Workstation or in VirtualBox.
Networking
Though Linux systems share many common elements, different Linux distributions have customized and modified how to configure networking.
Networking in CentOS
Changes to the hostname made in this file take effect when the system reboots.
Other options to the hostnamectl command can be found by running hostnamectl help.

Configuring the interface eth0 in CentOS 6.6
The significance of most lines is self-explanatory, though CentOS provides additional documentation in the file /usr/share/doc/initscripts-x.yy.zz/sysconfig.txt (the directory varies with the version of CentOS).
These tools allow the user to provide one or more IP addresses for each interface.

The Firewall Configuration tool in CentOS 6.1
In each case, the graphical firewall tool is a front end to iptables.
SELinux on CentOS
CentOS systems install SELinux by default. SELinux modifies the kernel to provide additional security features and finer-grained access control. Though effective and useful, it is also very difficult to configure, extremely difficult to debug, and many deployed systems ran with SELinux disabled.
Set SELinux to permissive mode by editing the file /etc/selinux/config; this will require a system reboot. In permissive mode, SELinux runs, but it does not prevent access violations. SELinux can temporarily be set into permissive mode with the command setenforce permissive. Changes made this way persist only until the next system reboot.
Networking in OpenSuSE
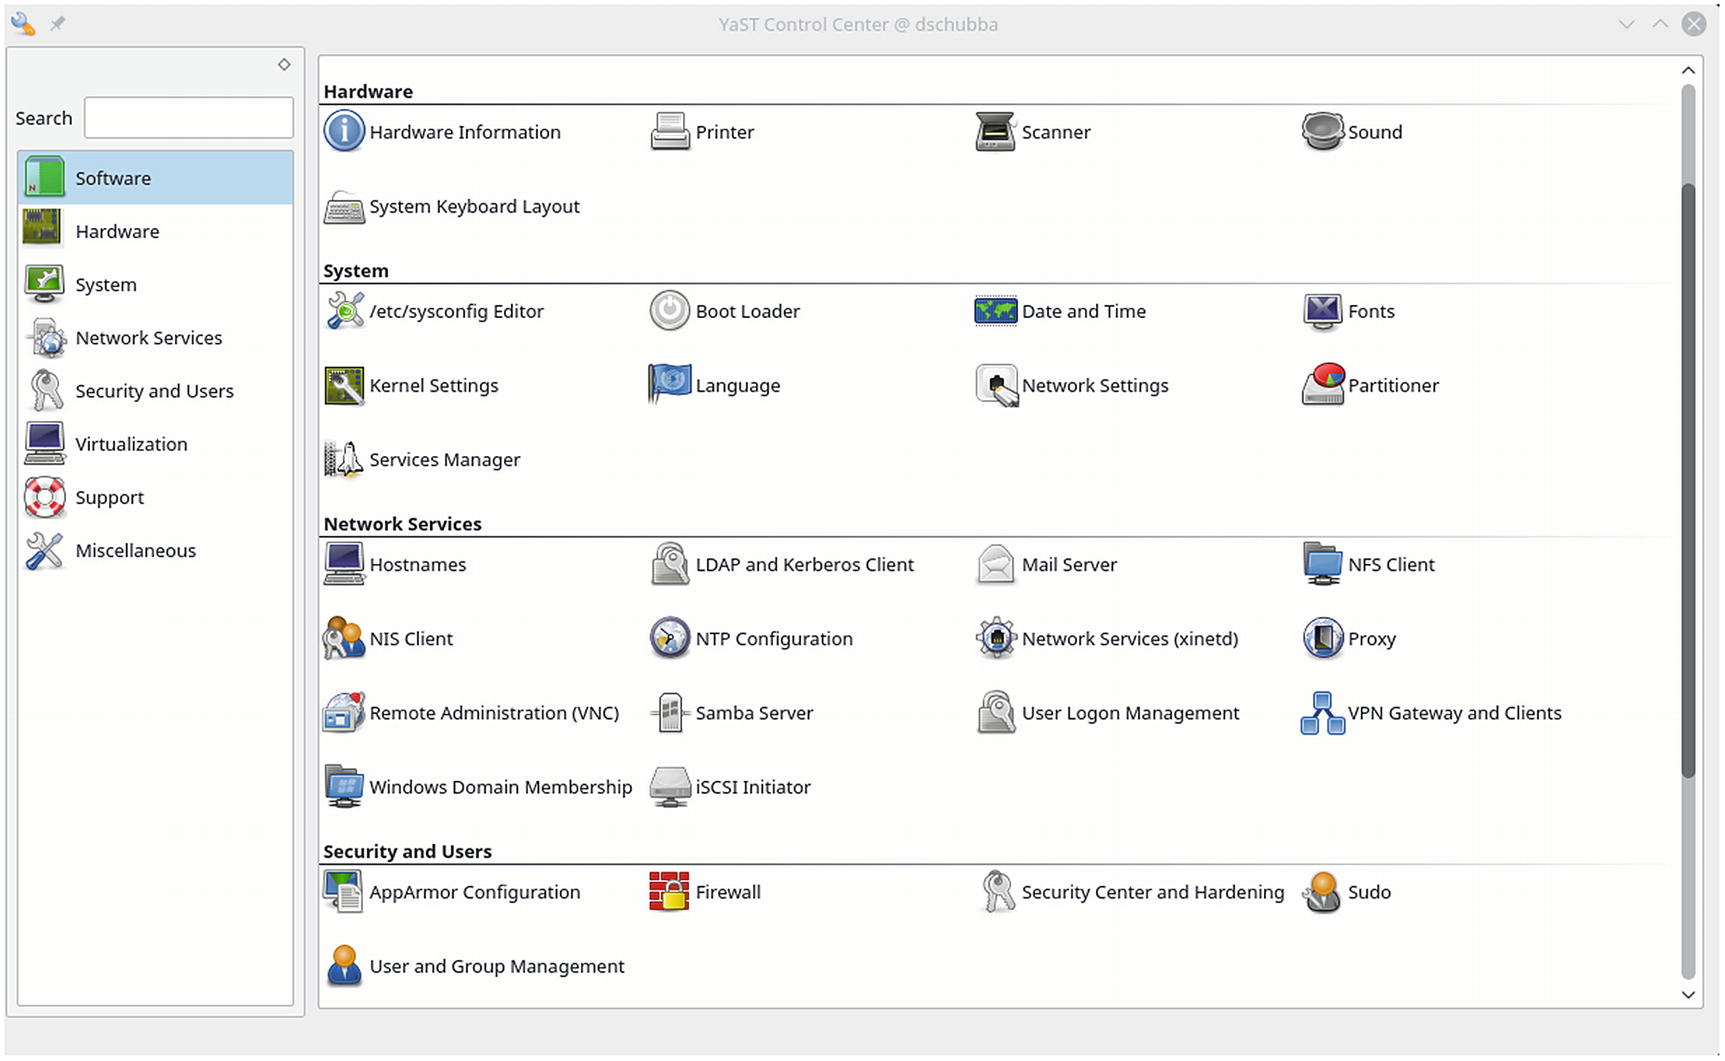
The configuration tool YaST on OpenSuSE 42.2
The network settings for an OpenSuSE system can be changed using YaST, though the location of the module within YaST varies with the version of OpenSuSE. On older systems including OpenSuSE 12 and 13, from YaST navigate Network Devices ➤ Network Settings. In later systems like OpenSuSE 42, navigate instead System ➤ Network Settings. In each case the graphical tool provides comparable functionality. The user can set the IP address(es), netmask, DNS servers, and the like for each available interface.
YaST also includes a graphical tool to configure the firewall for the system; it is available from within YaST in the collection Security and Users.
Networking in Ubuntu
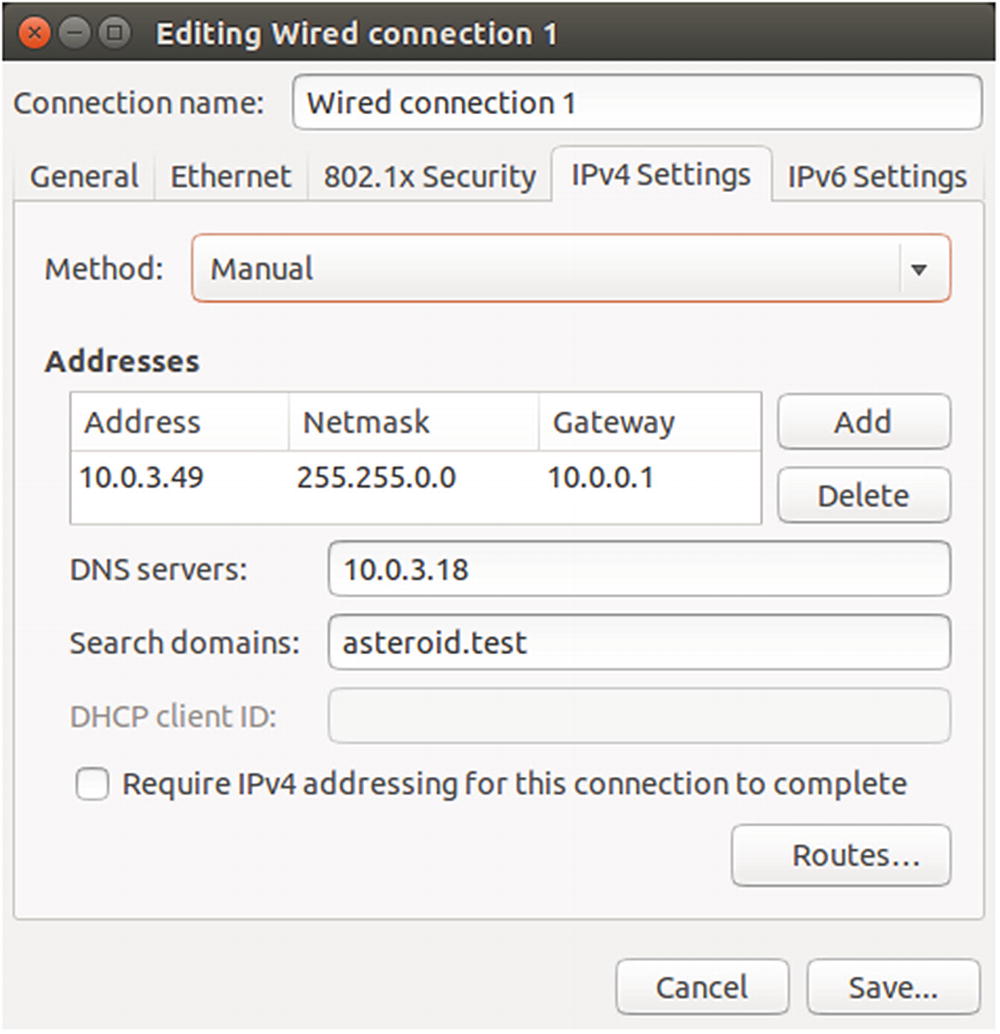
Configuring the network on an Ubuntu 14.04 system
Networking in Mint
Mint systems are configured in the same fashion as Ubuntu systems; this is unsurprising as Mint is based on Ubuntu. To change the hostname on older versions of Mint, a user can change the contents of /etc/hostname and reboot the system. Later systems like Mint 16 allow the use of hostnamectl, though the result is still stored in /etc/hostname.
The graphical tools to modify the network settings on Mint systems are the same as on Ubuntu systems though they are in different locations within the start menu. On an old system like Mint 12, launch the tool by navigating the main menu through Applications ➤ Other ➤ Network Connections. On later systems like Mint 17, navigate the main menu through Preferences ➤ Network Connections.
Networking in Kali
To configure the networking on a Kali system, navigate to the system properties as if the system were a CentOS 7 system by selecting the power icon in the top right of the main menu, then selecting the icon that appears to be a crossed screwdriver and wrench. From the resulting dialog, select Network and configure the interfaces on the system.
Configuring Software Repositories
These Linux distributions use a package manager for software. The package manager is used when adding additional software to the system as well as managing security updates for the system. To keep these systems as they were deployed after installation and still retain the needed flexibility to install additional software, the package managers need to be configured to so as not to automatically download updates.2 This process is slightly different for each distribution.
Configuring yum in CentOS
These entries begin with a label that describes the repository, then a longer full name for the repository. They continue with a mirror list and a commented-out line that describes the location of the repository. The mirror list does exactly that: provides a mirror of the repository so that different users end up at different repositories. These entries conclude with a flag indicating that GPG should be used to verify packages and provide the location of the corresponding GPG key.
It is possible to disable a repository by using the setting enabled=0. However, there are many repositories, spread over many files. A simpler solution is to remove or rename these files; if the file extension is not ".repo", the file is not parsed by yum. Then add one or more new repository files configured as desired.
The URL http://vault.centos.org/6.0/os/x86_64 shows the actual repository files. This location varies for the version of CentOS and the architecture. For example, for a 32-bit version of CentOS 5.9, the base URL is http://vault.centos.org/5.9/os/i386/ , while the URL for a 64-bit version of CentOS 7.0-1406 is http://vault.centos.org/7.0.1406/os/x86_64/ .
The URL for currently supported versions of CentOS is not located at vault.centos.org, but rather at mirror.centos.org; for example, today the appropriate repository for CentOS 7.4-1708 (which is the current version) is http://mirror.centos.org/centos-7/7/os/x86_64/ .
The command yum list available lists all available packages. To search for packages that contain “php” in the name, run the command yum list available *php*. To search for the string “php” in the description, summary, or package name, run the command yum search php. To install a package along with its dependencies, use the command yum install packagename. The command yum help shows the available commands.
Configuring zypper in OpenSuSE
Like the similar files on CentOS systems, this provides a label for the repository, a name for the repository, a few flags, and the URL that points to the repository.
OpenSuSE repository files typically contain only one repository per file. The various debug and update repositories can be disabled by editing the corresponding file or changing the file extension. The repository for the installation medium is usually named after the install disc; on an OpenSuSE 42.2 system, that is the file /etc/zypp/repos.d/openSUSE-42.2-0.repo.
The command zypper search findthis will list any packages with “findthis” in either the package name or its description. To install a package along with its dependencies, use the command zypper install packagename. To see the available commands, use zypper help.
Configuring apt in Ubuntu
The first (commented out) is the installation CD, while the first uncommented line is the primary online repository at http://us.archive.ubuntu.com/ubuntu . Because Ubuntu 16.10 is also named “Yakkety Yak,” the line indicates the version of Ubuntu. There are four repositories at http://us.archive.ubuntu.com/ubuntu for Ubuntu 16.10 (Yakkety Yak): they are main, which is for software supported by Canonical (the makers of Ubuntu); universe, which contains community maintained open source software; restricted, which contains proprietary device drivers; and multiverse, which contains non-free software. The other commented-out lines are for source code and for software updates. Later lines in the file include security fixes and a variety of other repositories. To keep the system in its initial state, these need to be commented out.
The command apt-cache search findthis will list any available package with “findthis” in either the package name or in the package description. To install a package along with its dependencies, use the command apt-get install packagename. Help on these commands is provided by apt-get help or apt-cache help.
Older Ubuntu (and Mint) systems use the commands apt-get and apt-cache. In 2014, the tool apt was released, which provides a more user-friendly interface to apt-get and apt-cache; see https://mvogt.wordpress.com/2014/04/04/apt-1-0/ for details.
Configuring apt in Mint
The situation with Mint is similar, as it uses both apt/apt-get/apt-cache and the Ubuntu repositories. Mint includes additional repositories for Mint specific software, and later versions of Mint, like Mint 17 and Mint 18 put the location of the primary repositories in /etc/apt/sources.list.d/official-package-repositories.list rather than in /etc/apt/sources.list. If all but the initial online repositories are disabled, some versions of Mint still require minor upgrades.
Configuring apt in Kali
Kali Linux is intended for use primarily as an attacking system, so it should be kept up to date with the latest patches and tools. It also uses apt to manage packages. Because Kali uses apt to distribute updates to many tools, most notably Metasploit, the commands apt update && apt dist-upgrade should be regularly run.
Services
Equivalency Between SysVInit/Upstart Commands and systemd Commands
Sysvinit/Upstart | systemd |
|---|---|
service sshd start | systemctl start sshd |
service sshd stop | systemctl stop sshd |
service sshd status | systemctl status sshd |
chkconfig sshd on | systemctl enable sshd |
chkconfig sshd off | systemctl disable sshd |
chkconfig sshd | systemctl is-enabled sshd |
Virtualization Support
The process to provide virtualization support within the guest depends on whether the virtual machine is running within VMWare Workstation or VirtualBox.
VMWare Tools
For most Linux systems, VMWare Tools is installed by the VMWare Workstation Easy Install process; this is the case for CentOS, OpenSuSE, Ubuntu, and Mint systems.
VirtualBox Guest Additions
VirtualBox Guest Additions must be installed manually on most Linux distributions. Because it requires special features in the system’s kernel, it may require the ability to compile software as well as the headers for the running kernel.
Installing VirtualBox Guest Additions on CentOS
If the process completes without errors, then the installation is complete after the system reboots.
Installing VirtualBox Guest Additions on OpenSuSE
In some cases, these tools are incomplete. They are generally sufficient for graphics, including seamless mode; they also provide a shared clipboard. They are sometimes insufficient for dragging/dropping files to/from the host or for shared folders.
If desired, it is possible to recover the missing functionality by removing the open source versions, installing the necessary compiler and kernel development tools, then installing the tools provided by VirtualBox.
If the process completes without errors, then the installation is complete after the system reboots.
Installing VirtualBox Guest Additions on Ubuntu, Mint, and Kali
On Ubuntu systems, VirtualBox Guest Additions can be installed without additional preparation of the guest. Load the VirtualBox Guest Additions CD and follow the autorun prompts.
Mint systems are simpler still, as the default install includes an equivalent set of packages, and so no additional work needs to be done beyond installing the operating system.
Browser Software
A deployed system is more than just its operating system; just as important to the security of the system is the collection of software installed on it. One of the most common uses of a Desktop system is to browse the Internet. These Linux distributions ship with a version of Firefox. Active web content is often displayed using either Java or Adobe Flash Player.
Installing Java on CentOS
CentOS systems include OpenJDK rather than Oracle’s Java, and they do not include a plugin for Firefox. Many versions of Oracle Java can be installed on CentOS, but it is most reasonable to choose a Java version that was in common use at the same time as the operating system. For example, CentOS 5.7 was released in September 2011, while Java 6 Update 27 was released in August 2011.
This creates a Java .rpm in the current directory, then installs Oracle Java in the directory /usr/java.
Restart Firefox; verify the plugin is installed and that it functions correctly.
The process to install Java 8 Update 11 on CentOS 7.0-1406 is essentially the same, with the only notable difference being the fact that only one version of Open Java is installed by default, rather than the two that were observed in CentOS 6.5.
Installing Adobe Flash Player on CentOS
To install Adobe Flash Player on CentOS, begin by choosing an appropriate version. Between 2012 and 2016, development of Adobe Flash Player for Linux was held at version 11.2, adding only security fixes.
To install Adobe Flash Player 10.3.183.5 (released August 2011) on a 32-bit CentOS 5.7 (released September 2011), begin by downloading the package from Adobe ( https://helpx.adobe.com/flash-player/kb/archived-flash-player-versions.html ).
Installing Java on OpenSuSE
The installation of Java on OpenSuSE systems follows the same general lines, save it uses a different tool name (update-alternatives rather than alternatives) and a different place to store the plugin (/usr/lib/browser-plugins/ or /usr/lib64/browser-plugins/).
Restart Firefox, verify the plugin installed, and that it functions correctly.
Installing Adobe Flash Player on OpenSuSE
Installing Java on Ubuntu
Installation of Java on Ubuntu is different, as it is not an .rpm based distribution, but rather a .deb based one, and Oracle does not distribute Java in this format.
Restart Firefox, then verify the plugin is installed and functioning correctly.
Installing Adobe Flash Player on Ubuntu
Restart Firefox, then verify the plugin is installed and functioning correctly.
In either case, restart Firefox and verify that Adobe Flash is functioning in the same fashion as CentOS or OpenSuSE.
Installing Java and Adobe Flash Player on Mint
Mint systems generally include a version of Java based on IcedTea that includes a properly configured plugin for the Firefox web browser. Most, but not all, versions of Mint also include a properly configured Adobe Flash Player installation, including a plugin for the browser.
A check then shows that Firefox is using the newly installed Oracle Java.
A check of Firefox then shows that Adobe Flash Player is installed.
Building Windows Systems
Windows systems can be classified as desktop systems or server systems. During 2011 through 2017, Microsoft released Windows 7 Service Pack 1, Windows 8, Windows 8.1, and Windows 10 for the desktop; they also released Windows Server 2008 R2, Windows Server 2012, Windows Server 2012 R2, and Windows Server 2016 for servers.
Older versions of Microsoft operating systems received Service Packs; these typically included all the appropriate security patches and would occasionally include new features. Beginning with Windows 10, however, Microsoft has moved to a rolling release model. Prior to 2018, there were five major Windows 10 releases; these can be differentiated by the corresponding version number. The initial release of Windows 10 was in July 2015, with version 1507. The next major release was version 1511 from November 2011. The so-called “Anniversary Update,” which included new features was released in July 2016 as version 1607. Version 1703 was released in April 2017 and was called the “Creator’s Update,” while Version 1709 was released in October 2017 and was called the “Fall Creator’s Update.”
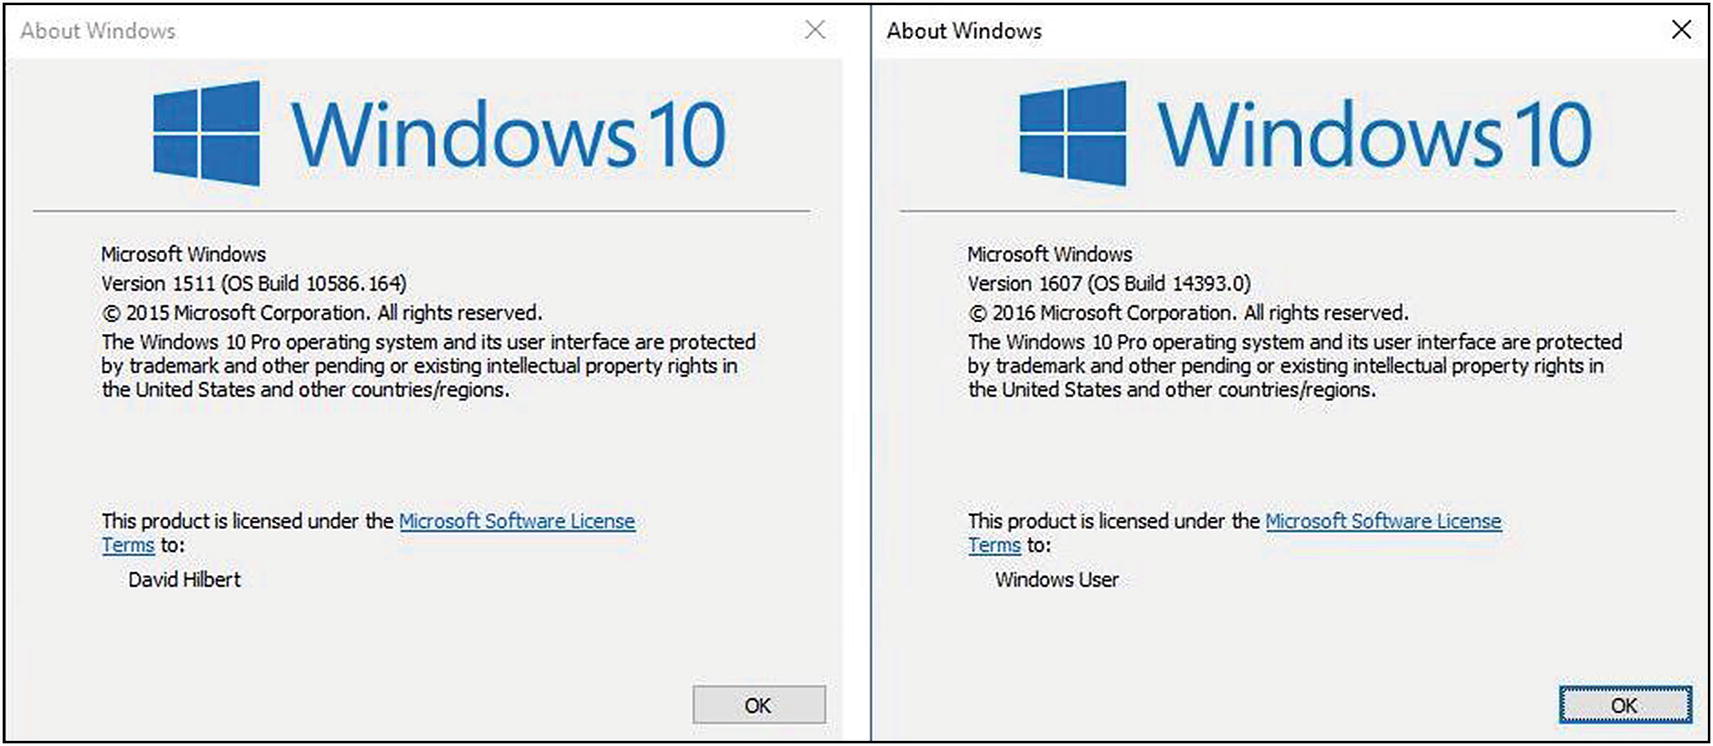
The results of the command winver on two different Windows systems. The one on the left is build 1511 and patched through 10586.164; the one on the right is the “Anniversary Update,” build 14393, and is otherwise unpatched.
Each Windows 10 system includes an OS Build number; this describes both the version and the patch level of the system. The initial release of Windows 10 is version 1504 with build number 10240. Version 1511 uses build number 10586, while the anniversary update, version 1607, uses build number 14393. As an example, build 10586.164 is Windows 10 Version 1511, patched through KB 3140768, which was released in March 2016.
Installation
The installation of Windows systems in virtualization is standard; both VirtualBox and VMWare Workstation recognize Windows systems.

Using customized settings for a Windows 8.1 x64 installation
When installing a Windows 8 system, the default installation process asks for an online account from Microsoft (including Xbox Live, Outlook.com, or OneDrive). This can be bypassed by selecting the installation setting “Sign in without a Microsoft account.”
When installing a Windows 10 system, the user is presented with a dialog box asking, “Who owns this PC?” If the user answers that “My work or school owns it,” they are presented with the option to either “Join Azure Active Directory” or “Join a local Active Directory domain.” Provided the second option is selected, the user can then set up a local account. It is not necessary to have a domain in place during the installation, though the systems can later be joined to a domain.
Configuring Windows Update
Windows 8.1 and earlier allow the user to decline the option of automatically installing Windows updates (cf. Figure 1-10). This can also be changed after the system is installed; navigate the Control Panel through Systems and Security ➤ Windows Update and make the necessary changes.

Disabling the Windows Update service on Windows 10
Configuring Windows Defender

Using MMC on Windows 10-1607 to disable Windows Defender
To re-enable Windows Defender, reset that value to “Not Configured,” then start the Windows Defender GUI and select “Start Now.” On a Windows Server installation, Windows Defender can be removed using the Add Roles and Features Wizard.
Virtualization Support
Both VirtualBox and VMWare Workstation support Windows operating systems. VMWare Workstation installs Windows systems using Easy Install, and automatically includes VMWare Tools.
The installation of VirtualBox Guest Additions on Windows systems must be performed manually. Once the guest has booted, navigate the guest’s VirtualBox main menu through Devices ➤ Insert Guest Additions CD Image. This will load a virtual CD with the needed software in the guest. If the program does not run automatically, start the process by running VBoxWindowsAdditions.exe from the disc. The installation process requires a guest system reboot when complete.
Networking on Windows
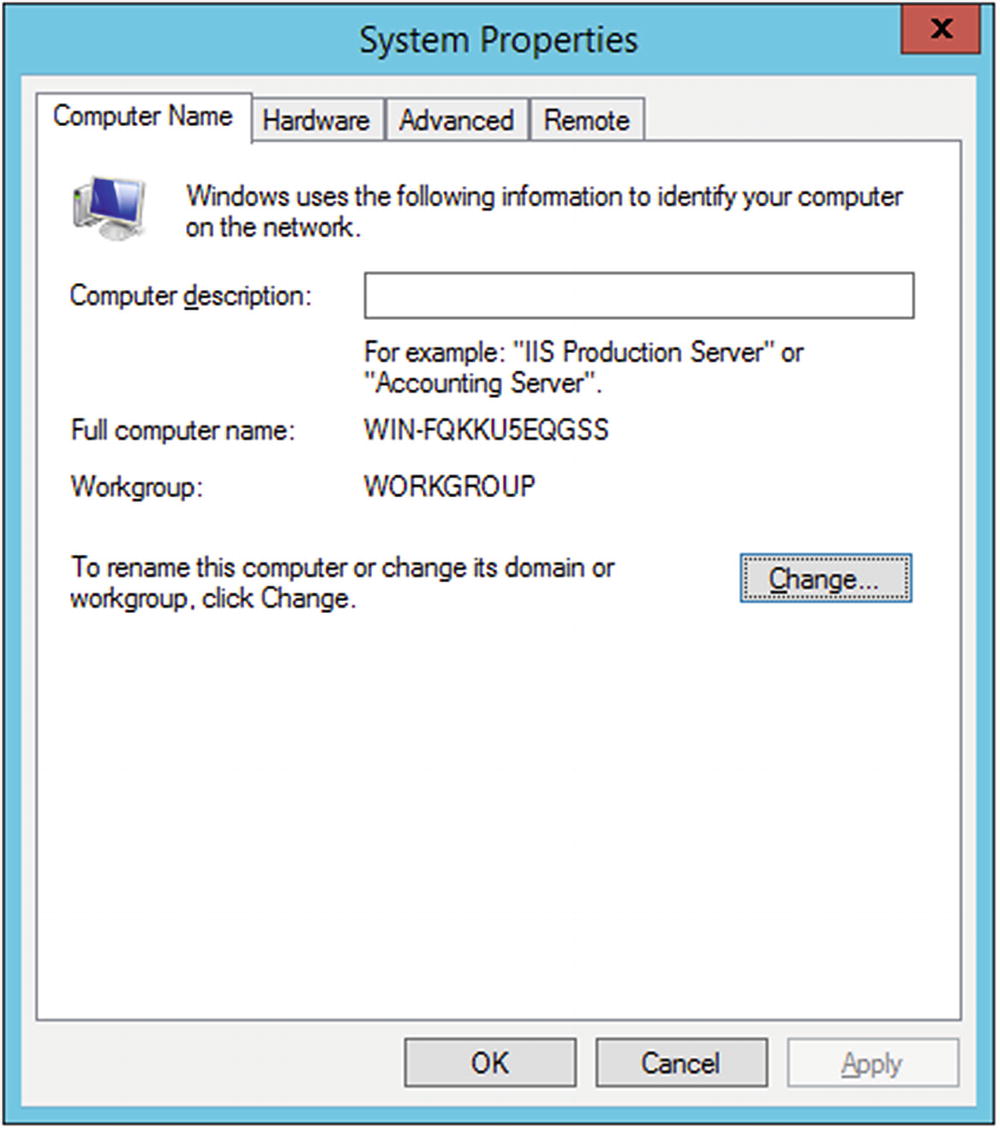
System Properties for Windows 2012 R2
The Change button leads to a dialog box that allows the computer name to be changed, including the primary DNS suffix of the system. Changing the system name necessitates a reboot.
To configure networking on a Windows system, start the Control Panel and navigate through Network and Internet ➤ Network and Sharing center ➤ Change adapter settings. Right-click on an adapter to obtain a dialog box to change the settings (Figure 1-14).

Local Area Connection Properties on Windows 10-1511
When the properties of a network adapter are changed, the location of that network needs to be set as either “Home network,” “Work network,” or “Public Network.” When building test networks, usually “Work Network” is the most appropriate choice. Windows 10 systems label networks as “Private” or “Guest or Public.”
The Windows Firewall is controlled through the Control Panel; navigate System and Security ➤ Windows Firewall.
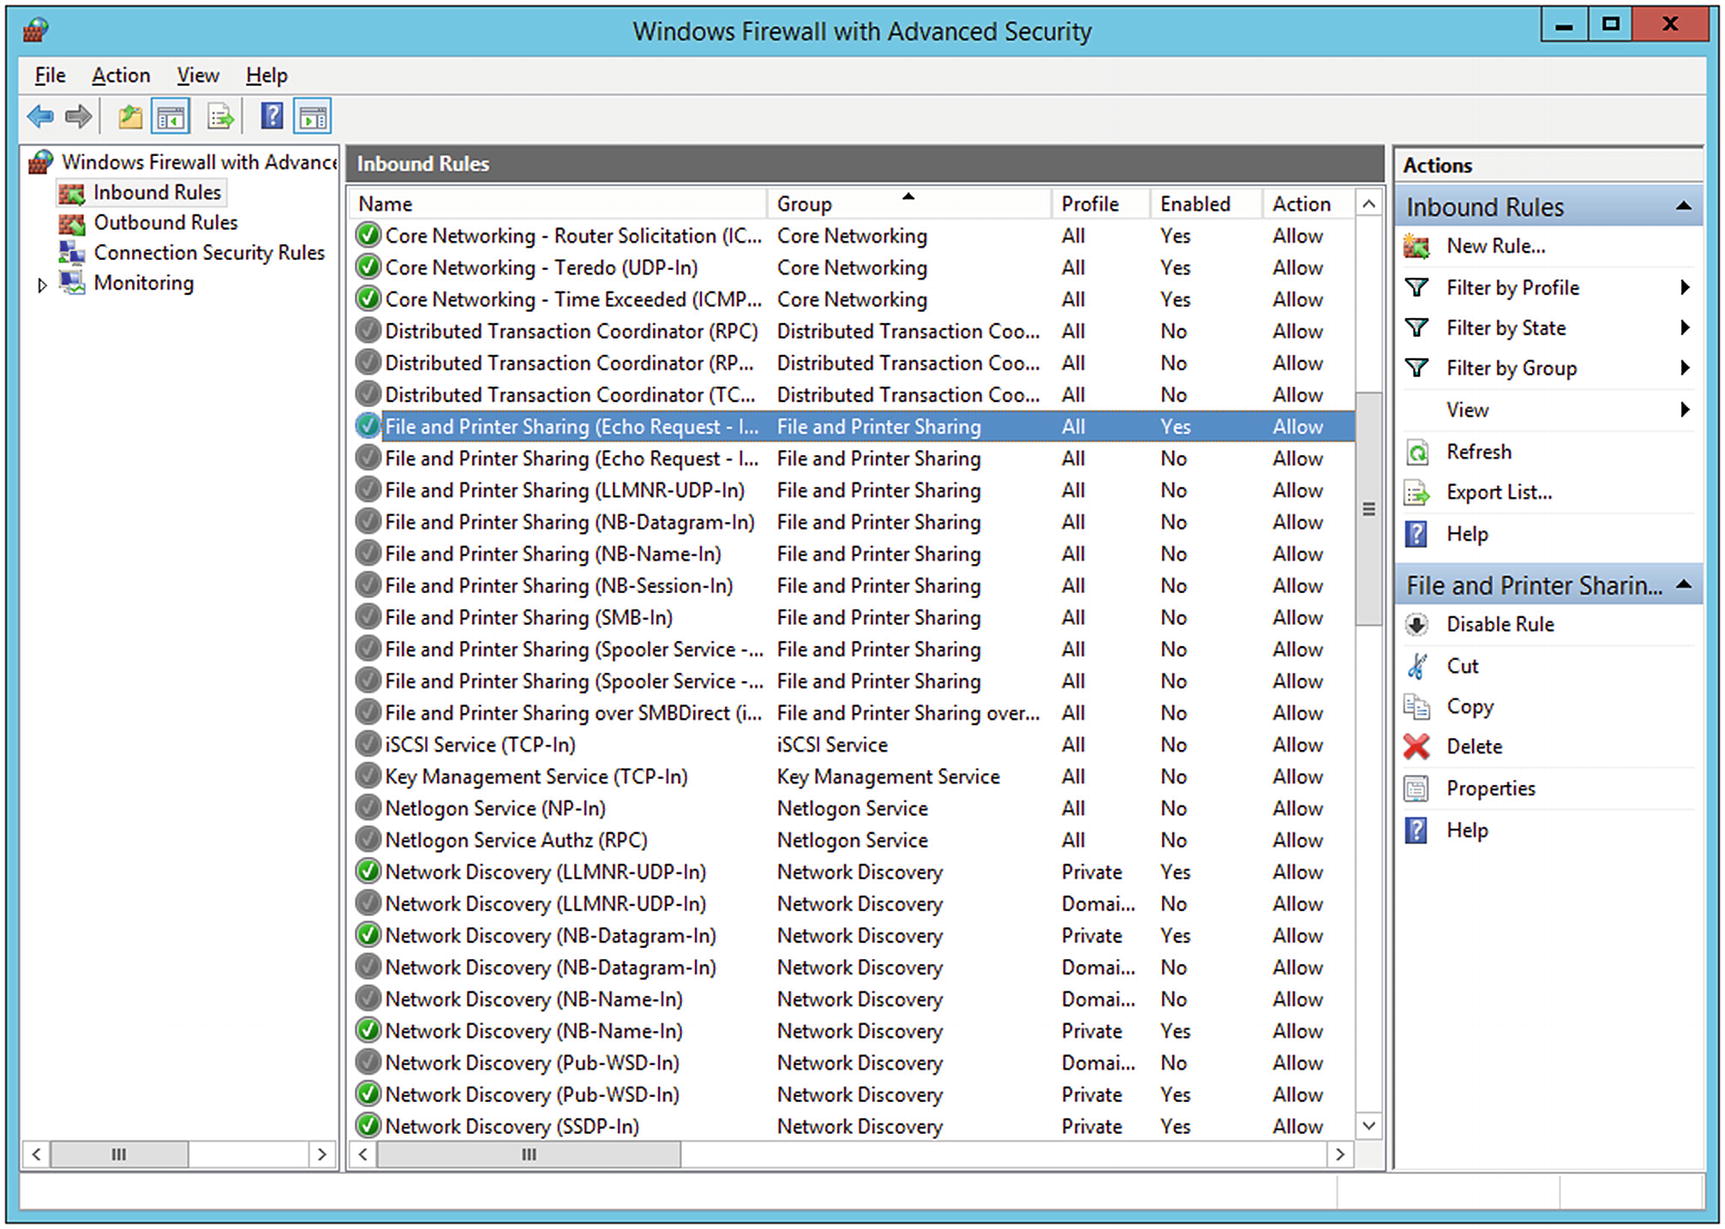
Configuring Windows 2012 R2 to reply to ping requests
Browsers on Windows
Windows 7, Windows 8, and Windows 8.1 systems ship with Internet Explorer as their default browser, while Windows 10 includes Edge as its default browser. Internet Explorer 10 is still included in Windows 10 and can be run from by typing “Internet Explorer” into the search bar on the start menu.
Firefox can be installed by downloading and running the proper installer. To keep Firefox in its installed version, automatic updates must be disabled. Navigate the Firefox main menu through Tools ➤ Options ➤ Advanced ➤ Update, and disable the settings found there; they vary slightly with different versions of Firefox.
app.update.auto
app.update.enabled
app.update.slient
The installation of Java on Windows is standard. Once installed, Java functions in both Firefox and Internet Explorer. Note that in general, a 32-bit version of Java is necessary for the plugin to function correctly. Microsoft Edge does not support plugins and will not run Java.10

Disabling the Java Update Scheduler with msconfig on Windows 7
Beginning with Windows 8, Microsoft includes a version of Adobe Flash Player in the default installation configured for Internet Explorer and Edge. Windows 8 includes Adobe Flash Player 11.3.372, Windows 8.1 includes 11.8.800, the initial Windows 10 release (version 1504, build 10240) includes Adobe Flash Player 18.0.0, while the anniversary edition (version 1607, build 14393) includes Adobe Flash Player 22.0.0, and the Fall Creator’s update (version 1709) includes Adobe Flash Player 27.0.0.
Later versions of Adobe Flash Player provide a dialog box during installation allowing the user to determine if and how updates are to be installed.
Notes and References
The easiest way to build a consistent test system is to be aware of the release dates of the various software components that are installed. This book has an online supplement at https://www.apress.com/us/book/9781484242933 that includes tables for the release dates of the operating systems and software described. For those so inclined, it also includes exercises for each chapter.
Windows operating systems must be purchased from Microsoft. Limited time evaluation copies are available from Microsoft through the TechNet Evaluation Center ( http://technet.microsoft.com/evalcenter ). Windows 10 can be downloaded from https://www.microsoft.com/en-us/software-download/windows10 . Students and educators can participate in the Microsoft Imagine program https://imagine.microsoft.com/en-us/catalog that gives access to current and some recent, older versions of their operating systems. Microsoft provides virtual machines to test Internet Explorer and Microsoft Edge at https://developer.microsoft.com/en-us/microsoft-edge/tools/vms/ .
Old versions of CentOS can be found at http://vault.centos.org/ ; however, the install images are redirected to the mirror http://archive.kernel.org/centos-vault/ . Links to mirrors containing old versions of OpenSuSE can be found at http://en.opensuse.org/openSUSE:Mirrors . Old versions of Ubuntu can be found at http://old-releases.ubuntu.com/releases/ . The Mint project provides links to current versions of Mint at https://www.linuxmint.com/download.php . Older versions of Mint remain available for download, though direct links to the pages are difficult to find. One approach is to visit a mirror directly; the list of Mint mirrors is available at https://www.linuxmint.com/mirrors.php . Many mirrors like http://mirrors.kernel.org/linuxmint retain older versions of Mint. Kali can be downloaded from https://www.kali.org/downloads/ .
Firefox can be downloaded from https://ftp.mozilla.org/pub/mozilla.org/firefox/releases/ .
Java can be obtained from the Oracle Java Archive at http://www.oracle.com/technetwork/java/archive-139210.html . Users must sign on with Oracle before being permitted to download software.
Adobe Flash Player is available at http://helpx.adobe.com/flash-player/kb/archived-flash-player-versions.html . Between 2011 and 2017, there were some 236 different releases of Adobe Flash Player.
Virtualization Tools
VMWare Workstation can be purchased directly from VMWare at http://www.vmware.com/products/workstation . Their free product, VMWare Player, is suitable for nearly all of this text. It can be downloaded from http://www.vmware.com/products/player/playerpro-evaluation.html .
VirtualBox can be downloaded from https://www.virtualbox.org . VirtualBox has an excellent online manual available at https://www.virtualbox.org/manual .
In my experience, the drag-and-drop function provided by VirtualBox Guest Additions does not always function as intended. I have had difficulty with this feature in OpenSuSE systems, some Ubuntu systems, and some Mint systems. This is rarely a problem though, as the shared folder feature works well.
Shared folders may be scanned by antivirus software running on the host. This can complicate the passing of malware between guests.
When planning enough memory for virtual machines, be sure to retain memory for the host and whatever virtualization software is needed.
Building Linux Systems
Documentation for CentOS can be found on their wiki at http://wiki.centos.org/Documentation , and the changes to the networking system implemented between CentOS 7 and CentOS 5/6 are well described at https://wiki.centos.org/FAQ/CentOS7 . OpenSuSE keeps their documentation at http://doc.opensuse.org . Documentation for Ubuntu can be found on their official site at https://help.ubuntu.com and on their wiki at https://help.ubuntu.com/community . In general, Mint is configured in the same fashion as Ubuntu; there are installation and usage guides available for some versions of Mint at http://www.linuxmint.com/documentation.php .
Documentation for iptables is available directly from http://www.netfilter.org/documentation/ .
There is a bug that affects the installation of Ubuntu 14.10 in VirtualBox. The graphics system is not properly detected during the installation, and so after the system boots to the installation disc, the display is a garbled collection of colored pixels. One way to solve the problem is to press Right CTRL + F1, then Right CTRL + F7 from the VirtualBox Ubuntu 14.10 system. This effectively tells Ubuntu to (properly) re-detect the graphics settings. See http://askubuntu.com/questions/541006/ubuntu-14-10-does-not-install-in-virtualbox for more details and other solutions.
Some systems when configured to use the original repositories still show one of more files that need to be updated; this is particularly noticeable on Mint systems but does occur on others.
A good reference for the structure of systemd is available from https://wiki.archlinux.org/index.php/systemd . A quick reference to the differences between Systemd and SysVinit is available from the documentation for the Fedora project at https://fedoraproject.org/wiki/SysVinit_to_Systemd_Cheatsheet . A comparison of systemd and Upstart (used by Ubuntu) is available from https://wiki.ubuntu.com/SystemdForUpstartUsers .
The change of network interface names from the older eth0 to the more modern enp0s3 was a change introduced in v197 of systemd; see https://www.freedesktop.org/wiki/Software/systemd/PredictableNetworkInterfaceNames/ .
Ubuntu 17.04 and 17.10 no longer install the tool ifconfig. To view and modify the IP address of such a system, the administrator can use the command ip addr.
By default, Ubuntu 17.10 does not allow the use of gedit with sudo; on these systems, root no longer has access to the display. This behavior can be modified with the command xhost +si:localuser:root. See https://askubuntu.com/questions/967389/gtk-ubuntu-17-10 .
Cloning and copying systems can lead to some surprising effects. For example, if a CentOS 6 system is created by cloning a VirtualBox system or copying a VMWare Workstation system, then the network adapter in the system should be assigned a different MAC address than the original. Because the CentOS udev device manager tracks the MAC address assigned to each network card, the copied guest will not have an eth0 card, but will have an eth1 card. To modify this behavior, edit the file /etc/udev/rules.d/70-persistent-net.rules and remove the reference to the older network card. Similar behaviors occur for a variety of different distributions and releases.
Building Windows Systems
Comparing these results, it is clear that the SID of the local user is just the SID of the system followed by a relative ID; administrator accounts have the relative ID of 500 (which is why renaming administrator accounts provides less security than might be imagined), the guest account has relative ID 501, and subsequent accounts start at 1000 and go up from there.
If a Windows system is duplicated, either by cloning a VirtualBox guest, or copying a VMWare Workstation guest, the system’s Machine SID remains unchanged. The machine SID can be changed by running the Sysprep program located on the system at c:\Windows\System32\Sysprep\Sysprep.exe with the generalize option enabled.
The question of what happens if there are two systems on a network with the same machine SID is an interesting one. There was a SysInternals tool to update a system’s Machine SID, but that has long since been discontinued. The tool’s author, Mark Russinovich, back in 2009 wrote on his blog: “I became convinced that machine SID duplication – having multiple computers with the same machine SID – doesn’t pose any problem, security or otherwise. I took my conclusion to the Windows security and deployment teams and no one could come up with a scenario where two systems with the same machine SID, whether in a Workgroup or a Domain, would cause an issue.” ( http://blogs.technet.com/b/markrussinovich/archive/2009/11/03/3291024.aspx )
Years of teaching a university course on these topics have convinced me that this is almost true. In particular, my students have noticed that on a Windows domain, if both a domain controller and a (different) Windows file server have the same SID, then some difficult-to-track-down errors occur, errors that are not present if the two systems have different SIDs.
More information about the sysprep process can be found from Microsoft TechNet at http://technet.microsoft.com/en-us/library/cc721940(v=ws.10).aspx .
The chapter recommends disabling the Windows Update service to prevent the Windows automatic update process. However, Windows occasionally disregards this setting, re-enables the Windows Update service, and then starts updating itself. For a stand-alone Windows 10 system, I do not know of a simple method to stop this problematic behavior. For systems on a domain, the domain administrator can create a group policy object, and navigate Policies ➤ Windows Settings ➤ Security Settings ➤ System Services, then select Windows Update and set it to disabled.
The Control Panel on Windows systems contain an entry for Java. On systems with Java 6, one of the tabs is meant to configure Java’s update behavior. It gives the option to disable automatic updates or to reschedule how often Java checks for updates. My experience, however, is that this simply does not work. Uncheck the box labeled “Check for Updates Automatically” and restart the system. Go back to the Java entry for the Control Panel, and you will see the box has been rechecked for you, and that Java will automatically check for updates.
It appears that Microsoft no longer provides official download links for older versions of Internet Explorer; visitors to the download page are only given the option of upgrading to the most recent version. There are third-party sites that maintain archives of older versions of software; however, additional care should be taken when using these services to ensure that the downloaded software has not been surreptitiously modified; this is complicated by the fact that Microsoft does not provide the usual software hashes (MD5, SHA1) either.