

Tiger McKee
I’m a DIY guy. I’ve always “figgered” if someone else can do something — so can I. My work may not be as pretty, but there’s pride in doing something yourself. Several years ago I started customizing S&W revolvers, focusing on K-Frame models. I began with small tasks, like bobbing the hammer, and eventually I was picking rough-looking volunteers to convert into what I call “Choppers.”

The M&P “volunteer” — made around 1905 — was in good shape internally, but the outside was really rough. Not a big surprise on a gun over 100 years old. The price made it the perfect candidate for customizing.
My favorite revolver is the S&W Model 13 with a 3" barrel and round butt — the old “FBI” gun. These are hard to find and usually expensive, and it’s a shame to modify one of them. My solution is to take a 4" pistol with square butt — think Model 10 or 13 — which are readily available and affordable. I then chop them down to 3", round butt pistols. My inspiration is the original chopped motorcycles of the ’50s and ’60s. You took a big heavy bike and cut everything off that wasn’t absolutely necessary, making it lightweight, easy to handle and faster.
After building several Choppers for friends, which funded more gunsmith adventures, I decided to build a lightweight version using an early K-Frame with the thin tapered barrel.
Raw Material
In October 2017, my buddy Jimmy at Scottsboro Gun & Pawn — best gun shop in the world and 30 minutes from home — notifies me they received a shipment of “evidence” guns sold off by a police department. “We’ve got lots of revolvers,” he says. On my next day off I head into town to visit.

It was “almost” a shame to cut the original 5" barrel down — but Tiger did! The left side looked better than the right, typical of old police guns seeing lots of right-side holster wear.
They have some nice revolvers, too nice for what I need. But, over to the side is a rough looking M&P .38 Special, a pre Model 10, with a 5" barrel, square butt and an ugly nickel finish. According to the serial number it was built around 1905 or so. Mechanically it’s sound, and a perfect candidate for a chopper with a $250 price I can afford. I take it home and shove it into the safe.
When it was time to begin the build, the first thing is to strip it down for cleaning and inspection. It looks good, especially for a gun over a hundred years old.

The rear portion of the frame’s grip is cut down to a round butt shap, matching the stocks. The front of the grip is left as is, and the stocks are cut out to fit the front of the grip. A rotary tool and patience is mandatory. Measure three times, cut a little, sand and check fit. Repeat as necessary. After fitting Tiger stippled the stocks using a wood burner.
I mark the barrel at 3", which works out perfectly with the factory lettering on the side of the barrel. I add another 1/8" for insurance and give it the “chop” — cutting off 2" of barrel and the front sight. It’s done, the point of no return. I am fully committed.

The trigger guard is thinned, allowing quicker access by the trigger finger. Sharp edges of the frame are “melted” to take out nicks and feel smoother. Remove a little material, sand and see how it looks. You can always remove more material but taking too much off is a problem.
Serious Work
I bead blast the frame to get off as much nickel as possible. You never know what to expect when blasting nickel, so it’s a good surprise when most of it comes off cleanly, leaving a great finish to work with.
Next I cut down the grip to make it a “round” butt. I say “round” but it’s really partly round and partly square. I cut and contour the rear strap of the frame to fit the round butt stocks. The front of the frame is untouched and the round butt stocks are modified to fit the frame.
For Choppers, I use Precision Gun Specialties “Hideout” stocks. With a little reshaping these stocks fit my hand perfectly and the injection-molded nylon can be stippled with a wood burner or soldering iron. The rear of the frame grip is stippled using a hammer and punch. This adds texture for control and matches the stippling on the stocks.
In the old days many fighting revolvers had the front of the trigger guard narrowed to make it easier to slip your finger onto the trigger. I take it a little further by blending the frame into the thinned guard and “melting” the frame in other areas, rounding off a bunch of the sharper edges. Older guns often have nicks and scratches on these edges, so this gives you a better feeling pistol while improving the look.
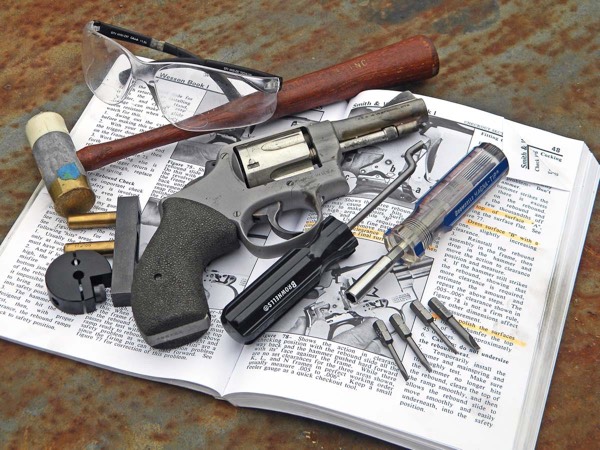
If you’re going to work on S&W revolvers you’ll need Kuhnhausen’s S&W Shop Manual. This has the details needed to restore or modify a Smith. You’ll also need a few specialty tools. The proper screwdrivers, or bits, are mandatory, ensuring you don’t ruin the screws.
Time to work the internals, plus the hammer and trigger. The internals are in great shape, so all that’s necessary is light polishing to smooth everything up. If you’re considering doing any of this type of work, get Kuhnhausen’s S&W Shop Manual . Tuning a revolver requires much more than just changing out springs. This book has the details on improving the S&W J-, K- and N-Frames.

The milling machine from the Little Machine Shop, Grizzly or others, is a great tool for the hobby gunsmith. They’re not that big — especially a tabletop model, or expensive, and it allows you to make almost anything. Tiger considers it one of the best investments he’s ever made.
I don’t change out any of the springs in this pistol. You can get a trigger too light, causing ignition problems, especially with the harder primers found in less expensive practice ammo.
Plus, I’m not a trigger snob when it comes to weight. I’m looking for a smooth trigger action, both in the stroke and reset, and reliable ignition with any ammo. Smoothing up the action and using factory weight springs is the way to go, or at least I think so.
A fighting pistol must have a bobbed hammer. All the spur does is hang up on your clothing, plus all defensive revolver work is DA-only. I also polish the face of the trigger to remove any serrations and sand and move the bevel on the front edges — I like a smooth trigger. I also blue the hammer and trigger with Birchwood Casey “Super Blue.” The key to cold bluing, or any type of finishing, is preparation and following the instructions. Take your time, prep properly and you’ll get good results.

Bobbing the hammer is the way to go for a defensive revolver. The hammer spur can catch in clothing, and all defensive revolver work is DAO anyway. Tiger removed the serrations from the trigger, and put a nice radius on the front edges so the finger slides smoothly on the trigger as it’s stroked.
Sight Work
I could buy a replacement sight, but this is “custom” work, meaning making one from scratch. Time for some work with the milling machine. “Milling machine,” you say, “Don’t have one of those.” Then I recommend visiting the Little Machine Shop on Grizzly Tools’ website. Both offer affordable table and bench top machines that handily do just about anything a hobby gunsmith needs. I use mine constantly, saving many hours of filing/sanding, and it makes my work look a lot better.
Designing a front sight is easy. The hard part is determining what order or sequence to make your cuts. I’m still learning machine work so often, in the middle of the work, I realize the sequence is wrong. After a few experiments — some people call them “mistakes” — I get it right. The new sight is nothing fancy but will do the job, and it fits the look of the pistol. I’m not sure yet what the “look” is, but the cool thing about a DIY is often the look is sort of revealed during the build.

Crowning and putting a chamfer on the barrel is simple as long as you have the right tools. It looks good and improves accuracy. Everything you need, for any caliber, is available from Brownells.
Crowning and chamfering the muzzle is easy as long as you have the right tools like handles, pilots and cutters. The pilot goes into the handle, the cutter goes onto the pilot and the pilot goes into the barrel, keeping everything straight. Apply a little cutting oil and give the handle a few twists (to the right only!) to square the muzzle. Swap-out cutters and repeat to chamfer. This part is almost fool proof.

To crown you flatten the muzzle, then chamfer and polish using the brass “bob” shown and some lapping compound. Only turn the cutters to the right or you’ll ruin them!
To attach the new front sight, I need to learn how to silver solder. It looks mystifying, but I’ve never let that stop me. I watch videos on the ’net, which are not very helpful. I read about it in my old gunsmith books too so in theory I know what I’m trying to accomplish. I “google” Editor Roy from American Handgunner to ask him questions and get advice on what supplies to order from Brownells. Finally, I decide it can’t be put if off any longer. It’s time to solder.

After a few “mistakes” Tiger made a decent looking front sight. Yes, it’s way too tall, but there’s plenty of room to trim it down to the proper height. On the milling machine this is an easy job, or you can do it by hand, using files just like they did in the “old” days.
To practice I use one of the “mistake” sights and some tubing. The hardest part is indexing the sight on the round barrel, getting everything straight. On Roy’s advice I get a Brownells’ sight jig to hold things in place. After testing I determine that yes, silver soldering is an art and it’s messy, but it’s not difficult to achieve decent results. I’m also surprised at how strong it is, especially considering the solder and flux used only has to be at 475 degrees to flow and “weld.”

Every build Tiger tries something new, and this one is no different. One of the new skills required on this build is silver soldering. The front sight jig from Brownells keeps everything held in place during soldering. Tiger was surprised how good the results looked after only a little practice.
I assemble the pistol for test firing and zeroing the front sight, determining what height it needs to be. And it’s always a good idea to test drive something before putting in the time required to apply a final finish to the metal.
The lightweight Chopper looks cool, and more importantly feels great in-hand. The trigger is at 9 lbs., smooth and crisp. Final weight of the pistol is 29 oz., unloaded — 5 oz. less than my 3" Model 13 with a heavy barrel and round butt. Now if I can just get time to actually shoot it.

The M&P chopper is assembled and ready for test firing and zeroing the front sight. The “raw” look is actually cool, and reminds Tiger of a rat rod — a hotrod assembled from a variety of parts without concern for how it looks. The focus for me is function and performance.
Test Fire Time
It’s only the third day of summer but already blazing and muggy here in Kirbytown, Alafrickinbama. It’s also the first Saturday in a long time I haven’t been teaching, so it’s a perfect day to test fire the new Chopper-version M&P.

During testing and zeroing I try different loaders, especially speed loaders, to ensure they clear the stocks. The pistol looks good, fits the hand well and shoots plenty accurately.
I know the front sight is way high. No surprise the first shots at seven yards are about 18" low. But it goes bang with every stroke of the trigger. To determine sight height I use blue tape on the sight, providing me with an exact point of hold. After a few groups and adjusting the tape, I find a good zero. Final testing occurs at 60 yards. It’s ringing the plate so I’m calling it good. Now it’s just a matter of cutting the sight down to the right height.

The final zero at seven yards from a standing, off-hand position, is a little high, which is what I like for defensive work. For final testing Tiger fires from 60 yards, holding on the “belt buckle,” focusing on the front sight and stroking the trigger. Happiness is the sound of a solid “ding” from the plate. That tells Tiger how much to trim off the top of the sight.
I’m pleased with the build. It shoots great, is accurate and looks bitchin’. The only thing left is to disassemble and put a nice finish on it.
Or not.
I kinda’ like the “rat rod” look. I think for now I’ll just clean it, carry and shoot it. Maybe along the way it will let me know what color it wants to be.
Words Of Encouragement
“Perfection” is the enemy of progress. The only way to learn how to do something is repetition. If you attempt “perfect” you’ll never finish anything. Remember, it’s only a failure if you stop trying. As long as you’re learning from your mistakes you’re making progress. As I tell students, “If you’re not making mistakes you’re not doing it right.” At some point you say, “That’s good enough,” and complete your work. Enjoy the experience, knowing the next one will be better.
Take your time. My first revolver took me about a year and a half. I started by learning how to take it apart and putting it back together, learning how it works. Small modifications came first, and after each of those I reassemble to test fire. Eventually I got it right, then immediately found another pistol to work on.

The “finished” project — still needing a finish — actually looks pretty good. Note the rat-rod, or neo-tribal look, especially with the contrast between the blasted frame and barrel and the parts still having some nickel coating. At some point Tiger will probably apply a finish — or maybe not. For now he’s going to carry, shoot and enjoy it.
With every build I was adding new skills and the necessary tools. Plus, I have a personal connection with each gun, something you don’t get when you buy a pistol or have someone build it for you. It feels good when you explain, “Oh, yes, I built that.”
Start out small and slow, take your time and don’t expect perfection. This way you’ll be pleased, amazed and proud once you’re done. Speaking of, now it’s time to think about my next “Kirbytown Kustom.”
For more info: www.