
Frank Jardim
If you’re into traditional muzzleloader shooting, eventually you’re going to break a wooden ramrod. In fact, you’ll probably break several. This sort of thing wasn’t unheard of back in the olden times either. Many, if not most, antique guns aren’t sporting their original rammer, if they have one at all.
Unlike shooters on the ragged edge of civilization 150 or more years ago, nobody’s life is on the line while you whittle a new rammer from a hickory branch.
Now let’s get past our shame and on to fixing that busted rod.
Avoidance Tips
Start with an ounce of prevention. You should have a polymer or fiberglass back-up rod with your shooting kit at all times. As a traditionalist, you naturally don’t want to be seen with these nigh-invulnerable, modern abominations, but when you break your period-correct wooden rod, your whole shooting outing won’t come to an end with you nervously driving home with a charge and ball stuck in the barrel.
Next, follow correct loading procedures. Don’t patch your balls so crazy-tight they’re hard to push down even a clean bore. Use a good patch lube to keep fouling soft and grease away. Use a ball starter. Clean the bore before the fouling gets so heavy you have to exert Herculean effort to ram the ball home. Finally, grip the ramrod no more than a few inches above the bore to minimize the flexing that will break it. If, despite all the care, you break it anyway, you’ll have to cobble together a new one.
Hickory Rocks
Unless the broken rod is an antique, forget about gluing it. A glued rod isn’t safe to use. You did a lot of flexing to break it and it let go at the weakest point dictated by physics. You might have weakened it badly in another place. Get a brand-new hardwood wooden rod of the appropriate length and diameter. Home Depot isn’t the place to shop for this particular item.

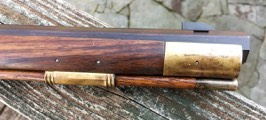
Carefully salvage the old end caps off your ramrod if it has them. The caps on this Pedersoli rifle were pinned on.
Hickory has long been the preferred wood for ramrods for its strength and flexibility. You can find hickory rods at primitive shows locally or order them from several vendors. Usually you need to order a few at a time because the shipping will cost more than the rod. That’s okay because spares come in handy. Dixie Gun Works will sell you four, straight-grained, 48"-long hickory rods cut from kiln-dried, American hickory slats in any of four diameters for less than $20 including shipping. While you’re at it, get some fiberglass ramrods too. Those sell for about five bucks a pair.
Ideally, you want a piece of wood as straight as possible. Dixie’s hickory rods start out that way, but as with any wood, as it absorbs humidity from the air, it has a tendency to bend. You can flex them a little to take the bowing out, but don’t get carried away. Once you seal the surface of the wood, any future bowing will be minimized.
Making A New Ramrod
Ramrods come in normal dowel sizes. What diameter you need depends on the caliber and the inside diameter of your ramrod thimbles. You can probably load a .50-cal patched ball with a 7/16" rod, but you won’t get it through the thimbles. Up to .36 caliber will usually use a 5/16" rod; .40 caliber can be 5/16" or 3/8"; .50 caliber is usually 3/8"; and .54 to .58 caliber can use 3/8" or 7/16".

With caps, you can use your old rod as a guide to cutting and rebating the tips of your new rod. Start with the end that goes through thimbles. You won’t need a wood lathe for this job.
You’ll want to make your new rod with the metal end caps salvaged from your old one. Install the cap that goes inside the thimbles first. This cap is a smaller diameter than the cap used for ramming home the ball and often has a threaded hole for a ball puller or cleaning jag. The ends of wooden ramrods are rebated to fit snug inside the end caps. Caps are attached with glue, a pin, or both. If yours uses a pin, drive it out with a nail or punch before you try to pull off the cap. You may have to dig out the old wood with a drill bit if it’s glued in.

Remove just enough wood from the diameter for a snug fit. Epoxy will hold it tight and fill any gaps.
If the rod fragment survived removal of the cap, use it to mark the depth of the rebating on the new rod by rolling the new rod under a sharp blade at the correct spot. Don’t go too deep. Shave back just enough wood, evenly around the circumference for a snug fit. Apply epoxy, like J-B Weld, and fit the cap. Wipe off any excess epoxy immediately and inspect the cap to ensure it’s on straight and let the epoxy dry. If you took off a little too much wood, the epoxy will take up the extra space and hold the cap solid.

Drill pin holes undersized and halfway through each side to meet in the middle. It’s best done by hand. This tool is just the chuck from an old “egg-beater” style manual drill.
If the cap is secured with a pin, wait for the epoxy to dry before you drill the hole. Do it by hand, with a bit slightly smaller than the pin. Hold the drill bit square and plumb with the hole and drill only halfway from each side, so you meet somewhere in the middle. If perfection escapes you, J-B Weld will fill the wandering path of your drill bit as solidly as the wood itself.
Length Matters
The new ramrod needs to be exactly the same length as the original one, but length may be hard to judge with a broken rod, especially if it broke in two spots. That’s why we installed the inner cap first. When the inner end cap of the rod is dry and secured, insert it to its full depth in the ramrod channel of your gunstock and use the front end cap itself to gauge where to trim your ramrod so there’s enough wood to fit all the way up inside it.

Fully install the ramrod inside its channel in the gunstock before you use the front end cap to mark your rebating line and overall length. If you don’t seat it all the way, your rod will come up short!
You’ll also use this end cap to mark the depth of the required rebating to seat it on the end of the rod. Do this by putting the cap over the side of the rod with the front flush with the muzzle. Holding it there, mark your rebating line along the rear of the cap with a sharp pencil. Complete shaving the rod diameter and fitting the front cap just like the rear cap.

Once Frank had the correct rebating line, he added the necessary length to fit inside the end cap and marked the cut. Measure twice, cut once.
Matching Finish
When the epoxy is dry, you can sand the wood smooth with progressively finer sandpaper (150-, 220-, 320-grit) and polish the metal ends if you desire. Once sanded, you can stain the wood to match your gunstock. Water based stains work best. I made my own iron stain by dissolving rusty nails in apple cider vinegar in a vented jar. Over the course of a few months, the metal was bare and the liquid a dark brown. The more coats applied, the darker the finish. Being water based, it takes a little time to dry.

Three coats of Birchwood Casey Genuine Oil (tung oil) was enough to seal the wood and prevent warpage.
When the stain dried, I knocked off the raised grain on the wood with some 000 steel wool and sealed the rod. You can use several applications of linseed oil for this, rubbed in every day over the course of a week. Tung oil works even better with fewer applications and I did this rod with some Birchwood Casey Genuine Oil, which is essentially a Tung oil. After rubbing in three coats, I had a nice protective surface finish.

The finished new ramrod cost less than $5 and required just about an hour of shop time to make. Not bad!
In my observation, the .32- and .36-caliber rifles seem to build up fouling faster than the big calibers. Be conscious of this if you are shooting guns of several calibers on the range and try to remember not to use .50 caliber loading force on those slender ramrods.
If you want to make things easier on yourself, just order some Hickory rods ahead of time so they’ll be on hand when you need them.
For more info: www.