

Jeremy D. Clough
Every build starts with a vision of what you want the finished product to be. Candidly, this one took me a while. Wilson Combat sent me a slide, receiver and barrel for use in a pair of barrel-fitting articles. After fitting the barrel, I never finished the gun and it rested at ease in the safe for several years. In time, my vision coalesced to turning the compact receiver and slide into a barbecue gun — a carry pistol dressed up nicely enough to display at a social gathering. Of course, before you can make it pretty, you have to build it, so we’ll start there.

The combination of selective polish, fire blue and the silver-inlaid grips combine to bring this compact .45 into the barbecue gun tradition. Under the shine is a serious concealed carry pistol.
First Steps: Barrel And Trigger
I fit the barrel using the John Miller hard-fit technique I was taught at Novak’s: file-fit and lap the barrel hood and upper lugs, then the lower lugs, which are cut with a milling cutter inserted through the slide-stop hole. I used a mix of several different barrel fitting tools and a fine Swiss pillar file — you can find all of those at Brownells. Fitting a coned barrel, like the short one for this compact pistol, is similar to the usual process except you must fit the lockup area at the muzzle at the same time as the hood and upper lugs, instead of last, which is how I was taught to fit bushings.

Wilson Combat provided the compact slide and receiver. Jeremy lapped in the trigger until it would “flow” back and forth under its own weight.
The first operation on the frame was to fit the long, solid aluminum trigger I ordered from Wilson. As a general principle it makes sense to break all sharp corners on a part prior to fitting it, otherwise you may get a false fit that will quickly wear away, leaving your part loose. With this in mind, I used the pillar file to break all four corners on the trigger shoe, and small needle files (followed by backed sandpaper) to go all the way around the trigger bow to ensure it wouldn’t bind on anything in the raceway.

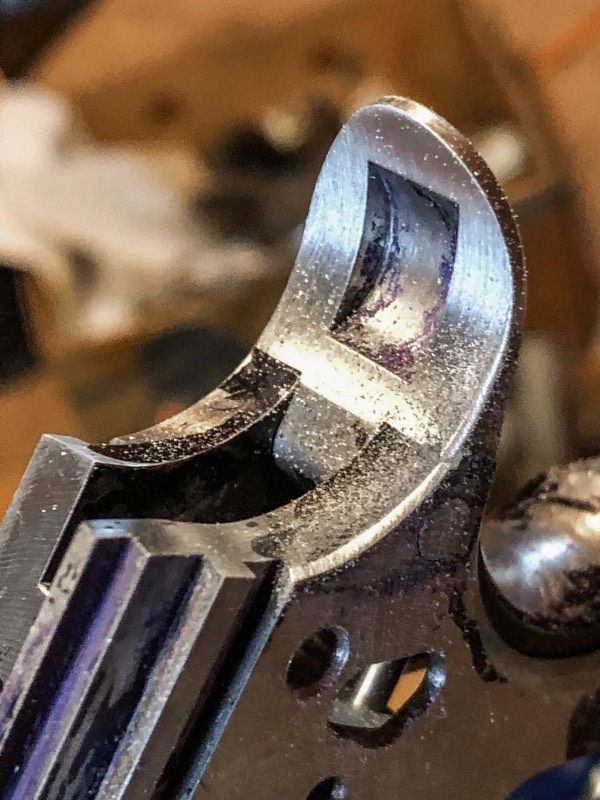
There has to be a slight step between the feed ramps in the barrel and the receiver. Also note the as-machined finish on the frame ramp.
The broach that cuts the raceway will eventually get dull, starting at the corners, so a slight bevel on the trigger bow is cheap insurance against a less-than perfect raceway. Mark the wear areas of the trigger with either Dykem or a Sharpie and once you start to push the trigger shoe into place, you’ll see where the material needs to be removed. Once it’s fully seated, put some lapping compound (such as Brownells’ 600-grit garnet compound) on the trigger shoe, then install the sear spring and mainspring housing to put pressure against the trigger and lap the trigger in. After you’re done and have removed the compound, you should be able to put the trigger in the raceway and have it “flow” back and forth under its own weight.

The frame feed ramp after being polished. Take care not to change the angle of the ramp when polishing it.
Action Work
Working toward the back of the gun, I assembled the magazine catch (I used a machined one provided by EGW) and lapped it into place to make sure it mated smoothly with the frame. Word to the wise: I polish springs and the holes in which they ride, but the wise man will not flatten and polish the end of the mag-catch spring, as it will let the mag-catch lock rotate and lock up. Ask me how I know.

Jeremy used a hammer/sear/disconnect set from Novak’s, then used a Power sear and hammer jig to stone the breakaway angle on the nose of the sear and cut the hammer hooks to the correct depth.
For the lockwork, I used a hammer/sear/disconnect set from Novak’s, and used a Power sear and hammer jig to stone the breakaway angle on the nose of the sear and to cut the hammer hooks to the correct depth. The general rule of thumb is they should never be less than 0.018" — and assuming you can still get a crisp trigger break, more is better. No matter what, the sear should fully engage the hammer hooks using either Dykem or a Sharpie to verify.
While skeletonized M1911 hammers have been popular since the days of Steve Nastoff, the extra weight of the original rowel-style hammer makes it hit just a little harder, adding a bit of insurance should lint or other debris accumulate near the firing pin, as it does with carry guns.
The frame came with a beavertail, and the rear-frame ears had already been radiused. This, however, is the beginning of the fitting process. The radius is usually a little oversized, which requires marking it and moving the beavertail back and forth until a bright spot appears and shows you where to remove material with either a file or 220-grit sandpaper.
The sides of the contact pad also need fitting where they contact the frame, as does the leg of the safety that interferes with the rear movement of the trigger (the actual “safety” part). I used a file to fit the leg, making sure the trigger would clear it when pushed in and wouldn’t when the safety is in the outward position.
When you fit the safety leg and have the sear spring, trigger, beavertail and mainspring housing in place, you should be able to depress the grip safety, pull the trigger and hold it back and release first the grip safety then the trigger. If both grip safety and trigger spring back when you release the trigger, you’re done, but if the trigger hangs up on the leg of the safety, you’ve got more work to do. After it was fit and functional, there was very little work required to fit the “grip” part of the safety to the frame, but, like the trigger and other parts, I lapped it in to ensure smooth operation.
Safety First!
For aesthetic reasons, I picked a Wilson ambidextrous safety because the lines of the thumb-contact pad mimic the original Swenson ambi, which, when combined with a well-fit beavertail, creates an attractive S-curve visual. Although the plate part of the safety did not need any fitting (as they often do with particularly high-cut beavertails such as the Ed Brown), I still beveled all corners on both sides.

Fitting the lug on the thumb safety consists of marking it and partially inserting the safety into the otherwise fully assembled frame. If in doubt, have a professional do this.
Fitting the lug on the safety consists of marking it and partially inserting the safety into the otherwise fully assembled frame and moving it until you can get a wear mark where it contacts the sear. Carefully remove material until it locks the sear in place and you can move it up and down with thumb pressure. The hammer should not move when you engage or disengage the safety.

To checker the original housing, Jeremy used a Marvel checkering jig to lay out the horizontal lines with a 20 LPI checkering file.
Mainspring Housing And Beavertail
The mainspring housing provided an unusual number of hours’ work. Other than blending it, the MSH is usually a drop-in thing. However, I decided I couldn’t live without an arched one, and they are surprisingly hard to find for an Officer’s-size receiver. I resorted to purchasing a used Colt one from Numrich Gun Parts.

The beavertail radius on a frame is usually oversized, so Jeremy “marked and moved” to find where to remove material. The sides of the contact pad also needed fitting where they contact the frame.
Unfortunately, the hole for the mainspring cavity was significantly undersize and the hole for the retaining pin was drilled incorrectly. All three holes had to be reamed by hand, which took more time. I also had to polish the mainspring cavity afterward, but I would have done it anyway.

Not bad — but it can get a lot better. The blue is Dykem marking fluid, useful for showing low spots.
To checker the housing, originally serrated at 20 lines per inch (LPI), I installed it in the frame and used a Marvel checkering jig to lay out the horizontal lines with a 20 LPI checkering file, then chased each individual line with a triangular riffling file.

Jeremy used files and sandpaper backed with a hard oak dowel to blend the top of the beavertail with the frame and the heel of the slide.
Beveling the sharp edges on a gun is mandatory for a carry pistol; blending the individual parts, though, while not absolutely required for the gun to be useful, is an element of craftsmanship that shouldn’t be ignored. With the mainspring housing fit and installed (along with its spring, cap and retainer) and providing pressure on the hammer and strut, I used sandpaper backed with a file to bring the frame and housing to a single flat plane.
After the lines were blended, Jeremy cut a matching bevel on the top of the frame and beavertail using a fine file, then finished it with sandpaper and a fine abrasive wheel.
Similarly, I blended the top of the beavertail with the frame and the heel of the slide (including the extractor and ejector) using fine files followed by sandpaper backed with a hard-oak dowel. Generally, the bottom of the beavertail — where it contacts your hand — is fit in the depressed position, and can be taped into place for that part of the work.

To fit the top of the beavertail, Jeremy used this tool from Harrison Designs that locks the beavertail in the upward position.
You should fit the top of the beavertail while the safety is in the opposite, upward position. I held it in place using a neat little tool from Harrison Designs that fits into the trigger raceway and uses a hex screw to lock the beavertail up.

After reaming the housing, the spring and cap were both polished for smooth operation.

With the mainspring housing, spring, cap and retainer installed, Jeremy used a file backed with sandpaper to bring the frame and housing to a single flat plane.
Guide Rod
I wound up with two separate recoil systems: I purchased one from Wilson and EGW provided one identical to their 4" Kimber system. Both used a 22-lb. flat wire recoil spring riding on a 0.250" guide rod. The Wilson rod stops just a little shy of the muzzle and is tapered near the end so it can be removed without tools, long an irritation of using a full-length guide rod. The one-piece EGW rod is drilled for the usual paperclip.

EGW supplied a keyed reverse plug drilled for a guide rod, providing a cleaner, closed look. The keyed part required minor fitting to ensure it didn’t interfere with the barrel fit.
Faced with the choice of easy takedown, which leaves the front of the gun open to debris, or a closed front harder to take apart, I chose the EGW full-length system — your mileage may vary. EGW also supplied a keyed reverse plug drilled for a guide rod, providing a cleaner, closed look.

These aircraft spring clamps were helpful for holding small parts during bead blasting.
Final Tuning And Polishing
Once the gun was fit and assembled, the parts took a trip through the solvent tank to get all the grit and lapping compound out. Then it was time for final tuning, including polishing the chamber and feed ramps on both barrel and frame and final shaping of the extractor hook. It’ll feed my preferred 230-gr. JHP load from Black Hills as well as empty brass.
Satisfied it worked, I bead blasted all the parts with a fine 800-grit media, then lightly polished the slide flats at 600 grit and shipped the big chunks of the gun to my alma mater, Novak’s .45 Shop, for bluing. I kept the controls and pins to nitre blue them.
While the gun was at Novak’s, I asked them to weld up the front dovetail cut and re-machine the slide for a Novak front. Besides using a different dovetail dimension, the Novak front is held in place with a roll pin to keep the sight from drifting in its dovetail should it shoot loose.

Novak’s welded up the front dovetail and re-machined the slide for their Glow Dome front sight. The Novak front also uses a roll pin to prevent sight movement.
They also installed a bright Glow Dome tritium front and an adjustable rear that has the same low profile as the famous LoMount rear and fits the same dovetail. The M1911 industry has broadly adopted the Novak rear sight cut, so the rear of my slide was already correctly machined. The rear has a tritium bar, avoiding both the possibility of major misalignment with three dots, as well as keeping the extra brightness of two dots on the rear from drawing your eye first to the rear sight instead of the front where it belongs.

This adjustable Novak rear fits the same dovetail as the fixed version and has a tritium bar, avoiding the problems inherent in having two tritium dots on the rear.
Fire Blue Elegance
The nitre (“fire blue”) bluing was used on the earliest M1911 pistols and is usually seen on retro, pre-A1-style guns. I’d been inspired by a Powder River Precision Hi-Power, where the otherwise matte-black carry pistol had polished and fire blued pins that added a classy, subtle touch. I did a light, selective polish in places like the edge of the thumb pads on the safety levers prior to bluing to create more contrast.

Nitre blue is usually seen on retro, pre-A1 style guns, but can be a classy, subtle touch on an otherwise matte-black pistol.
Grips Make The Gun
Of course, the grips also make the gun, so I reached out to Handmade Grips. They create some outstanding pistol grips with silver or gold-colored metal inlays. After sending them an image of the heraldic design I’ve used for many years as a personal logo, they sent me a pair of laser-checkered wooden grips with my logo inlaid in each side. While the end result was a little different from what I had imagined, it’s cool enough it doesn’t matter. Pricing is more reasonable than you would think, as was turnaround time.

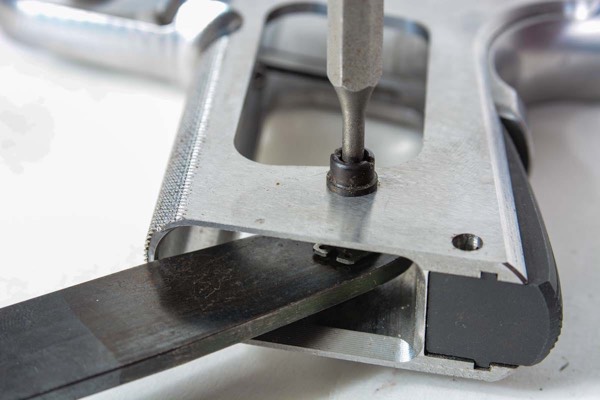
You can install and remove grip screw bushings with a regular screwdriver, but you’re also likely to destroy them in the process. Use this bushing driver from Brownells instead.
Many grips will require some degree of fitting, and these were no exception, as the screw holes were just a bit too close. I used a file as a scraper to relieve the rear of the grip panels, as well as sandpaper on a round needle file.
Unless you want them to come off the gun every time you remove the grips, you should stake the bushings in place with an 1/8" punch and staking tool.
Once the grips would seat in place on their bushings, I took a grip screw and used a 40 LPI checkering file to serrate all the way around the screw head so when I screwed it in place, it would cut a clean relief for the screw head. The grips are held in place with a set of Mil-Tac’s practical grip screws combining a hex with a slot so there’s more than one way to remove or install them.

Handmade Grips creates outstanding pistol grips with silver or gold-colored metal inlays. They made this set with the heraldic design that’s Jeremy's personal logo.
Ready For The BBQ
And now we get to the holster. Since the whole idea of the barbecue gun is a bit of a Western thing, I reached out to Mike “Doc” Barranti who crafted one of his Ranger holsters as well as a matching spare-mag pouch. Appropriately named, the Ranger is a faithful interpretation of the Brill-style holster designed at the request of the Texas Rangers almost 100 years ago. Minor modifications make it sit a bit higher on the belt, so it’s more practical for modern carry. Although tan usually shows off stamping better, I chose black, and the result is breathtaking: beautifully crafted, with white stitching and a smooth tan lining.

Many grips will require some degree of fitting. Jeremy serrated a grip screw, so it recut the front hole cleanly.
It’s the sort of thing that would look exceptional displayed at a barbecue … and just as good concealed beneath a jacket.

Mike “Doc” Barranti’s Ranger holster is a faithful interpretation of the Brill-style holster designed at the request of the Texas Rangers almost 100 years ago. Barranti also included a matching black mag pouch stamped with the same basketweave pattern used on original Brill holsters.
For more info: www.