Arduino is an architecture that includes the Atmel microcontroller family along with standard hardware. The pin diagram of Arduino is as follows:
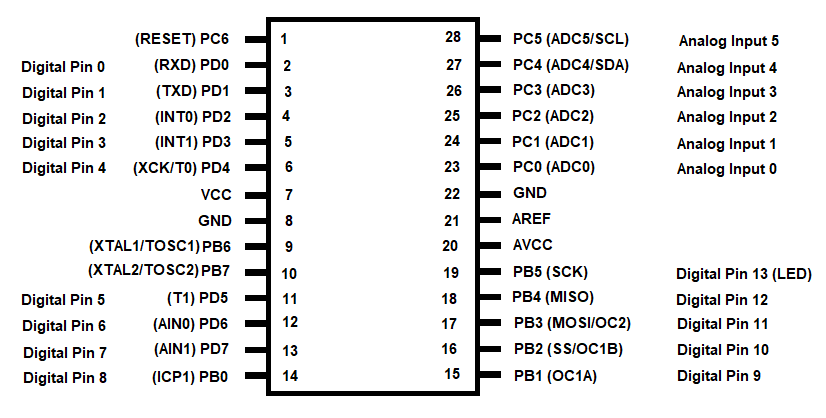
Arduino includes 14 digital pins that can operate with 5V:
- Pins 0 (RXD) and 1 (TXD) are the serial pins used to transfer TTL serial data.
- Pins 2 and 3 are the external interrupt pins used to activate an interrupt.
- Pins 3, 5, 6, 9, 10, and 11 are used to provide the PWM output.
- Pins 10, 11, 12, and 13 are SPI pins (short for the Serial Peripheral Interface). Named SS, MOSI, MISO, and SCK, these pins are used for SPI communication.
- Pin 13 is an LED pin. A HIGH digital value, when supplied to this pin, will make the LED glow.
- Analog pins 4 and 5—called SDA and SCL, respectively—are used in the communication of TWI (short for the Two-Wire Interface).
- The AREF (short for Analog Reference) pin is used to connect to some reference voltage from an external power supply.
- The RESET (RST) pin is used to reset the microcontroller.
As far as software is concerned, Arduino comes with an IDE that we can use to write and edit applications and can even upload them to do specific tasks. This IDE includes support for the C and C++ programming languages for programming microcontrollers. It contains several libraries that make the job of a software developer quite easy. Besides this, the IDE provides communication windows in order to enter data into the board as well as to get output.
The Arduino board provides ports to connect LCDs, relays, and much more to its output pin and provides input pins to input information from sensors, relays, and much more. The Arduino board can be powered either by a USB or by connecting a 9V battery.
While working with Arduino programming, we will be using the following functions:
- Serial.begin() is used to set the data rate while establishing communication between the Arduino board and the PC. In order to communicate with the computer through serial data transmission, we need to first set the data rate in bits per second (baud). We can use any of the baud rates, such as 300, 600, 1200, 2400, 4800, 9600, 14400, 19200, 28800, 38400, 57600, or 115200.
- Serial.println() is used to display a message to the serial port in a human-readable format. It displays the message in ASCII text followed by a newline character on the serial monitor. You will need to press Ctrl + Shift + M to open the serial monitor.
- Serial.available() checks whether the data, in terms of bytes from the serial port, is available for reading. Essentially, the data to be read from the serial port is stored in the serial receive buffer and this method checks whether the data has arrived in this buffer. This method returns the number of bytes available to read:
- Serial.read() reads incoming serial data and returns the first byte of incoming serial data available. The method returns -1 if no data is available to read.
- analogRead() reads the value from the specified analog pin. The Arduino board contains a multichannel, 10-bit analog-to-digital converter. As a result of this, it will map input voltages between 0 and the operating voltage (5V or 3.3V) into integer values between 0 and 1023.
For example, if you're using a 5V Arduino and a sensor is connected to its analog pin, then the following formula is used to convert the 10-bit analog reading into a temperature:
Voltage at pin in milli volts = Reading from ADC * 5000/1024
This formula converts the number 0-1023 from the ADC into 0-5000 mV.
If you're using a 3.3V Arduino, then the following formula is used to convert the analog reading into a temperature:
Voltage at pin in milli volts = Reading from ADC * 3300/1024
This formula converts the number 0-1023 from the ADC into 0-3300 mV.
To convert the number of millivolts retrieved from the preceding formula into a temperature, the following formula is used:
Centigrade temperature = Analog voltage in mV / 10
That wraps up our introduction to embedded systems and IoT. We'll now review the required technical software and hardware we need to complete the recipes in this chapter. After that, we will begin with the first recipe.