We will define a variable, i, of the unsigned char type; a variable of the unsigned char type can store 256 bits, whereas that of a signed char can store only 128 bits. The i variable is assigned the HEX value of 0. We will set a while loop to execute infinitely. With every iteration of the while loop, the value of the i variable will increment by 1. Within the while loop, we will assign the value of the i variable, that is, 0, to port P3.
We will introduce a delay by using two nested for loops. Thereafter, we will execute a while loop again, incrementing the value of the i variable, making it 1. Again, we will assign the value of the i variable to port P3 for display. And, we will reintroduce some delay, followed by executing the while loop again. This process continues infinitely; consequently, port P3 will display the counter from 0 until 255 repeatedly.
Press F7 or click on the Build button to compile the code. If there is no error, you can move ahead to the next step; otherwise, first, debug the code. In order to see the output of the code through simulation, we will use Keil's built-in Debug option for simulation of the code. To do this, click on Debug | Start/Stop Debug Session. Alternatively, you can press Ctrl + F5 as the shortcut key, or click on the Start/Stop Debug Session icon (it appears in the form of a D) in the toolbar.
On the free version of Keil, there is a condition that the running code size should not be more than 2 KB, so you will get a dialog box indicating that the running code has an upper limit of 2 KB. Click on OK to move further. The project workspace window shows most of the SFRs as well as the GPRs, from r0 to r7. Click on the Run icon from the toolbar or press the F5 key. You can see the output of the ports under Peripherals | Select I/O ports| Port 3. You will see the bits of the ports showing the counter from 0 to 255.
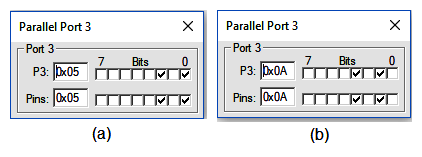
In the following screenshot, (a) shows the bits set to a value of 5. The binary value of 5 is 101, so, accordingly, the first and third bits are set to a HIGH signal and the remaining bits are set to a LOW signal. Similarly, (b) shows the bits displaying the counter value of 10. The bits of the port will be set showing the values from 0 to 255:
Voilà! We've successfully created a counter using Embedded C. Now, let's move on to the next recipe!