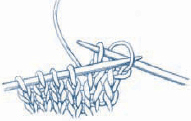
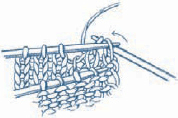
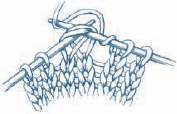
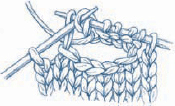
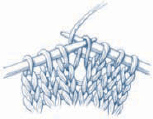
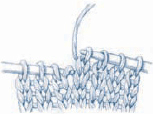
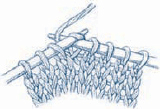
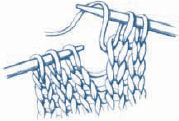
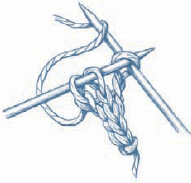
Knit the first stitch, *knit the next stitch (2 stitches on right needle), insert left needle tip into first stitch on right needle (Figure 1) and lift this stitch up and over the second stitch (Figure 2) and off the needle (Figure 3). Repeat from * for the desired number of stitches.

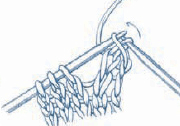
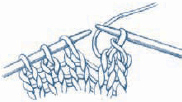
Cut the yarn three times the width of the knitting to be bound off, and thread onto a tapestry needle. Working from right to left, *insert tapestry needle purlwise (from right to left) through first 2 stitches (Figure 1) and pull the yarn through, then bring needle knitwise (from left to right) through the first stitch (Figure 2), pull the yarn through, and slip this stitch off the knitting needle. Repeat from * for desired number of stitches.

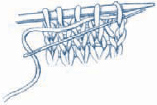
Place the stitches to be joined onto two separate needles and hold the needles parallel so that the right sides of knitting face together. Insert a third needle into the first stitch on each of two needles (Figure 1) and knit them together as 1 stitch (Figure 2), *knit the next stitch on each needle the same way (2 stitches on right needle), then use the left needle tip to lift the first stitch on right needle over the second and off the needle (Figure 3). Repeat from * until 1 stitch remains on third needle. Cut yarn and pull tail through last stitch to secure.
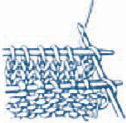

Blocking is the process of wetting or steaming knitted pieces to even out the lines of stitches and the yarn fibers. There are a number of ways to do this, depending on the yarn fiber, the stitch pattern, and the amount of time you have.
Unless the label on the yarn tells you otherwise, most yarns will benefit from a light steaming. Spread out a couple of beach towels on a mattress and lay the knitted piece on top of the towels. Pin out the corners of the knitted piece, if necessary, and straighten the edges. Slowly wave a hot iron about an inch above the knitted surface and let the steam penetrate the entire surface. Let dry thoroughly.
Alternately, wet the piece by placing it in a sink of cool water. When it is saturated, let the water drain from the sink and gently squeeze (be careful not to wring) the excess moisture out of the knitted piece. Spread the piece out on an open beach towel and roll it up in the towel. Gently push on the rolled towel to help it draw moisture out of the knitting. Unroll the towel and lay the piece out on a dry beach towel, molding any cables with your fingers, and straightening it out. Pin it in place, if necessary. Let dry thoroughly.
Work to where you want the buttonhole to be, yarnover, knit the next 2 stitches together (k2tog), work to end of row or to next buttonhole position. On next row, work the yarnover in pattern as an ordinary stitch to complete the buttonhole.
Work to where you want the buttonhole to begin, bring yarn to front, slip 1 stitch purlwise, bring yarn to back (Figure 1). *Slip 1 stitch purlwise, pass first slipped stitch over second; repeat from * 2 (3, 4) more times. Place last stitch back on left needle (Figure 2), turn. Cast on 4 (5, 6) stitches as foll: **Insert right needle between the first and second stitches on left needle, draw up a loop, and place it on left needle (Figure 3); repeat from ** 3 (4, 5) more times, turn. Bring yarn to back, slip the first stitch of left needle onto right needle and pass last cast-on stitch over it (Figure 4), work to end of row or to next buttonhole position.


Cables are made when stitches cross over each other, or twist, within a row of knitting. In effect, small groups of stitches change places with each other. You will need a cable needle (a short knitting needle with a point at each end). To make a cable, slip the designated number of stitches (usually 2 or 3) onto a cable needle, hold the cable needle in front of the work for a left-leaning twist (Figure 1) or in back of the work for a right-leaning twist (Figure 2), knit the specified number of stitches from the left needle (usually the same number of stitches that were placed on the cable needle), then work the stitches from the cable needle in the order in which they were placed on the needle (Figure 3).
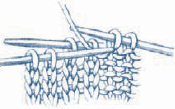

*Loop working yarn counterclockwise and place this loop on the needle so that it doesn’t unwind. Repeat from * for desired number of stitches.

*Insert right needle between first 2 stitches on left needle (Figure 1), wrap yarn around needle as if to knit, draw yarn through (Figure 2) and place new loop on tip of left needle (Figure 3) so that new loop forms first stitch on needle. Repeat from * for desired number of stitches, always working between the first 2 stitches on the left needle.

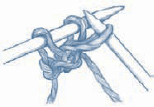
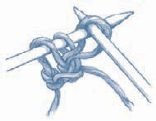
With waste yarn and crochet hook, make a loose chain of about 4 stitches more than you need to cast on. With knitting needle, working yarn, and beginning 2 stitches from end of chain, pick up and knit 1 stitch through the back loop of each crochet chain stitch (Figure 1) for desired number of stitches to cast on. Work the piece as desired, and when you’re ready to work in the opposite direction, pull out the crochet chain (Figure 2) and carefully place live stitches on a needle.
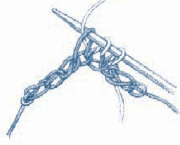
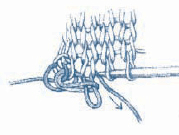
Make a loose slipknot of working yarn and place on right needle. Hold waste yarn next to slipknot and around your left thumb; hold working yarn over your left index finger. *Bring right needle forward under waste yarn, over working yarn, grab a loop of working yarn (Figure 1), then bring needle to the front over both yarns, and grab a second loop (Figure 2). Repeat from * for desired number of stitches. When you’re ready to work in the opposite direction, pick out waste yarn and carefully place live stitches on a needle.
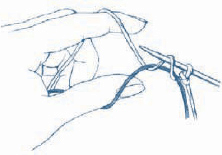
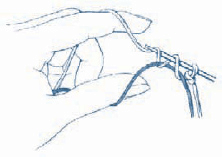
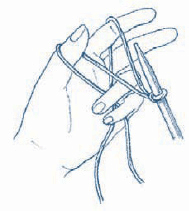
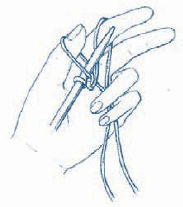
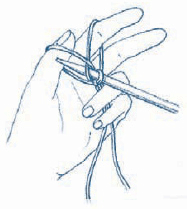
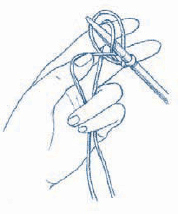
Leaving a long tail (about ½" to 1" [1.3 to 2.5 cm]) for each stitch to be cast on), make a slipknot and place on right needle. Place thumb and index finger of left hand between yarn ends so that working yarn is around your index finger and tail end is around your thumb. Secure the yarn ends with your other fingers and hold palm upwards, making a V of yarn (Figure 1). *Bring needle up through loop on thumb (Figure 2), catch first strand around index finger with needle, and go back down through loop on thumb (Figure 3). Drop loop off thumb and, placing thumb back in V configuration, tighten resulting stitch on needle (Figure 4). Repeat from * for desired number of stitches.
Charts are visual representations of the knitted fabric when viewed from the right side. Charts are plotted on graph paper so that one square represents one stitch and one horizontal row represents one row of knitting. The symbols or colors in the squares indicate how to work each stitch. For color work charts, the colors represent yarn colors; for texture work, the symbols represent stitch manipulations. Unless otherwise specified, charts are read from the bottom to the top, and from right to left for right-side rows and from left to right for wrong-side rows. When you’re knitting in the round (so that the right side of the knitting is always facing out), all rows are read from right to left.
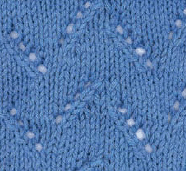
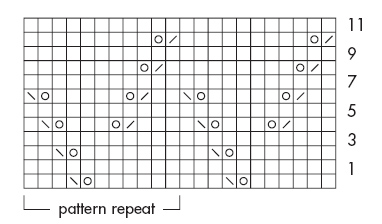
Notice how the stitches mimic the chart symbols in this simple lace pattern.
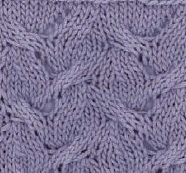
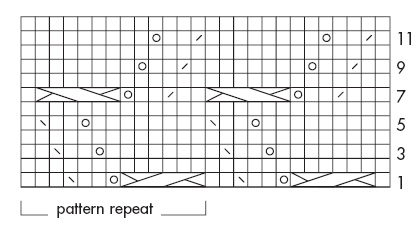
The chart symbols for cables indicate the direction of the cable-twists.
Make a slipknot and place on crochet hook. *Yarn over hook and draw through loop on hook. Repeat from * for desired number of stitches. To fasten off, cut yarn and draw end through last loop formed.
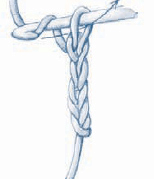
*Yarn over hook, insert hook into a stitch, yarn over hook and draw a loop through (3 loops on hook), yarn over hook (Figure 1) and draw it through 2 loops, yarn over hook and draw it through the remaining 2 loops (Figure 2). Repeat from * for desired number of stitches.
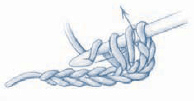
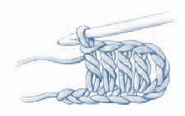
*Yarn over hook, insert hook into a stitch, yarn over hook and draw a loop through (3 loops on hook), yarn over hook (Figure 1) and draw it through all the loops on the hook (Figure 2). Repeat from * for desired number of stitches.

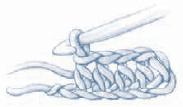
*Insert crochet hook into an edge stitch, yarn over hook and draw a loop through the stitch, yarn over hook (Figure 1), and draw loop through both loops on hook (Figure 2). Repeat from * for desired number of stitches.


nsert hook into stitch, yarn over hook and draw loop through stitch and loop on hook.

Knit 2 stitches together as if they were a single stitch—2 stitches are reduced to 1.
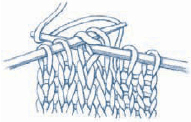
Purl 2 stitches together as if they were a single stitch—2 stitches are reduced to 1.
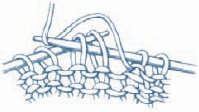
Slip 1 stitch knitwise, knit the next stitch (Figure 1), then use the left needle tip to lift the slipped stitch over the knitted stitch and off the needle (Figure 2).
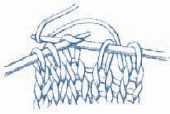
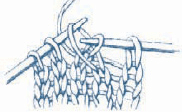
Slip 2 stitches individually knitwise (Figure 1), then insert left needle tip into the front of these 2 slipped stitches, and use the right needle to knit them together through their back loops (Figure 2).

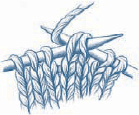
Holding yarn in front, slip 2 stitches individually knitwise (Figure 1), then slip these 2 stitches back onto left needle (they will appear twisted), and purl them together through their back loops (Figure 2).
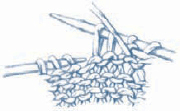
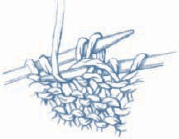
Working into edge half-stitch of the knitted piece, *bring tip of threaded needle in and out of a knitted stitch, place working yarn under needle tip, then bring threaded needle through the stitch and tighten. Repeat from *, always bringing threaded needle on top of working yarn.
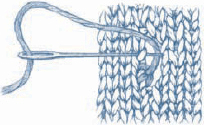
Horizontal: Bring threaded needle out from back to front at the base of the V of the knitted stitch you want to cover. *Working right to left, pass needle in and out under the stitch in the row above it and back into the base of the same stitch. Bring needle back out at the base of the V and the next stitch to the left. Repeat from * for desired number of stitches.
Vertical: Beginning at lowest point, work as for horizontal duplicate stitch, ending by bringing the needle back out at the base of the stitch directly above the stitch just worked.
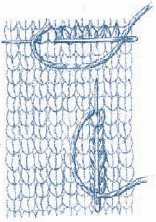
Bring threaded needle out of knitted background from back to front, wrap yarn around needle 1 to 3 times, and use your thumb to hold the wraps in place while you insert needle into background a short distance from where it came out. Pull the needle through the wraps into the background.
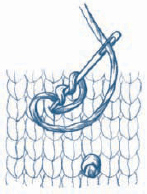
*Bring threaded needle out of knitted background from back to front at the center of a knitted stitch. Insert the needle into the upper right edge of the next stitch to the right, then out again at the center of the stitch below. Repeat from * for desired length.
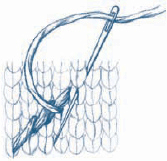
*Bring threaded needle out of knitted background from back to front at the base of the stitches to be covered, then in from front to back at the top of the stitches to be covered. Repeat from *, working in straight lines or radiating from a point as desired.
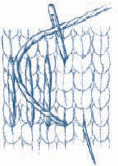
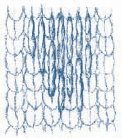
Fill washing machine with hot water and add soap. Place knitted piece in washing machine, along with a pair of blue jeans or some tennis balls for friction. Run the machine on regular wash cycle alternating with cold rinse cycle. Repeat the cycles and check the piece periodically for progress, being careful not to let it shrink too much.
Fill a basin with very warm (not scalding) soapy water. Place the knitted piece in the basin and use your hands to vigorously rub and agitate the knitting so that the fibers will mat together. Rinse in a basin of fresh, cold water. Repeat, adding hot water to soapy basin, and rinse in a fresh basin of cold water until piece is desired size. Roll felted piece in dry bath towel to remove excess water. Shape and let air dry.
Gauge is an indispensable part of any kitting pattern. Matching gauge is crucial when you’re making a sweater with parts that need to fit together or when you want to know ahead of time the dimensions of your final project. When you’re knitting a wrap, however, it’s not as important to match a particular gauge. For most wraps, there are no pieces to fit together and as long the knitted fabric looks good and fits over your head or around your neck, it will probably be just fine. Most wraps will fit even if they are an inch or two wider or narrower, or shorter or longer, than the one in the photograph. If you match gauge and your swatch feels stiff (like a piece of cardboard), get a larger needle and swatch until the piece has pleasing drape and flexibility. Conversely, if your swatch feels loose and floppy, use a smaller needle to tighten up the stitches.
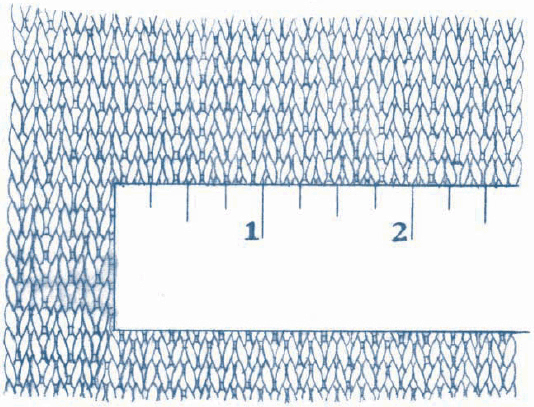
To measure gauge, cast on 30 to 40 stitches using the recommended needle size. Work in the specified pattern stitch until the piece measures at least 4" (10 cm) from the cast-on edge. Remove the swatch from the needles or bind off the stitches loosely. Lay the swatch on a flat surface. Place a ruler over the swatch and, in the space of 4" (10 cm), count the number of stitches across and the number of rows down (including fractions of stitches and rows). Repeat this measurement two or three times on different areas of the swatch to confirm your initial measurement. If you have more stitches and rows than called for in the instructions, your stitches are too small and you should try again with larger needles; if you have fewer stitches or rows, your stitches are too large and you should try again with smaller needles. Repeat the process until you get the gauge you’re after.
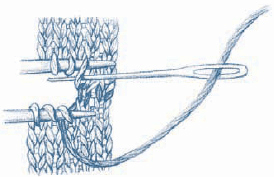
Place stitches to be joined onto two separate needles. Hold the needles parallel to each other, with the points facing to the right and so that wrong sides of the knitting face each other. With a threaded tapestry needle, work back and forth between the stitches on the two needles as follows:
Step 1: Bring threaded needle through first stitch on front needle as if to purl and leave stitch on needle.
Step 2: Bring threaded needle through first stitch on back needle as if to knit and leave stitch on needle.
Step 3: Bring threaded needle through first stitch on front needle (the same one used in Step 1) as if to knit and slip this stitch off needle. Bring threaded needle through next stitch on front needle as if to purl and leave stitch on needle.
Step 4: Bring threaded needle through first stitch on back needle as if to purl (as illustrated), slip that stitch off, bring needle through next stitch on back needle as if to knit, and leave this stitch on needle.
Repeat Steps 3 and 4 until all stitches have been worked.
Knit into a stitch but leave it on the left needle (Figure 1), then knit through the back loop of the same stitch (Figure 2) and slip original stitch off the needle.
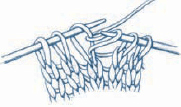
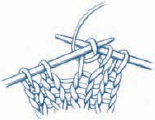
Left Slant: Knit into the back of a stitch (in the “purl bump”) in the row directly below the stitch on the needle (Figure 1). Knit into the stitch on the needle, then slip the original stitch off the needle (Figure 2).
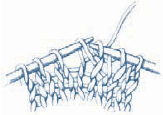
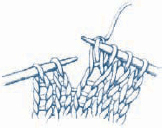
Right Slant: Insert left needle tip into the back of the stitch below the stitch just knitted (Figure 1), then knit this stitch (Figure 2).
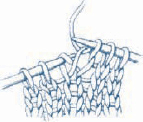
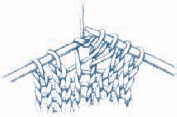
If no direction is specified, work the left-slant increase.
Left-Slant (M1L): With left needle tip, lift the strand between last knitted stitch and first stitch on left needle from front to back (Figure 1), then knit the lifted loop through the back (Figure 2).

Right-Slant (MIR): With left needle tip, lift the strand between last knitted stitch and first stitch on left needle from back to front (Figure 1), then knit the lifted loop through the front (Figure 2).
Wrap the working yarn around the needle from front to back (Figure 1), then bring yarn into position to work the next stitch (leave it in back if a knit stitch follows; bring it under the needle to the front if a purl stitch follows).
With double-pointed needle, cast on desired number of stitches. *Without turning the needle, slide stitches to other end of needle, pull the yarn around the back, and knit the stitches as usual. Repeat from * for desired length.
Hold the working yarn behind the needles and use your right hand to bring the right needle into the first stitch on the left needle from front to back, rotate it counterclockwise (over and behind in a scooping motion) around the taut working yarn, and back out the stitch, pulling the new stitch through the old as you slide the old stitch off the left needle.
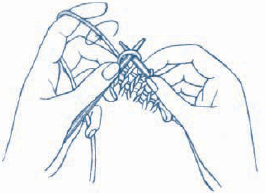
Hold the working yarn in back of the work and insert the right needle from front to back into the first stitch on the left needle, so that the needle tip extends about an inch (2.5 cm) beyond the stitch. Grasp the right needle with your left thumb and forefinger (without letting go of the left needle), bring the yarn up with your right forefinger, and wrap it around the right needle tip counterclockwise—behind the needle, then to the front between the two needles. Retrieve the right needle with your right hand and use that needle to draw the new stitch through the old as you slide the old stitch off the left needle. Tighten the yarn with your right hand to tension the stitch.
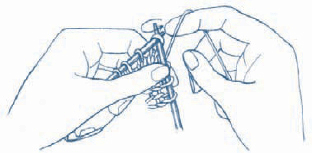
Hold the yarn in front of the work and insert the right needle behind the yarn and down (from front to back) into the first stitch on the left needle. Rotate the right needle around the yarn counterclockwise—over, behind, and around to the front again. Then push the needle to the back, pulling the new stitch through the old and sliding the old stitch off the left needle as you do so.
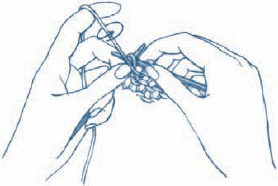
Hold the yarn in front and insert the right needle from back to front into the stitch, so that the tip extends about an inch (2.5 cm) beyond the stitch. Grasp the right needle with your left thumb and forefinger as you use your right forefinger to wrap the yarn around the right needle tip counterclockwise—over and behind the needle, then to the front between the two needles. Move both hands back into their starting position as you use the right needle to draw the new stitch through the old and off the needle. Tighten the stitch with your right hand.
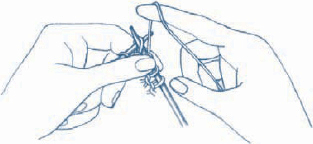
Hold pieces to be seamed so that their right sides face each other and so that the edges to be seamed are even with each other. Thread seaming yarn on a tapestry needle and join the pieces as follows: *Insert threaded needle through both layers, from back to front, 2 stitches to the left (Figure 1), then from front to back 1 stitch to the right (Figure 2). Repeat from *, working right to left so that seaming yarn follows a circular path.
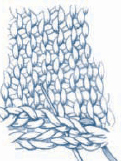
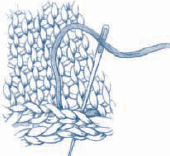
Hold pieces to be seamed side by side, with their right sides facing upward. Thread seaming yarn on a tapestry needle and join the pieces as follows: *Insert threaded needle under two horizontal bars between the two edge stitches on one piece (Figure 1), then under two bars between the corresponding stitches on the other piece (Figure 2), pulling the seaming yarn firmly to bring the pieces together. Repeat from *, alternating a stitch from one piece and a stitch from the other piece.
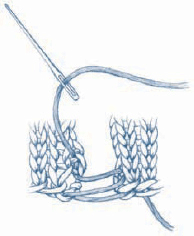
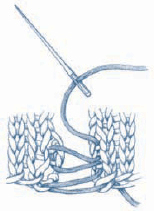
Hold pieces to be seamed together so that the edges to be seamed are even with each other. Thread seaming yarn on a tapestry needle and join the pieces as follows: *Insert threaded needle through both layers from back to front, then bring threaded needle to back and repeat from *.
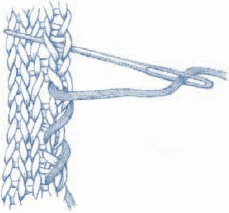
Some shawl, cape, and poncho edges aren’t hidden in seams, and designers frequently use a selvedge stitch (or several selvedge stitches) at the outside edges to ensure that the sides stay even and neat. Frequently these stitches are worked in a different stitch pattern (such as garter stitch) from that used in the garment body. A pattern may call for one or more selvedge stitches and will give instructions for how to knit them.
Work to turn point, slip next stitch purlwise to right needle. Bring yarn to front (Figure 1). Slip same stitch back to left needle (Figure 2). Turn work and bring yarn in position for next stitch, wrapping the stitch with the working yarn as you do so. When you come to wrapped stitch on a subsequent row, hide the wrap by working it together with the wrapped stitch as follows: Insert right needle tip under the wrap (from the front if wrapped stitch is a knit stitch; from the back if wrapped stitch is a purl stitch), then into the stitch, and work the stitch and its wrap together.
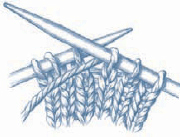
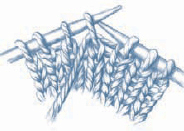
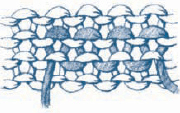
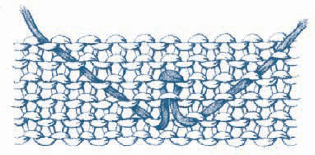
An important step in any knitting project is to weave in the loose ends. The ends are the tails of yarn left hanging at the beginning, end, and throughout the body of the project wherever a new ball of yarn was joined. All of these ends need to be worked into the knitted fabric to prevent raveling. Depending on the size of your project and the number of colors used, you may have anywhere from two ends (the cast-on tail and the bind-off tail) to dozens of ends to secure. Designers have different ways to do this, but in general, each end is threaded onto a tapestry needle and worked into the wrong side of the fabric. The goal is to make the ends as inconspicuous as possible. When you can, work the ends into seams or at boundaries between stitch patterns where there is already a visual interruption in the knitted fabric. Otherwise, trace the path of a row of stitches (Figure 1) or work on the diagonal, catching the back side of the stitches (Figure 2). To reduce bulk, do not weave two ends in the same area. To keep color changes sharp, work the ends into areas of the same color.
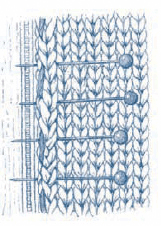
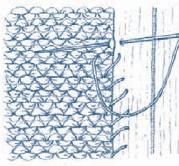
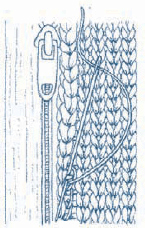
With right side of piece facing and zipper closed, pin zipper to fronts so front edges cover the zipper teeth. With contrasting sewing thread and right side facing, baste zipper in place close to teeth (Figure 1). Turn work over and with matching sewing thread and needle, stitch outer edges of zipper to wrong sides of knitted edge (Figure 2), being careful to follow a single column of stitches in the knitting to keep the zipper straight. Turn work so right side is facing, and with matching sewing thread, sew knitted fabric close to teeth (Figure 3). Remove basting stitches.
