Chapter 12. Supporting the iOS Ecosystem
In this chapter, we’ll add support for sharing, handoffs (so users can resume what they’re doing on other iOS devices or in the OS X app), and search (so the iOS search system can be used to find text within note documents). All three of these features help to integrate your app into the wider context of the user’s phone, which means that your app is no longer an island.
Sharing with UIActivityController
We’ll start by adding sharing support to the image attachment view controller, as shown in Figure 12-1.

Figure 12-1. The standard iOS share sheet
Sharing on iOS is handled by UIActivityViewController, which provides a standard view controller offering system services, such as copy, paste, and so on, as well as sharing to social media, email, or text messaging. Other apps can also provide share destinations.
-
Open Main.storyboard and go to the image attachment view controller.
-
Add a
UIToolBarfrom the Object library to the view and place it at the bottom of the screen. This will also include aUIBarButtonItem, which works pretty much exactly like our old friendUIButton, but is customized to work in toolbars. -
Resize the toolbar to make it fit the width of the screen. Next, click on the Pin menu, and pin the left, right, and bottom edges of the view. This will keep it at the bottom of the screen and make it always fill the width of the screen.
-
Select the button and set its System Item property to Action, as shown in Figure 12-2. This will change its icon to the standard iOS share icon.
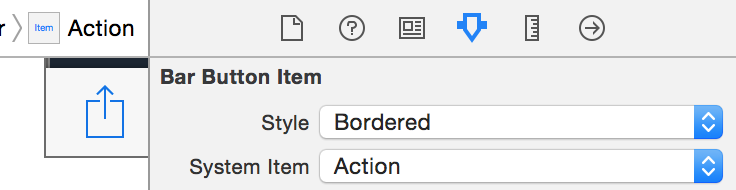
Figure 12-2. Setting the button to the Action mode
-
Open ImageAttachmentViewController.swift in the Assistant editor.
-
Hold down the Control key and drag from the toolbar button you just added into
ImageAttachmentViewController. Create a new action calledshareImage. -
Add the following code to the
shareImagemethod. Note that the type for thesenderparameter isUIBarButtonItem—you’ll need to change it when you start writing the code:
@IBActionfuncshareImage(sender:UIBarButtonItem){// Ensure that we're actually showing an imageguardletimage=self.imageView?.imageelse{return}letactivityController=UIActivityViewController(activityItems:[image],applicationActivities:nil)// If we are being presented in a window that's a regular width,// show it in a popover (rather than the default modal)ifUIApplication.sharedApplication().keyWindow?.traitCollection.horizontalSizeClass==UIUserInterfaceSizeClass.Regular{activityController.modalPresentationStyle=.PopoveractivityController.popoverPresentationController?.barButtonItem=sender}self.presentViewController(activityController,animated:true,completion:nil)}
When the share button is tapped, we want to prepare and present a UIActivityController, which will allow the user to do something with the image. What that something actually is depends upon the capabilities of the system and the apps that the user has installed. To create it, you pass in an array of activityItems, which can be a wide variety of things: URLs, images, text, chunks of data, and so on. The UIActivityController will then determine what services can accept these items, and then let the user choose what to do.
When the app is being presented in a larger screen, such as on an iPhone 6+ or iPad, we want to show it as a popover. To detect this, we ask the window in which the app is running to tell us about its horizontal size class—that is, whether it is in a horizontally “compact” view, or a horizontally larger “regular” view. If it’s in a regular-sized view, we instruct the activity controller to use a popover, and we set the barButtonItem property on the popoverPresentationController to the sender, which will visually connect the popover to the share button in the toolbar.
Handoffs
Let’s imagine that your user’s on a bus, tapping out a note. She arrives at her stop, gets off the bus, and walks into the office, still writing the note. Eventually, she reaches her desk, and she wants to finish up the note. She could finish it up on the phone, but she’s right in front of a dedicated workstation. Rather than deal with a tiny touchscreen, she instead uses Handoff to move her work from her phone to the desktop.
Handoff is a technology on the Mac, iOS, and on watchOS that allows the user to start an activity on one device and seamlessly move to another device (see Figure 12-3). The way it works is this: applications register activity types with the system, which are simple text strings that are the same across all of the different apps that can receive the handoff. When the user opens a document, he marks it as the current activity; this makes the operating system broadcast this fact to all nearby devices. When the user decides to activate Handoff on another device, the originating device and the receiving device quickly swap information about what he wants to do, and the receiving device’s app delegate is then given the opportunity to continue the activity.

Figure 12-3. Handoffs working with Safari on iOS and OS X
Note
Because we’re using NSDocument and UIDocument, lots of the details of this get taken care of for you. If you weren’t using the document system, you’d need to manually create your own NSUserActivity objects before calling becomeCurrent. For more information, see the Handoff Programming Guide in the Xcode documentation.
To get started using Handoff, we need to describe to the system the type of “activity” that is associated with editing this document. When we do this, the device will inform all other devices that belong to the same person that this specific document is being edited.
-
Select the project at the top of the Project Navigator (Figure 12-4).
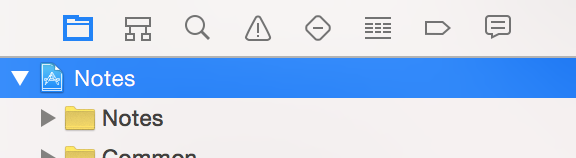
Figure 12-4. Selecting the project in the Project Navigator
-
Go to the Notes target settings (that is, the OS X app) and scroll down to the Document Types section.
-
Add a new entry in “Additional document type properties” by expanding the “Additional document type properties” triangle, selecting the
CFBundleTypOSTypesentry, and clicking the + button that appears. -
Call the new entry
NSUbiquitousDocumentUserActivityTypeand set its type toString. Set its value toau.com.secretlab.Notes.editing. -
Now go to the same place in Notes-iOS, and add the same entry.
Warning
If you have been using a custom bundleID throughout, make sure you use that here with
.editingappended at the end. If you don’t do this, handoffs will not work.Once you’ve done this, the two applications will associate a Handoff-able activity with their document types. When the document is open, the app will be able to simply say to the system, “Begin broadcasting the fact that this document is open.”
-
Open the AppDelegate.swift file that belongs to the Notes-iOS target (not the OS X one!).
-
Implement the following method, which returns to the list of documents and then signals that that view controller should resume an activity:
funcapplication(application:UIApplication,continueUserActivityuserActivity:NSUserActivity,restorationHandler:([AnyObject]?)->Void)->Bool{// Return to the list of documentsifletnavigationController=self.window?.rootViewControlleras?UINavigationController{navigationController.popToRootViewControllerAnimated(false)// We're now at the list of documents; tell the restoration// system that this view controller needs to be informed// that we're continuing the activityiflettopViewController=navigationController.topViewController{restorationHandler([topViewController])}returntrue}returnfalse}The
continueUserActivitymethod is called when the user has decided to hand off the activity from one device to the next.TheuserActivityobject contains the information describing what the user wants to do, and this method is responsible for telling the app what needs to happen to let the user pick up from where the last device left off.It does this through the
restorationHandlerclosure that it receives as a parameter. This closure takes an array of objects which the app should call therestoreUserActivityStatemethod on; this method receives theNSUserActivityas a parameter, which can be used to continue the state.The reason for doing this is to move as much of the logic that drives the continuation of the activity to the view controllers, instead of making the app delegate have to know about the details of how documents get opened.
The way that we’ll handle this in this app is to return to the
DocumentListViewController, and then indicate that the view controller should be told about the handoff by passing it to therestorationHandler. -
Open DocumentListViewController.swift.
-
Add the following method to the
DocumentListViewControllerclass:overridefuncrestoreUserActivityState(activity:NSUserActivity){// We're being told to open a documentifleturl=activity.userInfo?[NSUserActivityDocumentURLKey]as?NSURL{// Open the documentself.performSegueWithIdentifier("ShowDocument",sender:url)}}This method is called as a result of passing the
DocumentListViewControllerto therestorationHandlerincontinueUserActivity. Here, we extract the URL for the document that the user wants to open by getting it from theNSUserActivity’suserInfodictionary, and then performing theShowDocumentsegue, passing in the URL to open. This means that when the application is launched through the Handoff system, the document list will immediately open the document that the user wants. -
Finally, add the following code to the
viewWillAppearmethod ofDocumentViewController, to make the activity current:// If this document is not already open, open itifdocument.documentState.contains(UIDocumentState.Closed){document.openWithCompletionHandler{(success)->Voidinifsuccess==true{self.textView?.attributedText=document.textself.attachmentsCollectionView?.reloadData()>// We are now engaged in this activity>document.userActivity?.becomeCurrent()// Register for state change notificationsself.stateChangedObserver=NSNotificationCenter.defaultCenter().addObserverForName(UIDocumentStateChangedNotification,object:document,queue:nil,usingBlock:{(notification)->Voidinself.documentStateChanged()})self.documentStateChanged()}Every
UIDocumenthas anNSUserActivity. To indicate to the system, and to every other device that the user owns, that the user’s current task is editing this document, we callbecomeCurrenton the document’suserActivity. This causes the current device to broadcast to all other devices in range, letting them know that we’re offering to hand off this activity.You can now test handoffs. Launch the iOS app on your phone, and then launch the OS X app. Open a document on your phone, and a Handoff icon will appear at the left of the dock on your Mac, as shown in Figure 12-5.
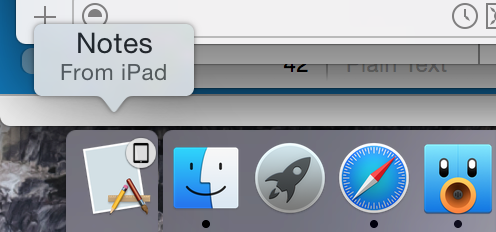
Figure 12-5. Handoff on OS X
The reverse will also work on iOS: open a document on your Mac, and the iOS app’s icon will appear on the lock screen (Figure 12-6).

Figure 12-6. Handoff on iOS—the handoff icon is shown in the bottom-left corner
Searchability
The next feature we’ll add is the ability for users to search the phone to find documents that they’ve written. There are three different searching technologies that we can use to support this: using NSUserActivity objects, Core Spotlight, and web indexing.
-
NSUserActivityallows you to index parts of your app—for example, if you have an app that downloads and shows recipes, every time the user views a recipe, you record that as an activity and describe how to get back to this screen; Spotlight indexes this activity and displays it if the user searches for things that match the activity’s description. -
Core Spotlight gives you control over the search index: you manually submit metadata items into the index. We’ll be covering using Core Spotlight in “Searching with a Spotlight Indexing Extension”.
-
Web indexing allows you to mark up websites for Apple’s search crawler to view.
Note
Because we’re not building web apps in this book, we won’t be covering web archiving. If you’re interested in it, you can read more about it in the App Search Programming Guide, in the Xcode documentation.
We’ll be covering marking NSUserActivity objects as searchable in this chapter. In the next chapter, which covers creating extensions, we’ll also talk about creating a Spotlight indexing extension, which provides additional search functionality by registering the contents of all documents in the app with Core Spotlight.
We’ll start by adding support for indexing the app through NSUserActivity.
-
Open DocumentViewController.swift.
-
Import the Core Spotlight framework at the top of the file:
importCoreSpotlight -
Update the
viewWillAppearmethod to add searchable metadata to the document’s user activity when the document is opened:// If this document is not already open, open itifdocument.documentState.contains(UIDocumentState.Closed){document.openWithCompletionHandler{(success)->Voidinifsuccess==true{self.textView?.attributedText=document.textself.attachmentsCollectionView?.reloadData()>// Add support for searching for this document>document.userActivity?.title=document.localizedName>>letcontentAttributeSet>=CSSearchableItemAttributeSet(>itemContentType:document.fileType!)>>contentAttributeSet.title=document.localizedName>contentAttributeSet.contentDescription=document.text.string>>document.userActivity?.contentAttributeSet>=contentAttributeSet>>document.userActivity?.eligibleForSearch=true// We are now engaged in this activitydocument.userActivity?.becomeCurrent()// Register for state change notificationsself.stateChangedObserver=NSNotificationCenter.defaultCenter().addObserverForName(UIDocumentStateChangedNotification,object:document,queue:nil,usingBlock:{(notification)->Voidinself.documentStateChanged()})self.documentStateChanged()}This code adds further metadata to the document’s
userActivity. First, it provides a name for the document, which will appear in the Spotlight search results. In addition, we create aCSSearchableItemAttributeSet, which is the (overcomplicated) term for “stuff the search system uses to decide if it’s what the user’s looking for.” In this case, we provide two pieces of information: the name again, and the text of the document.We then provide this to the
userActivityand mark it as available for searching.
You can now test searching. Run the app and open a document. Type some words into the document, close the app, and go to the Search field (swipe down while on the home screen). Type in some of the words that you added to the document, and your document will appear! When you tap on the search result, the app will launch, and you’ll be taken to the document.
Conclusion
When an application participates in the wider iOS ecosystem, it feels like it “belongs” on the user’s device. When you take advantage of as many system features as possible, rather than reinventing new systems from whole cloth, it’s more likely that users will consider your apps an indispensable part of their device use.