
SNIP ‘N’ STITCH
Finished sewing caddy: 9½˝ × 8¼˝
Techniques:
Wool appliqué and punch needle
Let me introduce you to my dear friend Susan Meyers! She is a fellow wool lover from Texas who hooks rugs along with doing punch-needle embroidery and appliqué. Susan and I met when she took a wool appliqué class I was teaching, and we have been friends ever since. We share a love of the Lord, family, and—of course—wool! Every year, I head down to her wool shop to teach classes and spend time with her and her lovely family.
This project uses wool appliqué combined with small quantities of the punch-needle technique. Punch-needle embroidery is similar to rug hooking in its use of closely placed loops to fill an area, but it is usually classified as embroidery because of its miniscule nature.
This technique has a long history (possibly as far back as ancient Egypt!) with various methods, but the basics have changed very little. This little sewing caddy is a great project to get a taste for punch needle and to add extra flair to your wool appliqué.

Photo by Tessa Christine Smith
Susan and I enjoy sharing about our faith and lives when we get together over a cold glass of iced tea—always with lemon!
—Rebekah

This little sewing companion will keep all the notions you need for snipping and stitching.
MATERIALS
Punch needle
• 1 weaver’s cloth 16˝ × 15˝
• Embroidery floss (DMC):
1 skein each:
Dark green (934) for tree Light green (3051) for tree Olive green (3011) for tree
Chartreuse (371) for door/window frames
Brown gray (3787) for windowpanes
Dark brown gray (3021) for windowpanes
Dark brown (3371) for spool and pockets
Dark pink (632) for spool
Cranberry red (3857) for spool
2 skeins each for door/windows and pockets:
Ecru (612)
Light brown (611)
Medium brown (610)
Wool appliqué
• 1 antique-white wool rectangle 2˝ × 6˝ for roof
• 1 dark-brown wool rectangle 4˝ × 6˝ for 2 scrolls and 2 pockets
• 1 faded-red wool rectangle 2½˝ × 5˝ for 2 scrolls and gate
• 1 light-green wool rectangle 4˝ × 2˝ for tree
• 1 light-brown wool rectangle 6˝ × 2˝ for awning and tree trunk
• 1 red wool square 4½˝ × 4½˝ for shop
• 2 cotton rectangles 10½˝ × 9¼˝ for background and backing
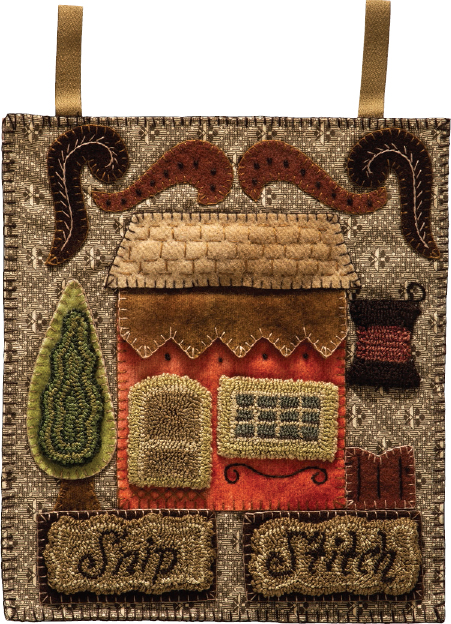
Design and wool appliqué by Rebekah L. Smith, punch-needle embroidery by Susan Meyers
• Embroidery floss (DMC):
1 skein each:
Ecru (612)
Light brown (611)
Medium brown (610)
• 12˝ length of ½˝-wide ribbon or twill tape for hanger
• 1 sheet of double-sided fusible
• Fiberfill polyester stuffing
• Freezer paper (such as Quilter’s Freezer Paper Sheets by C&T Publishing)
PUNCH NEEDLE
Refer to How to Punch Needle as needed for additional details on these steps.
1. Trace the pattern onto the weaver’s cloth, leaving 1˝ between each design. These patterns do not need to be reversed.
2. Following the color guide, punch the spool, the pocket fronts, the windows, the door, and the tree.
3. Punch the signs in this order: outline the border, punch the letters of the sign, and then fill in the background.
4. For the spool, once you have outlined it, fill in the dark pink and cranberry red in stripes to mimic threads.
WOOL APPLIQUÉ
Getting Started
Refer to How to Wool Appliqué as needed for additional details on these steps.
1. Cut out the wool appliqué pieces using the pattern.
2. Lay out the wool project to be sure you have all the pieces.
Making Your Project
Refer to Stitching Your Projects for details on the blanket stitch and embroidery stitches.
1. Blanket stitch the red rectangle to the background cotton.
2. Pin the awning to the top of the red rectangle, leaving the sides and bottom of the awning loose to make a needle flap.
3. Stitch the rest of the wool pieces on, except for the 2 brown pockets. Note that the roof is a pincushion. Be sure to leave a 1˝ opening to add a small amount of fiberfill; then blanket stitch the opening closed.
4. Add the embellishment stitches as desired.
5. Using a steam iron on the wool setting, press the finished piece on the wrong side.
FINISHING
1. Cut out each finished punch-needle motif, leaving a ¼˝ seam allowance of the weaver’s cloth all the way around.
2. Turn under the extra weaver’s cloth around the punch-needle motifs and tack them down.
hint You may need to notch some of the rounded parts so that they lie flat.
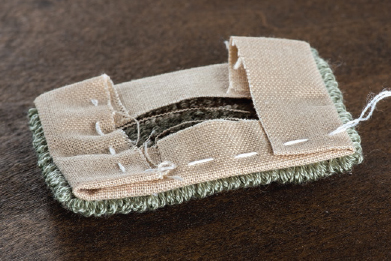
Detail of finishing the punch-needle pieces
3. Cut a piece of fusible slightly smaller than each of the punch pieces.
4. Following the manufacturer’s instructions, adhere the fusible to the back of each of the punched pieces.
5. One at a time, adhere the punched pieces to the project, making sure they are straight. Gently tack down the pieces where needed with a few whipstitches.
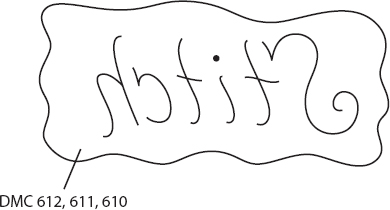
6. To make the Snip ‘n’ Stitch pockets, stitch the punch-needle pieces onto the wool rectangles.
7. Blanket stitch the pockets into place, leaving the top side open.
8. Using a steam iron on the wool setting, press the finished piece on the wrong side.
9. Press a ½˝ hem all the way around the front and backing pieces.
10. Pin the front and backing pieces with the wrong sides together.
11. Pin the twill tape hangers 1˝ from each corner at the top, between the front and backing.
12. Blanket stitch all the way around the piece to finish. Be sure to go back and blanket stitch the back side of the twill tape hangers.
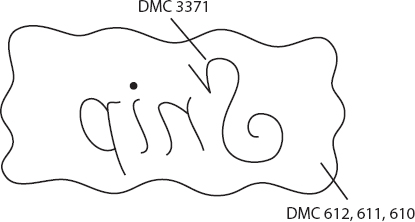
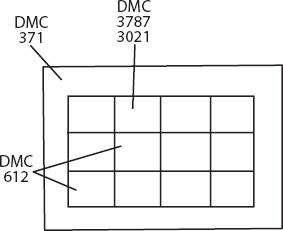
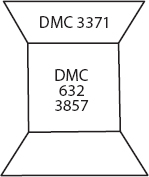
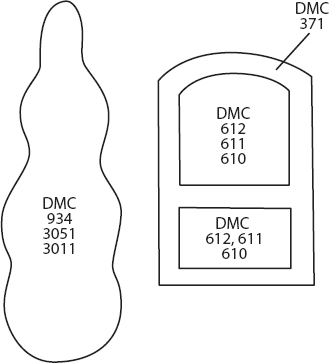
Punch-needle patterns with color guide
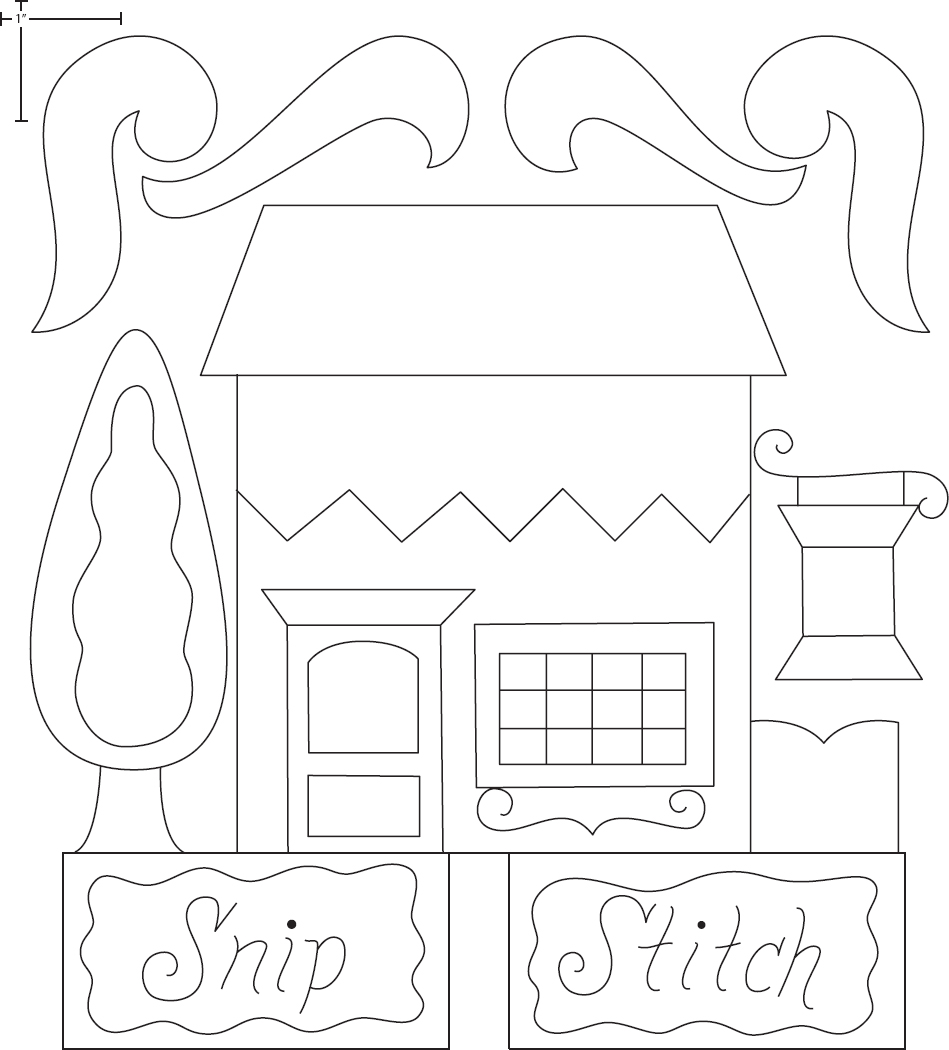
Wool appliqué patterns
For all printable patterns or digital content: https://tinyurl.com/11341-patterns-download