A GARDEN PATCHWORK
Finished table rug: 23˝ × 23˝
Techniques:
Wool appliqué and quilting
Kathy Wright is a wealth of information, especially about textiles. I have to give her credit for teaching me the freezer-paper method for cutting out my wool appliqué patterns. She dabbles in most textile arts, but making quilts and quilting are among her passions.
I meet a great number of quilters who enjoy working in wool appliqué. Quilting has its own appliqué process, of course, but I can see how so many people enjoy both quilting and wool appliqué.
Because of this, I knew I would have to design a project for quilters who also love appliqué. Kathy made a tiny quilt for the center, using cottons and a black linen. I framed the simple geometric center with a bold floral motif in appliqué. If you don’t quilt already, this basic piece could be a great first step.

Photo by Tessa Christine Smith
Kathy and I love all things textiles, from threads to fabrics.
—Rebekah

Combine a quilt and appliqué for a unique table mat.
MATERIALS
Wool appliqué
• 1 black wool square 23˝ × 23˝ for background
• 1 red wool rectangle 11˝ × 11˝ for 6 tulips and 8 flower centers
• 1 green wool rectangle 11˝ × 17˝ for 6 leaves and 6 tulip bands
• 1 light-green wool rectangle 10˝ × 8˝ for 6 medium leaf centers and 8 medium flower petals
• 1 black wool rectangle 4˝ × 7˝ for 6 small leaf centers
• 1 tan wool rectangle 7˝ × 6˝ for 8 large flower petals
• 1 black wool/felt rectangle 23˝ × 23˝ for backing
• Embroidery floss: 1 skein each of dark brown (DMC 3371), dark mustard (DMC 829), and antique white (DMC 841)
• Freezer paper (such as Quilter’s Freezer Paper Sheets by C&T Publishing)
Quilt
• 1 black linen rectangle 17½˝ × 5˝ or 1 strip 2½˝ × 36
• 1 faded red cotton square 6˝ × 6˝
• 1 green cotton square 5˝ × 5˝
• 1 mustard cotton square 5˝ × 5˝
• 1 tan cotton square 5˝ × 5˝
• Sewing machine
fabric note The cotton used in the quilt is Aged Muslin by Marcus Fabrics. The variegated colors in these cottons help give the center quilt depth and dimension.
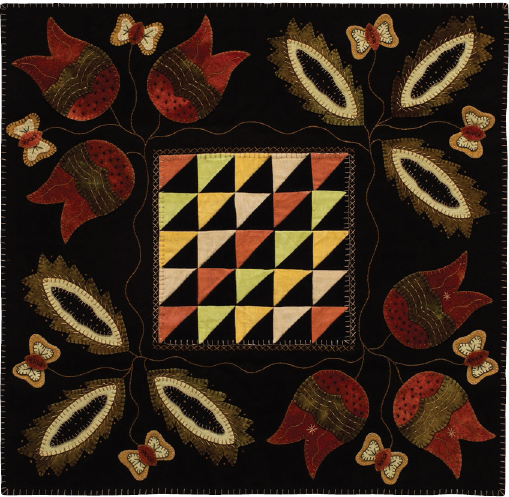
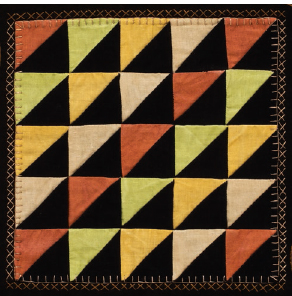
Design and wool appliqué by Rebekah L. Smith, center quilt by Kathy Wright
QUILT
Making Your Project
1. Cut out the following:
• 13 squares 2½˝ × 2½˝ from the black linen
• 3 squares 2½˝ × 2½˝ each from the green, mustard, and tan cotton
• 4 squares 2½˝ × 2½˝ from the faded red cotton
2. Cut each square in half diagonally to make 2 triangles.
3. Make units by sewing together 1 black linen triangle and 1 cotton triangle on the longest side, right sides together and using a ¼˝ seam.
4. Lay out all the units as shown in the project photo.
5. Sew together the individual units to make 5 rows.
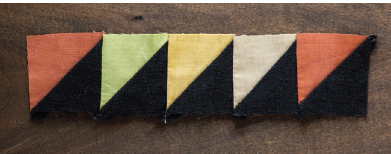
Sewing a row
6. Sew together the rows to form the quilt center.
7. Turn under the outer edges and press. Center the patchwork in the middle of the wool background and use a small whipstitch to attach it to the background.
WOOL APPLIQUÉ
Getting Started
Refer to How to Wool Appliqué as needed for additional details on these steps.
1. Cut out the wool appliqué pieces using the patterns.
2. Lay out the wool project to be sure you have all the pieces.
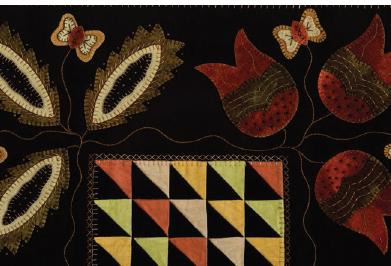
Detail of the wool appliqué
Making Your Project
Refer to Stitching Your Projects for details on the blanket stitch and embroidery stitches.
1. Using the blanket stitch, appliqué all the wool pieces to the background wool.
2. Add the embellishment stitches as desired.
3. Using a steam iron on the wool setting, press the finished piece on the wrong side.
4. Pin together the finished appliqué and the backing fabric.
5. Blanket stitch all the way around the outside edge.