Chapter 10
Ballet’s Tasmanian Devil: The Pirouette
In This Chapter
 Finding your spot
 Turning on one or two legs
 Traveling turns
 The Famous Fouetté
If there’s one movement that shouts “ballet” to the general public, it’s the pirouette. That’s the incredibly graceful controlled turn that makes a dancer seem to spin like a gyroscope.
If you’ve ever seen a movement like that during an Olympic figure skating event, you’ve probably wondered how anyone on earth could do it. Well, you’re about to find out. And you’re even going to try it yourself.
But wait, you’re no doubt thinking, with so much emphasis that you require italics. These people think that they’re going to show ballet newcomers how to do a pirouette in one chapter? Without a teacher? Are they NUTS?!?
Yes. But you knew that already.
It’s All in the Spot
The secret of any controlled turn is called the spot. This handy little technique allows ballet dancers to make any number of turns without getting dizzy.
Start by finding a special little spot that you can call your own. In your dance studio or living room, look for something at about eye level to concentrate on. It can be a smudge on a wall, a picture in a frame, your Uncle Ashley’s precious Ming vase, or even your own reflection in a mirror. That’s your spot.
Caution: Better move the vase.
Face your spot, with your feet in sixth position. Next, keeping your eyes on the spot, slowly turn your body around to the right, in a circle. But wait — although your body turns, your head keeps stationary — forcing you to look farther and farther over your left shoulder, Exorcist style.
At some point in your turn, something has to give. You can no longer keep your eyes on the spot — without doing some major damage, that is. At this moment, quickly turn your head around to the right, and find the spot again over your right shoulder. Now keep moving your body around to its starting point.
You have completed one spot. Try this a few more times, gradually increasing the pace. When you can spot fluently, you’re on your way to mastering the pirouette.
The Pre-Pirouette: Turning on Two Legs
We’ll be honest here: There’s no such thing as an easy pirouette. The moves in this chapter are among the most complicated in the book. And if you’re not careful, you can hurt yourself doing them.
.jpg)
For an introductory exercise, we hereby introduce the somewhat simpler Turn on Two Legs. Though this is easier than a one-legged pirouette, it presents one considerable challenge: using your stomach muscles to keep the upper and lower halves of your body moving as one.
The turn on two legs is known in French as soutenu en tournant en dedans (“soo-tuh-NUE ahn toor-NAHN ahn duh-DAHN”). Say that to any ballet dancer, and he’ll get that gleam in his eye that only ballet dancers get. Then he’ll dare you to do one.
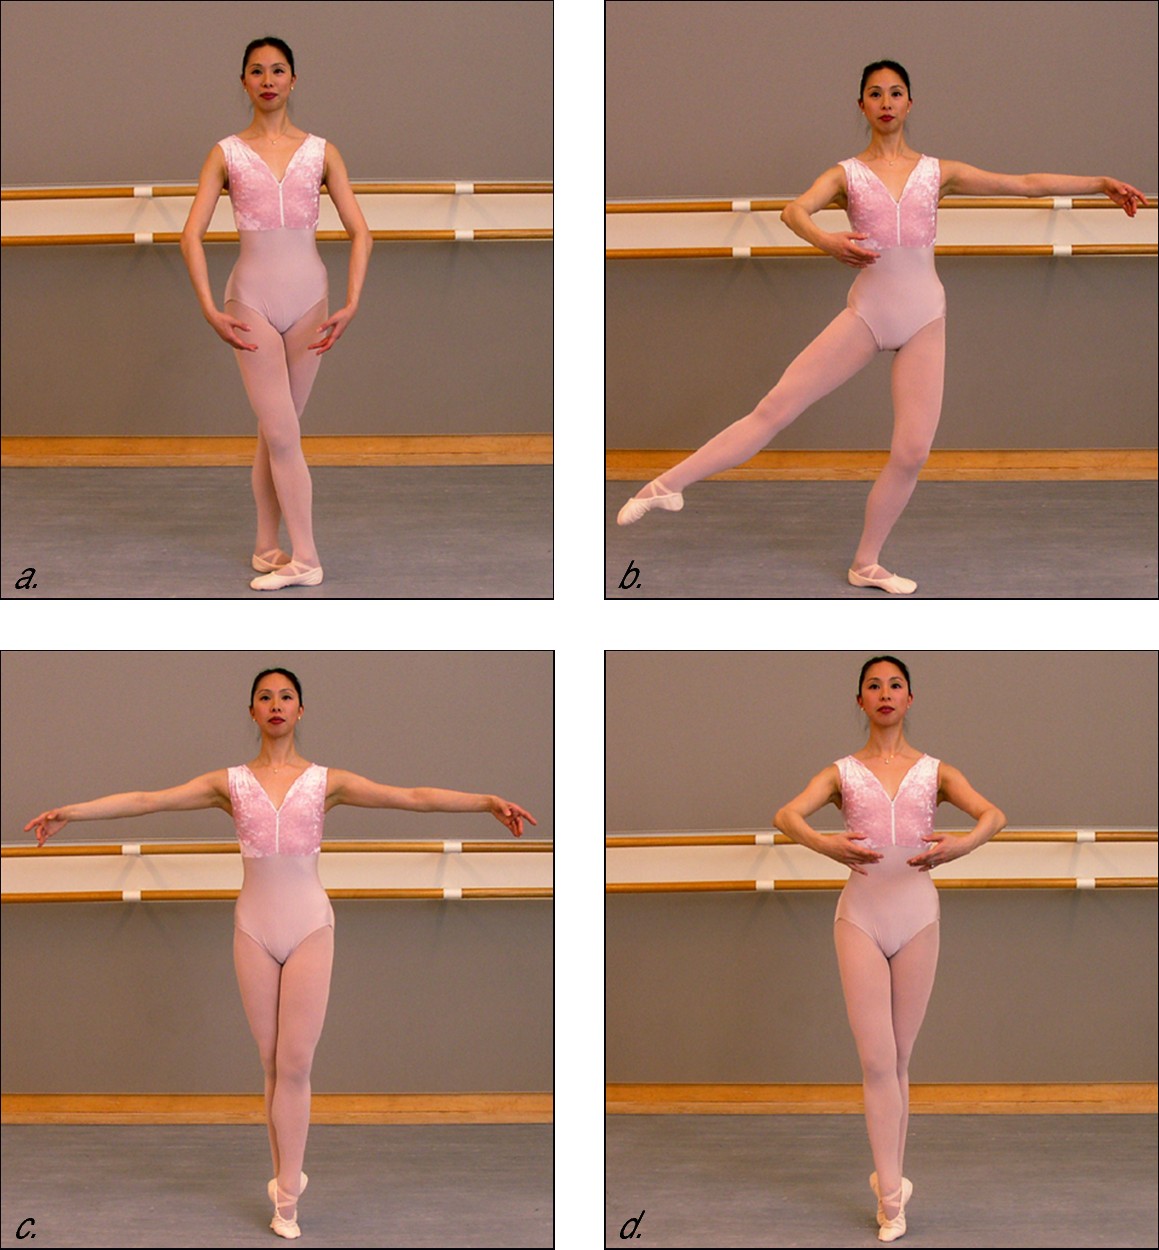
Begin facing D-1 (see Chapter 9 if you need help deciphering that Battleship -type reference), in fifth position with your right foot in front, your arms in low fifth position. Your knees are straight, with both heels on the ground (Figure 10-1a). Got it?
1. Move your arms forward, with your right arm in front, to low fourth position. At the same time, brush your right leg toward the side, as you do a demi-plié on your left leg (Figure 10-1b).
Chapter 6 tells you all about the demi-plié.
2. Push off your left leg and put all your weight on your right. Step onto the balls of your feet and cross your left leg in front to fifth position, as you open the arms into second position (Figure 10-1c).
3. Because your left foot is crossed in front of your right, there’s only one way you can turn — to the right. Make one full revolution on the balls of your feet, remembering to spot. At the same time, bring your arms together in middle fifth position. When you finish, your right foot should be in front (Figure 10-1d).
See the preceding section for more on spotting.
4. Now do a demi-plié in fifth position. To finish, take your arms to second position. Then straighten your knees to return to the starting position (Figure 10-1a).
|
Figure 10-1: The Pre-Pirouette: The starting position (a); the preparation for the turn (b); legs in fifth position (c); the position after the turn (d). |
|

Congratulations! Feel free to pause a moment to offer thanks for your first successful turn.
.jpg)
Start the music at the beginning, and wait until the harp finishes playing a long, showy, somewhat self-indulgent flourish (about one minute into the piece). Then listen as the orchestra starts anew with a quick “OOM-pah-pah” rhythm. Count this music in groups of four, where each entire “OOM-pah-pah” gets one count. (Chapter 5 tells you more about counting music for ballet.)
While listening to the first four OOM-pah-pahs, stay in position, but feel free to move your arms outward and back, to feel the beat. Then: Over the next counts 1 through 4, do steps 1 to 4 above, dancing one step on each count.

Repeat this step till you’re tired, dizzy, or facedown on the floor. Then, switch sides. Go back to the beginning position, but with the left foot in front — and do the whole thing to the left.
When done correctly, this exercise builds killer abs — and transforms your gluteus maximus into an impressive gluteus minimus.
Turning on One Leg

We thought you’d like to know.
Outward from fifth to fifth position
The first pirouettes in this chapter are known as pirouettes outward, or pirouette en dehors (“ahn duh-OR”). All English-speaking ballet dancers know this rhyme: “En dehors, open the door.” There’s a reason for that: One leg moves outward — opening a door, so to speak — at the beginning of the turn.
If that’s not enough, you may want to remember this: All en dehors turns go in the direction of the raised foot. If your right foot is in the air, turn to the right. If your left foot is in the air, turn to the left. It’s as simple as that.
Getting the “look”
When mastering any pirouette, all ballet students start by mastering the look of the turn. This means mastering all the leg and arm movements — without actually turning. They then graduate to a single turn, and, finally, to multiple turns.
Try following that sequence now: Begin facing D-1, in fifth position with your right foot in front. Hold your arms low and rounded.
1. Lift your arms through middle fifth position and open them to low fourth with your right arm forward, legs in demi-plié.
2. Go up on the ball of your left foot. Straighten your left knee as you lift your right leg into retiré. At the same time, bring your arms, rounded together, in front of you in middle fifth position.
See Chapter 6 for more information on retiré.
3. Close your right leg in fifth position in back, knees bent in demi-plié, and open your arms to the side in second position.
4. Straighten your legs and bring your arms down to the original low rounded position.
Now you are in the position you started in, with one exception — your left leg is in front. Perfect, in other words, for practicing this move to the other side.
Once around
After you master the “look” of the turn, you can try the turn itself. Don’t be intimidated — you’re simply doing exactly what you did before, with one added movement. OK — one really, REEEEEALLY BIG added movement.
.jpg)
If you’d like a little help in the support department, go back to the barre. Practice rising onto the ball of one foot (relevé) while turning yourself around at the barre with your arms. Try for a feeling of strength and solidity in the supporting leg.
Begin by facing D-1, in fifth position with your right foot in front. Your arms are in low fifth position.
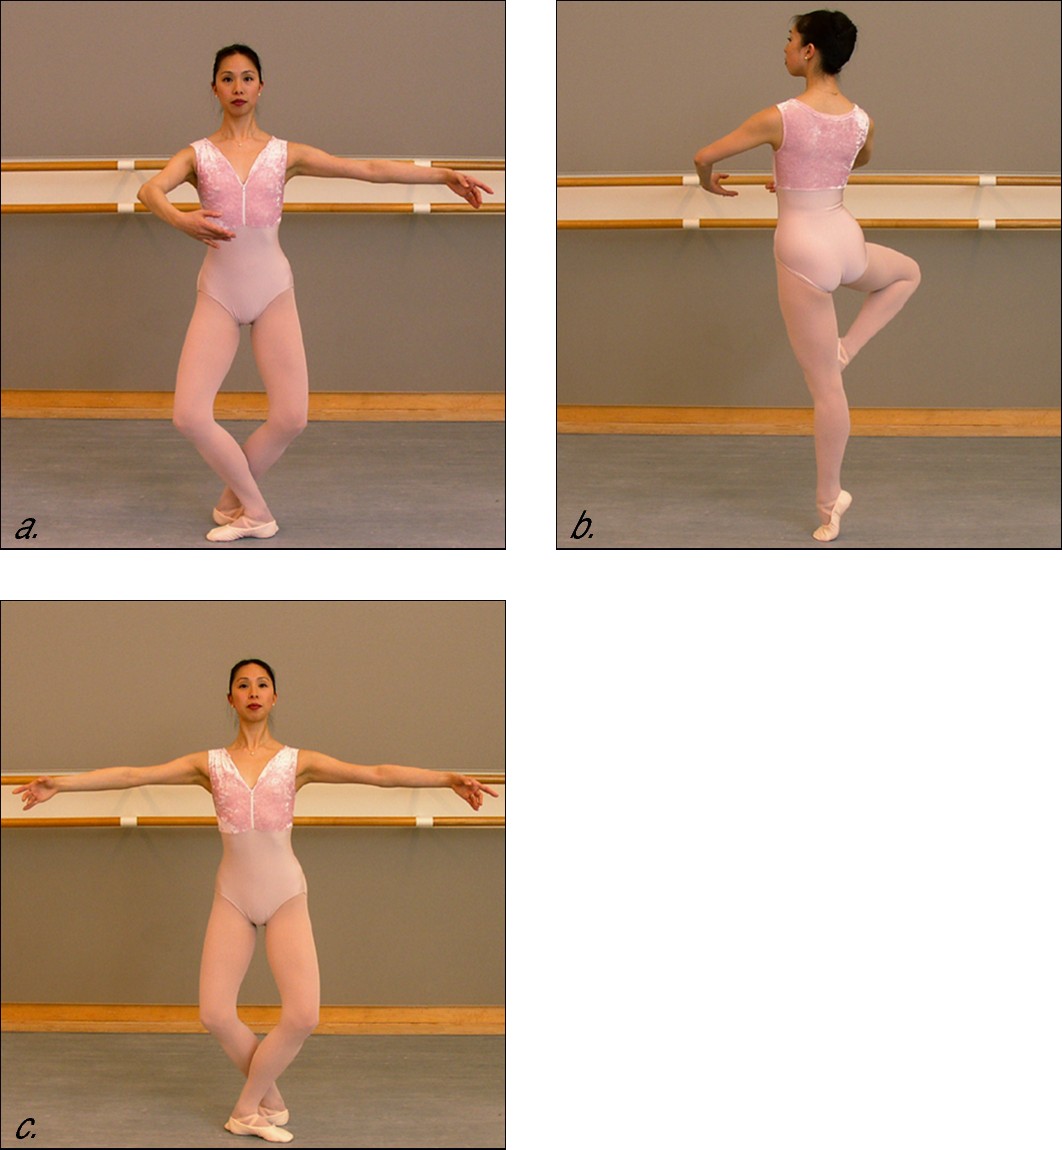
1. Bring your arms to low fourth position with your right arm forward, legs in demi-plié (Figure 10-2a).
This is the wind-up!
2. Push off (you’re heading to the right) and relevé on your left foot. When the left knee is straight, lift your right leg into retiré. As you close your left arm into middle fifth position, rotate to the right (Figure 10-2b), until you face front once again.
3. Close to fifth position with your right leg in back, in demi-plié, and open your arms to second position (Figure 10-2c).
4. Straighten your legs to finish.
.jpg)
|
Figure 10-2: The single pirouette: The prepa-ration (a); the turning position (b); the finishing position (c). |
|
The music to Tchaikovsky’s Suite no. 3, fourth movement (“Tema con variazioni”), is perfect for this exercise. But if you can’t find it, you can use any music in a steady, moderate tempo and a very steady beat — say, a little slower than one beat per second.
By the way, the first note of Tchaikovsky’s music, played by violins, is the pickup to the beat. The next note is beat 1. You count this music in groups of four beats, with each beat lasting a little longer than one full second. (“And-ONE -and-TWO-and-THREE-and-FOUR,” and so on.)
Over the next counts 1 through 4, do steps 1 to 4 above, dancing one step on each count. As always, don’t forget to spot!
After you have mastered this exercise, try doing it four times in a row. (On step 3, the first three times, close your right leg in front. The fourth time, close the right leg in back in demi-plié. )
Now repeat the whole exercise to the left!
Outward from fourth to fifth position
The pirouette described in the preceding section may be the simplest of all pirouettes, but the next one is the most common . What’s the difference? Well, in this one you take off from a different position — fourth instead of fifth.
When you take off in fourth position, you suddenly have much more force available to generate the turn. That makes the turn more spectacular. Anytime you see a dancer showing off, spinning around and around, chances are he or she started in fourth position.
.jpg)
.jpg)
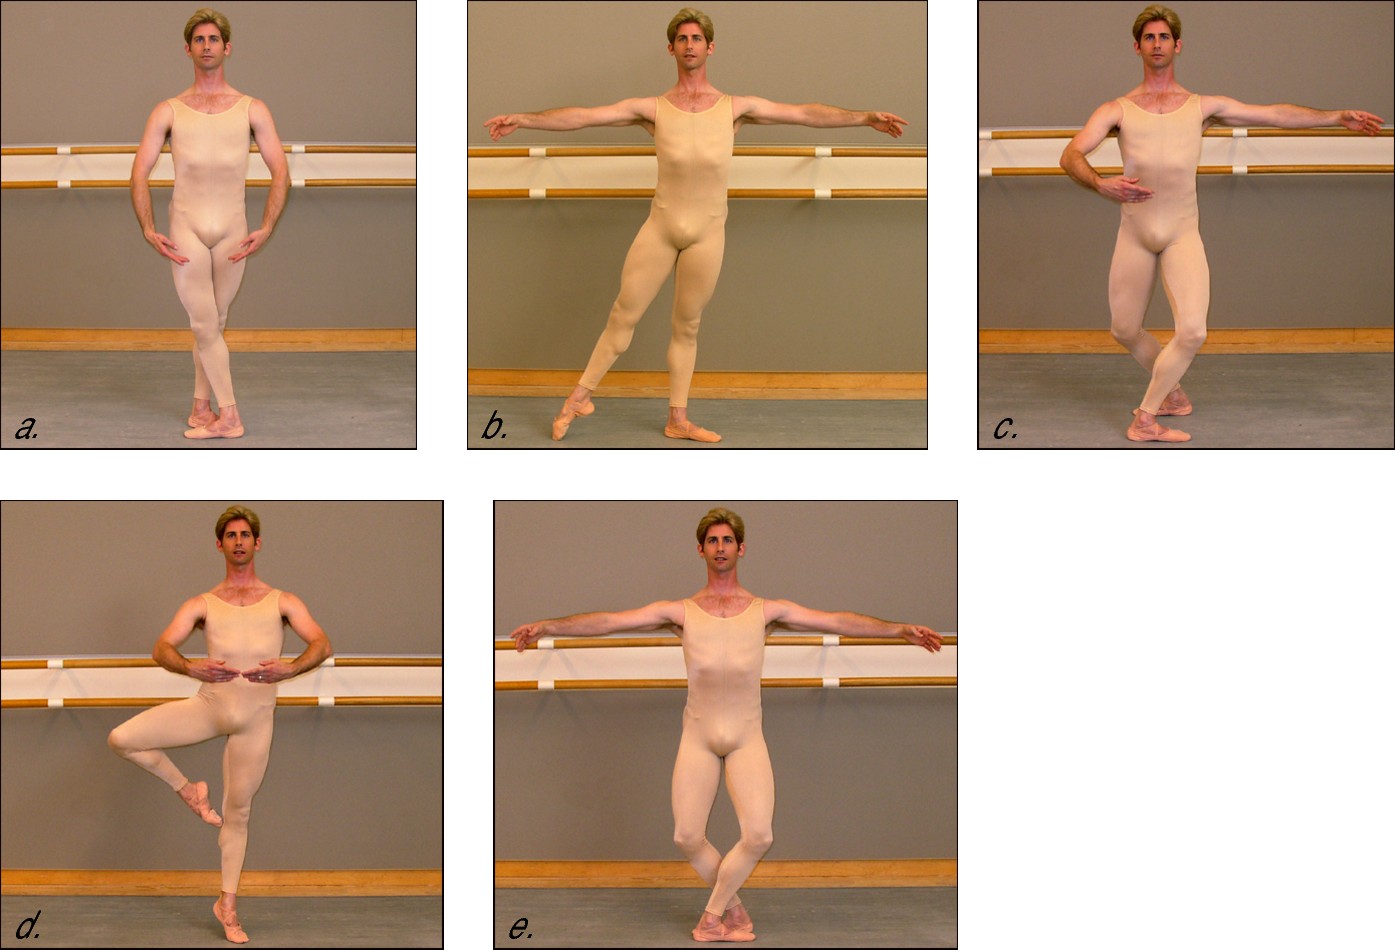
Begin in fifth position, with your right foot in front, arms in low fifth position (Figure 10-3a).
1. Point your right foot to the right side (battement tendu) with a straight knee. Meanwhile, bring your arms through middle fifth position and open them out to second (Figure 10-3b).
2. Now for the windup: Bring your right leg back, foot pointed (demi rond de jambe), and do a demi-plié in fourth position. Meanwhile, your left arm stays to the side, and your right arm is rounded in front of you, in fourth position (Figure 10-3c).
3. Push off the right leg and bring it up into retiré. Meanwhile, do a relevé on the left foot, left knee straight, and rotate to the right. As you turn, bring your arms together in middle fifth position, to help you get all the way around (Figure 10-3d).

Don’t forget to spot!
4. Close to fifth position with your right foot in back, in demi-plié, and open your arms to second position (Figure 10-3e).
|
Figure 10-3: The fourth-to-fifth-position pirouette: The starting position (a); battement tendu to the side (b); the wind-up (c); the position in the turn (d); the big finish (e). |
|
.jpg)
The music begins with four heavy beats. Then the main theme begins — and this is where you begin to count and dance. For this music, count to 4, where each beat lasts about one second.
On each count, do one step above. (The entire preparation and turn takes four counts.) Now repeat the turn to the other side.
Multiple pirouettes
In principle, multiple pirouettes are just as easy to grasp as single pirouettes. After a professional dancer completes a full revolution, he doesn’t stop — he just keeps spinning as long as he can.
But we don’t recommend that you attempt multiple pirouettes at this stage of your development. They’re very, very difficult to do. Even professionals differ in their spinning aptitude. Some can do triples or more; others are content to do a good double turn. So don’t try the multiple pirouette yet. We like you too much.
Inward from fourth to fifth position
If you like the pirouette outward, you are going to love the pirouette inward (pirouette en dedans — “ahn duh-DAHN”).
If you’ve read the preceding section, you may remember that for outward turns, you always turn in the direction of the raised foot: “En dehors, open the door.” Well, for inward turns, you turn as if you are closing the same door — toward the standing leg.
But be warned: This move is a little trickier. When turning inward, it’s a little harder to maintain that all-important “turned-out” leg position that is the basis of all ballet.

As in other turns, you should start with the “look” of the turn. After you feel comfortable, add the turn itself.
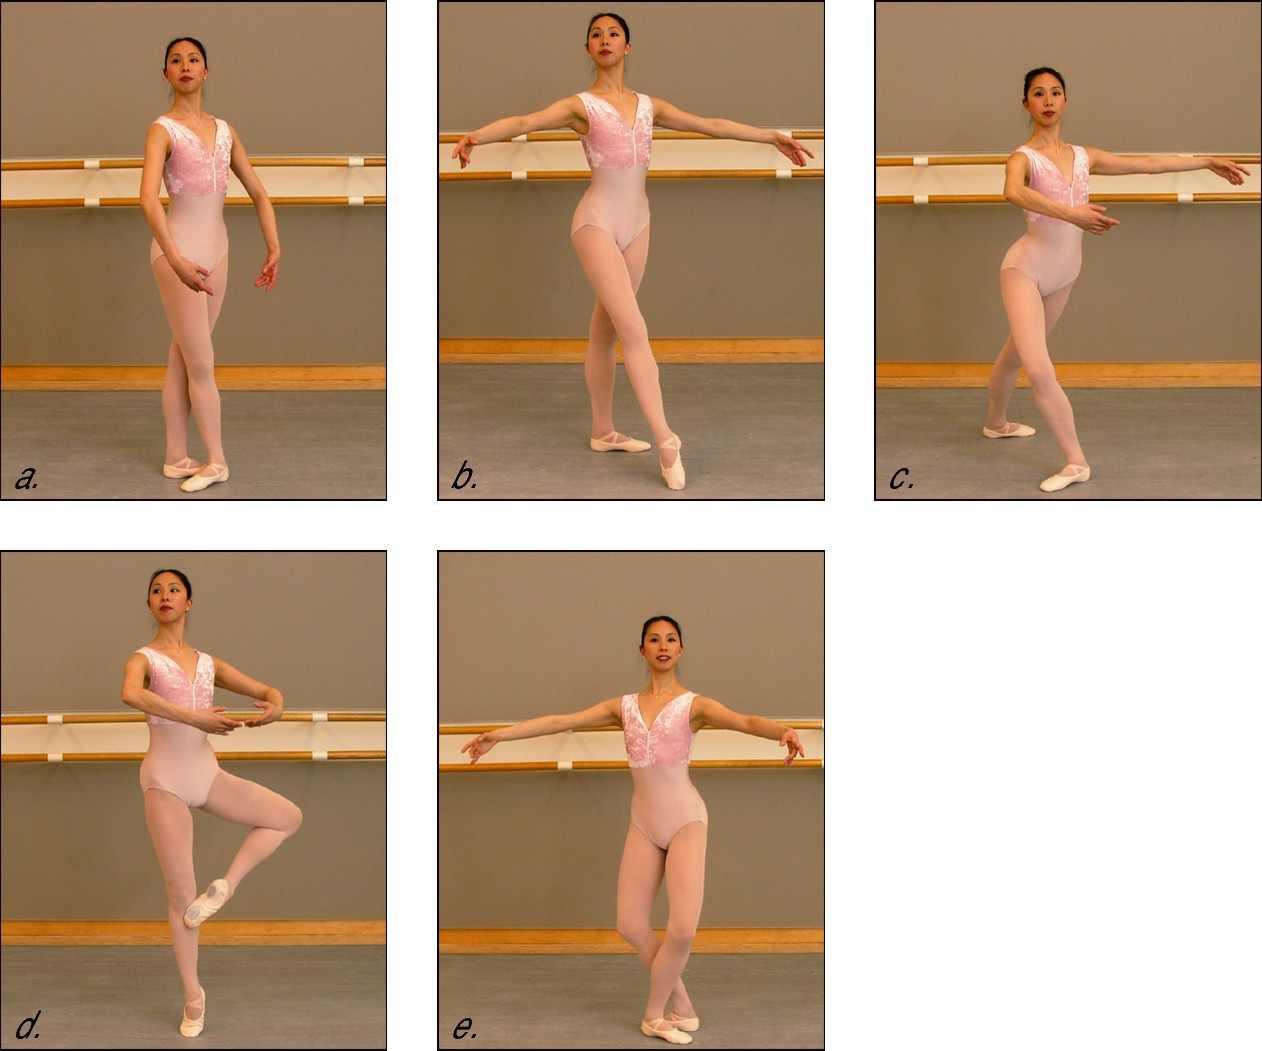
Begin facing D-8, in fifth position with your right foot in front, arms in low fifth position (Figure 10-4a).
1. Point your right foot forward to D-8 (tendu croisé) with a straight knee. Meanwhile, bring your arms through the middle and open them to second position (Figure 10-4b).
2. Lower your right heel and bend your right knee, in fourth position (demi-plié). Meanwhile, bring your right arm to the front. Your left arm remains to the side in fourth position (Figure 10-4c).
3. Quickly rise to the ball of your right foot, with your right knee straight. As you do, bring up your left leg in retiré. Meanwhile, bring your left arm in to meet the right in a rounded middle fifth position (Figure 10-4d), as you turn.
Because you’re turning to the right, look at your right foot in the preparation position and turn in the direction it is pointing.

Don’t forget to spot!
4. After one turn, close your left leg in front in fifth position, facing D-2 (croisé). Do a demi-plié to absorb any extra force, and bring your arms to second position to help you to stop (Figure 10-4e).
5. Straighten your knees to finish.
“That was a pirouette en dedans,” you can triumphantly proclaim to your party guests.
Did you notice — your feet are now in exactly the opposite position from the start. You know what that means — you are ready to repeat the turn to the left. Go for it!

|
Figure 10-4: Pirouette en dedans: The starting position (a); pointing the right foot forward (b); the fourth position preparation (c); the turning position (d); the finish (e). |
|
.jpg)
Over counts 1 through 4, do Steps 1 to 4 — one step on each count of the music. Over the next counts 1 through 4, repeat this exercise to the other side.
As you see, you can constantly alternate sides as you repeat this move: right, left, right, left.
Traveling Turns
Almost anyone can do traveling turns. What makes them different from all the other turns we mention in this chapter is that they involve traveling across the floor — on purpose, that is.
On one leg
With the traveling turn on one leg, you can cover a lot of space in a short period of time — impressing your friends, neighbors, and anyone who may be looking in the window. The traveling turn on one leg is known in French as the tour en dedans piqué (“TOOR ahn duh-DAHN pee-KAY”), or simply piqué turn for short.


Often these turns are combined with other kinds of turns, and performed at a dazzling pace, driving the audience wild. Afterwards, the dancer often freezes for a moment in a graceful pose. After the bravos have started, she takes center stage to bow, with great humility. (She’s lovin’ every minute.)
In ballet, not every move gets performed by both men and women. Some were invented strictly for one gender or the other. Though our male readers are welcome to try our piqué turns, we should point out that you almost never see men piqué -ing away in performance.

Start facing D-1, in fifth position facing front (en face), arms in low fifth position.
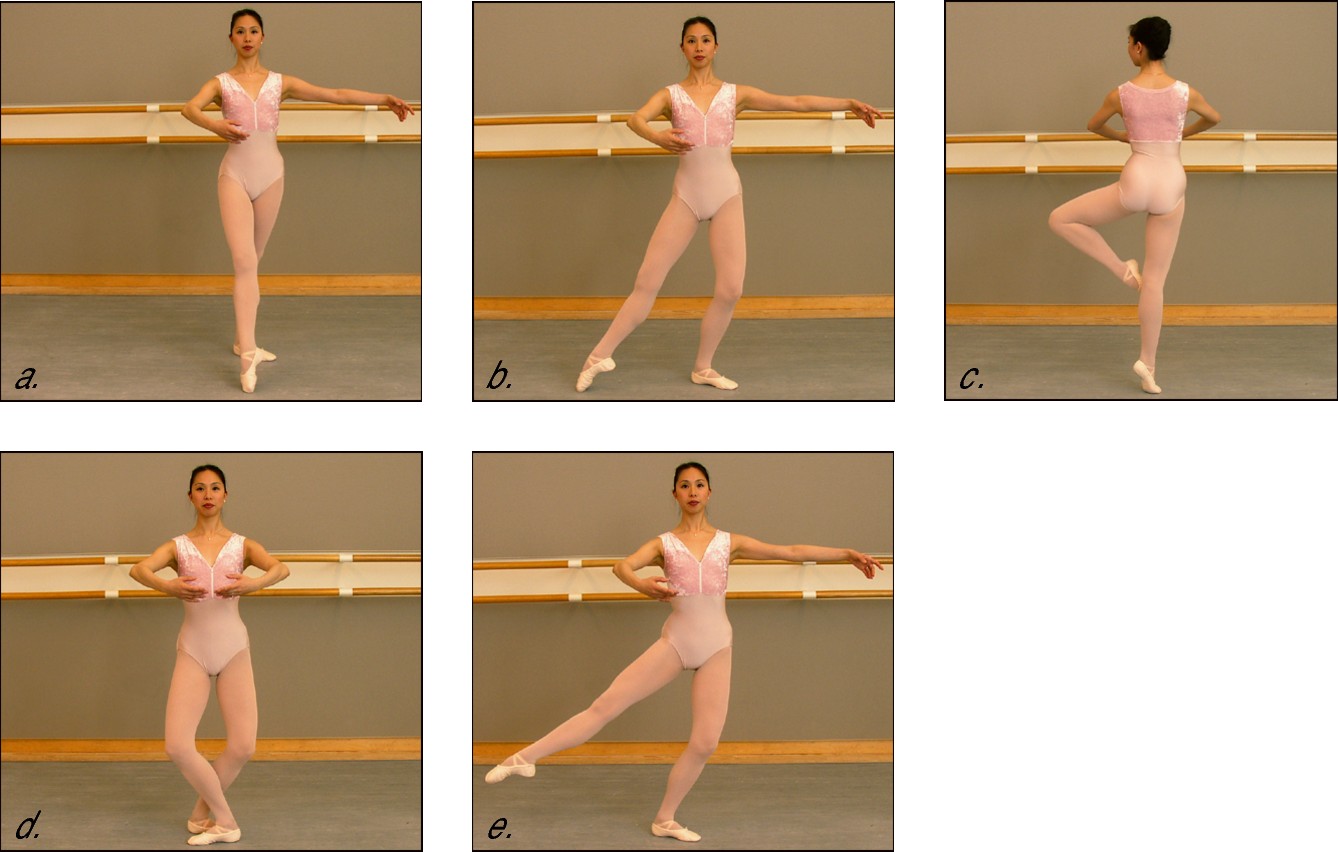
1. Extend your right leg forward, pointing your right foot (tendu); lift your arms through the middle to low fourth position — your left arm opens to the side, while your right arm rounds in front of your stomach (Figure 10-5a).
2. With your right leg, draw a quarter circle on the floor from the front to the side (demi rond de jambe), and bend your left knee (demi-plié). Your arms stay in low fourth position (Figure 10-5b).
3. Push off your left leg and step onto the ball of your right foot (demi pointe), with your right knee straight. Meanwhile, bring your left leg into retiré back. Keep your arms rounded in front of you (Figure 10-5c).
This, by the way, is your “piqué turn” position. Later you actually make the turn at this point. But for now, try to balance there for at least a second, to get the feeling of a sustained pose. Imagine turning in this position. Thrilling, isn’t it?
4. When you are ready to come down — or if gravity is ready for you — bring your left leg down behind your right into a fifth position demi-plié. (Figure 10-5d).
5. Now, to prepare to repeat the move, brush your right leg to the side (dégagé), simultaneously returning your arms to low fourth position (Figure 10-5e).
You are now ready for the next piqué . Note that this move (beginning with step 3) is repeated the exact same way until you reach the opposite corner.
We suggest that you try this move several times across the floor to the right — and then repeat it to the left — before trying to add the turn.
.jpg)
|
Figure 10-5: Tour en dedans piqué: right leg battement tendu to the front (a); right leg battement tendu to the side, ready for push-off (b); the turning position (c); the finish of the turn (d); preparing to repeat the turn (e). |
|


To practice this kind of traveling turn, pick some music with a beat you can hear clearly — almost any pas de deux would work beautifully. (For instance, you could use the “Wedding” pas de deux from the ballet Don Quixote. ) Now repeat this step from one side of the room to the other.
On two legs
If you’ve watched any ballet at all, chances are you have seen repeated turns on two legs (tours chaînés déboulés — “TOOR sheh-NAY day-boo-LAY”). They make quite an impression — especially fast! But when broken down, they are really only a succession of simple half-turns. Each one is lovely, but when connected together, they resemble a string of pearls.

1. Begin with your heels together, feet pointed outward in first position. Your arms are low and rounded just in front of your thighs, in low fifth position.
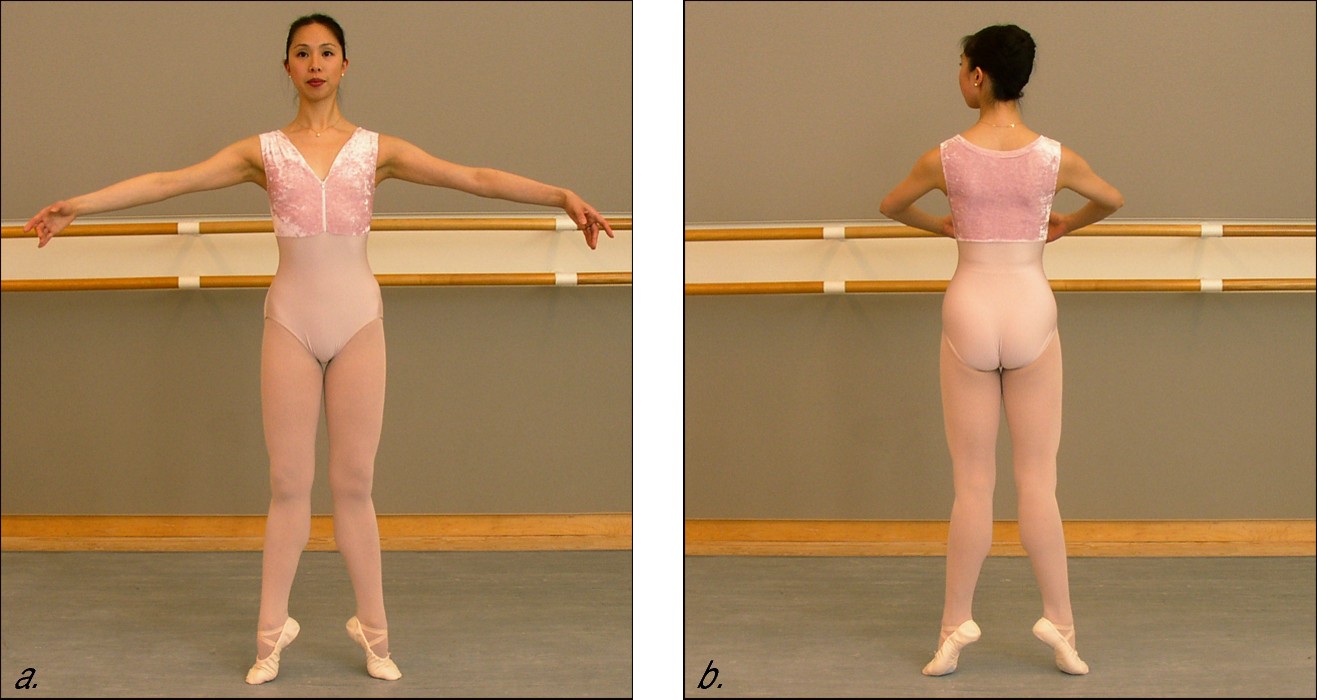
2. Rise to the balls of your feet, keeping your knees straight and ankles strong, with your weight in the middle of your feet (first position rélevé). Lift your arms through middle fifth position into second position (Figure 10-6a).
3. Close your arms into the rounded middle-fifth position in front of your body. This gives you the force to lift your left leg slightly off the floor and rotate to the right, halfway around. Keep your feet in first position, with your knees straight (Figure 10-6b).
Now you’re facing the back wall.
4. Open your arms to the side, into second position, while lifting your right leg off the ground ever so slightly. Rotate to your right, coming around to the front again in first position, as in Figure 10-6a.
|
Figure 10-6: Chaîné déboulé: The position facing front (a); halfway around the turn (b). |
|
.jpg)
In the Just for Fun Department
Okay, you’ve discovered how to do multiple turns on one leg — and multiple turns on two legs. Now, why not combine ‘em? Ballet dancers and choreographers do this all the time, and so can you.
Try doing four piqué turns, followed by four chaîné turns. (Poked and chained. And they say ballet is non-violent.)
Now try the opposite: Four chaîné turns, followed by four piqué turns.
With a little imagination, you can create your own combinations. Mix and match — keeping the flow of movement going. You’re on your way to great choreography.
Repeat this as many times as you can, until you run out of room or fall over in a pearllike heap. Then try it to the left.


A two-legged traveling turn combination
Here’s an exercise for practicing your traveling turns on two legs (tours chaînés déboulés ). For music, we suggest the “Four Little Swans” from Tchaikovsky’s Swan Lake. Count this music in groups of four. (This music has an “OOM-pah, OOM-pah” sound, and each “OOM” gets a new count.)
1. Start in the D-6 corner with your right foot front, in fifth position, with your body facing D-8 (croisé). Your arms are in low fifth position.
2. On the first four counts, prepare to turn. Point your right foot, knee straight, toward D-8 (tendú croisé). Bring your arms through middle fifth position into low fourth position, with your right arm rounded in front.
3. On the fourth count of this preparation, do a demi-plié on your left leg.
4. Over counts 1 and 2, push off your left leg and transfer your weight to the right on demi pointe. As you do, bring your left foot in to meet your right in first position, while making a half turn and bringing your arms to middle fifth position.
You should now be facing D-5.
5. On count 3, continue to turn half a revolution to your right, until you are facing D-1. As you turn, open your arms to second position.
6. On count 4, continue turning to the right until you are facing D-5, with your arms in middle fifth position and your legs in first position.
Now keep repeating Steps 4, 5, and 6. Depending on your level of ability or your mood, you can alternate between steps as quickly or as slowly as you like. For example, you can start by taking one turn for every four counts. As you get more confident, try one turn for every two counts. And finally, when you’ve really mastered the motion, do one turn on each count.
7. Now for the big finish. Slide your right leg through a fourth position demi-plié, facing D-2. Your left leg is back in battement tendú arrière as you straighten your right knee and transfer your weight to your right foot. Meanwhile, bring your arms from middle fifth position to high fourth position with your left arm up, and try to combat your dizziness.
Whipping It Up: The Famous Fouetté
The incomparable, jaw-dropping, eye-popping, heart-stopping, floor-mopping turn, the fouetté en tournant, is known to the entire ballet world simply as fouetté (“foo-et-TAY”).
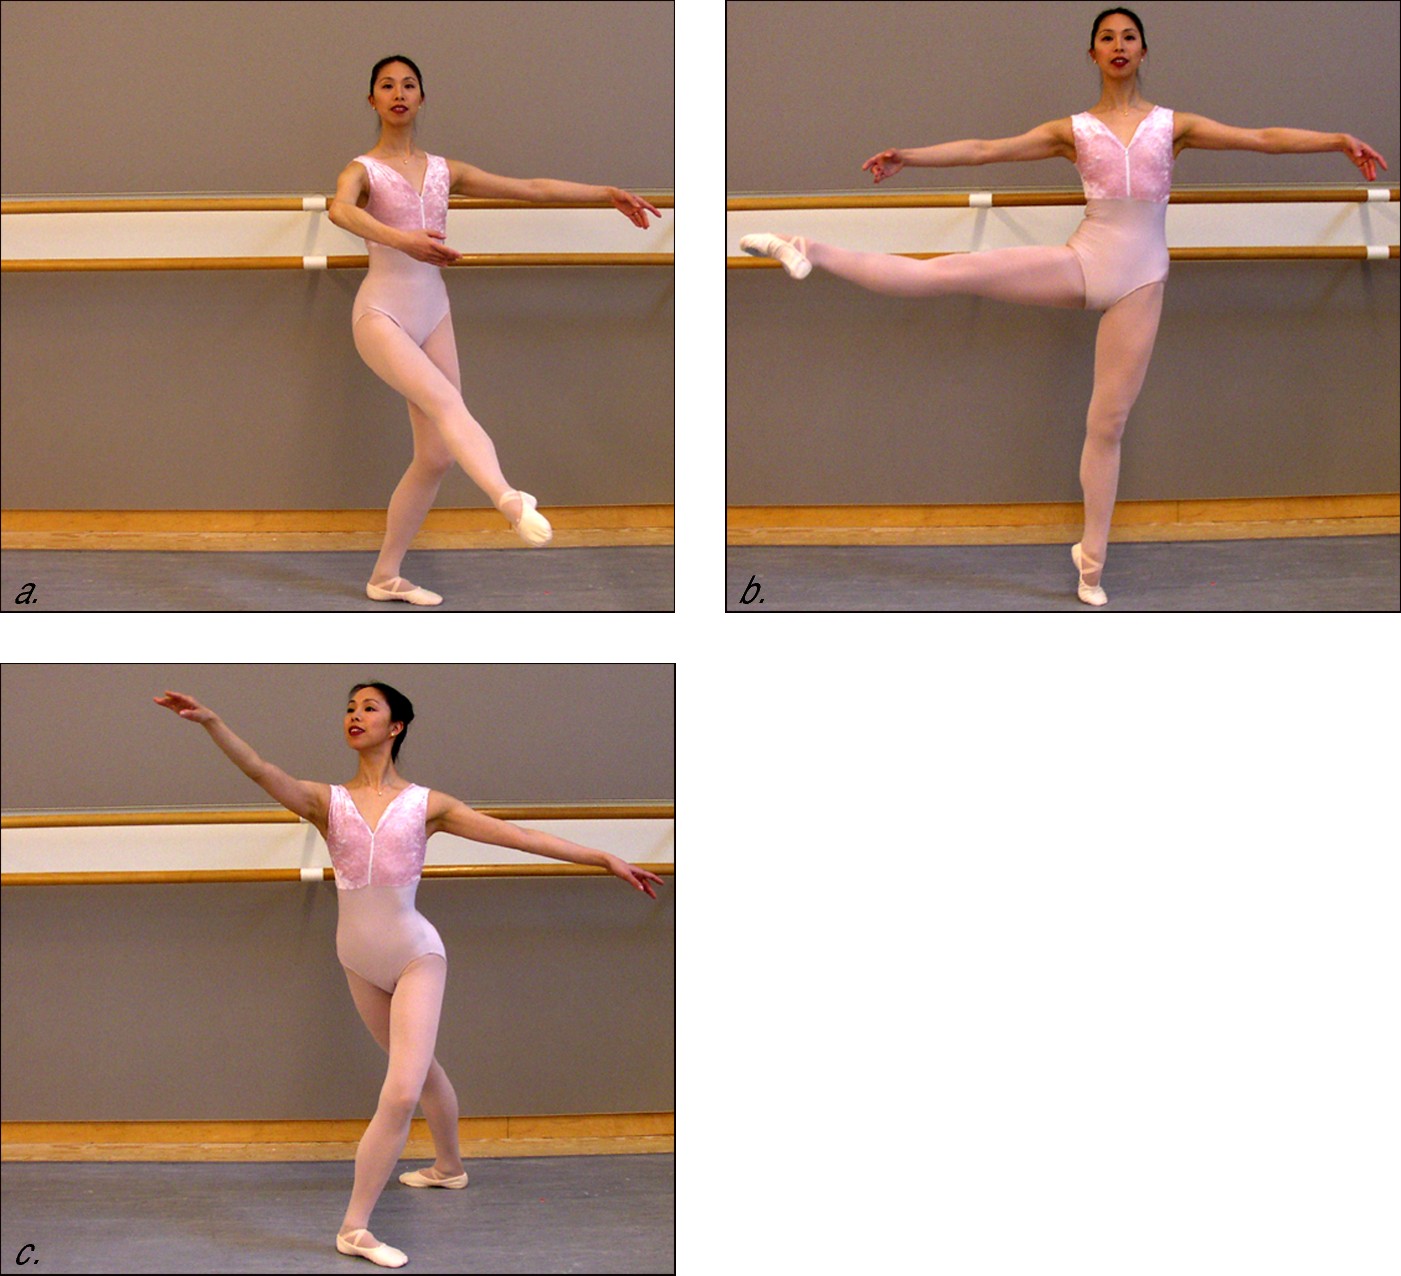
Literally, fouetté means “whipped.” As the ballerina executes multiple turns on one leg, she raises and lowers herself on that leg (the very same relevé you can read about in Chapter 6), while simultaneously whipping the other leg around and around (see Figure 10-7). Whip! Whip! If you stand anywhere in the general vicinity of a fouetté -ing ballerina, you can feel the change in air pressure every time that lethal gam whooshes by.

|
Figure 10-7: The Famous Fouetté (a and b), and the big finish (c). |
|
In fact, this move is such a staple of the classical ballet repertoire that today, most ballerinas must be able to complete 32 good fouettés — or else have something equally amazing to offer — before being considered for a role with a major dance company.
To make matters just a little more interesting, this most challenging of steps is usually performed toward the very end of a ballet — say, in Act III — when the ballerina is already tired out from a long evening of dancing. Therefore, the showiest ballerinas never fail to demonstrate their superhuman stamina by throwing in a few double or triple turns — just because they can.
By the way, the fouetté is primarily the province of females. But men sometimes integrate one or two into their grand pirouette turns in second position, during the coda — just because they can.
The practice of pirouettes is a years-long endeavor — but one that offers some of the most gratifying rewards in ballet. May your revolutions never end.