Let’s go on a group photoshoot! First and foremost, it’s important to establish a good rapport with your subjects and create a relaxed and fun environment. Having that foundation will set you up for success. Below are my top tips for creating group portraits of which you can be proud. You can apply these ideas to taking photos of your own family and friends, as well as sessions with clients.
Your demeanor will help you get the best results, make for happy clients and make for future jobs. When I arrive at a location with a client, especially when it is in her home, I assess her expectations. What are her ideas for locations? Are there any special sentimental places on the property where she would like some shots taken? Does she prefer posed shots, candids or both? Some of these questions can be answered ahead of time on the phone, in person at a consult or via e-mail. At the photo session, I fulfill their wishes while at the same time showing confidence and control of the situation when constructing poses, making determinations based on available light, adjusting my camera, weaving my own ideas in with their expectations, etc. I have a few tricks up my sleeve for making folks feel relaxed and comfortable, and some incentive ideas for kids who are less than enthusiastic.
It’s important that your subjects’ clothing not be mismatched or distracting. I suggest to my clients that they wear neutral colors that go together, like gray, burgundy and blue denim. If they prefer more juicy colors, I request that they wear no more than three colors amongst them. The best trick is to pick one or two neutral colors as a base, like white, black, brown or gray. Then add one to two colors in addition to that. Let’s say a client chooses white as a base and yellow and blue. The yellows and blues don’t have to be exactly the same tones to work together. If you are looking for pleasing color palettes, you can find them online at Design-Seeds.com.
Location will make or break your shots. Make sure that your setting does not have extraneous elements in the way. I’ve been known to move furniture and clear large fallen branches from the background. Your setting does not necessarily have to be stark, as aspects of the environment can weave very nicely into compositions. For instance, if a family lives on a farm surrounded by a stone wall, take some stone wall shots. Or maybe get creative and pose the family around an antique heirloom tractor. Other possible locations can be gardens, public parks, city streets, the beach, indoors with natural light or an indoor portrait studio if you have the proper equipment.
Look for light that will be evenly exposed on all group members’ faces. Stay away from shadows and heavy contrasts. Overcast days and the rich light of late afternoon are ideal and provide even lighting. There is always the shade of a tree on a bright day.
Shooting indoor group portraits is no fun in my opinion, as it is usually a struggle to get even lighting on all of your subjects, unless you’re in a studio. Try placing clients near a north-facing window, not in direct light. To brighten shadows indoors use either a reflector, a fill flash or bounce flash. You can bounce the flash off a low white ceiling, white wall or a reflector.
If you are composing a posed group shot, you’ll want to make sure that the subjects’ heads are at different levels. In general, stay away from one single row. Visibility of all subjects is key, whether you are taking a posed shot or candid. Make sure you can see everyone’s face in the composition. Also make sure there is not too much space in between subjects; think tight but not squished.
I recommend using either the Cloudy or Shade white balance settings if shooting beneath overcast skies or in the shade, as either will warm your photos up. If you can’t avoid shadowy areas outdoors, you can use reflectors or fill flash to illuminate these darker spots. If using a dedicated flash to create more overall light, consider keeping the unit on or close to the camera for group shots. If you place the flash too close to a group in a tiered pose, the person closest to you will get the most light, making for uneven exposure.
Rather than list a few ideas on poses and perspective, I’d like to share my go-to posing app called Posing App. This app gives tips and tricks and posing ideas for children, women, men, couples, groups, weddings and glamour shots. They make updates that include more posing ideas.
This would be a very handy tool to take with you on your next group photo session. Clients can suggest poses to try from the app, you can suggest them, and you will all have the visual to refer to when setting up the pose. This can also lighten the mood and relax clients, as you can joke about some of the poses that don’t quite fit the situation. Check out the app and you’ll see what I mean. Tip: For folks with double chins, have them raise their chins a tad to make it less obvious. If they ask why, explain it gives adults a more flattering look.
For a group shot use anywhere between f/8 and f/11. These aperture settings will ensure that all members of the group are clear and in focus. If you decide to use a wider aperture, you’ll have to move farther away from your subjects or zoom out to ensure everyone is in focus. Do some test shots to check focus.
If you’re shooting in P mode, you can indirectly manipulate aperture by increasing or decreasing shutter speed with the program shift feature. To obtain a smaller aperture, just decrease the shutter speed by simply turning the dial on the top of your DSLR to the left. For a wider aperture, increase shutter speed by turning it to the right.
Dial in your aperture setting in Aperture Priority mode or Manual mode and choose an ISO speed appropriate for the ambient light. In Aperture Priority mode, your camera will generate a shutter speed based on your selections. In Manual mode, you dial in a shutter speed that brings the digital marker on the light meter to center. You’ll want to keep an eye on shutter speed in either case, especially in low light.
This is an acceptable shutter speed range for group portraits. As slow as 1⁄60 sec. can work for portraits where everyone is still. If you want to be on the safe side and if your subjects are relatively still, 1⁄125 sec. to 1⁄250 sec. will ensure sharpness.
If you have wiggly children in the mix, go with 1⁄250 sec. or a bit faster. If you are in a low-light situation, you can increase ISO or widen the aperture, or do a combination of the two, to obtain the faster shutter speeds, but try not to go any wider than f/8 for group shots, unless you plan on standing farther away or zooming out. Flash is always an option.
In P mode, you can increase shutter speed by using your camera’s program shift feature—just flip the dial to the right. If the aperture gets too wide for a group shot, you can indirectly make it smaller by selecting a higher ISO.
I personally think it’s a lot easier to go into Aperture Priority mode and lock down the aperture you want. If the shutter speed slows too much, increase ISO for a faster speed. Of course shooting in Manual mode is another option. Just enter an ideal aperture for group portraits, anywhere from f/8 to f/11, and dial in an acceptable shutter speed and ISO combination to yield a standard exposure. Swap stops if necessary.
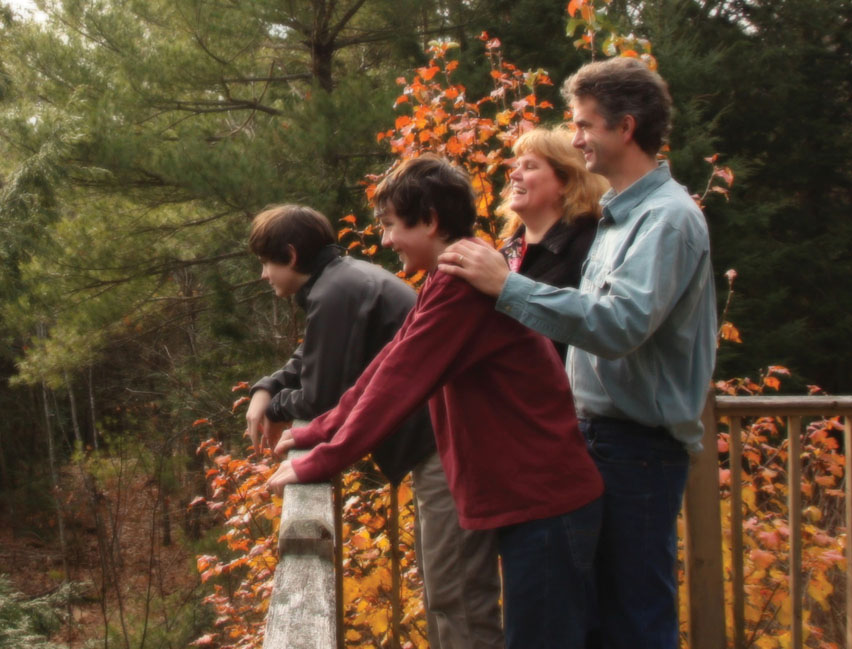
Creative Posing/Less Formal - This family’s home sits on top of a hill with an incredible vista. I did a less formal, more relaxed profile shot of them looking out onto this natural treasure, something which I’m sure they have done many times in their lives. It was a privilege to capture this image, a photograph for remembrance. 15–85mm f/3.5–5.6 lens at 17mm, ISO 200, f/8 for 1⁄125 sec.
A general rule of thumb is to focus on the eyes of the person closest to you. I am a huge fan of autofocus, as it tends to produce more reliable results than manual focus.
Take at least three shots in a row, instead of one. This way you have choices for each shot and can pick the ones sans blinking, coughing, sneezing, turning away, etc. If you are using a tripod with the camera’s internal timer, because you yourself are going to jump into the pose, make sure to set it to Continuous Shooting mode (at least three shots in a row).
Or a bit lower as you compose the shot. This keeps body parts looking well proportioned.
Do a quick look-over of the group, making sure folks are looking at the camera, smiling, posed to perfection. Make sure the scene doesn’t have any distracting elements and the background is clean. Check to make sure there are no mergers like a big sunflower behind someone’s head. You can give a verbal cue if you want to, such as counting to three, so people can scratch their noses before you press the shutter, but whatever you do, don’t ask them to say cheese! unless you’re looking for a bunch of unnatural, forced smiles.
Eyeglasses are always a challenge, as you have to carefully compose the shot to avoid glare on the person’s lenses. Usually all it takes is a simple slight turn of the person’s head, so the light source is no longer reflecting off their glasses. Just be aware of this, as plenty of great shots can be ruined by eyeglass glare.

Silly Shot - This is a rare case where the eyeglass glare adds to the flavor of this silly posed shot. 15–85mm f/3.5–5.6 lens at 38mm, ISO 400, f/8 for 1⁄160 sec.
I am a bit of a goof and definitely lighthearted. These personality traits come in handy when helping my subjects to relax and trust in me. Find things to compliment your clients about, show interest in them without prying, even joke around. Of course, everyone has a different comfort zone, so you’ll need to adjust accordingly. If they’re not the talkative type, you can always tell them about what you are doing, technically speaking, to take their photographs. Stay relaxed and low-key yourself, and enjoy.
Use the prize bag with kids! It contains small rewards like balls, bubbles, trinkets, stickers, puzzles, fun dollar-store stuff. Beware of giving chokeables to babies. To make the babies smile, coo and giggle, or get a little snuggly character to attach to your lens.
You might also want to try doing some informal candids of the family engaging in something they love, making for more natural, authentic photographs that are a nice alternative to traditional poses. Continuous Focus mode is preferable. Use a shutter speed of at least 1⁄250 sec. to freeze motion and 1⁄500 sec. for faster action.
Throw in some fun, creative shots. Have at least one silly posed shot where everyone gets to strike their most ridiculous pose or expression. Kids love to do this, and you can use it as an incentive. Making a silly shot will refresh and energize everyone for the rest of the photoshoot, as well as relax subjects and make the subsequent photos more natural.
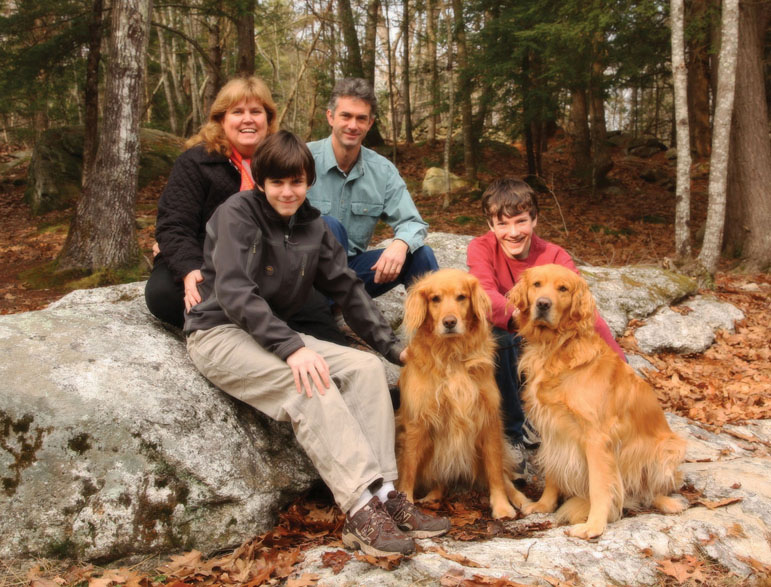
Focus on the Closest Eyes- The natural rock outcropping made it easy for the family members to position themselves on different levels. I focused on the eyes of the boy closest to me. The dogs were on a hidden leash, waiting for me to give them a treat from my pocket. That trick works with pets every time. 15–85mm f/3.5–5.6 lens at 26mm, ISO 400, f/8 for 1⁄160 sec.
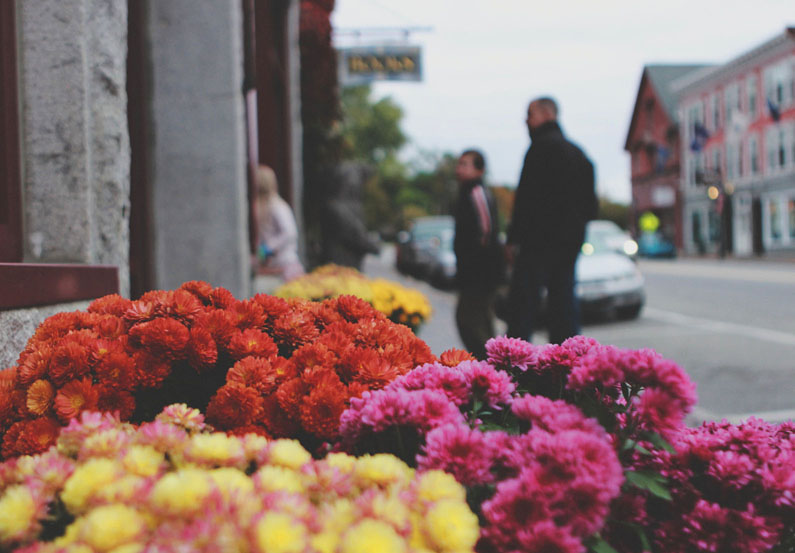
Group Shot/Selective Focus- When I’m out with my family on a day trip, I look for opportunities to take candids that are a bit out of the ordinary. In this shot, selective focus was an option and I chose the unexpected by focusing on a portion of the mums in the foreground, which served to creatively blur a part of the foreground as well as my family in the background. A very wide aperture played a crucial part in yielding this result. The overcast sky enabled me to capture the rich color of the mums, which adds pizazz to an otherwise gray autumnal photo. 24–70mm f/2.8 lens at 27mm, ISO 200, f/2.8 for 1⁄250 sec.
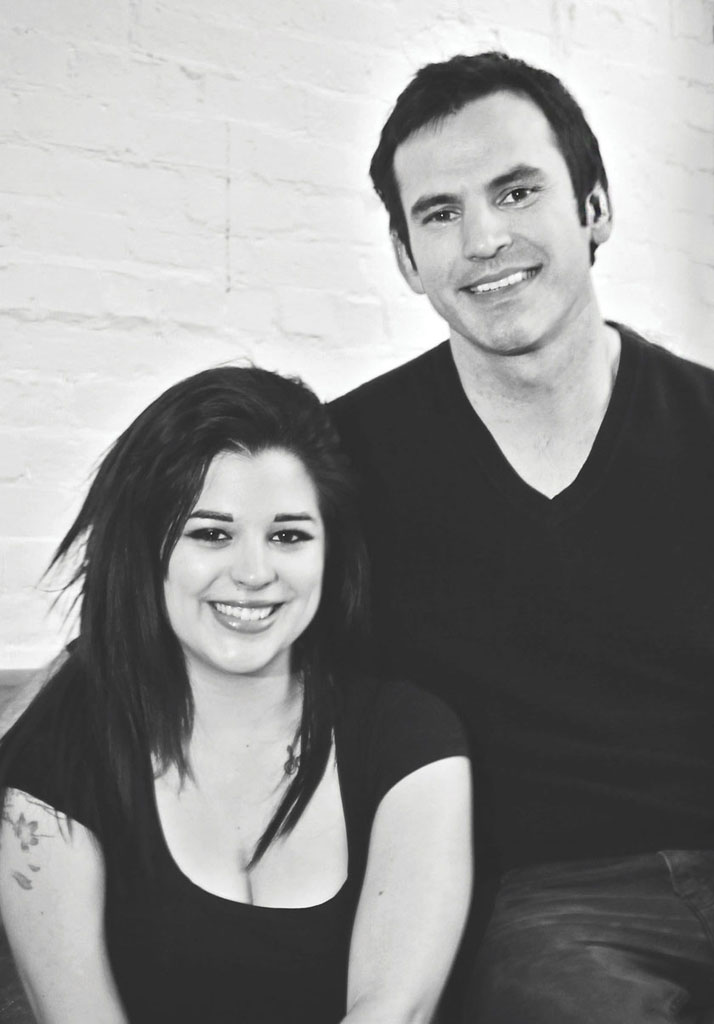
Fill Flash Couple - I placed this couple near a window that allowed indirect, diffused, overcast daylight to hit the left sides of their faces. To brighten the shadows on the other sides of their faces, I used a powered-down Canon Speedlite 580EX II off-camera flash, which I directed at the shadowy areas, creating directional sidelighting that served as a fill. The flash also yielded charming catchlights in their eyes.
Flash Photography Scenario: Use available light in conjunction with flash for more natural shots. For those who know a little bit about using a dedicated flash (or wish to), let me tell you about a simple technique that will make your flash photography look very natural, especially with photos taken in low-light scenes. (I used this technique for this shot of the couple.) The technique is easy, but the reasoning behind it is a little complex. When using my dedicated flash I choose my aperture and ISO settings in Aperture Priority mode, and let the camera select an appropriate shutter speed. My dedicated flash will sync with the shutter speed that’s chosen in an effort to produce a well-exposed shot. Higher-end flashes are capable of syncing with practically any shutter speed, while less expensive ones have limitations. In this example of the couple, I selected f/5.6 to blur the background, but also to retain a little detail in the brick wall. I chose ISO 200 to keep the grain factor low. Because there was low light in this scene, the camera selected a slower shutter speed to properly expose the background, while the flash exposed the subjects in the foreground, an example of slow sync flash photography. This is just like using a technique called “dragging the shutter,” where the photographer chooses a slower shutter speed to let in the existing or ambient light of a low-light scene before the flash fires, making for a more natural shot.
I love using this flash method in low-light situations because it yields very natural-looking photographs where both the background and subject are well-exposed, as opposed to having that unappealing, obvious flash look of a ghostly bright subject set against a blacked-out background. The only downside is that you need to hold very still or use a tripod to accommodate the slower shutter speeds that occur in low light; subjects also need to be still; otherwise you get subject blur. If shutter speed gets too slow, you can always increase ISO, which will indirectly increase shutter speed. Raising the ISO, which makes your image sensor more sensitive to the ambient light, will also brighten the background of a low-light scene even more, ensuring depth in your photo. 24–70mm f/2.8 lens at 25mm, ISO 200, f/5.6 for 1⁄25 sec.
Tip: If you don’t have a dedicated flash, you can use your DSLR’s built-in flash and rear curtain flash feature, also called second curtain sync, which allows the camera to expose for the ambient lighting in the room just before firing the flash, creating a much more natural look. The downsides of a built-in flash are that you can’t reduce its power as much as you can with a dedicated flash unit and you can’t remove or angle it, which means you can’t bounce it or remove it to create directional lighting. I highly recommend a higher-end dedicated flash unit—worth every penny.
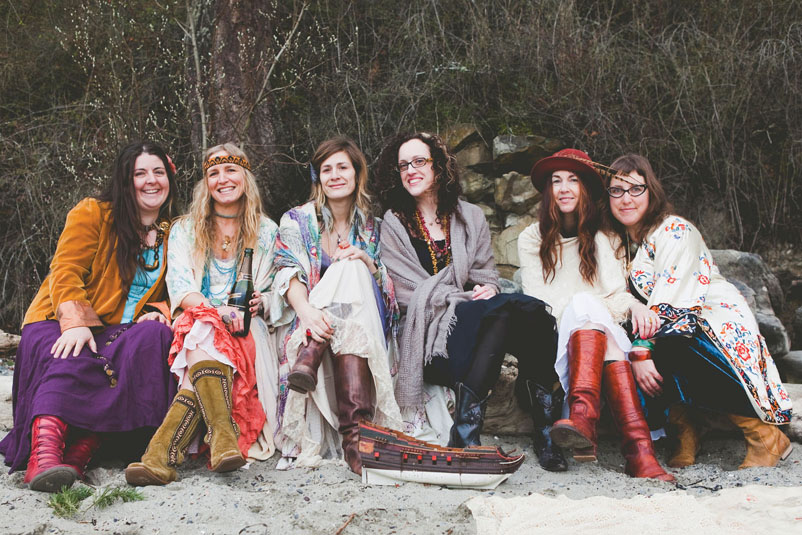
Photo by Contributor Vivienne McMaster - “I wanted to capture the magic of gathering with a group of friends for a day of dressing up and having a beautiful picnic and used my camera’s self-timer so I could add myself in the photo too!” says Vivienne. Vivienne processed both of her photos in this spread using a Lightroom preset called Summer Wheat B&W. 24–70mm f/2.8 lens at 28mm, ISO 100, f/4 for 1⁄125 sec.
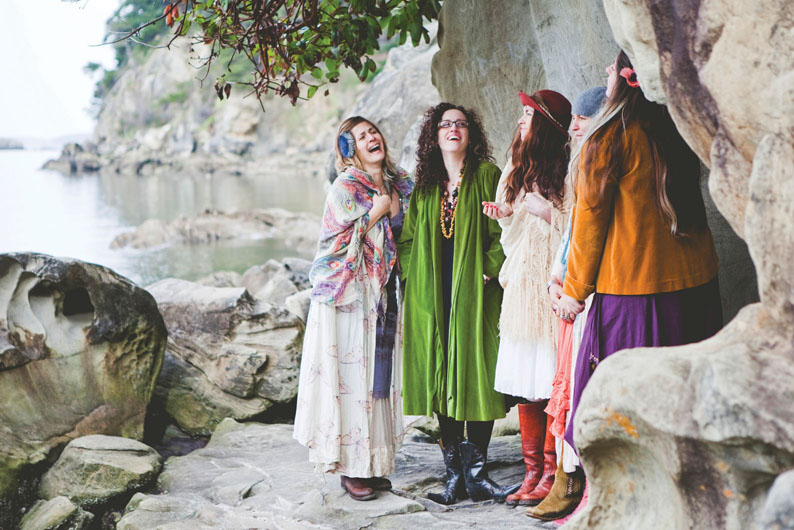
Photo by Contributor Vivienne McMaster - Vivienne shares,“There was this most beautiful curve in the rock at this spot, and I wanted to capture this wonderful group of friends in a lovely, unscripted moment of fun and laughter.” 24–70mm f/2.8 lens at 68mm, ISO 100, f/2.8 for 1⁄160 sec.