Artists create self-portrait photos for a variety of artistic and personal reasons, perhaps as a form of self-exploration, for a headshot, documentation of an event or a study of human form. I myself explore self-portraiture through my mobile photography and enjoy sharing this particular vein of my work on Instagram and other online mobile photography communities.
Most of my iPhone shots are monochrome, have a time-worn, textured appearance and utilize creative blur. Sometimes I experiment with the form of the human body, while other times you’ll find me dressing up in costumes, becoming a character, posing in interesting settings, letting the stories unfold.
I use my own body as the model for my story-telling mobile photos because it’s practical, convenient, relaxed and fun. What I find interesting is that I don’t tend to think of these particular photos as being self-portraiture; it’s more like I am an actress bringing a character in a play to life.
Let go and have fun! Make a date with yourself and try out some of the ideas below.
Outdoor environments like gardens, woods and fields make excellent natural settings, indoors by a window, against a white or black backdrop. Make sure the background is fairly simple, without distracting elements that take away from the subject.
If outdoors, it is best to shoot during the golden hours, as the light will be soft and diffused. Overcast skies are also ideal. If it’s bright and sunny, head for the edge of the shade.
For selfies taken indoors, shoot near a north-facing window that provides soft, indirect light. Stay away from direct light, as it’s contrasty. If you have a dedicated flash unit for your DSLR, consider using it as a bounce flash to bounce light onto shadowy areas. Bouncing light onto the subject via a reflector is another possibility. Or try using inexpensive work lights, available at hardware stores.
If you are taking a close-up self-portrait with your DSLR, you already know that shallow DOF will be your best bet (try f/4 or wider). What aperture should you select if you are photographing yourself in a landscape scene?
If you are taking a photo of yourself in a landscape scene, you will want to choose the Landscape Scene mode on your DSLR. Your camera will automatically choose a smaller aperture to ensure you capture detail in the foreground as well as the background. If a slower shutter speed is generated, I recommend that you hold still if you want to be clear and in focus.
If you are shooting yourself in a landscape scene using Aperture Priority mode or Manual mode, choose an aperture anywhere between f/16 and f/22 to ensure the most clarity from front to back in the scene. Hold still to ensure good focus with a slower shutter speed. In Aperture Priority mode, lock in an aperture of, say, f/16 and choose an ISO setting appropriate for the light in the scene. The camera will select a shutter speed based on your aperture and ISO selections. In Manual mode, dial in your primary setting, which in this case is aperture. Choose an ISO speed appropriate for the given light, and use the light meter as a guide to dial in a shutter speed that yields a proper exposure.

I took this iPhone self-portrait, titled Sweet Gravity, with the Camera+ app. I manipulated it with a variety of apps to achieve the final result, including Camera+, FocalLab, VSCO Cam and Filterstorm.
If you wish to sharpen details in your landscape/self-portrait shot, you can do so with sharpening tools in Photoshop CS/Elements or Pixlr.
Many apps offer sharpening tools, including PhotoWizard, Leonardo, Photogene and Filterstorm.
If you are using your camera’s built-in timer for self-portraits (DSLR or mobile), I have a trick for ensuring that you, the subject, will be in focus. Take a small slip of colored paper and attach it to the spot (usually a wall) where you will go once you set the timer in motion. If you can, make it level with the location of your eyes, since you will want focus to be there. Lock focus on that paper, so when you stand in front of it, you will be in focus. Make sure the color of the paper is in contrast with the wall. If it is the same or a similar color, your camera will have trouble locking focus.
Be aware that your iPhone’s front-facing snapshot feature will produce low-resolution photographs. For high-resolution results, you must use the camera on the outside (nonscreen side) of your phone.

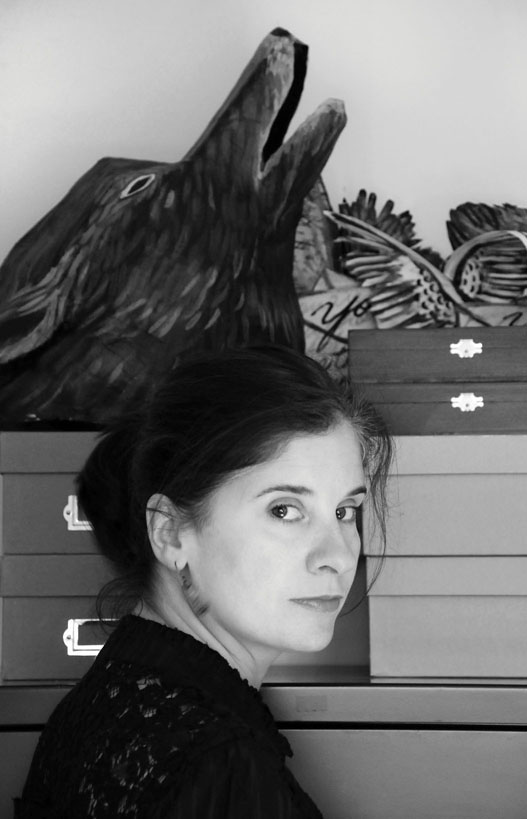
This compelling self-portrait was taken by Canadian photographer and dear friend of mine, Susanna Gordon. The viewer makes an immediate connection to the subject through the intense eye contact that she makes with the camera; we see her strength, beauty, passion and kindness. It’s all in the eyes. 18–135mm f/3.5–5.6 lens at 80mm, ISO 800, f/5.6 for 1⁄50 sec.

Photographer Erin Little enjoys using her iPhone to make selfies and pictures with her partner, Mark. Her iPhone’s portability and ease of use makes it the perfect tool for capturing their love and documenting the everyday moments that make it so special. Erin’s favorite go-to app, which is actually the only app she uses on her mobile photos, is VSCO Cam.

Photo by Contributor Vivienne McMaster - “I actually almost deleted this photo, as I took it as a photo of my whole body and it brought up my inner critic. When I cropped the photo I saw an entirely different story to be told in it, and it ended up being one of my favorites,” reveals Vivienne. 24–70mm f/2.8 lens at 34mm, ISO 100, f/2.8 for 1⁄125 sec.

Photo by contributor Vivienne McMaster - “To me this image symbolizes a long journey to the feeling of being free and at home in my own skin.” 24–70mm f/2.8 lens at 24mm, ISO 100, f/2.8 for 1⁄80 sec.