
How Do I Connect My iPad to a Network?
You can do plenty of things locally on your iPad without having to reach out and touch some remote site or service. You can jot some notes, add appointments, edit contacts, or just play around with your iPad’s settings. Nothing wrong with any of that, but I’m willing to bet you didn’t fork over the bucks for an iPad just so you could use the Notes app. I didn’t think so. After all, the iPad is engineered from the ground up to connect. Whether it’s the web to go on a surfin’ safari, the App Store or iBookstore to grab some content, or Google Maps to find your way, the iPad comes alive when it’s connected to a network.
Understanding Internet Access Networks
Connecting to a Wi-Fi Network
Working with Cellular Network Connections
Switching Your iPad to Airplane Mode
Understanding Internet Access Networks
To get on the web, your iPad must first connect to a network that offers Internet access. To make this easy and seamless, your iPad comes with internal hardware that enables it to detect and connect to available networks. Exactly how this happens and what kinds of networks your iPad can access depends on the type of iPad you own:
• iPad with Wi-Fi. This type of iPad can connect only to Wi-Fi wireless networks.
• iPad with Wi-Fi + 3G. This type of iPad can connect to Wi-Fi wireless networks and cellular networks.
The next couple of sections tell you more.
Understanding Wi-Fi networks
Wireless devices such as the iPad transmit data and communicate with other devices using radio frequency (RF) signals that are beamed from one device to another. Although these radio signals are similar to those used in commercial radio broadcasts, they operate on a different frequency. For example, if you use a wireless keyboard and mouse, you have an RF receiver device plugged into, usually, a USB port on your computer. The keyboard and mouse have built-in RF transmitters. When you press a key or move or click the mouse, the transmitter sends the appropriate RF signal; that signal is picked up by the receiver, and the corresponding keystroke or mouse action is passed along to the operating system, just as if the original device had been connected to the computer directly.
A radio transceiver is a device that can act as both a transmitter and a receiver of radio signals. All wireless devices that require two-way communications use a transceiver, and your iPad is no exception.
The most common wireless networking technology is Wi-Fi (which rhymes with hi-fi), and the generic Institute of Electrical and Electronics Engineers (IEEE) designation for this wireless networking standard is 802.11. There are four main types — 802.11a, 802.11b, 802.11g, and 802.11n — each of which has its own range and speed limits, as you see in the following list:

All wireless standard speeds are theoretical because interference and bandwidth limitations almost always mean that real-world speeds are slower than the optimum speeds. Bear that in mind as you read about the various Wi-Fi standards.
• 802.11b. The original 802.11 standard was published by the IEEE in 1997, but few people took it seriously because it was hobbled by a maximum transmission rate of just 2 Mbps. By 1999, the IEEE had worked out not one but two new standards: 802.11a and 802.11b. The 802.11b standard became the more popular of the two, so I discuss it first. 802.11b upped the Wi-Fi data transmission rate to 11 Mbps. The indoor range of 802.11b is about 115 feet. 802.11b operates on the 2.4 GHz radio frequency, which is an unregulated frequency often used by other consumer products such as microwave ovens, cordless telephones, and baby monitors. This keeps the price of 802.11b hardware down, but it also can cause interference problems when you attempt to access the network near another device that’s using the 2.4 GHz frequency.
• 802.11a. The 802.11a standard was released at around the same time as the 802.11b standard. There are two key differences between these standards: 802.11a has a maximum transmission rate of 54 Mbps, and it operates using the regulated 5.0 GHz radio frequency band. This higher frequency band means that 802.11a devices don’t have the same interference problems as 802.11b devices, but it also means that 802.11a hardware is more expensive, offers a shorter range (about 75 feet), and has trouble penetrating solid surfaces such as walls. So, despite its impressive transmission speed, 802.11a had too many negative factors against it, so 802.11b won the hearts of consumers and became the first true wireless networking standard.
• 802.11g. During the battle between 802.11a and 802.11b, it became clear that consumers and small businesses really wanted the best of both worlds. That is, they wanted a WLAN (wireless local area network) technology that was as fast and as interference free as 802.11a, but had the longer range and cheaper cost of 802.11b. Alas, “the best of both worlds” is a state rarely achieved in the real world. However, the IEEE came close when it introduced the next version of the wireless networking standard in 2003: 802.11g. Like its 802.11a predecessor, 802.11g has a theoretical maximum transmission rate of 54 Mbps, and like 802.11b, 802.11g boasts an indoor range of about 115 feet and is cheap to manufacture. That cheapness comes from its use of the 2.4 GHz RF band, which means that 802.11g devices can suffer from interference from other nearby consumer devices that use the same frequency. Despite the possibility of interference, 802.11g has quickly become the most popular of the Wi-Fi standards, and most WLAN devices sold today support 802.11g.
• 802.11n. The latest wireless standard is called 802.11n. 802.11n implements a technology called multiple-input multiple-output (MIMO) that uses multiple transmitters and receivers in each device. This enables multiple data streams on a single device, which will greatly improve WLAN performance. For example, using three transmitters and two receivers (the standard configuration), 802.11n promises a theoretical transmission speed of up to 248 Mbps. 802.11n also promises to double the wireless range to about 230 feet.

When you’re talking about data communications, a megabit (Mb) is equal to one million bits. So, the 11 Mbps transmission speed of 802.11b means that it can (theoretically, of course) transfer 11 million bits of data per second. Just to confuse matters, if you’re talking about memory or data storage, a megabit equals 1,048,576 bits.
How does your iPad fit into all this? I’m happy to report that the iPad supports 802.11n, which means it can take advantage of the fastest wireless networks out there, particularly those based on Apple’s AirPort Extreme wireless access point. (AirPort is the name Apple uses instead of Wi-Fi.) However, the iPad actually comes with 802.11a/b/g/n support, which means it also understands older wireless networks that use the 802.11a, 802.11b, and 802.11g standards. In other words, your iPad works perfectly with any wireless network.
This is good news because although you may know what kind of Wi-Fi technology you have in your home or office, you’ll likely not have a clue when it comes to the wireless networks that are popping up in cities all across the world: in coffee shops, cafes, restaurants, fast-food outlets, hotels, airports, trains, and even dental offices. Some cities have even started offering universal Wi-Fi access in their downtown areas. These wireless networks share an Internet connection, so you can connect to the network and then use it to surf the web, check your e-mail, catch up on your RSS feeds, log on to the office network, and more. A public wireless network that shares an Internet connection is called a wireless hot spot (or just a hot spot). In some cases, the establishment offers Internet access free as a perk for doing business with it. However, most hot spots charge a fee to access the network.

Not sure if you have any hot spots nearby? One easy way to find Wi-Fi near you is to open the Maps app on your iPad, display your current location (see Chapter 12), and type wifi into the search box. This gives you a map with pushpins representing Wi-Fi hotspots near you. The App Store also has lots of apps that can locate not only wireless hot spots, but also unsecured wireless networks within range. See, for example, Bitrino’s WiFiTrak and JiWire’s Free Wi-Fi Finder.
Because most wireless networks are connected to high-speed Internet connections, Wi-Fi is by far your best bet for an Internet connection on your iPad. You get fast downloads, and if you have an iPad with 3G support, you don’t use up data transfers in whatever Internet connection plan you have with your cellular provider. As long as a Wi-Fi network is within range and you can connect to that network, your iPad always defaults to using Wi-Fi for Internet access.
Understanding cellular networks
If your iPad is a Wi-Fi + 3G model, it means not only can your iPad connect to Wi-Fi networks and hot spots, but it also can make use of a cellular network if no Wi-Fi is within range. In fact, your iPad is social enough to be on friendly terms with not just one, but two, types of cellular networks:
• 3G. Short for Third Generation, 3G is currently available in several hundred U.S. metropolitan areas. Most other countries offer widespread 3G coverage, so you won’t often find yourself out of 3G service. The 3G network is a cellular network, so as long as you’re in a 3G coverage area, you can access the Internet from anywhere, even a moving car. 3G is slower than Wi-Fi, but download speeds are anywhere from 2 to 2.5 times as fast as the notoriously pokey EDGE downloads (discussed next), so you won’t grow old waiting for a website to open. If your 3G-enabled iPad has no Wi-Fi hot spot in range, it automatically switches to the 3G network, assuming you’re in a coverage area.
• EDGE. This is short for Enhanced Data rates for GSM (Global System for Mobile communication) Evolution, an absurdly grandiose name for a rightfully maligned cellular network technology. Why the bad press for EDGE? Because it’s, in a word, slow. Paint dries faster than most websites download over an EDGE connection. So why bother with EDGE at all? Mostly because although 3G is widespread, it doesn’t have as much coverage as EDGE does. So if you don’t have a Wi-Fi network nearby, and you’re not in a 3G coverage area, your cellular-chip-equipped iPad drops down into EDGE mode so you can at least get a signal.
Unfortunately, although you can often ride the Wi-Fi train for free, there’s no such luck when it comes to cellular networks. Your iPad’s 3G chip won’t work unless you plug a micro-SIM (Subscriber Identity Module) into the iPad’s micro-SIM slot (located on the left edge of the device when you hold it in portrait mode). However, to get a micro-SIM, you must sign up for a data plan with a cellular provider.
Why not just pop out the micro-SIM in your existing phone and pop it into your iPad? Ah, that would be sweet, wouldn’t it? Unfortunately, that’s probably not going to work because most mobile phones today use regular SIMs, while the iPad uses the fairly obscure (for now) micro-SIM, which is much smaller. (A traditional SIM is 15mm by 25mm, while a micro-SIM is 12mm by 15mm.) So chances are good that your mobile phone’s SIM is too big to fit into the iPad’s micro-SIM slot. What if you have a micro-SIM from an iPhone 4? Nope, sorry, but iPhone 4 micro-SIMs don’t work with the iPad.
If you examine a regular SIM and a micro-SIM, you’ll notice that the metal contact area is the same size in both. The contact area is the “working” part of the SIM, and the rest is just nonuseful plastic or cardboard. Therefore (and you didn’t hear this from me), it is possible to take some sharp scissors and very carefully cut a regular SIM to the same size and shape as a micro-SIM (leaving the contact area untouched, of course). You should then be able to use the trimmed SIM in your iPad.
Inserting a micro-SIM into your iPad
After you sign up for a data plan, or if you just happen to have a micro-SIM available through your existing cellular provider, then to use the cellular network, you must insert the micro-SIM into your iPad. Here’s how it’s done:
1. Turn off your iPad.
2. Locate the SIM Removal Tool that came with your iPad. The SIM Removal Tool is a thin piece of metal with a handle on one end. You can also take any medium-sized paper clip and straighten out one end.
3. Stand up the iPad in portrait mode, and locate the micro-SIM slot on the left edge of the device. You’re looking for a thin slot with a tiny hole near one edge.
4. Insert the end of the SIM Removal Tool (or paper clip) carefully into the micro-SIM slot hole. You don’t need to go in very far — a sixteenth of an inch is plenty.
5. Gently pull the SIM Removal Tool (or paper clip) away from the iPad. As you pull,the micro-SIM tray should come along with the tool. If it doesn’t, insert the tool a little farther.
6. After you have the tray out, orient the micro-SIM with the edges of the tray, and then drop the micro-SIM inside the tray. Make sure the micro-SIM is lying flat in the tray.
7. Slide the micro-SIM tray back into the micro-SIM slot. Make sure you put the tray back into the slot using the same orientation as when you removed it. Make sure the tray is fully inserted into the slot.
8. Place a finger over the micro-SIM tray to keep it in place, and then pull out the paper clip (or SIM Removal Tool).
Connecting to a Wi-Fi Network
You see a bit later (in the section on working with cellular network connections) that a 3G-enabled iPad connects to cellular networks automatically. Things aren’t automatic when it comes to Wi-Fi connections, at least not at first. As soon as you try to access something on the Internet — a website, your e-mail, a Google Map, or whatever — your iPad scours the surrounding airwaves for Wi-Fi network signals. If you’ve never connected to a Wi-Fi network, or if you’re in an area that doesn’t have any Wi-Fi networks you’ve used in the past, you see the Select a Wi-Fi Network dialog, as shown in Figure 1.1. (If you don’t see the Select a Wi-Fi Network dialog, you can still connect to a wireless network; see the section on stopping the incessant Wi-Fi network prompts later in this chapter.)
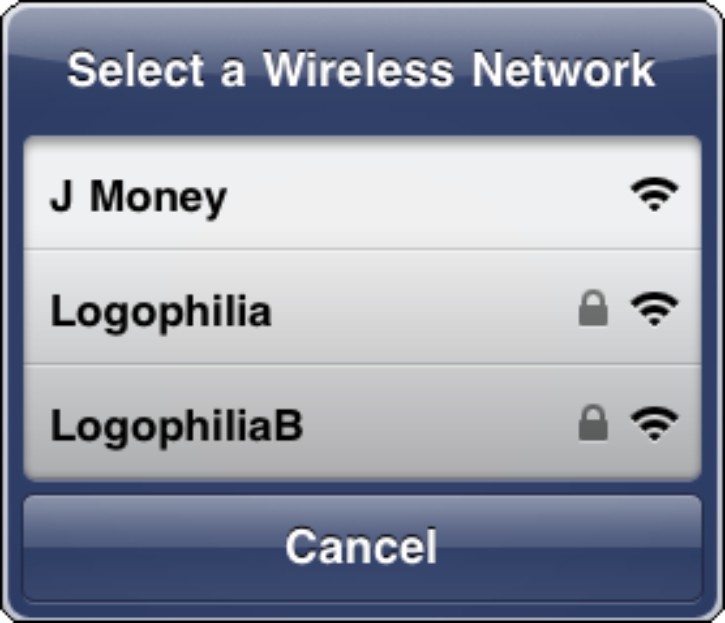
1.1 If you’re just starting out on the Wi-Fi trail, your iPad displays a list of nearby networks.
This dialog displays a list of the Wi-Fi networks that are within range. For each network, you get three tidbits of data:
• Network name. This is the name that the administrator has assigned to the network. If you’re in a coffee shop or similar public hot spot and you want to use that network, look for the name of the shop (or a variation on the name).
• Password-protected. If a Wi-Fi network displays a lock icon, it means the network is protected by a password, and you need to know that password to make the connection.
• Signal strength. This icon gives you a rough idea of how strong the wireless signals are. The stronger the signal (the more bars you see, the better the signal), the more likely you are to get a fast and reliable connection.
Making your first connection
Follow these steps to connect to a Wi-Fi network:
1. Tap the network you want to use. If the network is protected by a password, your iPad prompts you to type the password, as shown in Figure 1.2.
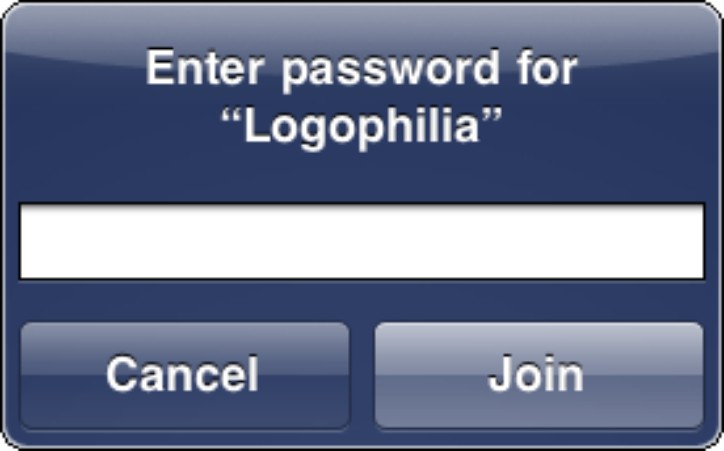
1.2 If the Wi-Fi network is secured with a password, use this screen to type it.
2. Use the keyboard to type the password.
3. Tap Join. The iPad connects to the network and adds the Wi-Fi network signal strength icon to the status bar.
To connect to a commercial Wi-Fi operation — such as those you find in airports, hotels, and convention centers — you almost always have to take one more step. In most cases, the network prompts you for your name and credit card data so you can be charged for accessing the network. If you’re not prompted right away, you will be as soon as you try to access a website or check your e-mail. Type your information and then enjoy the Internet in all its Wi-Fi glory.
Because the password box shows dots instead of the actual text for added security, this is no place to demonstrate your iPad speed-typing prowess. Slow and steady wins the password typing race (or something).
Connecting to known networks
If the Wi-Fi network is one that you use all the time — for example, your home or office network —the good news is your iPad remembers any network you connect to. As soon as a known network comes within range, your iPad makes the connection without so much as a peep. Thanks!
Stopping the incessant Wi-Fi network prompts
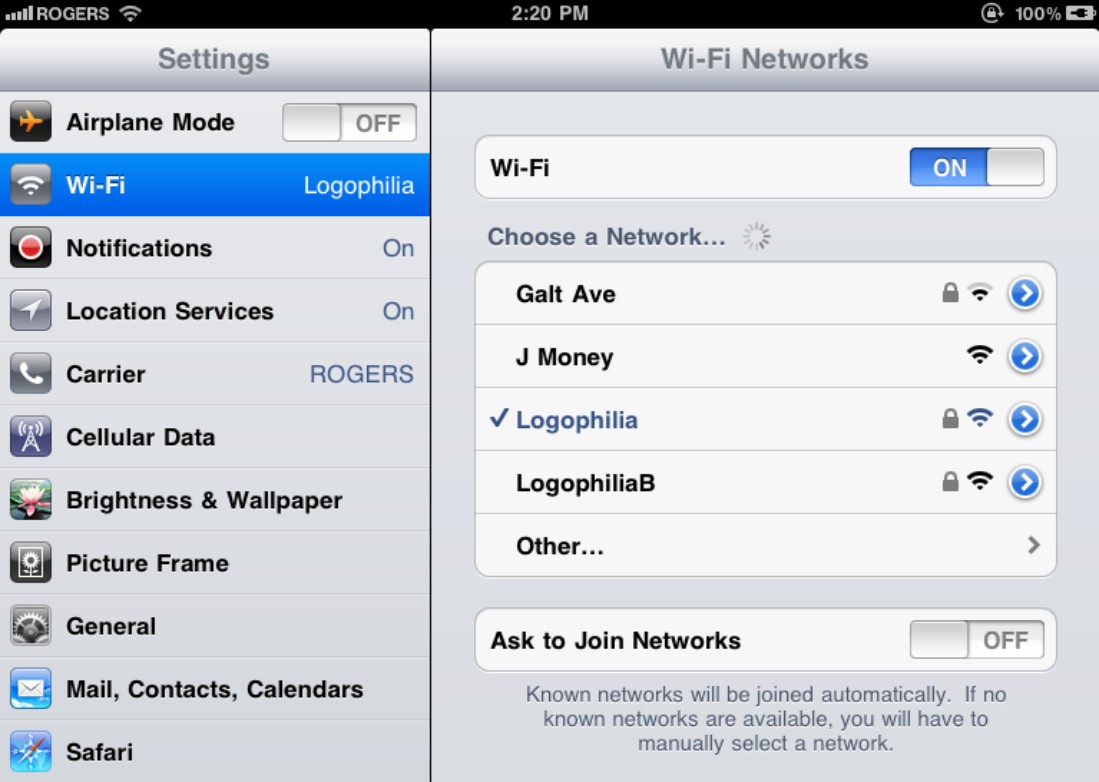
The Select a Wi-Fi Network dialog is a handy convenience if you’re not sure whether a Wi-Fi network is available. However, as you move around town, you may find that dialog popping up all over the place as new Wi-Fi networks come within range. One solution is to wear your finger down to the bone with all the constant tapping of the Cancel button, but there’s a better way: Just tell your iPad to shut up already with the Wi-Fi prompting. Here’s how:
1. On the Home screen, tap Settings. The Settings screen appears.
2. Tap Wi-Fi. iPad opens the Wi-Fi Networks screen.
3. Tap the Ask to Join Networks switch to the Off position, as shown in Figure 1.3. Your iPad no longer prompts you with nearby networks. Whew!
Okay, I hear you ask, if I’m no longer seeing the prompts, how do I connect to a Wi-Fi network if I don’t even know it’s there? That’s a good question, and here’s a good answer:
1. On the Home screen, tap Settings. Your iPad displays the Settings screen.
2. Tap Wi-Fi. The Wi-Fi Networks screen appears, and the Choose a Network list shows you the available Wi-Fi networks.
3. Tap the network you want to use. If the network is protected by a password, your iPad prompts you to type the password.
4. Use the keyboard to type the password.
5. Tap Join. The iPad connects to the network and adds the Wi-Fi network signal strength icon to the status bar.
1.3 Toggle the Ask to Join Networks switch to Off to put a gag in the network prompts.
Connecting to a hidden Wi-Fi network
Each Wi-Fi network has a network name — often called the Service Set Identifier, or SSID — that identifies the network to Wi-Fi-friendly devices such as your iPad. By default, most Wi-Fi networks broadcast the network name so you can see the network and connect to it. However, some Wi-Fi networks disable network name broadcasting as a security precaution. The idea here is that if an unauthorized user can’t see the network, he or she can’t attempt to connect to it. (However, some devices can pick up the network name when authorized computers connect to the network, so this is not a foolproof security measure.)
You can still connect to a hidden Wi-Fi network by entering the connection settings by hand. You need to know the network name, the network’s security type and encryption type, and the network’s password. Here are the steps to follow:
1. On the Home screen, tap Settings to open the Settings screen.
2. Tap Wi-Fi. You see the Wi-Fi Networks screen.
3. Tap Other. Your iPad displays the Other Network screen, as shown in Figure 1.4.
4. Use the Name text box to type the network name.
5. Tap Security to open the Security screen.
6. Tap the type of security used by the Wi-Fi network: WEP, WPA, WPA2, WPA Enterprise, WPA2 Enterprise, or None.
7. Tap Other Network to return to the Other Network screen. If you chose WEP, WPA, WPA2, WPA Enterprise, or WPA2 Enterprise, your iPad prompts you to type the password.
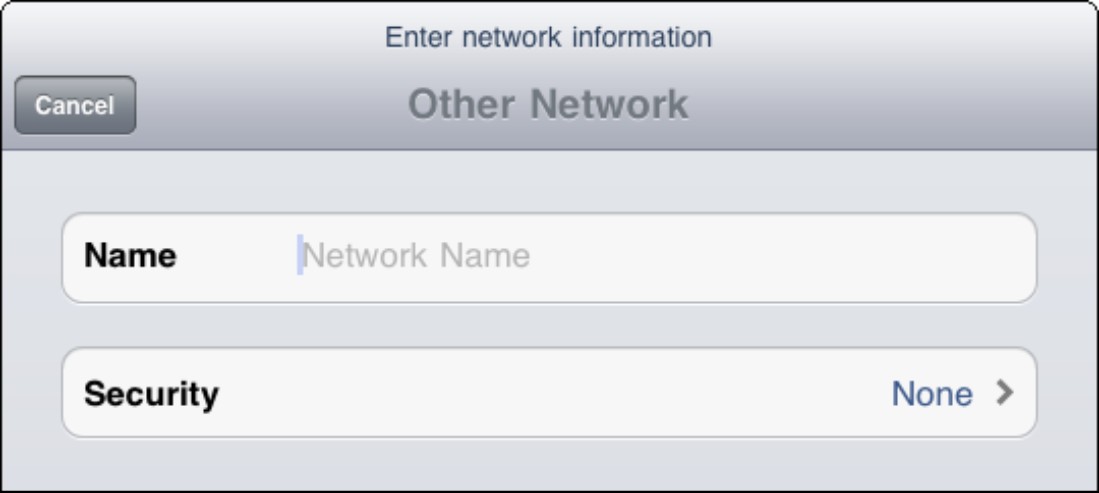
1.4 Use the Other Network screen to connect to a hidden Wi-Fi network.
8. Use the keyboard to type the password.
9. Tap Join. The iPad connects to the network and adds the Wi-Fi network signal strength icon to the status bar.
Turning off the Wi-Fi antenna to save power
Your iPad’s Wi-Fi antenna is constantly on the lookout for nearby Wi-Fi networks. That’s useful because it means you always have an up-to-date list of networks to check out, but it takes its toll on the iPad battery. If you know you won’t be using Wi-Fi for a while, you can save some battery juice for more important pursuits by turning off your iPad’s Wi-Fi antenna. Here’s how:
1. On the Home screen, tap Settings. The Settings screen appears.
2. Tap Wi-Fi. The Wi-Fi Networks screen appears.
3. Tap the Wi-Fi switch to the Off position. Your iPad disconnects from your current Wi-Fi network and hides the Choose a Networks list, as shown in Figure 1.5.
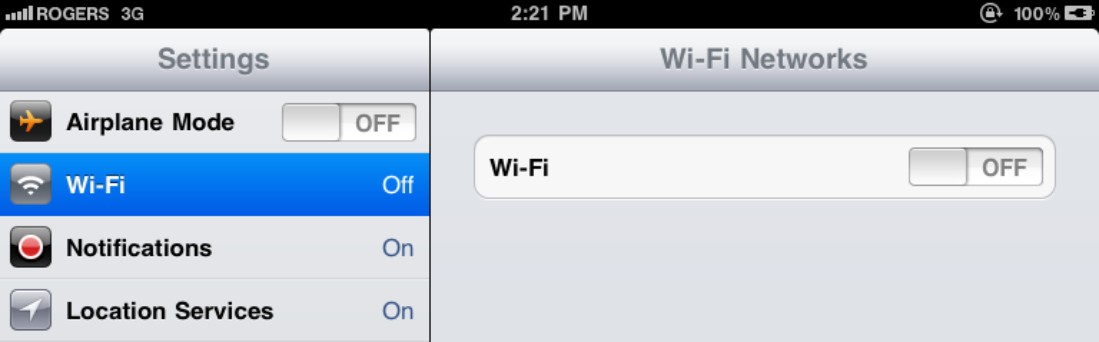
1.5 If you don’t need Wi-Fi for now, turn off the antenna to save battery power.
When you’re ready to resume your Wi-Fi duties, return to the Wi-Fi Networks screen and tap the Wi-Fi switch to the On position.
 Tethering your iPad to an iPhone’s Internet connection
If you have a Wi-Fi-only iPad, you might think you’re stuck if you’re out and about and need to use the Internet but there’s no Wi-Fi in sight. If you have an iPhone that’s running iOS 4.3, then you can work around this problem using a nifty feature called Personal Hotspot, which enables you to configure your iPhone as a kind of Internet hub or gateway device — something like the hotspots that are available in coffee shops and other public areas. You can then connect your iPad to your iPhone via Wi-Fi, and your iPad can then use the iPhone’s cellular Internet connection to get online. This is often called Internet tethering.
This sounds too good to be true, but it’s real, I swear. The downside (you just knew there had to be a downside) is that additional usage charges apply. In the US, for example, both AT&T and Verizon will charge you an extra $20 per month to get up to 2GB of Personal Hotspot data. (And just to be clear: That’s $20 over and above what you pay for your regular iPhone data plan.)
Your first step down the Personal Hotspot road is to activate the feature on your iPhone. Here’s how it’s done:
1. On the iPhone Home screen, tap Settings. The Settings screen appears.
2. Tap Personal Hotspot. iPhone opens the Personal Hotspot screen.
3. Tap the Personal Hotspot switch to the On position. If you don’t have the Bluetooth antenna turned on, as I describe in Chapter 3, your iPhone asks if you want to turn it on.
4. Tap Wi-Fi and USB Only.
5. Personal Hotspot generates a Wi-Fi password automatically, but you can set your own by tapping Wi-Fi Password, typing the new password, and then tapping Done.
With Personal Hotspot enabled on your iPhone, follow these steps to connect your iPad to it via Wi-Fi:
1. On your iPad, display the list of nearby wireless networks.
2. In the network list, click the one that has the same name as your iPhone, as shown in Figure 1.6. Your device prompts you for the Wi-Fi password.
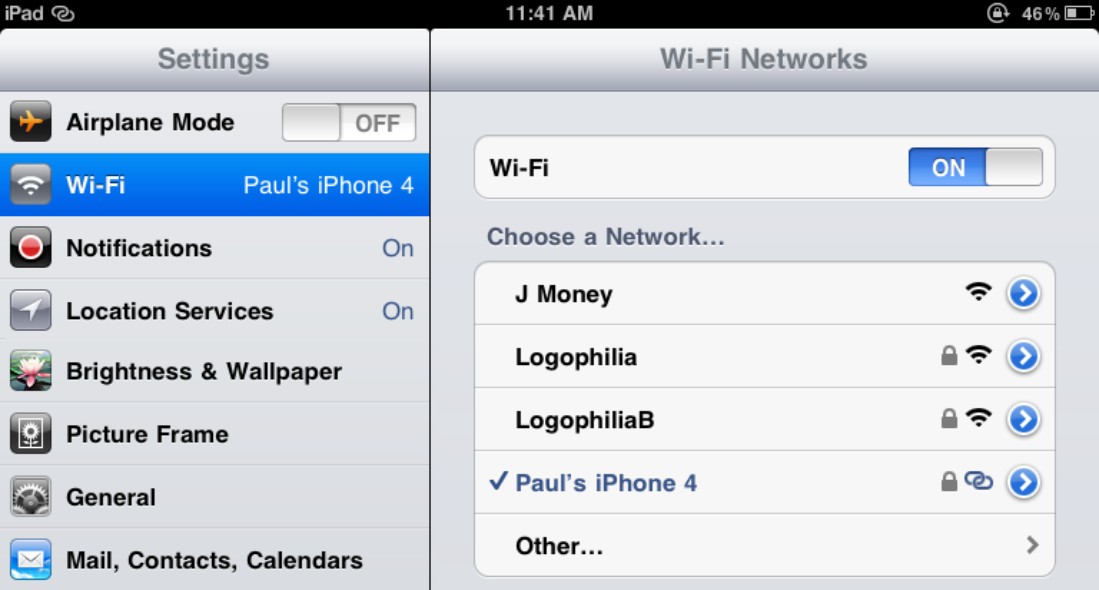
1.6 To make a Wi-Fi connection to the iPhone’s hotspot, display the list of wireless networks and then select your iPhone.
3. Type the Personal Hotspot Wi-Fi password and then click OK. In the status bar, your iPhone shows the Personal Hotspot icon, which is two interconnected rings (see Figure 1.6).
Working with Cellular Network Connections
Connections to the cellular network are automatic and occur behind the scenes. As soon as you switch on your 3G-enabled iPad it checks for a 3G signal, and if it finds one it connects to the network and displays the 3G icon as well as the connection strength in the status bar (the more bars, the better). If your current location doesn’t do the 3G thing, your iPad tries to connect to an EDGE network instead. If that works, you see the E icon in the status bar (plus the usual signal strength bars). If none of that works, you see No Signal, so you might as well go home.
Tracking cellular data usage
Having a data plan with a cellular provider means never having to worry about getting access to the network. However, unless you’re paying for unlimited access (lucky you!), you should be worrying about going over whatever maximum amount of data usage your plan provides per month. That’s because going over your data max means you start paying through the nose for each megabyte, and you can run up a hefty bill in no time.
To avoid that, keep track of your cellular data usage by following these steps:
1. On the Home screen, tap Settings. The Settings screen appears.
2. Tap General. Your iPad displays the General options screen.
3. Tap Usage. Your iPad displays the Usage screen.
4. Examine the Sent and Received values in the Cellular Network Data section.
Your iPad’s cellular usage values are meaningful only if they correspond to your monthly data cycle with your provider. Check with your cellular provider to see which day of the month your data resets. On that day, follow the previous steps to open the Usage screen, and then tap Reset Statistics. When the iPad asks you to confirm, tap Reset.
Disabling data roaming
Data roaming is an often convenient cellular plan feature that enables you to surf the web, check and send e-mail, and exchange text messages when you’re outside your provider’s normal coverage area. The downside is that roaming charges are almost always eye-poppingly expensive, and you’re often talking several dollars per minute, depending on where you are and what type of service you’re using. Not good!
Unfortunately, if you have your iPad’s Data Roaming feature turned on, you may incur massive roaming charges even if you never use the device! That’s because your iPad still performs background checks for things like incoming e-mail messages and text messages, so a week in some far-off land could cost you hundreds of dollars without even using the device. Again, not good!
To avoid this insanity, turn off your iPad’s Data Roaming feature when you don’t need it. Follow these steps:
1. On the Home screen, tap Settings. The Settings screen appears.
2. Tap Cellular Data. The Cellular Data screen appears.
3. Tap the Data Roaming On/Off button to change this setting to Off.
Turning off the 3G antenna to save power
Your iPad’s 3G antenna is constantly on the lookout for a 3G cellular connection. That’s handy because it means you always have access whenever you’re in a 3G network coverage area. However, this constant 3G searching uses up your iPad battery like crazy. If you’re on a Wi-Fi network, or you don’t need a 3G network connection for a while, you can preserve precious battery life by turning off your iPad’s 3G antenna:
1. On the Home screen, tap Settings. The Settings screen appears.
2. Tap Cellular Data. The Cellular Data screen appears.
3. Tap the Cellular Data switch to the Off position. Your iPad disconnects from your 3G cellular connection and connects to the EDGE network, if you’re in an EDGE coverage area.
When you’re ready to get back on the 3G highway, return to the Cellular Data screen and tap the Cellular Data switch to the On position.
Switching Your iPad to Airplane Mode
When you board a flight, aviation regulations in most countries are super strict about disallowing not only cell phone calls, but also wireless signals of any kind. This means your iPad is a real hazard to sensitive airline equipment because it also transmits Wi-Fi and Bluetooth signals, even if there are no Wi-Fi receivers or Bluetooth devices within 30,000 feet of your current position.
Your pilot or friendly flight attendant will suggest that passengers simply turn off their devices. Sure, that does the job, but darn it you’ve got an iPad, which means there are plenty of things you can do outside of its wireless capabilities: listen to music or an audiobook, watch a show, view photos, and much more.
So how do you reconcile the no-wireless-and-that-means-you regulations with the iPad’s multitude of wireless-free apps? You put your iPad into a special state called airplane mode. This mode turns off the transceivers — the internal components that transmit and receive wireless signals — for the iPad’s 3G antenna, Wi-Fi, and Bluetooth features. With your iPad now safely in compliance of federal aviation regulations, you’re free to use any app that doesn’t rely on wireless transmissions.
Follow these steps to activate airplane mode:
1. On the Home screen, tap Settings. The Settings screen appears.
2. Tap the airplane mode On/Off switch to turn this setting On, as shown in Figure 1.7. Your iPad disconnects your cellular network and your wireless network (if you have a current connection). Notice, as well, that while airplane mode is on, an airplane icon appears in the status bar in place of the signal strength and network icons.
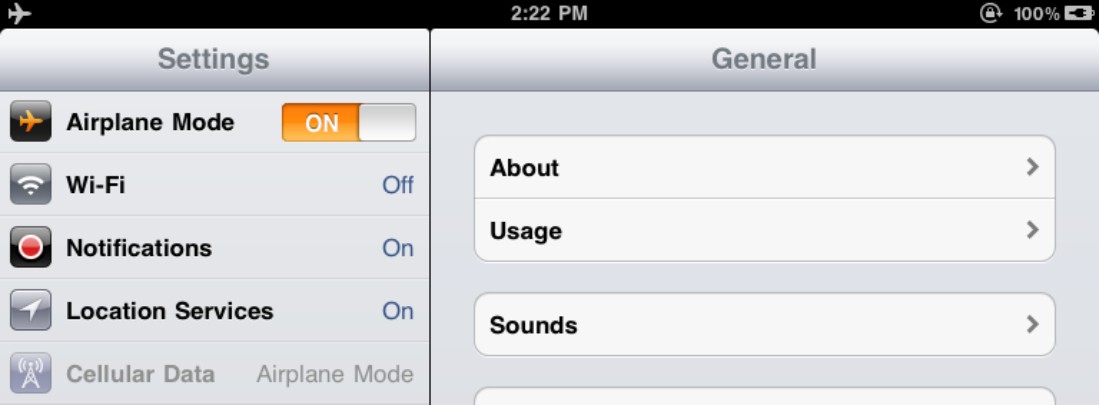
1.7 When your iPad is in airplane mode, an airplane icon appears in the status bar.