How Do I Keep My iPad in Sync?
Your iPad weighs a mere 1.3 pounds (a tiny bit more if it has a 3G chip shoehorned inside), so it’s about as portable as a portable computer can get. This inherent packability means you’ll often have your trusty iPad with you when you venture out of your home or office, but (hello?) aren’t you forgetting something? That’s right: You were just about to waltz outside without bringing any of your data with you. Your contacts, calendars, bookmarks — not to mention your music, videos, and other media — are just sitting there on your main computer, so why not take them with you? You can if you sync some or all of that data with your iPad, as you learn in this chapter.
Connecting Your iPad to Your Computer
Syncing Your iPad Automatically
Syncing Your iPad Manually
Taking Syncing to a Higher Level
Syncing Your iPad with MobileMe
Connecting Your iPad to Your Computer
We’re all waiting for that glorious day when computers and devices such as our iPads can just sort of sense each other’s presence and begin a digital conversation without requiring something as inelegant as a physical connection. Ugh. However, despite the fact that your fancy-schmancy iPad supports two wireless technologies — Wi-Fi (see Chapter 1) and Bluetooth (see Chapter 3) — exchanging data between the iPad and a Mac or PC requires a wired connection.
You have a couple ways to make the connection:
• USB cable. Use the cable that comes with your iPad to attach the USB connector to a free USB port on your Mac or Windows PC, and then attach the dock connector to the 30-pin connector port on the bottom of the iPad.
• Dock. If you shelled out the bucks for an optional iPad dock (a regular dock or a keyboard dock), first plug it in to a power outlet. Using your iPad’s cable, attach the USB connector to a free USB port on your Mac or Windows PC, and attach the dock connector to the 30-pin connector port on the back of the dock. Now insert your iPad into the dock’s cradle.
Syncing Your iPad Automatically
Depending on the storage capacity of your iPad — 16GB, 32GB, or 64GB — you may be able to cram all your computer’s iPad-friendly digital content onto the iPad hard drive. If that sounds like the way you want to go, then you can take advantage of the easiest of the iPad syncing scenarios, in which you don’t have to pay any attention in the least: automatic syncing. (If that does not sound like the way you want to go, no worries: See the section on syncing your iPad manually a bit later in this chapter.) Because you know all the iPad-able content on your Mac or Windows PC is going to fit, all you have to do is turn on your iPad and connect it to your computer.

I’ve found that syncing can sometimes fail if your iPad is open to an app’s settings screen when you launch the sync. Press the Home button to ensure that no settings or apps are open before trying to sync.
Yup, that’s all there is to it! iTunes opens automatically, connects to your iPad, and begins syncing. (As an added bonus, the USB port also begins charging your iPad’s battery.) Note these three things while this is happening, as shown in Figure 2.1:
• You see your iPad in the iTunes Devices list.
• You see Syncing “iPad” in the iTunes status area.
• Your iPad displays the Sync in Progress screen while the sync runs.
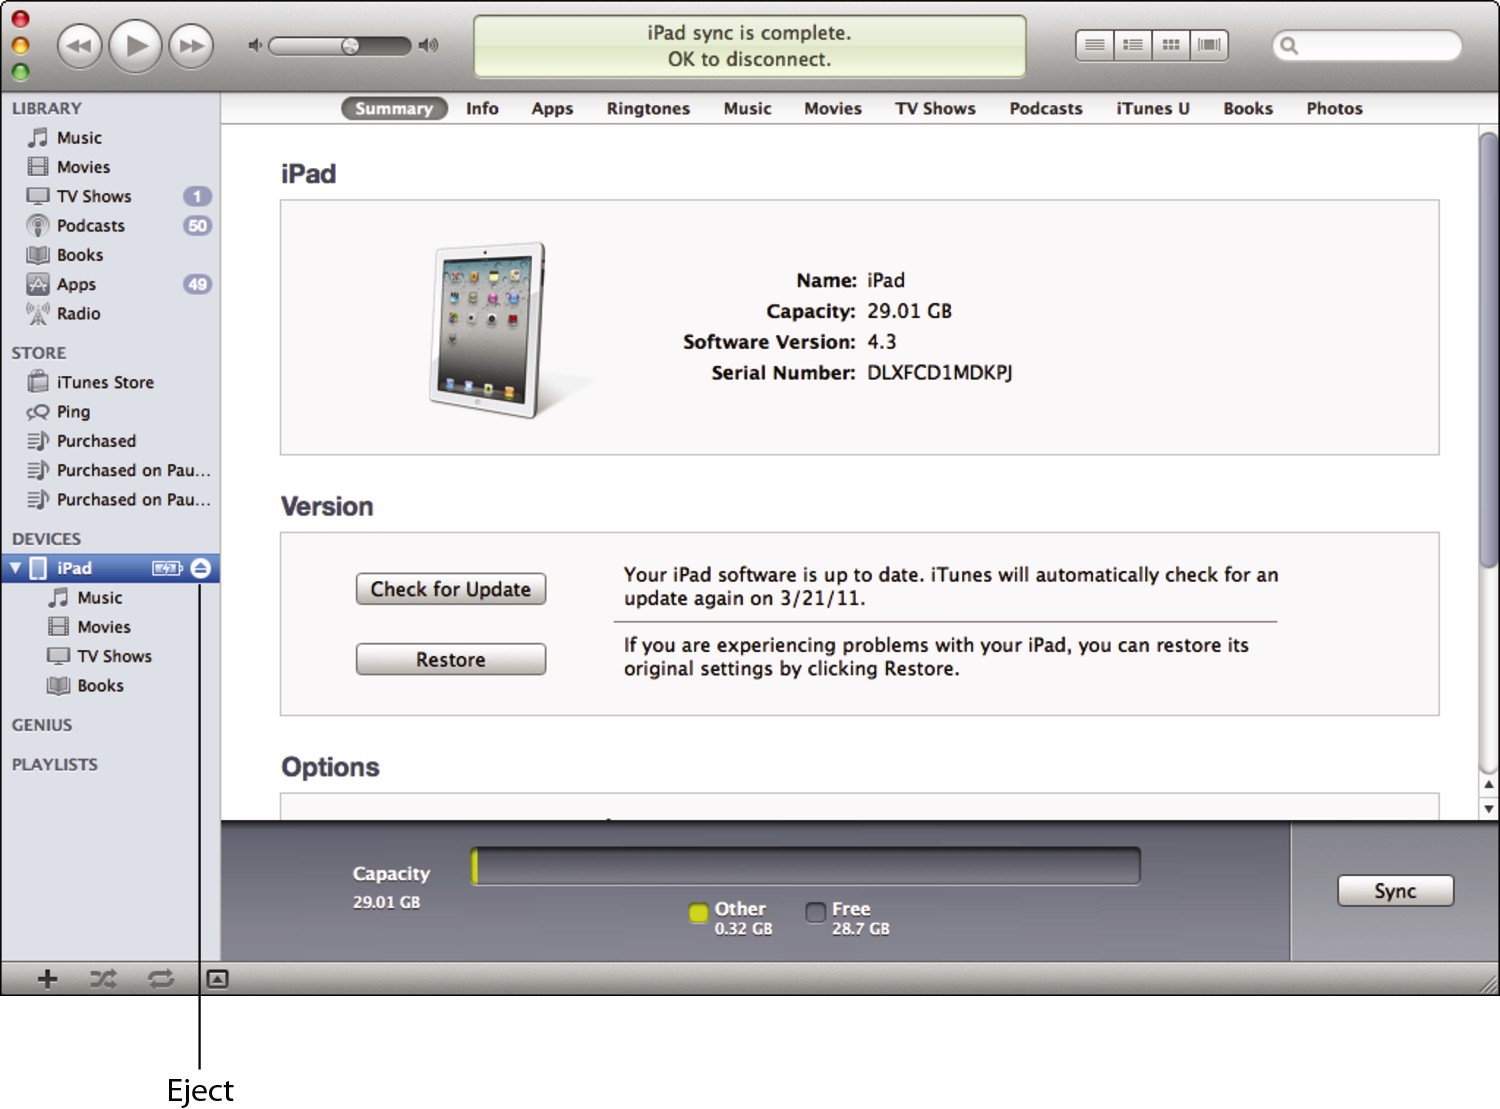
2.1 When you connect your iPad, iTunes springs into action and starts syncing.
Note that you can’t use your iPad while the sync is running. However, one of the iPad’s nicest features is its willingness to be rudely interrupted in midsync. When the Sync in Progress screen appears, you see the Slide to Cancel slider at the bottom of the screen. If you ever need to bail out of the sync to perform some other duty, drag the slider to the right. iTunes dutifully cancels the sync so you can go about your business. When you’re ready to restart the sync, click the Sync button in iTunes.
When the sync is done, you need to do two things:
1. In iTunes, click the Eject icon beside your iPad in the Devices list. I point out this icon in Figure 2.1.
2. Remove the dock connector from the iPad’s 30-pin connector port.
Giving Your iPad a Snappy Name
This isn’t necessarily a syncing topic, but I thought that while you’re in iTunes, you might want to give your iPad a proper name, one that’s a tad more interesting than the boring “iPad” that passes for the default name. Here’s what you do:
1. Double-click your iPad in the Devices list. iTunes forms a text box around the name.
2. Type the name you want to use. You can use any characters you want, and the name can be as long as you want, although you might want to use no more than about 15 or 16 characters to ensure the name doesn’t get cut off in the Devices list.
3. Press Return or Enter to save the new name.
As soon as you press Return or Enter, iTunes connects to your iPad and saves the name on the iPad. This way, even if you connect your iPad to another computer, that machine’s version of iTunes shows your custom iPad name.
Bypassing the automatic sync
Sometimes, you may want to connect your iPad to your computer, but you don’t want it to sync automatically. I’m not talking here about switching to manual syncing full time; I get to that in a second. Instead, I’m talking about bypassing the sync one time only. For example, you may want to connect your iPad to your computer just to charge it (assuming you either don’t have the optional dock or you don’t have it with you). Or perhaps you just want to use iTunes to eyeball how much free space is left on your iPad or to check for updates to the iPad software.
Whatever the reason, you can tell iTunes to hold off the syncing this time only by using one of the following techniques:
• Mac. Connect the iPad to the Mac, and then quickly press and hold the Option and  keys.
keys.
• Windows. Connect the iPad to the Windows PC, and then quickly press and hold the Ctrl and Shift keys.
When you see that iTunes has added your iPad to the Devices list, you can release the keys.
Note, however, that you don’t need to use iTunes to see how much free space is left on your iPad. On the Home screen, tap Settings, tap General, and then tap About. In the About screen that slides in, the Available value tells you how many gigabytes (or megabytes) of free space you have to play with.
Troubleshooting automatic syncing
Okay, so you connect your iPad to your computer and then nothing. If iTunes isn’t already running, it refuses to wake up from its digital slumbers. What’s up with that?
A couple things could be the problem. First, connect your iPad, switch to iTunes on your computer, and then click your iPad in the Devices list. On the Summary tab, as shown in Figure 2.2, make sure the Open iTunes when this iPad is connected check box is selected.
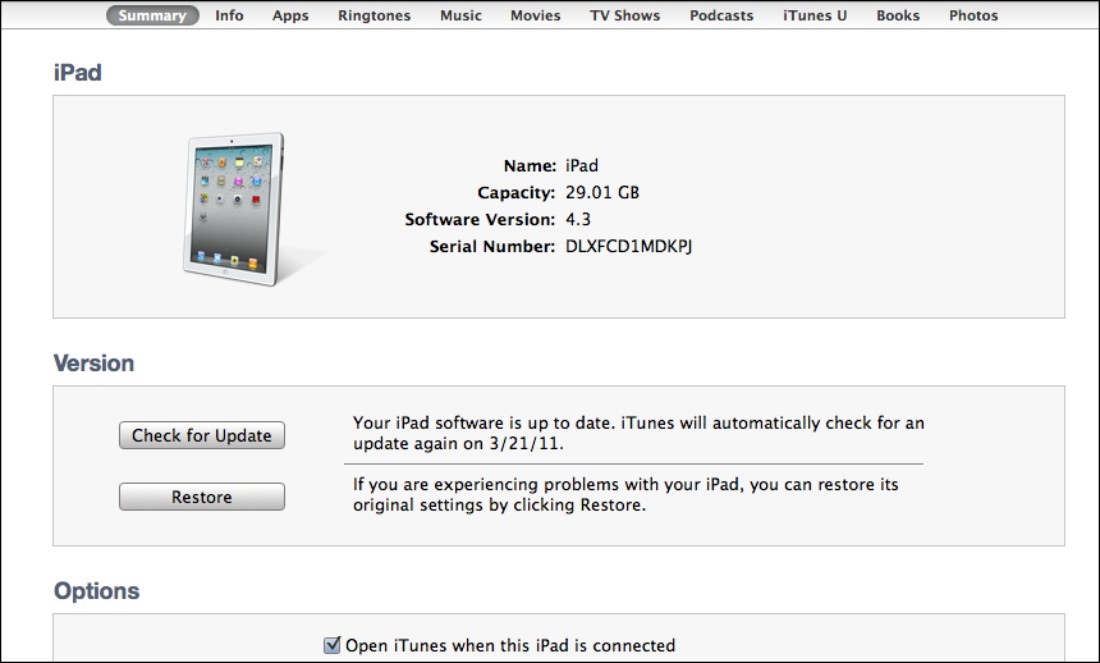
2.2 Select the Open iTunes when this iPad is connected check box.
If that check box was already selected, you need to delve a bit deeper to solve the mystery. Follow these steps:
1. Open the iTunes preferences:
• Mac. Choose iTunes → Preferences, or press +. (period).
• Windows. Choose Edit → Preferences, or press Ctrl+. (period).
2. Click the Devices tab.
3. Deselect the Prevent iPods, iPhones, and iPads from Syncing Automatically check box.
4. Click OK to put the new setting into effect and enable automatic syncing again.
Syncing Your iPad Manually
When you first connected your iPad to iTunes, the brief setup routine included a screen that asked if you wanted to automatically sync certain content, such as music and photos. If you activated a check box for a particular type of content, iTunes configured the iPad to sync all of that content. That’s fine, but depending on how much content you have, you might end up throwing a lot of stuff at your iPad.
One fine day, you’ll be minding your own business and performing what you believe to be a routine sync operation when a dialog like the one shown in Figure 2.3 rears its nasty head.
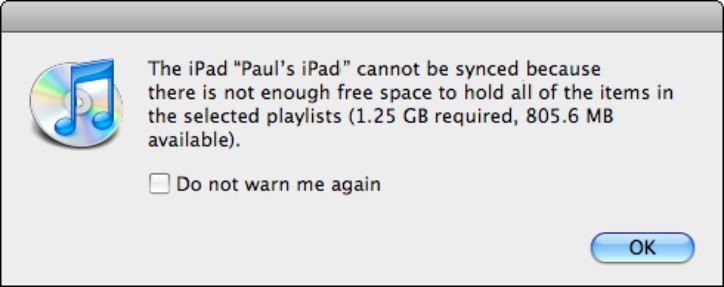
2.3 You see this dialog if iTunes can’t fit all your stuff on your iPad.
Groan! This most unwelcome dialog means just what it says: You don’t have enough free space on your iPad to sync all the content from your computer. You can handle this in a couple of ways:
• Remove some of the content from your computer. This is a good way to go if your iPad is really close to having enough space. For example, the dialog says your computer wants to send 100MB of data, but your iPad has only 98MB of free space. Get rid of a few megabytes of stuff on your computer, and you’re back in the sync business.
• Synchronize your iPad manually. This means that you no longer sync everything on your computer. Instead, you hand-pick which playlists, podcasts, audiobooks, and so on are sent to your iPad. It’s a bit more work, but it’s the way to go if there’s a big difference between the amount of content on your computer and the amount of space left on your iPad.
Syncing manually means that you handle the syncing yourself for the various content types: contacts, calendars, e-mail, bookmarks, music, podcasts, audiobooks, eBooks, photos, videos, and apps. You do this using the other tabs in the iPad window: Info, Music, Photos, and so on. To learn the specifics for each type of data, see the following sections of the book:
• Safari bookmarks. In Chapter 4, see the section on syncing your bookmarks.
• E-mail account info. In Chapter 5, see the section on syncing your e-mail accounts.
• Mail application notes. In Chapter 5, see the section on syncing your notes.
• Photos. In Chapter 6, see the section on syncing photos.
• eBooks. In Chapter 7, see the section on syncing eBooks.
• Music, podcasts, and audiobooks. In Chapter 8, see the section on syncing music and other audio content.
• Movies and TV shows. In Chapter 9, see the section on syncing videos.
• Contacts. In Chapter 10, see the section on syncing your contacts.
• Calendars. In Chapter 11, see the section on syncing your calendar.
• Apps. In Chapter 13, see the section on syncing your apps.
When your sync settings are straight, you click the iTunes Sync button to perform the synchronization.
Taking Syncing to a Higher Level
Syncing data between your iPad and your Mac or PC isn’t complicated, and most of the time it’s a straight connect-and-sync task. I’m loath to add complexity to such an admirably simple procedure, but you need to know how to handle the main sync challenges that might come your way. The next few sections show you how to handle sync conflicts, deal with large sync changes, replace and refresh iPad data, and merge and sync data from two or more computers.
Handling conflicting sync changes
When you sync information between your iPad and a computer, you might think it’s exclusively new data that’s being transferred: new songs, new contacts, new calendar appointments, and so on. However, the sync also includes edited or changed data. For example, if you change someone’s e-mail address on your iPad, the next time you sync, iTunes updates the e-mail address on the computer, which is exactly what you want.
However, what if you already changed that person’s address on the computer? If you made the same edit, it’s no big deal because there’s nothing to sync. But what if you made a different edit? Ah, that’s a problem, because now iTunes doesn’t know which version has the correct information. In that case, it shrugs its digital shoulders and passes off the problem to a program called Conflict Resolver, which displays the dialog shown in Figure 2.4.
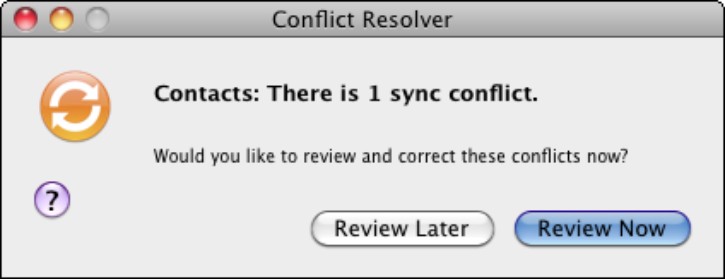
2.4 If you make different edits to the same bit of information on your iPad and your computer, the Conflict Resolver springs into action.
If you want to deal with the problem now, click Review Now. Conflict Resolver offers you the details of the conflict. For example, in Figure 2.5 you can see that a contact’s work e-mail address is different in Address Book and on the iPad. To settle the issue once and for all (you hope), click the correct version of the information, and then click Done. When Conflict Resolver tells you it will fix the problem during the next sync, click Sync Now to make it happen right away.
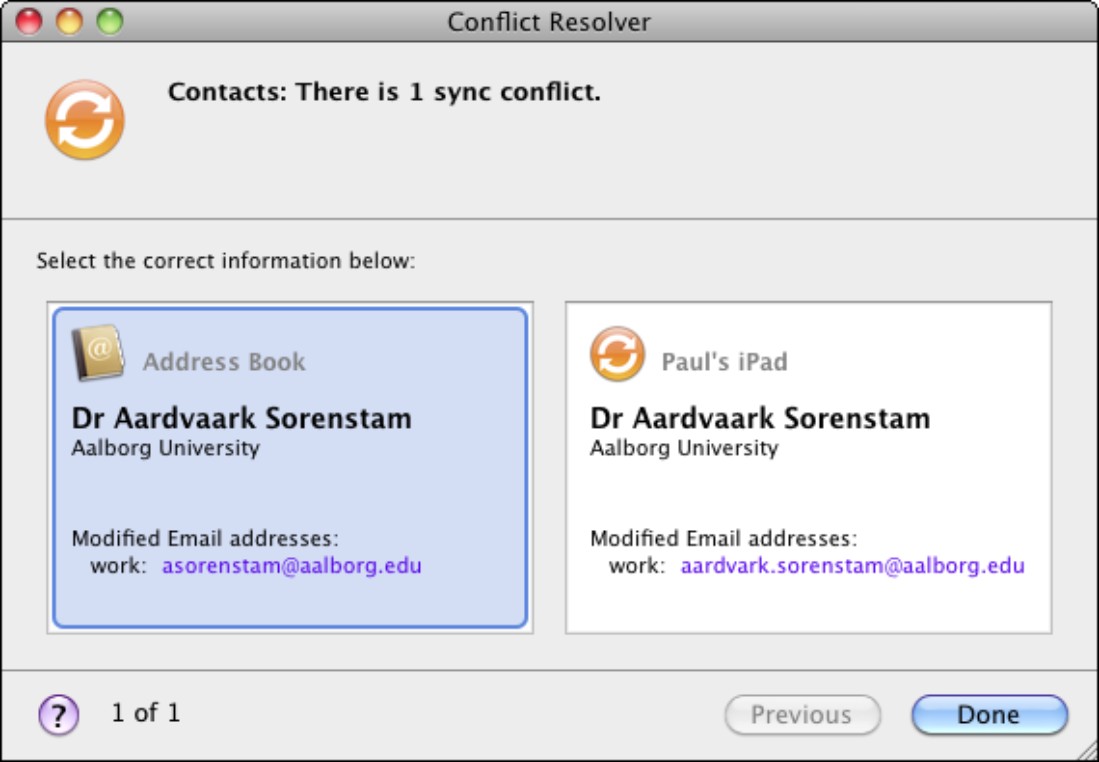
2.5 Review Now shows you the details of any conflicts.
Handling large iPad-to-computer sync changes
Syncing works both ways: Not only does your iPad receive content from your computer, but your computer also receives content from your iPad. For example, if you create any bookmarks, contacts, or appointments on your iPad, those items get sent to your computer during the sync.
However, it’s implied that the bulk of the content flows from your computer to your iPad, which makes sense because for most things it’s a bit easier to add, edit, and delete stuff on the computer. So that’s why if you make lots of changes to your iPad content, iTunes displays a warning that the sync is going to make lots of changes to your computer content. The threshold is five percent, which means that if the sync changes more than five percent of a particular type of content on your computer — such as bookmarks or calendars — the warning appears. For example, Figure 2.6 shows the Sync Alert dialog you see if the sync will change more than five percent of your computer’s bookmarks.
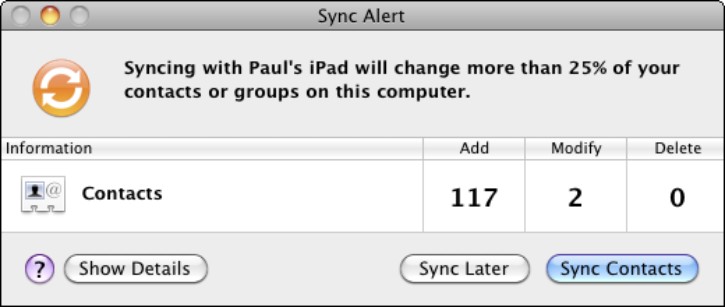
2.6 iTunes warns you if the sync will mess with more than five percent of your computer’s content. In this example, the sync will change more than 25 percent of the Mac’s contacts.
If you’re expecting this (because you did change lots of stuff on your iPad), click the Sync Whatever button, where Whatever is the type of data: Bookmarks, Contacts, and so on. If you’re not sure, click Show Details to see what the changes are. If you’re still scratching your head, click Sync Later to skip that part of the sync.
If you’re running iTunes for Windows, you can either turn off this warning or adjust the threshold. (For some unfathomable reason, iTunes for the Mac doesn’t offer this handy option.) Follow these steps:
1. Choose Edit→Preferences, or press Ctrl+, (comma). The iTunes dialog comes aboard.
2. Click the Devices tab.
3. If you want to disable the sync alerts altogether, deselect the Warn When check box. Otherwise, leave that check box selected and move to Step 4.
4. Use the Warn When Percent of the Data on the Computer will be Changed list to set the alert threshold, where Percent is one of the following:
• any. Select this option to see the sync alert whenever syncing with the iPad will change data on your computer. iPad syncs routinely modify data on the computer, so be prepared to see the alerts every time you sync. (Of course, that may be exactly what you want.)
• more than X%. Select one of these options — your choices are 5% (the default), 25%, and 50% — to see the alert only when the sync will change more than X percent of some data type on the computer.
5. Click OK to put the new settings into effect.
Removing data from your iPad and replacing it with fresh info
After you know what you’re doing, syncing contacts, calendars, e-mail accounts, and bookmarks to your iPad is a relatively bulletproof procedure that should happen without a hitch each time. Of course, this is technology you’re dealing with here, so hitches do happen every now and then, and as a result you might end up with corrupt or repeated information on your iPad.
Or perhaps you’ve been syncing your iPad with a couple of different computers (see the section on syncing media with two or more computers later in this chapter), and you decide to cut one of the computers out of the loop and revert to just a single machine for all your syncs.
In both these scenarios, you need to replace the existing information on your iPad with a freshly baked batch of data. Fortunately, iTunes has a feature that lets you do exactly that. Here’s how it works:
1. Connect your iPad to your computer.
2. In the iTunes Devices list, click the iPad.
3. Click the Info tab.
4. Select the Sync check boxes for each type of information you want to work with (contacts, calendars, e-mail accounts, bookmarks, or notes). If you don’t select a check box, iTunes won’t replace that information on your iPad. For example, if you like your iPad bookmarks just the way they are, don’t select the Sync Bookmarks check box.
5. In the Advanced section, select the check box beside each type of information you want to replace. Figure 2.7 shows five check boxes: Contacts, Calendars, Mail Accounts, Bookmarks, and Notes.
6. Click Apply. iTunes replaces the selected information on your iPad.

2.7 Use the check boxes in the Advanced section to decide which information to replace on your iPad.

If a check box in the Advanced section is disabled, it’s because you didn’t select the corresponding Sync check box. For example, in Figure 2.7 you see that the Sync notes check box is deselected, so in the Advanced section, the Notes check box is disabled.
Merging data from two or more computers
Long gone are the days when our information resided on a single computer. Now it’s common to have a desktop computer (or two) at home, a work computer, a smartphone (such as an iPhone), and, of course, your iPad. It’s nice to have all that digital firepower, but it creates a big problem: You end up with contacts, calendars, and other information scattered over several machines. How are you supposed to keep track of it all?
Apple’s latest solution is MobileMe, which provides seamless information integration across multiple computers (Mac and Windows), and I talk about it later in this chapter (see the section on syncing your iPad with MobileMe).
If you don’t have a MobileMe account, you can still achieve a bit of data harmony. That’s because iTunes offers the welcome ability to merge information from two or more computers on the iPad. For example, if you have contacts on your home computer, you can sync them with your iPad. If you have a separate collection of contacts on your notebook, you can also sync them with your iPad, but iTunes gives you two choices:
• Merge Info. With this option, your iPad keeps the information synced from the first computer and merges it with the information synced from the second computer.
• Replace Info. With this option, your iPad deletes the information synced from the first computer and replaces it with the information synced from the second computer.
Follow these general steps to set up your merged information:
1. Sync your iPad with information from one computer. This technique works with contacts, calendars, e-mail accounts, and bookmarks.
2. Connect your iPad to the second computer.
3. In iTunes, click your iPad in the Devices list.
4. Click the Info tab.
5. Select the Sync check boxes that correspond to information already synced on the first computer. For example, if you synced contacts on the first computer, select the Sync Contacts check box.
6. Click Apply. iTunes displays a dialog like the one shown in Figure 2.8.
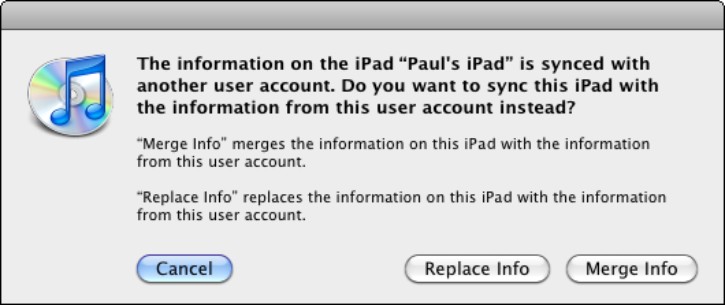
2.8 You can merge contacts, calendars, e-mail accounts, and bookmarks from two or more computers.
7. Click Merge Info. iTunes syncs your iPad and merges the computer’s information with the existing information from the first computer.
Syncing media with two or more computers
It’s a major drag, but you can’t sync the same type of content to your iPad from more than one computer. For example, suppose you’re syncing photos from your desktop computer. If you then connect your iPad to another computer (your notebook, for example), crank up iTunes, and select the Sync Photos from check box, iTunes coughs up the dialog in Figure 2.9. As you can see, iTunes is telling you that if you go ahead with the photo sync on this computer, it will blow away all your existing iPad photos and albums!
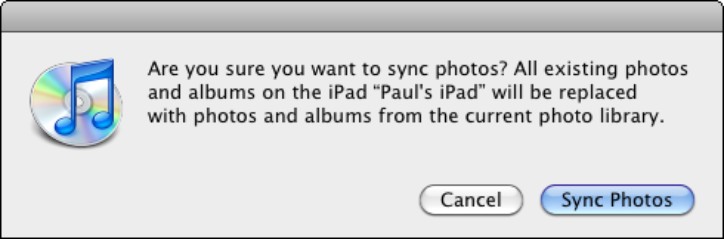
2.9 Syncing the same type of content from two different computers is a no-no in the iTunes world.
So there’s no chance of syncing the same iPad with two different computers, right? Not so fast, my friend. Let’s try another thought experiment. Suppose you’re syncing your iPad with your desktop computer, but you’re not syncing Movies. Again, you connect your iPad to your notebook computer (or whatever), crank up iTunes, and select the Sync Movies check box. Hey, no ominous warning dialog! What gives?
The deal here is that if iTunes sees that you don’t have any examples of a particular type of content (such as movies) on your iPad, it lets you sync that type of content, no questions asked.
In other words, you can sync your iPad with multiple computers, although in a roundabout kind of way. The secret is to have no overlapping content types on the various computers you use for the syncing. For example, let’s say you have a home desktop computer, a notebook computer, and a work desktop computer. Here’s a sample scenario for syncing your iPad with all three machines:
• Home desktop (music and video only). Select the Sync music check box in the Music tab, and select all the Sync check boxes in the Movies tab. Deselect the Sync check boxes on the Photos and Podcasts tabs.
• Notebook (photos only). Select the Sync photos from check box on the Photos tab. Deselect all the Sync check boxes in the Music, Podcasts, and Movies tabs.
• Work desktop (podcasts only). Select the Sync box in the Podcasts tab. Deselect the Sync check boxes in the Music, Photos, and Movies tabs.
Syncing Your iPad with MobileMe
When you go online, you take your life along with you, of course, so your online world becomes a natural extension of your real world. However, just because it’s online doesn’t mean the digital version of your life is any less busy, chaotic, or complex than the rest of your life. Apple’s MobileMe service is designed to ease some of that chaos and complexity by automatically syncing your most important data — your e-mail, contacts, calendars, and bookmarks. Although the syncing itself may be automatic, setting it up is not, unfortunately. The rest of this chapter shows you what to do.
MobileMe works particularly well with the iPad because when you’re on the town or on the road you need data pushed to you. To ensure your iPad works seamlessly with your MobileMe data, you need to add your MobileMe account and configure the iPad’s MobileMe sync settings.
Setting up your MobileMe account on your iPad
Start by setting up your MobileMe account on your iPad:
1. On the Home screen, tap Settings. Your iPad opens the Settings screen.
2. Tap Mail, Contacts, Calendars. The Mail, Contacts, Calendars screen appears.
3. Tap Add Account. The Add Account screen appears.
4. Tap the MobileMe logo. Your iPad displays the MobileMe screen, as shown in Figure 2.10.
5. Tap the Name text box, and type your name.
6. Tap the Address text box, and type your MobileMe e-mail address.
7. Tap the Password text box, and type your MobileMe password. You also can tap the Description text box and type a short description of the account.
8. Tap Next. Your iPad verifies the account info and displays the MobileMe screen, as shown in Figure 2.11.
9. If you want to use push e-mail, leave the Mail switch set to On.
10. If you want to use push contacts, tap the Contacts switch to On and then tap Sync.
11. If you want to use push calendars, tap the Calendars switch to On and then tap Sync.

2.10 Use the MobileMe screen to configure your MobileMe account on your iPad.
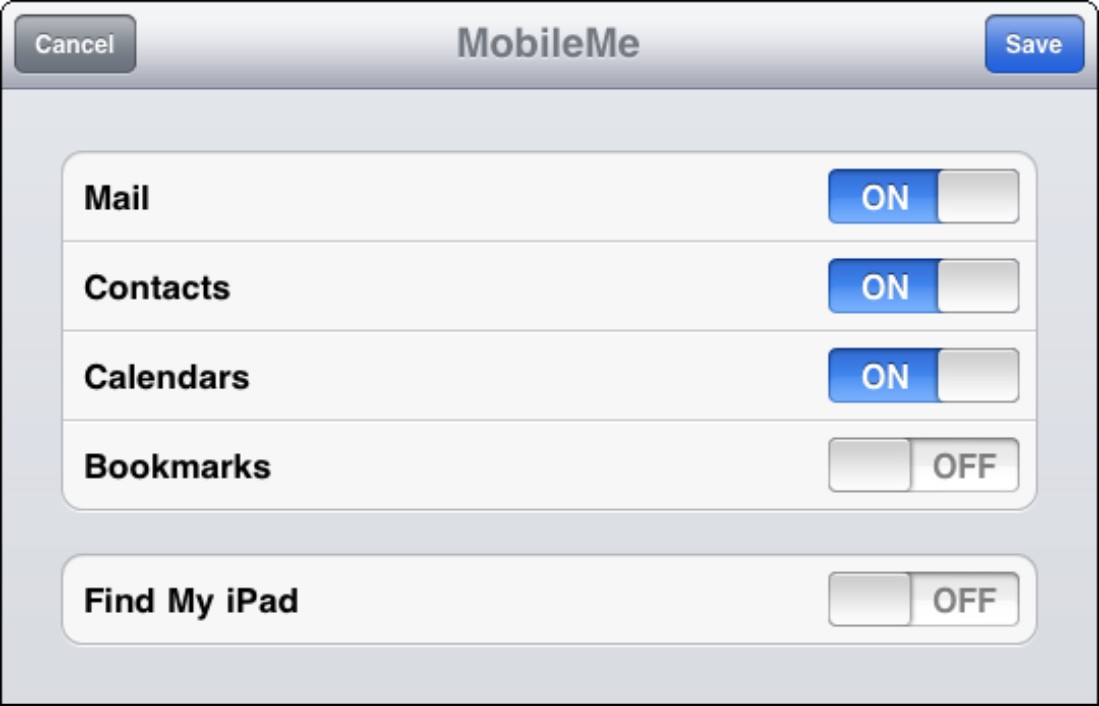
2.11 Use this MobileMe screen to activate push e-mail, contacts, calendars, and bookmarks.
12. If you want to use push bookmarks, tap the Bookmarks switch to On and then tap Sync.
13. Tap Save. Your iPad returns you to the Mail settings screen with your MobileMe account added to the Accounts list.
Setting up MobileMe synchronization on your iPad
The “mobile” part of MobileMe means that no matter where you are, your e-mail messages, contacts, and calendars get pushed to your iPad and remain fully synced with all your other devices. Your iPad comes with this push feature turned on, but if you want to double-check this, or if you want to turn off push in order to concentrate on something else, you can configure the setting by following these steps:
1. In the Home screen, tap Settings. The Settings screen appears.
2. Tap Mail, Contacts, Calendars. The Mail, Contacts, Calendars screen appears.
3. Tap Fetch New Data. Your iPad displays the Fetch New Data screen, as shown in Figure 2.12.
4. If you want MobileMe data sent to you automatically, tap the Push switch to the On position. Otherwise, tap Push to the Off position.
5. If you turned push off, or if your iPad includes applications that don’t support push, tap the frequency with which your iPad should fetch new data: Every 15 Minutes, Every 30 Minutes, Hourly, or Manually.
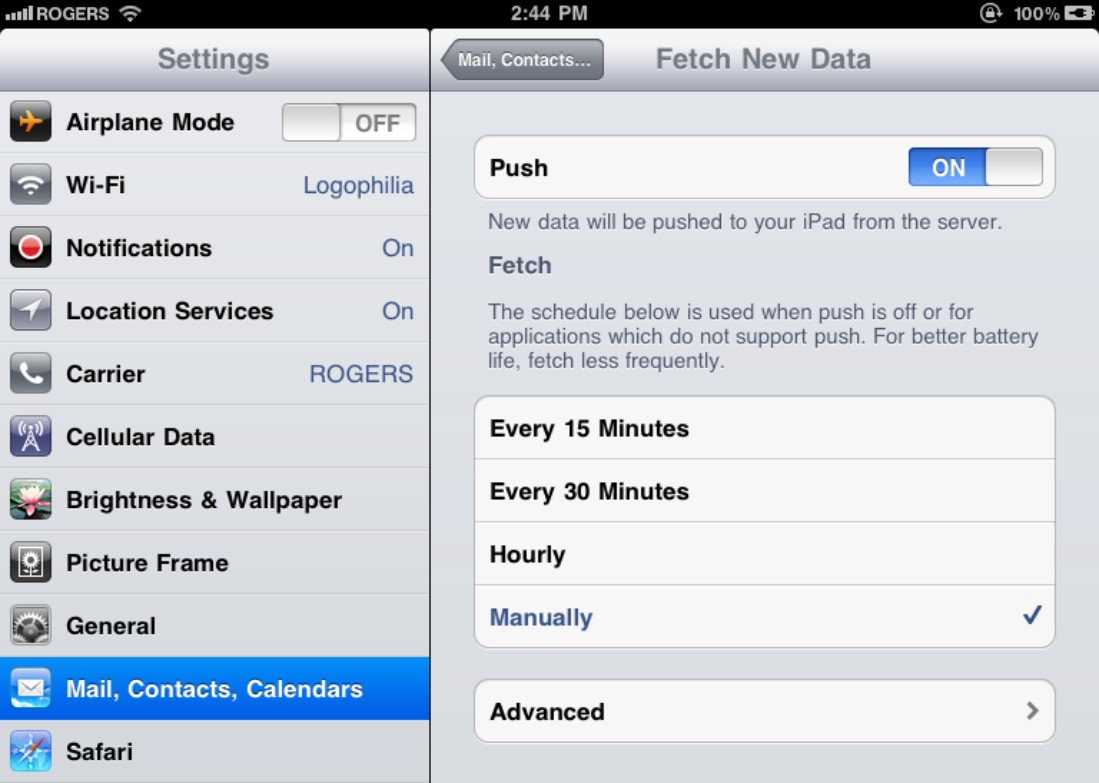
2.12 You use the Fetch New Data screen to configure MobileMe synchronization on your iPad.
If you want to keep your Mac in sync with MobileMe’s push services, you need to add your MobileMe account to the Mail application and configure your Mac’s MobileMe synchronization feature.
Setting up your MobileMe account on your Mac
Follow these steps to get your MobileMe account into the Mail application:
1. In the Dock, click the Mail icon. The Mail application appears.
2. Choose Mail→Preferences to open the Mail preferences.
3. Click the Accounts tab.
4. Click +. Mail displays the Add Account dialog.
5. Type your name in the Full Name text box.
6. Type your MobileMe e-mail address in the Email Address text box.
7. Type your MobileMe password in the Password text box.
8. Leave the Automatically set up account check box selected.
9. Click Create. Mail verifies the account info and returns you to the Accounts tab with the MobileMe account added to the Accounts list.
Setting up MobileMe synchronization on your Mac
Macs were made to sync with MobileMe, so syncing should be a no-brainer. To ensure that’s the case, you need to configure your Mac to make sure MobileMe sync is activated and that your e-mail accounts, contacts, and calendars are part of the sync process. Follow these steps to set your preferences:
1. Click the System Preferences icon in the Dock. Your Mac opens the System Preferences window.
2. In the Internet & Wireless section, click the MobileMe icon. The MobileMe preferences appear.
3. Click the Sync tab.
4. Select the Synchronize with MobileMe check box. Your Mac enables the check boxes beside the various items you can sync, as shown in Figure 2.13.
5. In the Synchronize with MobileMe list, choose Automatically.
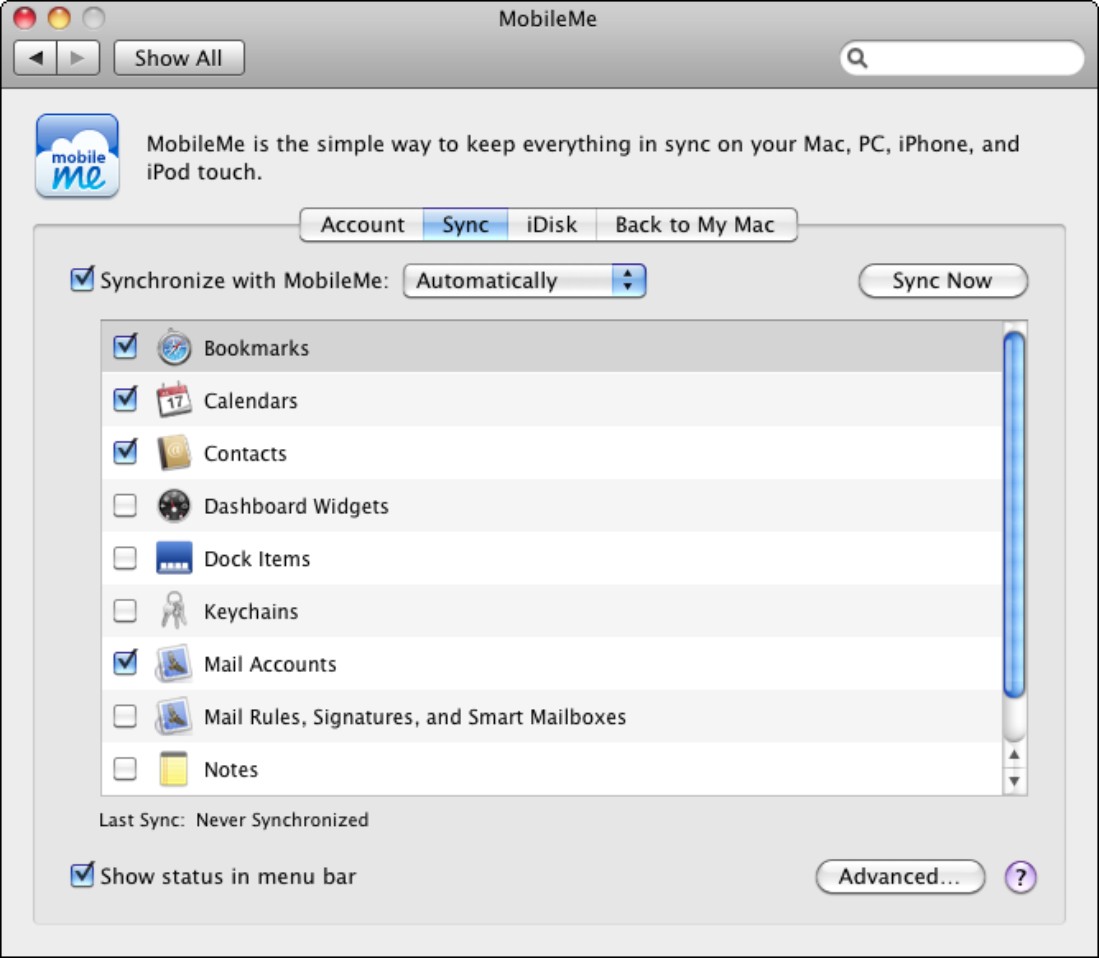
2.13 Select the Synchronize with MobileMe check box, and then select the items you want to sync.
6. Select the check box beside each data item you want to sync with your MobileMe account, particularly the following push-related items:
• Bookmarks
• Calendars
• Contacts
• Mail Accounts
7. Click the Close button. Your Mac is now ready for MobileMe syncing.
Configuring your MobileMe account on your Windows PC
MobileMe is happy to push data to your Windows PC. However, unlike with a Mac, your Windows machine wouldn’t know MobileMe if it tripped over it. To get Windows hip to the MobileMe thing, you need to do two things:
• Download and install the latest version of iTunes.
• Download and install the MobileMe Control Panel for Windows, which you can find here: http://support.apple.com/downloads/MobileMe_Control_Panel_for_Windows.
With that done, you now configure MobileMe to work with your Windows PC by following these steps:
1. On the Windows PC that you want to configure to work with MobileMe, choose Start→Control Panel to open the Control Panel window.
2. Double-click the MobileMe icon. If you don’t see this icon, first open the Network and Internet category. The MobileMe Preferences window appears.
3. Use the Member Name text box to type your MobileMe member name.
4. Use the Password text box to type your MobileMe password.
5. Click Sign In. Windows signs in to your account.
6. Click the Sync tab.
7. Select the Sync with MobileMe check box, and then choose Automatically in the Sync with MobileMe list, as shown in Figure 2.14.

2.14 Use the MobileMe Preferences dialog to set up your Windows PC to work with MobileMe.
8. Select the Contacts check box, and then use the Contacts list to select the address book you want to sync.
9. Select the Calendars check box, and then use the Calendars list to select the calendar you want to sync.
10. Select the Bookmarks check box, and then use the Bookmarks list to select the web browser you want to sync.
11. If you want to run a sync immediately, click Sync Now.
12. If you see the First Sync Alert dialog, choose Merge Data and click Allow.
13. Click OK.