
How Can I Get More Out of iPad Web Surfing?
When Apple announced the iPad in January 2010, one of the presenters was demonstrating the iPad’s Safari web browser and summarized the experience with a terrific line: “It just feels right to hold the Internet in your hands.” That’s about as succinct a description of web surfing on the iPad as you’re ever going to come across, not just because it’s perfect in its pithiness, but also because the iPad just might be the ultimate web surfing tool. It’s portable, fast, intuitive, and offers no compromises — it shows actual, full-size web pages, rendered as each site designer intended. However, that doesn’t mean you can’t make browsing on your iPad even better. This chapter takes you through my favorite tools and techniques for getting even more out of web surfing on your iPad.
Touchscreen Tips for Web Surfing
Juggling Multiple Web Pages
Filling in Online Forms
Using Bookmarks for Faster Surfing
Getting Even More Out of Safari on Your iPad
Touchscreen Tips for Web Surfing
The case in favor of crowning the iPad the best web surfing appliance ever isn’t hard to make: It’s blazingly fast, it renders most sites perfectly, and the large screen means you almost always see a complete (horizontally, at least) view of the regular version of each page (rather than a partial view of the page or some ugly and dumbed-down mobile-only version of the page).
But what really sets the iPad’s web surfing apart not only from other tablet devices, but also from desktop, notebook, and netbook computers, is the touchscreen. With other devices, although you can click links and fill in forms, the page is really a static entity that just sits there. However, with the iPad (as well as its smaller touchscreen cousin, the iPhone), you can zoom into and out of the page by spreading and pinching your fingers, and you can pan the page by flicking a finger in the direction you want to go. You really feel as though you’re not just interacting with the web page, but manipulating the web page with your bare hands!
The touchscreen is the key to efficient and fun web surfing on the iPad, so here’s a little collection of touchscreen tips that ought to make your web excursions even easier and more pleasurable:
• Double-tap. A quick way to zoom in on a page that has various sections is to double-tap on the specific section — be it an image, a paragraph, a table, or a column of text — that you want magnified. Your iPad zooms the section to fill the width of the screen. Double-tap again to return the page to the regular view.

The double-tap-to-zoom trick works only on pages that have identifiable sections. If a page is just a wall of text, you can double-tap until the cows come home (that’s a long time) and nothing much happens.
• Precision zooming. Zooming on the iPad is straightforward: To zoom in, spread two fingers apart; to zoom out, pinch two fingers together. However, when you zoom in on a web page, it’s almost always because you want to zoom in on something. It may be an image, a link, a text box, or just a section of text. To ensure that your target ends up in the middle of the zoomed page, pinch your thumb and forefinger together on the screen as if you are pinching the target you want to zoom in on. Spread your thumb and forefinger apart to zoom in.
• The old pan-and-zoom. Another useful technique for getting a target in the middle of a zoomed page is to zoom and pan at the same time. That is, as you spread (or pinch) your fingers, you also move them up, down, left, or right to pan the page at the same time. This takes a bit of practice, and often the iPad allows you to pan either horizontally or vertically (not both), but it’s still a useful trick.
• One tap to the top. If you’re reading a particularly long-winded web page and you’re near the bottom, you may have quite a long way to scroll if you need to head back to the top of the page. Save the wear and tear on your flicking finger! Instead, tap the page title, which appears just above the address box; Safari immediately transports you to the top of the page.
• Tap and hold to see where a link takes you. You “click” a link in a web page by tapping it with your finger. In a regular web browser, you can see where a link takes you by hovering the mouse pointer over the link and checking out the link address in the status bar. That doesn’t work in your iPad, of course, but you can still find out the address of a link before tapping it. Hold your finger on the link for a few seconds and Safari displays a pop-up screen that shows the link address, as shown in Figure 4.1. If the link looks legit, either tap Open to surf there in the current browser page, or tap Open in New Page to start a fresh page. (See the section about opening and managing multiple browser pages later in this chapter for more info on browser pages.) If you decide not to go there, tap anywhere outside of the pop-up screen.

4.1 Hold your finger on a link to see the link address and several link options.
• Tap and hold to make a copy of a link address. If you want to include a link address in another app, such as a note or an e-mail message, you can copy it. Tap and hold your finger on the link for a few seconds, and Safari displays the pop-up screen (refer to Figure 4.1). Tap Copy to place the link address into memory, switch to the other app, tap the cursor, and then tap Paste.
• Use the portrait view to navigate a long page. When you rotate your iPad 90 degrees, the touchscreen switches to landscape view, which gives you a wider view of the page. Return the iPad to its upright position, and you return to portrait view. If you have a long way to scroll in a page, first use the portrait view to scroll down and then switch to the landscape view to increase the text size. Scrolling in the portrait view goes much faster than in landscape.
• Two-fingered frame scrolling. Some websites are organized using a technique called frames, where the overall site takes up the browser window, but some of the site’s pages appear in a separate rectangular area — called a frame — usually with its own scroll bar. In such sites, you may find that the usual one-fingered scroll technique scrolls only the entire browser window, not the content within the frame. To scroll the frame stuff, you must use two fingers to do the scrolling. Weird!
• Getting a larger keyboard. The on-screen keyboard appears when you tap into a box that allows typing. I’ve noticed, however, that the keyboard you get in landscape view uses noticeably larger keys than the one you see in portrait view. For the fumble-fingered among us, larger keys are a must, so always rotate the iPad into landscape mode to type text.
• Save typing with standard web addresses. Most websites have addresses that start with http://www. and end with .com/. Safari on your iPad knows this, and it uses this otherwise unremarkable fact to save you tons of typing. If you type just a single block of text into the address bar — it could be a single word such as wiley or two or more words combined into one, such as wordspy — and then tap Go, Safari automatically adds http://www. to the front and .com/ at the end. So wiley becomes http://www.wiley.com/ and wordspy becomes http://www.wordspy.com/.
Remember that rotating the iPad changes the view only if your iPad is upright. The iPad uses gravity to sense the change in orientation, so if it’s lying flat on a table, rotating the iPad won’t do anything. So rotate it first before you put it on the table.
Juggling Multiple Web Pages
These days, it’s a rare web surfer who marches sequentially through a series of web pages. In your own surfing sessions, you probably leave a few web pages open full time (for things like Google searches and RSS feed monitoring), and you likely come across lots of links that you want to check out while still leaving the original page open in the browser. In your computer’s web browser, you probably handle these and similar surfing situations by launching a tab for each page you want to leave open in the browser window. It’s an essential web browsing technique, but can it be done with your iPad’s Safari browser?
Yes, indeed, although not with tabs. Instead, Safari offers the next best thing: pages. A page is a kind of browser “window,” and when you create a new page, you can use it to display a different website. Then it’s a quick tap and flick to switch between them. (The next couple of sections fill in all these details.) And you’re not restricted to a meager two pages, no sir. Your iPad lets you open up to nine — count ’em, nine — pages, so you can throw some wild web page parties.
Opening and managing multiple browser pages
Follow these steps to open and load multiple pages:
1. In Safari, tap the Pages icon in the status bar, as shown in Figure 4.2. Safari displays a thumbnail version of the current page.

4.2 Tap the Pages icon to create a new page.
2. Tap the empty box that appears above the New Page label. Safari opens a blank page using the full screen.
3. Load a website into the new page. You can do this by selecting a bookmark, typing an address, searching for a site, or whatever.
4. Repeat Steps 1 to 3 to load as many pages as you need. As you add pages, Safari keeps track of how many are open and displays the number in the Pages icon, as shown in Figure 4.3.

4.3 The Pages icon tells you how many pages you have on the go.
Some web-based apps and web page links are configured to automatically open the page in a new window, so you may see a new page being created when you tap a link. Also, if you add a web clip to your Home screen (as I describe in Chapter 3), tapping the icon opens the web clip in a new Safari page.

Be careful if you have the full complement of nine browser pages opened. If you click a link that automatically opens in a new browser page, Safari automatically shuts down the first browser page, which could be a bit of a problem if you had some important info in that window. To avoid this problem, consider opening a maximum of eight Safari pages so you always have an extra page available if you need it.
Navigating open pages using page thumbnails
When you have two or more pages fired up, you can use these techniques to impress your friends:
• Switch to another page. Tap the Pages icon to get to the thumbnail view, shown in Figure 4.4, and then tap the page.
• Close a page. Tap the Pages icon, and then tap the X in the upper-left corner. Safari trashes the page without a whimper of protest.
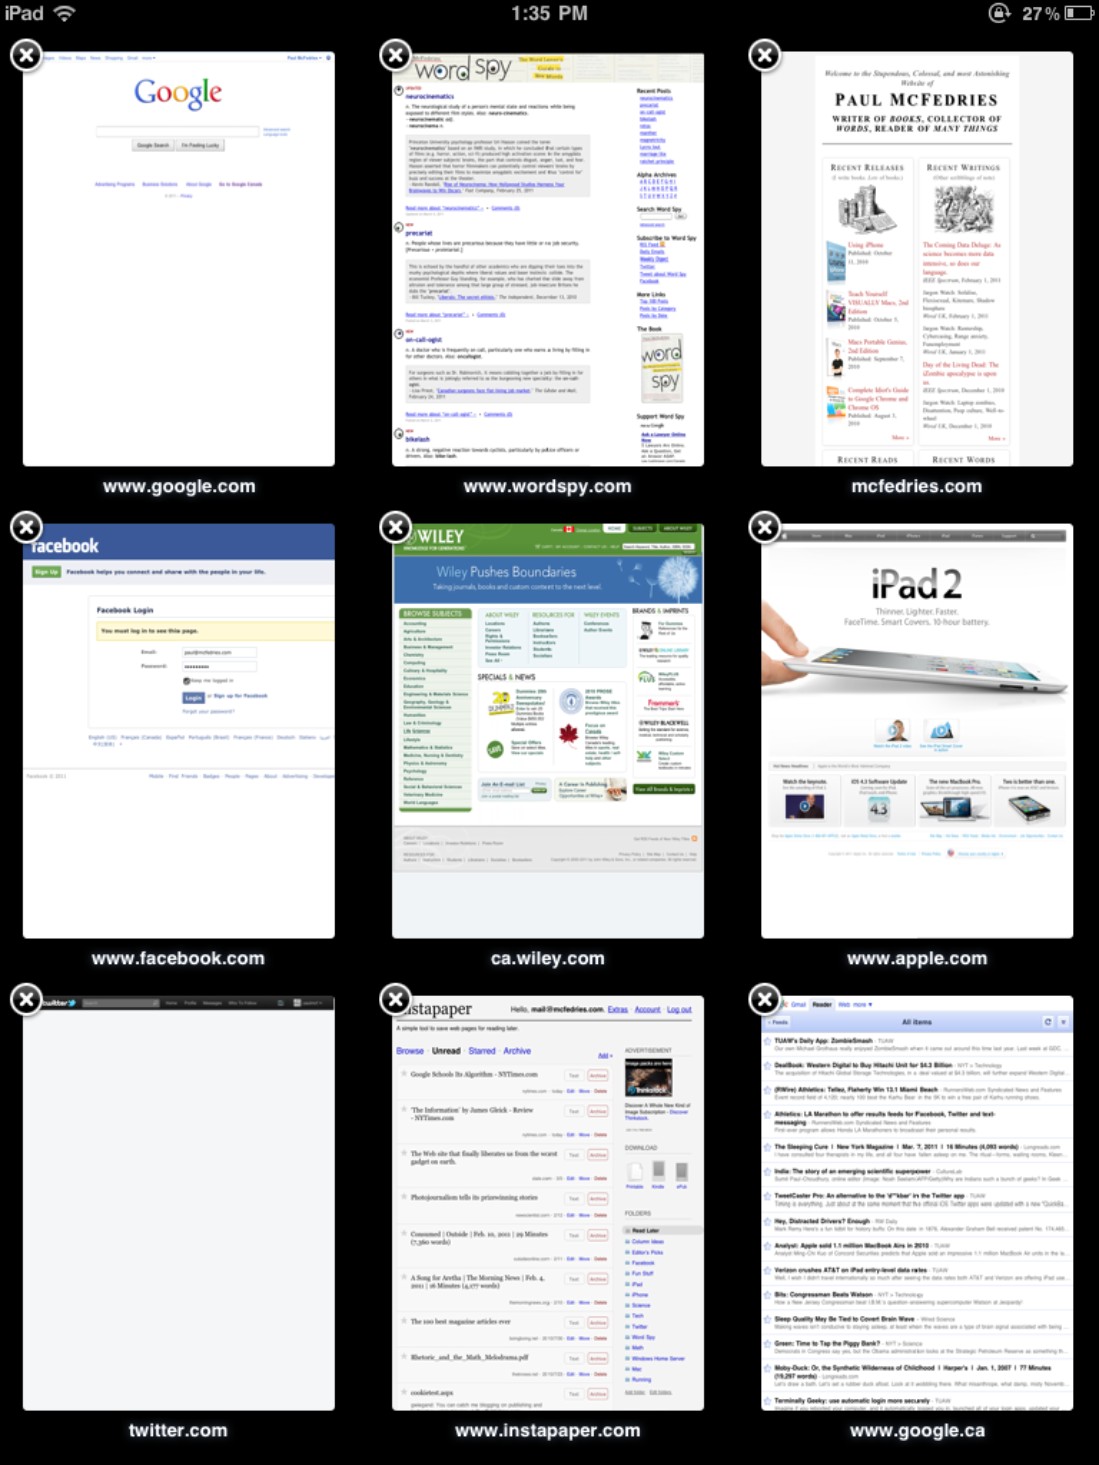
4.4 Tap the Pages icon to see thumbnail versions of your open pages.

If you’re in portrait mode and you’re having trouble reading the text or viewing the images in a thumbnail, turn your iPad to landscape mode. This gives you wider thumbnails that are slightly more magnified for easier reading.
Filling in Online Forms
Many web pages include forms where you fill in some data and then submit the form, which sends the data off to some server for processing. Filling in these forms in your iPad’s Safari browser is mostly straightforward:
• Text box. Tap inside the text box to display the touchscreen keyboard, type your text, and then tap Done.
• Text area. Tap inside the text area, and then use the keyboard to type your text. Most text areas allow multiline entries, so you can tap Return to start a new line. When you finish, tap Done.
• Check box. Tap the check box to toggle the check mark on and off.
• Radio button. Tap a radio button to activate it.
• Command button. Tap the button to make it do its thing (usually submit the form).
Many online forms consist of a bunch of text boxes or text areas. If the idea of performing the tap-type-Done cycle over and over isn’t appealing to you, fear not. Your iPad’s Safari browser offers an easier method:
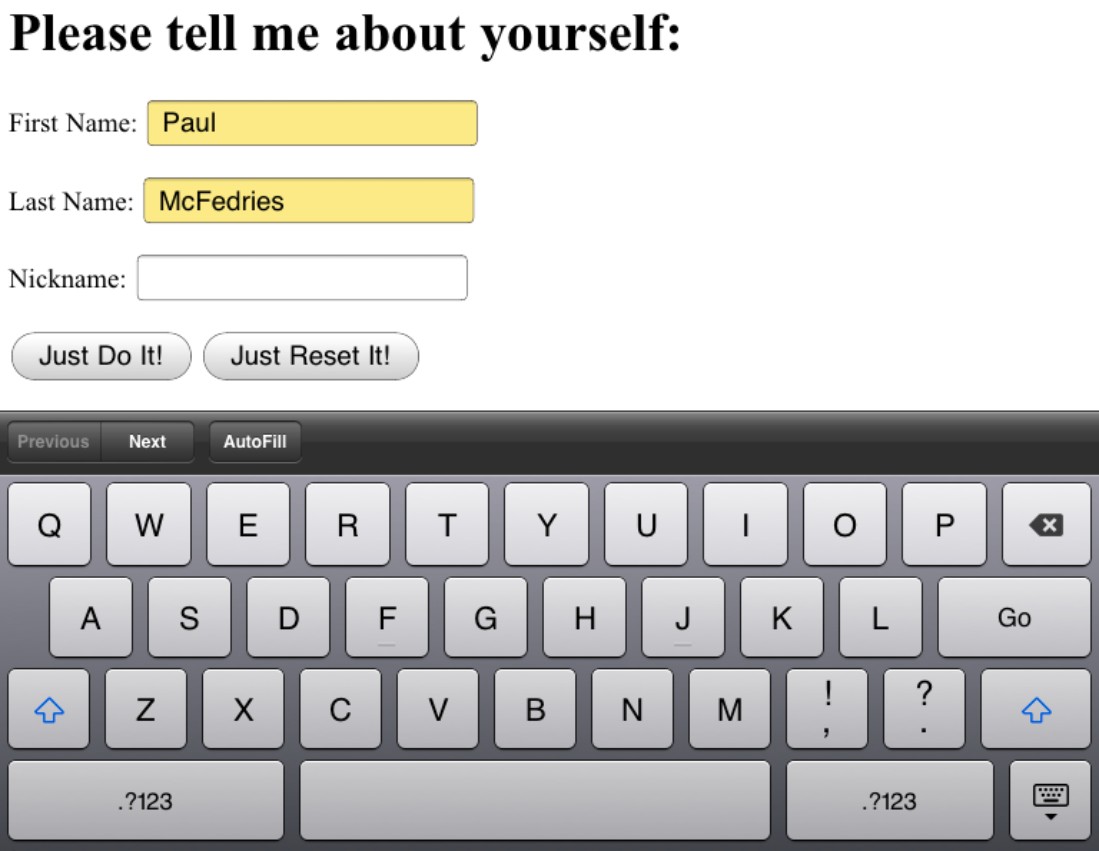
1. Tap inside the first text box or text area. The keyboard appears.
2. Type the text you want to enter. Above the keyboard, notice the Previous and Next buttons, as shown in Figure 4.5.
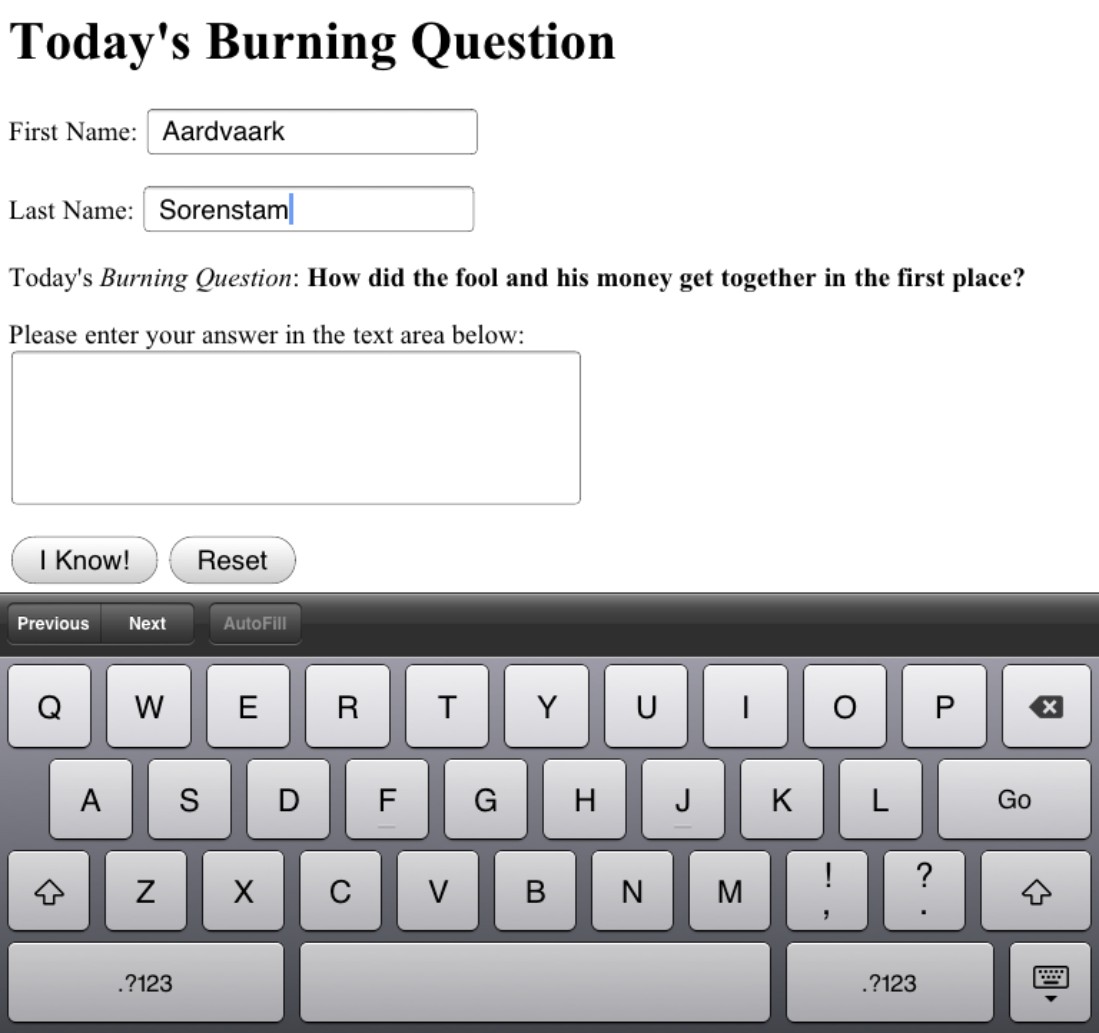
4.5 If the form contains multiple text boxes or text areas, you can use the Previous and Next buttons to navigate them.
3. Tap Next to move to the next text box or text area. If you need to return to a text box, tap Previous instead.
4. Repeat Steps 2 and 3 to fill in the text boxes.
5. Tap Done. Safari returns you to the page.
I haven’t yet talked about selection lists, and that’s because your iPad’s browser handles them in an interesting way. When you tap a list, Safari displays the list of items in a separate box, as shown in Figure 4.6. In the list of items, the currently selected item appears with a check mark to its right. Tap the item you want to select.
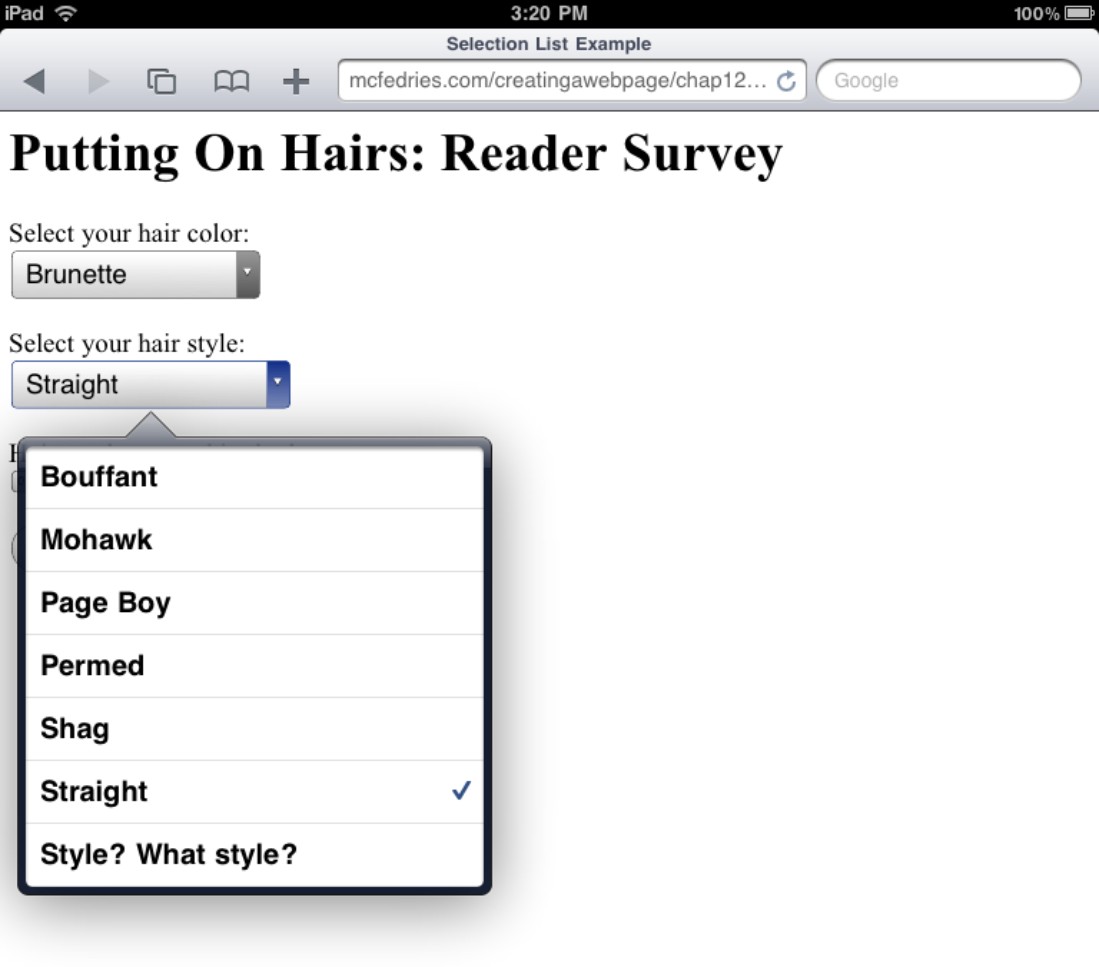
4.6 Tap a list to see its items in a separate box for easier selecting.
Turning on AutoFill for faster forms
The iPad’s Safari browser makes it relatively easy to fill in online forms, but it can still be slow going, particularly if you have to do lots of text box or text area typing. To help make forms less of a chore, your iPad’s Safari browser supports a welcome feature called AutoFill. Just as with the desktop version of Safari (or just about any other mainstream browser), AutoFill remembers the data you enter into forms and then enables you to fill in similar forms with a simple tap of a button. You also can configure AutoFill to remember usernames and passwords.
To take advantage of this nifty new feature, you first have to turn it on by following these steps:
1. On the Home screen, tap Settings. Your iPad opens the Settings screen.
2. Tap Safari. The Safari screen appears.
3. Tap AutoFill to open the AutoFill screen.
4. Tap the Use Contact Info switch to the On position. This tells Safari to use your item in the Contacts app to grab data for a form. For example, if a form requires your name, Safari uses your contact name.
5. The My Info field should show your name; if it doesn’t, tap the field and then tap your item in the Contacts list.
6. If you want Safari to remember the usernames and passwords you use to log in to sites, tap the Names and Passwords switch to the On position. A completed AutoFill screen appears in Figure 4.7.
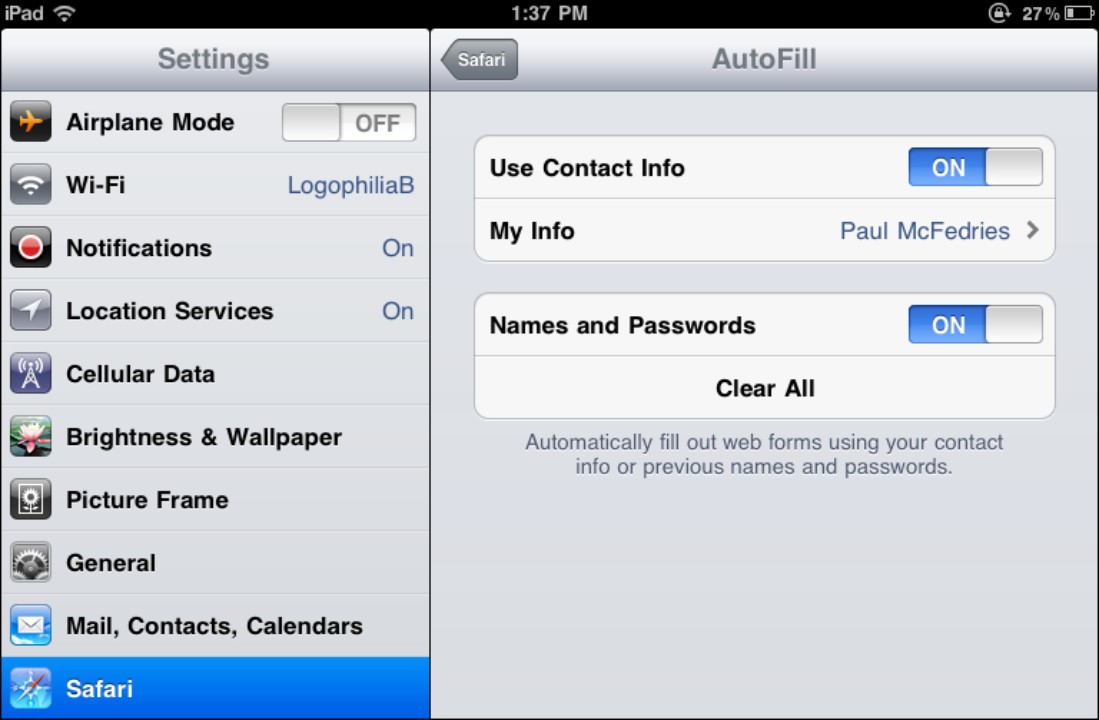
4.7 Fill in the AutoFill screen to make online forms less of a chore.
Now when you visit an online form and access any text field in the form, the AutoFill button becomes enabled. Tap AutoFill to fill in those portions of the form that correspond to your contact data, as shown in Figure 4.8. Notice that the fields Safari is able to automatically fill in display with a colored background.
4.8 Tap the AutoFill button to fill in form fields with your contact data.
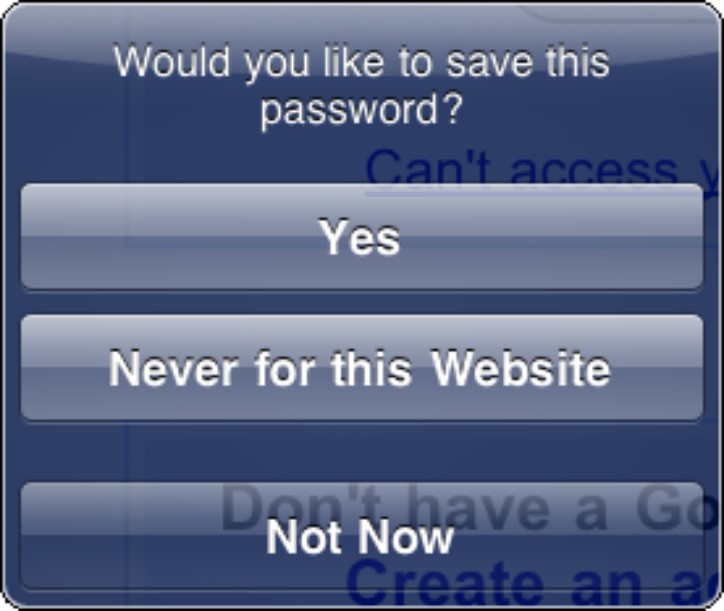
Saving website login passwords
If you enabled the Names and Passwords option in the AutoFill screen, each time you fill in a username and password to log into a site, Safari displays the dialog shown in Figure 4.9 that asks if you want to remember the login data, and it gives you three choices:
4.9 If you configured Safari to remember usernames and passwords, you see this dialog when you log in to a site.
• Yes. Tap this button to have Safari remember your username and password.
• Never for this website. Tap this button to tell Safari not to remember the username and password, and to never again prompt you to save the login data.
• Not Now. Tap this button to tell Safari not to remember the username and password this time, but to prompt you again next time you log in to this site.
Your iPad is a cautious beast, so it doesn’t offer to save all the passwords you enter. In particular, if the login form is part of a secure site, then your iPad doesn’t ask if you want to save the password. This means you won’t be tempted to store the password for your online bank, corporate website, or any site where you saved your credit card data (such as Amazon and similar online shopping sites).
Using Bookmarks for Faster Surfing
The web era is into its third decade now, so you certainly don’t need me to tell you that the web is a manifestly awesome resource that redefines the phrase treasure trove. No, at this stage of your web career, you’re probably most concerned with finding great web treasures and with returning to the best or most useful of those treasures in subsequent surfing sessions. Safari’s History list can help here (I talk about it later in this chapter), but the best way to ensure that you can easily return to a site a week, a month, or even a year from now is to save that site as a bookmark.
Syncing your bookmarks
By far, the easiest way to get bookmarks for your favorite sites into your iPad is to take advantage of your best bookmark resource: the Safari browser on your Mac (or your Windows PC), or the Internet Explorer browser on your PC (which calls them favorites). You’ve probably used those browsers for a while and have all kinds of useful and fun bookmarked sites at your metaphorical fingertips. To get those bookmarks at your literal fingertips — that is, on your iPad — you need to include bookmarks as part of the synchronization process between the iPad and iTunes (which I talk about in general terms in Chapter 2).
Having used Safari or Internet Explorer for a while means having lots of great sites bookmarked, but it likely also means that you have lots of digital dreck — sites you no longer visit or that have gone belly-up. Before synchronizing your bookmarks with the iPad, consider taking some time to clean up your existing bookmarks. You’ll thank yourself in the end.
What’s that? You’ve already synced your bookmarks to your iPad, and you now have a bunch of useless sites clogging up iPad Safari’s bookmark arteries? Not a problem! Return to your desktop Safari (or Internet Explorer), purge the bogus bookmarks, and then resync your iPad. Any bookmarks you blew away also get trashed from your iPad.
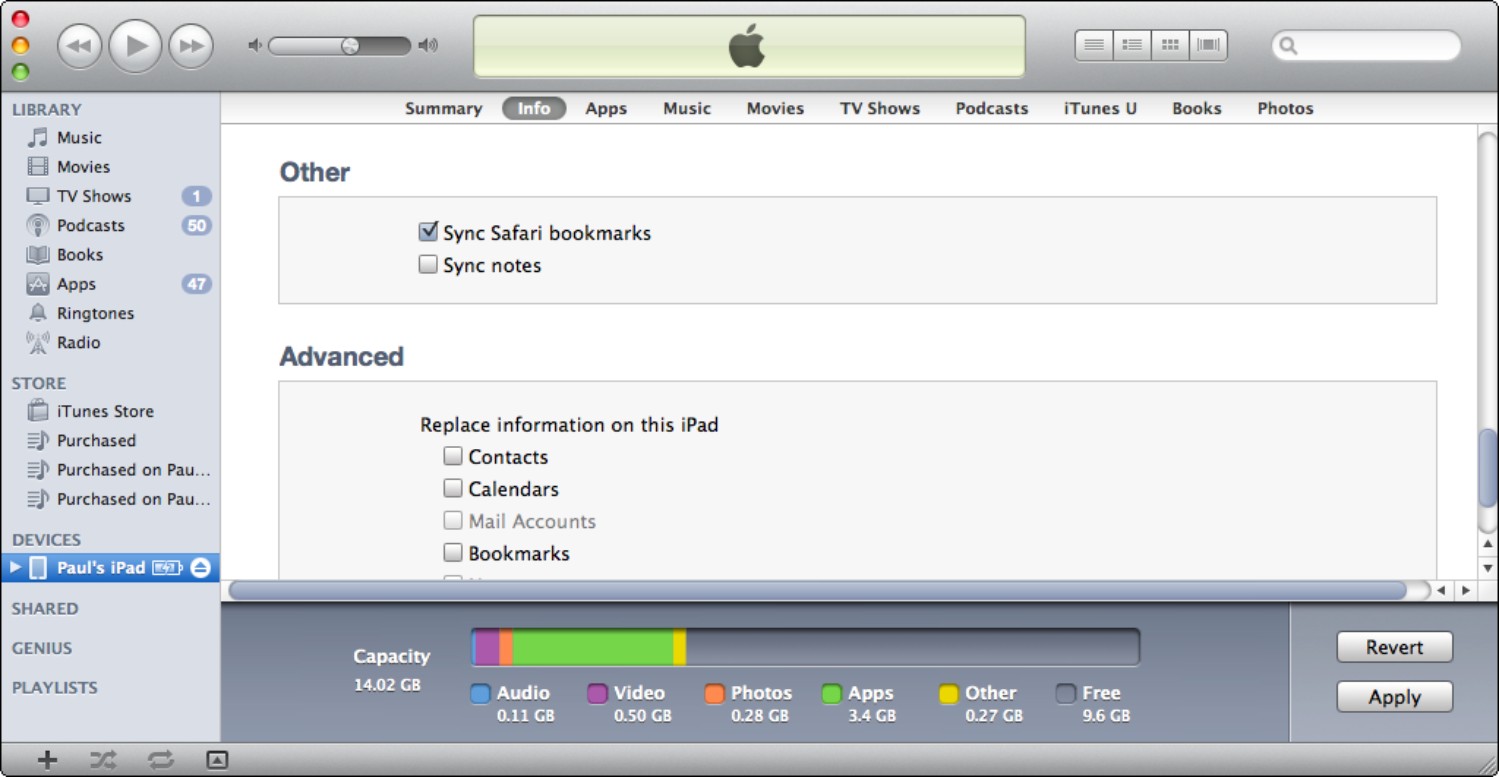
Bookmark syncing is turned on by default, but you should follow these steps to make sure:
1. Connect your iPad to your computer.
2. In the iTunes sources list, click the iPad.
3. Click the Info tab.
4. Scroll down to the Other section, and use one of the following techniques:
• Mac. Select the Sync Safari bookmarks check box, as shown in Figure 4.10.
4.10 Make sure the Sync Safari bookmarks check box is selected.
• Windows. Select the Sync Bookmarks With check box, and then select your web browser from the drop-down list.
5. Click Apply. iTunes begins syncing the bookmarks from your computer to your iPad.
Adding bookmarks manually
Even if you have your iPad bookmarks off to a flying start by copying a bunch of existing bookmarks from your Mac or Windows PC and now have a large collection of bookmarks at your beck and call, it doesn’t mean your iPad bookmark collection is complete. After all, you might (heck, you will) find some interesting sites while you’re surfing with the iPad. If you think you’ll want to pay those sites another visit down the road, you can create new bookmarks right on the iPad. Here are the steps to follow:
1. On the iPad, use Safari to navigate to the site you want to save.
2. Tap the Actions icon (pointed out in Figure 4.11) in the status bar.
3. Tap Add Bookmark. This opens the Add Bookmark screen, as shown in Figure 4.11.
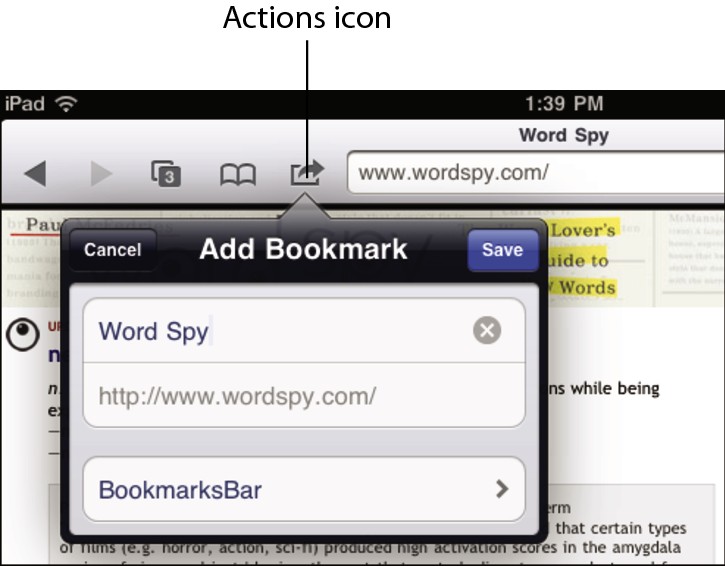
4.11 Use the Add Bookmark screen to specify the bookmark name and location.
4. Tap into the top box, and enter a name for the site that helps you remember it. This name is what you see when you scroll through your bookmarks.
5. Tap Bookmarks. This displays a list of your bookmark folders.
6. Tap the folder you want to use to store the bookmark. Safari returns you to the Add Bookmark screen.
7. Tap Save. Safari saves the bookmark.
Syncing bookmarks is a two-way street, which means that any site you bookmark in your iPad is added to your desktop Safari (or Internet Explorer) the next time you sync.
Getting Firefox bookmarks into your iPad
iTunes bookmark syncing works only with Safari and Internet Explorer. So are you out of luck if your entire web life is bookmarked in Firefox? Nope. Fortunately Firefox has a feature that lets you export your bookmarks to a file. You can then import those bookmarks to Safari or Internet Explorer and then sync with your iPad. It’s a bit of a winding road, I know, but it’s better than starting from scratch. Here are the details:
1. Crank up Firefox, and start the export procedure like so:
• Firefox 3 (Mac). Choose Bookmarks → Organize Bookmarks (or press Shift+ +B) to open the Library. Click the Import and Backup button, and then click Export HTML.
• Firefox 3 (Windows). Choose Bookmarks → Organize Bookmarks (or press Ctrl+Shift+B) to open the Library. Click the Import and Backup button, and then click Export HTML.
• Firefox 2 (Windows). Choose Bookmarks → Organize Bookmarks to open the Bookmarks Manager, and then choose File → Export.
2. In the Export Bookmarks File dialog, choose a location for the file and click Save. Firefox saves its bookmarks to a file named bookmarks.html.
3. Import the Firefox bookmarks file to your browser of choice:
• Safari. Choose File → Import Bookmarks, locate and click the bookmarks.html file, and then click Import.
• Internet Explorer. In versions 9, 8, and 7, press Alt+Z and then click Import and Export; in version 6, choose File → Import and Export. In the Import/Export Wizard, click Next, click Import Favorites, and then follow the wizard’s instructions to import the bookmarks.html file.
4. Connect your iPad to your computer. iTunes opens, connects to the iPad, and syncs the bookmarks, which now include your Firebox bookmarks.
Managing your bookmarks
After you have a few bookmarks stashed away in the bookmarks list, you may need to perform a few housekeeping chores from time to time, including changing a bookmark’s name, address, or folder; reordering bookmarks or folders; or getting rid of bookmarks that have worn out their welcome.
Before you can do any of this, you need to get the Bookmarks list into edit mode by following these steps:
1. In Safari, tap the Bookmarks icon in the status bar, as shown in Figure 4.12. Safari opens the Bookmarks list.

4.12 Tap the Bookmarks icon to display the Bookmarks list.
2. If the bookmark you want to mess with is located in a particular folder, tap to open that folder. For example, if you’ve synced with Safari, you should have a folder named Bookmarks Bar, which includes all the bookmarks and folders that you’ve added to the Bookmarks Bar in your desktop version of Safari.
3. Tap Edit. Your iPad switches the Bookmarks list to edit mode, as shown in Figure 4.13. With edit mode on the go, you’re free to toil away at your bookmarks. Here are the techniques to master:
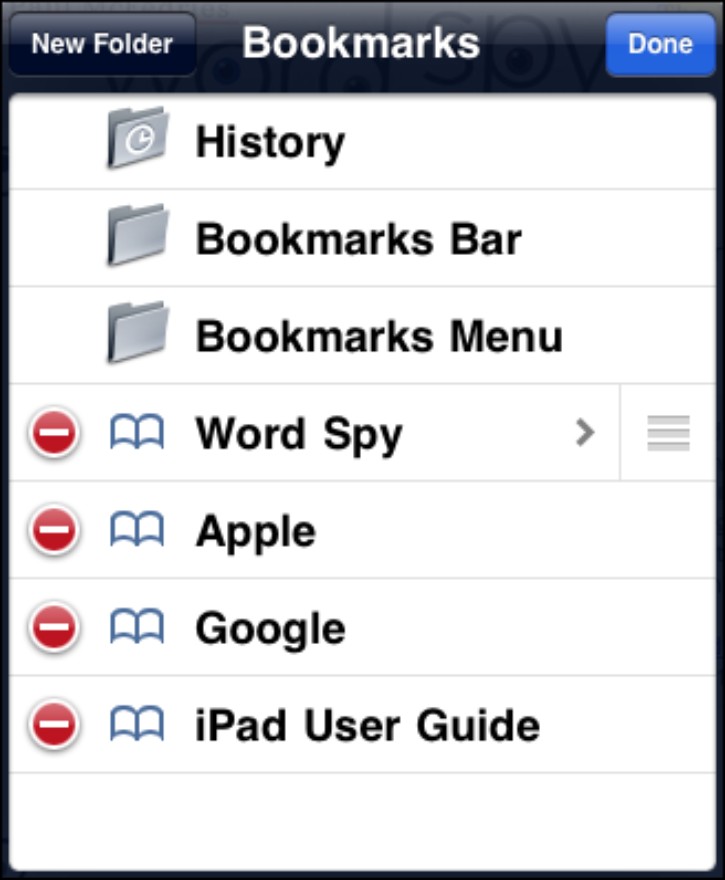
4.13 With the Bookmark list in edit mode, you can edit, rearrange, and delete bookmarks to your heart’s content.
• Edit bookmark info. Tap the bookmark to fire up the Edit Bookmark screen. From here, you can edit the bookmark name, change the bookmark address, and change the bookmark folder. When you finish, tap the name of the current bookmark folder in the top-left corner of the screen.
• Change the bookmark order. Use the drag icon on the right to tap and drag a bookmark to a new position in the list. Ideally, you should move your favorite bookmarks near the top of the list for easiest access.
• Add a bookmark folder. Tap New Folder to launch the Edit Folder screen, and then tap a folder title and select a location. Feel free to use bookmark folders at will, because they’re a great way to keep your bookmarks neat and tidy (if you’re into that kind of thing).
• Delete a bookmark. No use for a particular bookmark? No problem. Tap the Delete icon to the left of the bookmark, and then tap the Delete button that appears.
When the dust settles and your bookmark chores are finished for the day, tap Done to get out of edit mode.
Getting Even More Out of Safari on Your iPad
You’ve seen lots of great Safari tips and techniques so far in this chapter, but I hope you’re up for even more, because you have a ways to go. In the rest of this chapter, you learn such useful techniques as using the History list, changing the default search engine, viewing RSS feeds, and configuring Safari’s security options.
Retracing your steps with the handy History list
Bookmarking a website (as I described earlier in this chapter) is a good idea if that site contains interesting or fun content that you want to revisit. Sometimes, however, you may not realize that a site had useful data until a day or two later. Similarly, you may like a site’s stuff, but decide against bookmarking it, only to regret that decision down the road. You could waste a big chunk of your day trying to track down the site, but then you may run into Murphy’s Web Browsing Law: A cool site that you forget to bookmark is never found again.
Fortunately, your iPad has your back. As you navigate the nooks and crannies of the web, iPad keeps track of where you go and stores the name and address of each page in the History list. The iPad’s limited memory means that it can’t store tons of sites, but it might have what you’re looking for. Here’s how to use it:
1. In Safari, tap the Bookmarks icon (refer to Figure 4.12) in the status bar. Safari opens the Bookmarks list.
2. If you see the Bookmarks screen (refer to Figure 4.13), skip to Step 3. Otherwise, tap the folder names that appear in the upper-left corner of the screen until you get to the Bookmarks screen.
3. Tap History. Safari opens the History screen, as shown in Figure 4.14. The screen shows the sites you’ve visited today at the top, followed by a list of previous surfing dates.
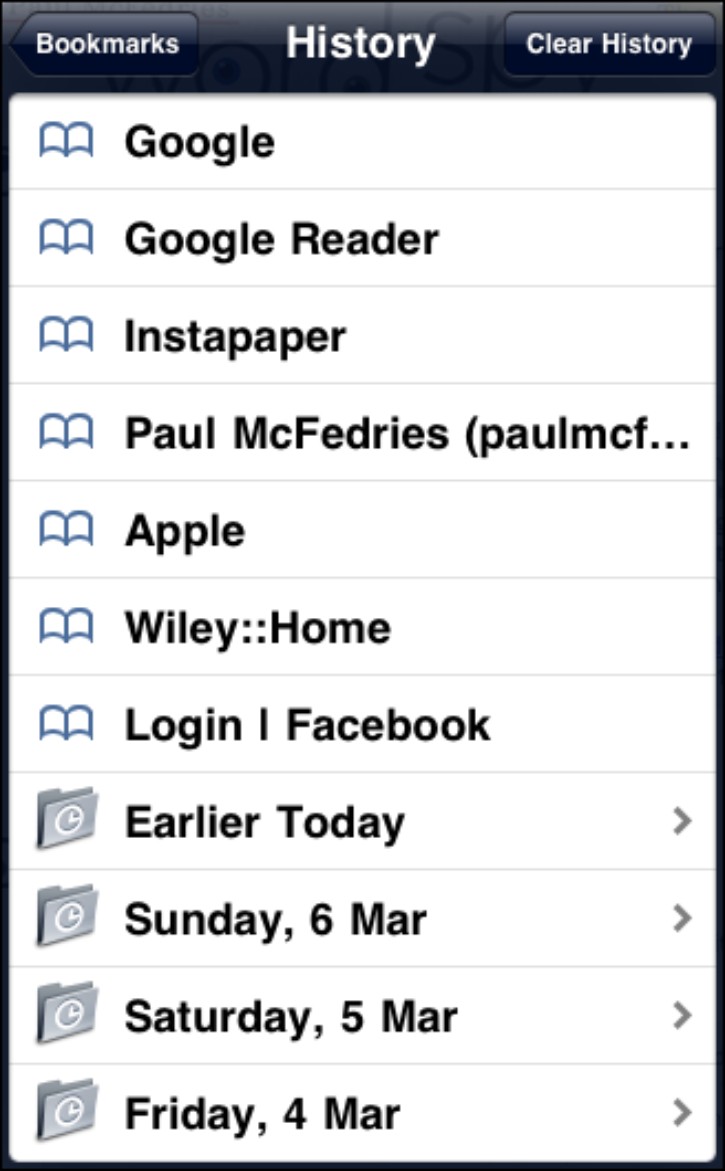
4.14 Safari stores your recent browsing past in the History list.
4. If you visited the site you’re looking for on a previous day, tap the day. Safari displays a list of the sites you visited on that day.
5. Tap the site you want to revisit. Safari loads the site.
Maintaining your privacy by deleting the History list
Your iPad’s History list of sites you’ve recently surfed is a great feature when you need it, and it’s an innocuous feature when you don’t. However, at times the History list is just plain uncool. For example, suppose you shop online to get a nice gift for your spouse’s birthday. If he or she also uses your iPad, your surprise might get ruined if the purchase page accidentally shows up in the History list. Similarly, if you visit a private corporate site, a financial site, or any other site you wouldn’t want others to see, the History list might betray you.
And sometimes unsavory sites can end up in your History list by accident. For example, you might tap a legitimate-looking link in a web page or e-mail message, only to end up in some dark, dank Net neighborhood. Of course, you high-tailed it out of there right away with a quick tap of Safari’s Back button, but that nasty site is now lurking in your History.
Whether you have sites on the History list that you wouldn’t want anyone to see, or if you just find the idea of your iPad tracking your movements on the web to be a bit sinister, follow these steps to wipe out the History list:
1. In Safari, tap the Bookmarks icon in the status bar. Safari opens the Bookmarks list.
2. Tap the folder names that appear in the upper-left corner of the screen until you get to the Bookmarks screen.
3. Tap History. Safari opens the History screen.
4. Tap Clear History. Safari prompts you to confirm.
5. Tap Clear History. Safari deletes every site from the History list.
Here’s another way to clear the History, and it may be faster if you’re not currently working in Safari. In the Home screen, tap Settings, tap Safari, and then tap Clear History. When your iPad asks you to confirm, tap Clear History.
Changing the default search engine
When you tap the Search box at the top of the Safari screen, your iPad loads the Google screen, places the cursor inside the Search box, and displays the keyboard so you can type your search text and then run the search. The screen is named Google because Google is the iPad’s default search engine. We all love Google, of course, but if you have something against it for some reason, you can switch to using either Bing or Yahoo! as your search engine of choice. Here’s how:
1. In the Home screen, tap Settings. Your iPad opens the Settings screen.
2. Tap Safari. The Safari screen appears.
3. Tap Search Engine. Your iPad opens the Search Engine screen.
4. Tap Bing or Yahoo!. Your iPad now uses your choice as the default search engine.
Viewing an RSS feed
Some websites remain relatively static over time, so you only need to check in every once in a while to see if anything’s new. Other sites change content regularly, such as once a day or once a week, so you know in advance when to check for new material. However, on the more verbose sites — particularly blogs — the content changes frequently, although not regularly. For these sites, keeping up with new content can be time consuming, and it’s criminally easy to miss new information. (Murphy’s Blog Reading Law: You always miss the post that everyone’s talking about.)
To solve this problem, tons of websites now maintain RSS feeds; RSS stands for Real Simple Syndication. A feed is a special file that contains the most recent information added to the site. The bad news is that your iPad’s Safari browser doesn’t give you any way to subscribe to a site’s feed like you can with desktop Safari or Internet Explorer. The good news is that your iPad can use a web-based RSS reader application (http://reader.mac.com/) that can interpret a site’s RSS feed and display the feed in the comfy confines of Safari.
Here’s how it works:
1. In Safari, navigate to a web page that you know has an RSS feed.
2. Pan and zoom the page until you find the link to the RSS feed. The link is often accompanied by (or consists entirely of) an icon that identifies it as leading to a feed. Look for an XML icon, an RSS icon, or an orange feed icon, as shown in Figure 4.15.
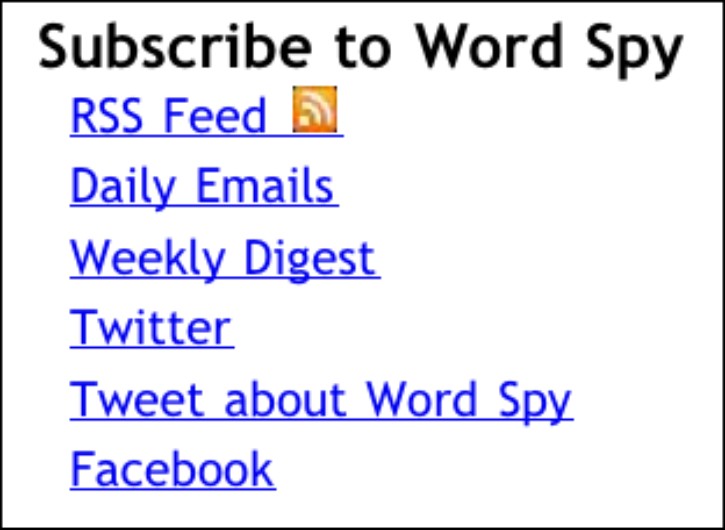
4.15 Most feed links are identified by a standard feed icon.
3. Tap the link. Safari loads the RSS file into the reader.mac.com feed reader application, as shown in Figure 4.16.
Like other links, such as web pages, you can bookmark RSS feed links and save them to the Home screen.
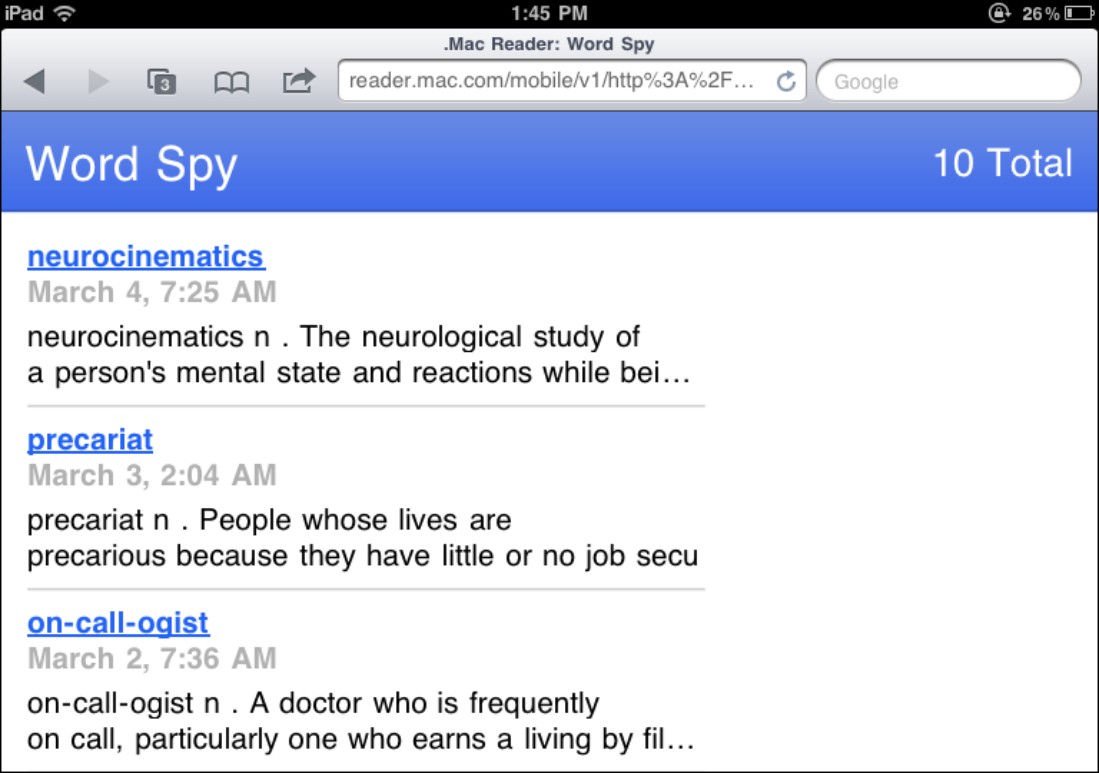
4.16 When you tap an RSS feed link, Safari loads the RSS file into the reader.mac.com feed reader application.
Setting the web browser security options
It’s a jungle out there in cyberspace, with nasty things lurking in the digital weeds. The folks at Apple are well aware of these dangers, of course, so they’ve clothed your iPad in protective gear to help keep the bad guys at bay. Safari, in particular, has five layers of security:
• Phishing protection. A phishing site is a website that on the surface appears to belong to a reputable company, such as an online bank or major corporation. In reality, some dark-side hackers have cobbled the site together to fool you into providing your precious login data, credit card data, social security number, or other private information. Many of these sites either are well known or sport tell-tale signs that mark them as fraudulent. iPad Safari comes with a Fraud Warning setting that, when activated, displays a warning about such sites.
• JavaScript. This is a programming language that website developers commonly use to add features to their pages. However, programmers who have succumbed to the dark side of The Force can use JavaScript for nefarious ends. Your iPad comes with JavaScript support turned on, but you can turn it off if you’re heading into an area of the web where you don’t feel safe. However, many sites won’t work without JavaScript, so I don’t recommend turning it off full time.
• Pop-up blocking. Pop-up ads (and their sneakier cousins, the pop-under ads) are annoying at the best of times, but they really get in the way on the iPad because the pop-up not only creates a new Safari page, but it immediately switches to that page. So now you have to tap the Pages icon, delete the pop-up page, and then (if you already had two or more pages running) tap the page that generated the pop-up. Boo! So you can thank your preferred deity that not only does your iPad come with a pop-up blocker that stops these pop-up pests, but it’s turned on by default to boot. However, some sites use pop-ups for legitimate reasons: media players, login pages, important site announcements, and so on. For those sites to work properly, you may need to turn off the pop-up blocker temporarily.
• Cookies. These are small text files that many sites store on the iPad, and they use those files to store information about your browsing session. The most common example is a shopping cart, where your selections and amounts are stored in a cookie. However, for every benign cookie, at least one not-so-nice cookie is used by a third-party advertiser to track your movements and display ads supposedly targeted to your tastes. Yuck. By default, your iPad doesn’t accept third-party cookies, so that’s a good thing. However, you can configure Safari to accept every cookie that comes its way or no cookies at all (neither of which I recommend).
Follow these steps to customize your iPad’s web security options:
1. On the Home screen, tap Settings. The Settings screen slides in.
2. Tap Safari. Your iPad displays the Safari screen, as shown in Figure 4.17.
3. Tap the Fraud Warning setting to toggle phishing protection On and Off.
4. Tap the JavaScript setting to toggle JavaScript support On and Off.
5. Tap the Block Pop-ups setting to toggle pop-up blocking On and Off.
6. To configure the cookies that Safari allows, tap Accept Cookies, tap the setting you want — None, From visited, or Always — and then tap Safari. The From visited setting (the default) means that Safari accepts cookies directly from the sites you surf to; it spits out any cookies from third-party sites such as advertisers.
7. If you want to get rid of all the cookies that have been stored on your iPad, tap Clear Cookies and, when you’re asked to confirm, tap Clear Cookies. It’s a good idea to clear cookies if you’re having trouble accessing a site or if you suspect some unwanted cookies have been stored on your iPad (for example, if you surfed for a while with Accept Cookies set to Always).
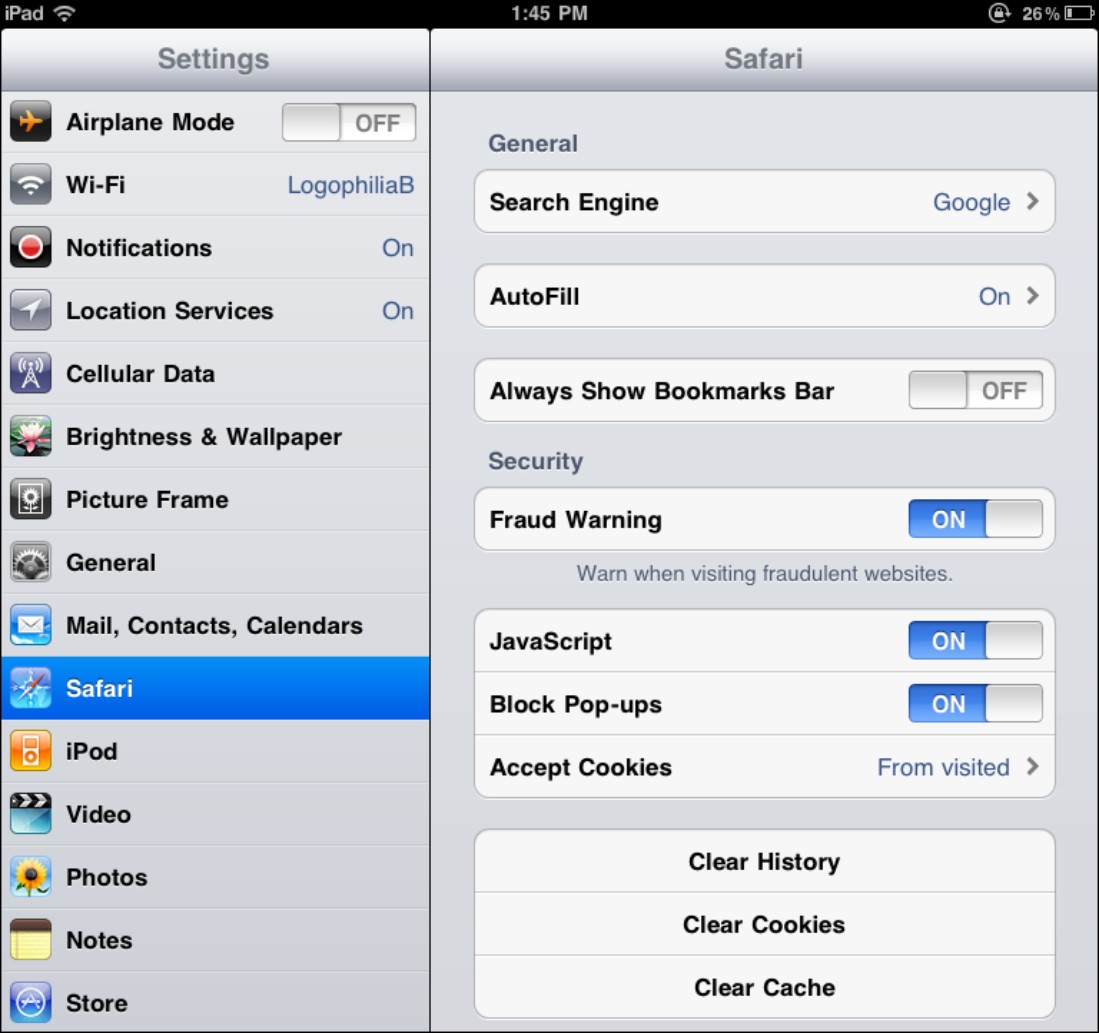
4.17 Use the Safari screen to set your iPad’s web security settings.
 Searching web page text
When you’re perusing a page on the web, it’s not unusual to be looking for specific information. In those situations, rather than reading through the entire page to find the info you seek, it would be a lot easier to search for the data. You can easily do this in the desktop version of Safari or any other computer browser, but, at first glance, the Safari app doesn’t seem to have a Find feature anywhere. It’s there all right, but you need to know where to look:
1. Use the Safari app to navigate to the web page that contains the information you seek.
2. Tap inside the Search box in the top right of the Safari window.
3. Tap the search text you want to use. Safari displays the usual web page matches, but it also displays “On This Page (X matches),” where X is the number of times your search text appears on the web page, as shown in Figure 4.18.
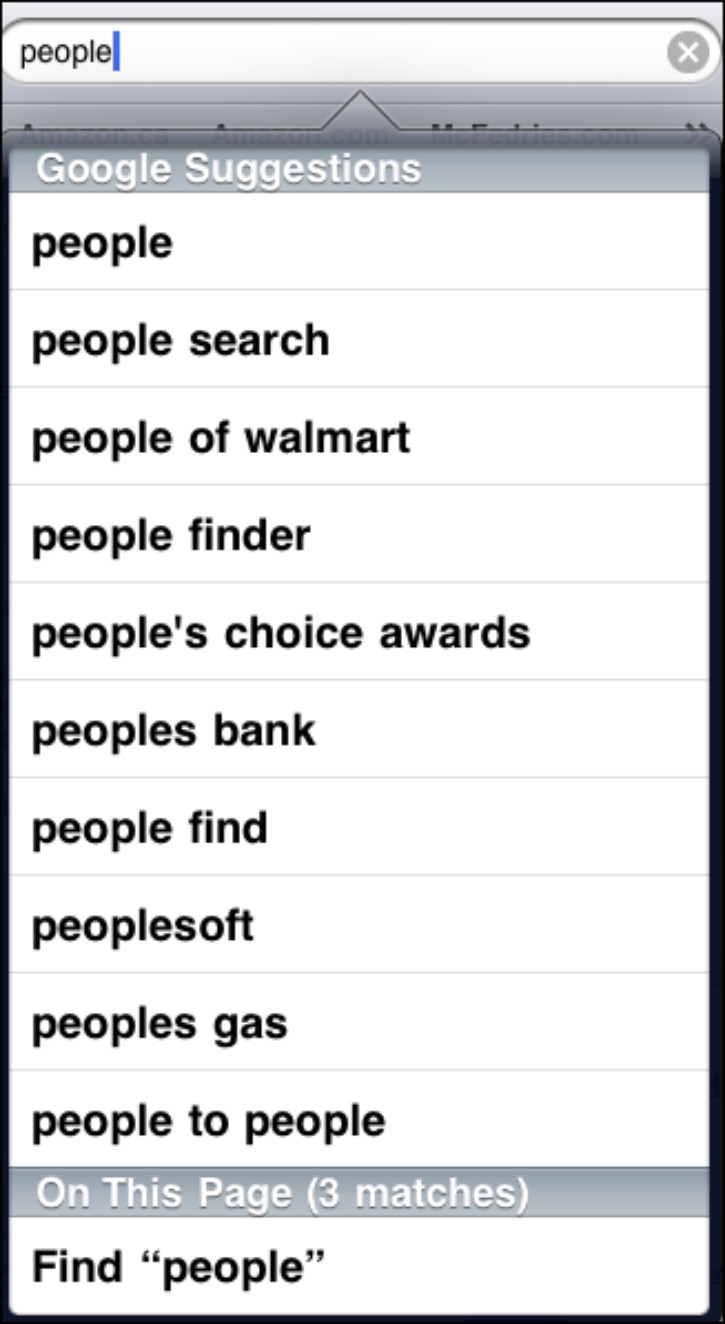
4.18 The On This Page message tells you the number of matches that appear on the current web page.
4. Tap Find “search” (where search is the search text you entered). Safari highlights the first instance of the search term, as shown in Figure 4.19.
5. Tap Next to cycle through the instances of the search term that appear on the page. Note that you can only cycle forward through the results. When you tap Next after the last result appears, Safari returns you to the first result.
6. When you’re finished with the search, tap Done.

4.19 Safari highlights the first instance of the search term that appears on the current web page.
Printing a web page with AirPrint
If you have a printer that supports the AirPrint standard for wireless printing, then you can send documents, such as web pages, directly to your printer.
As I write this, only a selected number of Hewlett-Packard printers support the AirPrint standard. To find out more, and to see a list of AirPrint-ready printers, visit www.hp.com/sbso/printing/mac/hp-airprint.html.
Here’s how it works:
1. Use the Safari app to navigate to the web page you want to print.
2. Tap Actions. A menu of web page actions appears.
3. Tap Print. The Printer Options screen appears.
4. Tap Printer. If the Printer field already shows the printer you want to use, you can skip to Step 6. Your iPad looks for wireless printers on your network and then displays a list of the available printers, as shown in Figure 4.20.
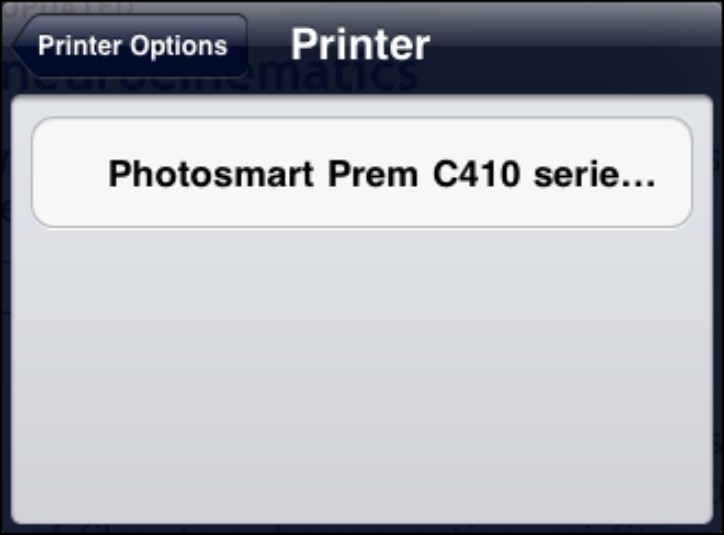
4.20 Your iPad displays a list of available printers.
5. Tap the printer you want to use. Your iPad adds the printer to the Printer Options screen and then enables the other controls on the screen, as shown in Figure 4.21.
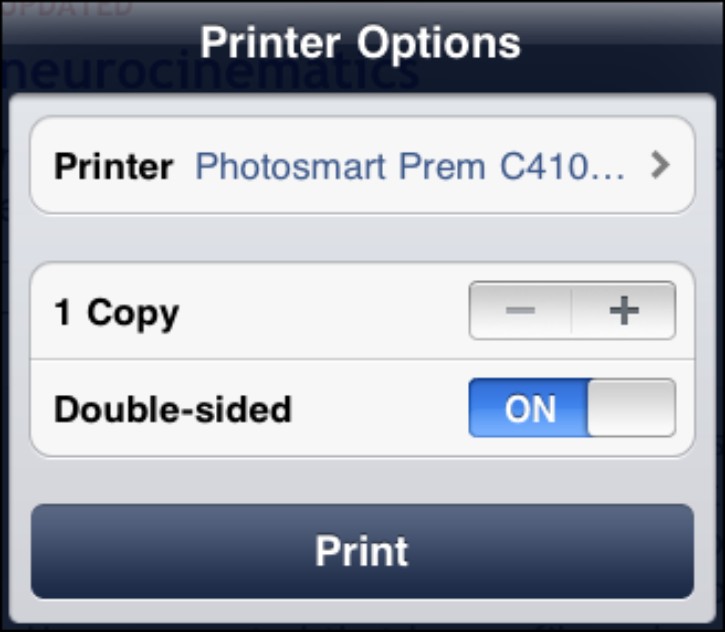
4.21 Use the Printer Options screen to configure the print job and then print the web page.
6. In the Copy field, tap + to set the number of copies you want to print.
7. Configure the other printer options as needed. Note that the options you see will vary from printer to printer.
8. Tap Print. Your iPad sends the web page to the printer.