
How Can I Get More Out of Listening to Audio on My iPad?
The iPod app on your iPad is built with audio in mind, and it lets you crank music, music videos, audiobooks, and podcasts. If you have a fast Wi-Fi connection (a 3G cellular connection will do in a pinch), you can even use your iPad to purchase music directly from the iTunes Store (tap the iTunes icon in the Home screen). Playing the track you want is a snap on your iPad: Tap iPod, tap a browse button, locate the track, and then tap it. However, your iPad is more than a simple tap-and-play device, and this chapter shows you how to take advantage of some of the iPad’s more useful audio features.
Getting iTunes Audio Ready for Your iPad
Syncing Music and Other Audio Content
Getting More Out of the iPod App
Getting More Out of Your iPad’s Audio Features
Getting iTunes Audio Ready for Your iPad
Although you can purchase and download songs directly from the iTunes Store on your iPad, I’m going to assume that the vast majority of your music library is cooped up on your Mac or PC, and that you’re going to want to transfer that music to your iPad. Or perhaps I should say that you’re going to want to transfer some of that music to the iPad. Most of us now have multigigabyte music collections, so depending on the storage capacity of your iPad (and the amount of other content you’ve stuffed into it, particularly videos and movies) it’s likely that you’ll only want to copy a subset of your music library.
If that’s the case, then iTunes gives you four choices when it comes to selecting which tunes to transfer: artists, genres, albums, and playlists. The first three are self-explanatory (and, in any case, I give you the audio-syncing details a bit later in this chapter), but it’s the last of these four where you can take control of syncing music to your iPad.
A playlist is a collection of songs that are related in some way, and you can use your iTunes library to create customized playlists that include only the songs that you want to hear. For example, you might want to create a playlist of upbeat or festive songs to play during a party or celebration. Similarly, you might want to create a playlist of your current favorite songs.
Playlists are the perfect way to control music syncing for the iPad, so before you start transferring tunes, consider creating a playlist or three in iTunes. As the next three sections show, you can create three types of playlists: standard, Smart, and Genius.
Building a standard playlist
A standard playlist is one where you control which songs are in the playlist (as opposed to the automatic Smart and Genius playlists that I talk about in the next two sections). A standard playlist is a bit more work to maintain, but it gives you complete control over the contents of the playlist.
Follow these steps to build a standard playlist:
1. Choose File → New Playlist. You can also press  +N (Ctrl+N in Windows) or click the Create a Playlist button (+). iTunes adds a new item to the Playlists section and adds an edit box around the item.
2. Type the name you want to give the playlist and then press Return (Enter in Windows).
3. In the iTunes Music library, display the song, album, artist, or genre that you want to include in the playlist.
4. Drag the song, album, artist, or genre and drop it on the playlist.
5. Repeat Steps 3 and 4 to populate the playlist.

If you’re looking for a faster way to create and populate a standard playlist, iTunes offers another technique that lets you select some or all of the songs in advance. Press and hold the key (Ctrl key in Windows) and then click each song that you want to include in your playlist. When you’re done, choose File → New Playlist from Selection or press +Shift+N (Ctrl+Shift+N in Windows).
Building a Smart Playlist
A standard playlist gives you a satisfying amount of control over the list contents, but it can often be a hassle. For example, if you’ve created a playlist for a particular genre, then every time you add new music from that genre you must then drag the new tunes to the playlist. Similarly, if you assign a particular album or artist to a genre that’s different than the one in your playlist, you have to remove the album or artist from the playlist by hand.
To avoid this kind of digital music drudgery, you can create a Smart Playlist where the songs that appear in the list have one or more properties in common, such as the genre, rating, artist, or text in the song title. The key here is iTunes populates and maintains a Smart Playlist automatically. For example, if you build a Smart Playlist based on a particular genre, then every time you add new music from the genre, iTunes automatically includes that music in the playlist. Similarly, if you change the genre of some music in your playlist, iTunes automatically removes the music from the playlist.
Here are the steps to follow to build a Smart Playlist:
1. Choose File → New Smart Playlist. You can also press +Option+N (Ctrl+Alt+N in Windows) or hold down Option (Shift in Windows) and click the Create a Playlist button (+). iTunes displays the Smart Playlist dialog.
2. Set up the condition for the playlist.
• Use the first pop-up menu to choose the field you want to use for the first condition.
• Use the second pop-up menu to choose an operator for the condition. Your choices here depend on the field you selected in the first pop-up menu. For example, if you chose a text field, the available operators include “contains,” “is,” and “starts with;” for a numeric field, the operators include “is greater than,” “is less than,” and “is in the range.”
• Use the third control (or set of controls) to enter the details of the condition. Again, the controls you see depend on the type of field, although in most cases you see a single text box. If you chose “is in the range” as the operator, you see two text boxes so that you can enter the beginning and end values for the range.
3. If you want to add another condition, click the Add button (+) to the right of the controls. iTunes adds another set of condition controls to the dialog.
4. Repeat Step 2 to specify the settings for the new condition.
5. Repeat Steps 3 and 4 to add as many conditions as you need. Figure 8.1 shows an example Smart Playlist dialog with four conditions added.
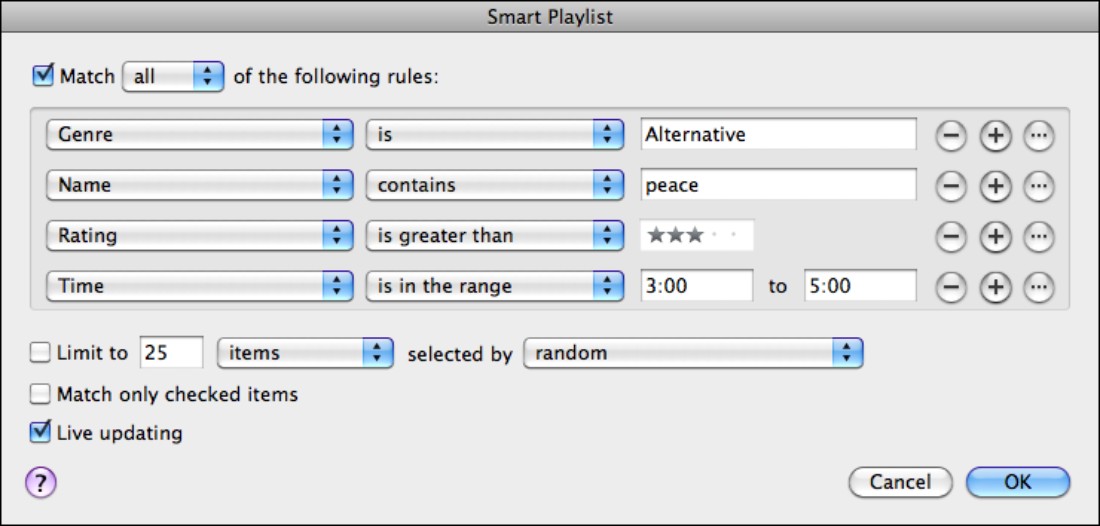
8.1 Use the Smart Playlist dialog to add the conditions that define your new playlist.
6. If you want to limit the playlist to a certain length or number of songs, select the Limit to check box and specify the limit:
• Type the number in the first box, and then choose Minutes, Hours, MB, GB, or Items in the first pop-up menu.
• In the second pop-up menu, choose how to select the songs — for example, by least often played, by highest rating, or at random.
7. Select the Match only checked items check box if you want to include only songs whose check boxes you’ve selected. This setting lets you clear a song’s check box and be sure it won’t show up in your Smart Playlist.
8. Select the Live updating check box if you want iTunes to update the Smart Playlist for you automatically.
9. Click OK. iTunes creates the playlist and displays an edit box around the name.
10. Type the name you want to give the playlist, and then press Return (or Enter).
Building a Genius playlist
You may be familiar with the iTunes Genius sidebar that shows you songs from the iTunes Store that are similar to a particular song in your library. A closely related feature is the Genius playlist. The idea here is that you pick a song in your music library, and iTunes creates a playlist of other songs in your library that are similar. It’s a ridiculously easy way to ride a particular sonic groove.
Follow these steps to set up a Genius playlist:
1. In your music library or in a playlist, select the song you want to use as the starting point for the Genius playlist.
2. Click the Start Genius button in the lower-right corner of the iTunes window or the Genius symbol in the iTunes track readout at the top of the window.
3. iTunes creates the Genius playlist and starts it playing.
4. To change the number of songs in the playlist, open the Limit To pop-up menu and choose a different number: 25 songs, 50 songs, 75 songs, or 100 songs.
5. Click Save Playlist. iTunes adds the playlist to the Genius section of the sidebar.
Creating a favorite tunes playlist for your iPad
Your iTunes library includes a Rating field that enables you to supply a rating for your tracks: one star for songs you don’t like so much, up to five stars for your favorite tunes. You click the song you want to rate and then click a dot in the Rating column (click the first dot for a one-star rating, the second dot for a two-star rating, and so on). Rating songs is useful because it enables you to organize your music. For example, the Playlists section includes a My Top Rated playlist, which includes all your four- and five-star-rated tunes, ordered by the Rating value.
Rating tracks comes in particularly handy when deciding which music to use to populate your iPad. If you have tens of gigabytes of tunes, only some of them will fit on your iPad. How do you choose? Later in this chapter, I show you how to sync the playlists you want to hear on your iPad. Another possibility is to rate your songs and then just sync the My Top Rated playlist to your iPad.
The problem with the My Top Rated playlist is that it includes only your four- and five-star-rated tunes. You can fit thousands of tracks on your iPad, but it’s unlikely that you’ve got thousands of songs rated at four stars or better. To fill out your playlist, you should also include songs rated at three stars, a rating that should include lots of good, solid tunes.
To set this up, you have two choices:
• Modify the My Top Rated playlist. Right-click (or Control+click on a Mac) the My Top Rated playlist, and then click Edit Playlist. In the Smart Playlist dialog, click the second star and then click OK.
• Create a new playlist. This is the way to go if you want to leave My Top Rated as your best music. Choose File → New Smart Playlist to open the Smart Playlist dialog. Choose Rating in the Field list, choose Is Greater Than in the Operator list, and then click the second star. Click OK, type a title for the playlist (such as Favorite Tunes), and then press Return (or Enter).
The next time you sync your iPad, be sure to include either the My Top Rated playlist or the Smart Playlist you created.
Syncing Music and Other Audio Content
The brainy iBooks app and the sleek Safari browser may get the lion’s share of kudos for the iPad, but many people reserve their rave reviews for its iPod app. The darn thing is just so versatile: It can play music, of course, but it also happily cranks out audiobooks and podcasts on the audio side and music videos, movies, and TV shows on the video side. Ear candy and eye candy in one package!
If there’s a problem with this digital largesse, it’s that the iPod player might be too versatile. Even if you have a big 64GB iPad, you may still find its confines a bit cramped, particularly if you’re also loading up your iPad with photos, contacts, and calendars, and you just can’t seem to keep your hands out of the iBookstore and App Store cookie jars.
All this means that you probably have to pay a bit more attention when it comes to syncing audio to your iPad, and the following sections show you how to do just that.
Syncing music and music videos
The iPad is a digital music player at heart, so you’ve probably loaded up your iPad with lots of audio content and lots of music videos. To get the most out of the iPod app’s music and video capabilities, you need to know all the different ways you can synchronize these items. For example, if you use the iPod app primarily as a music player and the iPad has more disk capacity than you need for all your digital audio, feel free to throw all your music onto the player. On the other hand, your iPad may not have much free space, or you may want only certain songs and videos on the player to make it easier to navigate. Not a problem! You need to configure iTunes to sync only the songs or playlists that you select.
Something I like about syncing playlists is that you can estimate in advance how much space your selected playlists will usurp on the iPad. In iTunes, click the playlist and examine the status bar, which tells you the number of songs in the playlist, the total duration, and, most significantly for your purposes, the total size of the playlist.
Before getting to the specific sync steps, you need to know the three ways to manually sync music and music videos:
• Playlists. With this method, you specify the playlists you want iTunes to sync. Those playlists also appear on the iPod app. This is by far the easiest way to manually sync music and music videos because you usually just have a few playlists to select. The downside is that if you have large playlists and you run out of space on your iPad, the only way to fix the problem is to remove an entire playlist. Another bummer: With this method, you can only sync all of your music videos or none of your music videos.
• Check boxes. With this method, you specify which songs and music videos get synced by selecting the little check boxes that appear beside every song and video in iTunes. This is fine-grained syncing for sure, but because your iPad can hold thousands of songs, it’s also lots of work.
• Drag and drop. With this method, you click and drag individual songs and music videos, and drop them on your iPad’s icon in the iTunes Devices list. This is an easy way to get a bunch of tracks on your iPad quickly, but iTunes doesn’t give you any way of tracking which tracks you’ve dragged and dropped.
What do you do if you want to select only a few tracks from a large playlist? Waste a big chunk of your life deselecting a few hundred check boxes? Pass. Here’s a better way: Press +A (Mac) or Ctrl+A (Windows) to select every track, right-click (or Control+click on a Mac) any track, and then click Uncheck Selection. Voilá! iTunes deselects every track in seconds flat. Now you can select just the tracks you want. You’re welcome.
Follow these steps to sync music and music videos using playlists:
1. Connect your iPad to your computer.
2. In iTunes, click your iPad in the Devices list.
3. Click the Music tab.
4. Select the Sync Music check box.
5. If iTunes asks you to confirm that you want to sync music, click Sync Music.
6. Select the Selected playlists, artists, albums, and genres option.
7. Select the check box beside each playlist, artist, album, and genre you want to sync, as shown in Figure 8.2.
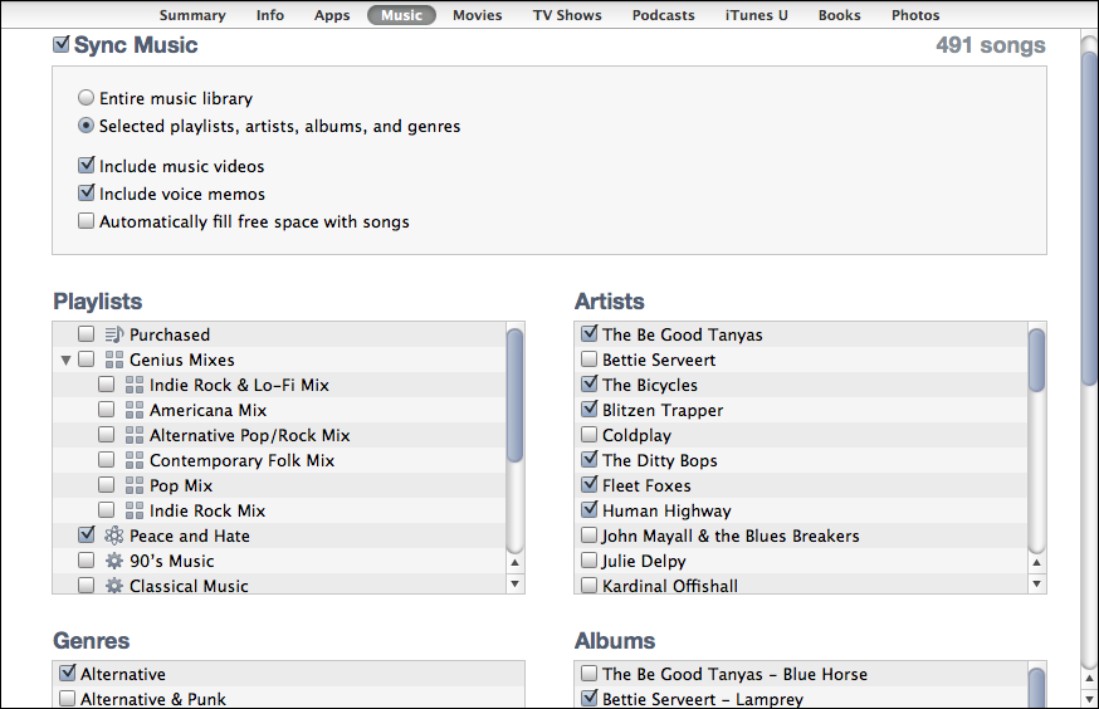
8.2 Select the Selected playlists, artists, albums, and genres option, and then select the items you want to sync.
8. Select the Include music videos check box if you also want to add your music videos into the sync mix.
9. Select the Include voice memos check box if you also want to sync voice memos that you recorded on your iPhone or other device.
10. If you want iTunes to fill up any remaining free space on your iPad with a selection of related music from your library, select the Automatically fill free space with songs check box.
11. Click Apply. iTunes syncs your iPad using the new settings.
Follow these steps to sync using the check boxes that appear beside each track in your iTunes Music library:
1. Click your iPad in the Devices list.
2. Click the Summary tab.
3. Select the Sync only checked songs and videos check box.
4. Click Apply. If iTunes starts syncing your iPad, drag the Slide to Cancel slider on the iPad to stop it.
5. Either click Music in the Library list or click a playlist that contains the tracks you want to sync. If a track’s check box is selected, iTunes syncs the track with your iPad. If a track’s check box is deselected, iTunes doesn’t sync the track with your iPad; if the track is already on your iPad, iTunes removes the track.
6. In the Devices list, click your iPad.
7. Click the Summary tab.
8. Click Sync. iTunes syncs just the checked tracks.
You also can configure iTunes to let you drag tracks from the Music library (or any playlist) and drop them on your iPad. Here’s how this works:
1. Click your iPad in the Devices list.
2. Click the Summary tab.
3. Select the Manually manage music and videos check box.
4. Click Apply. If iTunes starts syncing your iPad, drag the Slide to Cancel slider on the iPad to stop it.
5. Either click Music in the Library list or click a playlist that contains the tracks you want to sync.
6. Choose the tracks you want to sync:
• If all the tracks are together, Shift+click the first track, hold down Shift, and then click the last track.
• If the tracks are scattered all over the place, hold down (Mac) or Ctrl (Windows) and click each track.
7. Click and drag the selected tracks to the Devices list, and drop them on the iPad icon. iTunes syncs the selected tracks.

When you select the Manually manage music and videos check box, iTunes automatically deselects the Sync Music check box in the Music tab. However, iTunes doesn’t mess with the music on your iPad. Even when it syncs after a drag and drop, it only adds the new tracks; it doesn’t delete any of your iPad’s existing music.

If you decide to return to playlist syncing by selecting the Sync Music check box in the Music tab, iTunes removes all tracks that you added to your iPad via the drag-and-drop method.
Syncing podcasts
In many ways, podcasts are the most problematic of the various media you can sync with your iPad. It’s not that the podcasts themselves pose any concern. Quite the contrary: They’re so addictive that it’s not unusual to collect them by the dozens. Why is that a problem? Because most professional podcasts are at least a few megabytes in size, and many are tens of megabytes. A large-enough collection can put a serious dent in your iPad’s remaining storage space. All the more reason to take control of the podcast-syncing process. Here’s how you do it:
1. Connect your iPad to your computer.
2. In iTunes, click your iPad in the Devices list.
3. Click the Podcasts tab.
4. Select the Sync Podcasts check box.
5. If you want iTunes to choose some of the podcasts automatically, select the Automatically Include check box and proceed to Steps 6 and 7. If you prefer to choose all the podcasts manually, deselect the Automatically Include check box and skip to Step 8.
6. Choose an option from the first pop-up menu:
• All. Choose this item to sync every podcast.
• X Most Recent. Choose this item to sync the X most recent podcasts.
• All Unplayed. Choose this item to sync all the podcasts you haven’t yet played.
• X Most Recent Unplayed. Choose this item to sync the X most recent podcasts that you haven’t yet played.
• X Least Recent Unplayed. Choose this item to sync the X oldest podcasts that you haven’t yet played.
• All New. Choose this item to sync all the podcasts published since the last sync.
• X Most Recent New. Choose this item to sync the X most recent podcasts published since the last sync.
• X Least Recent New. Choose this item to sync the X oldest podcasts published since the last sync.
7. Choose an option from the second pop-up menu:
• All Podcasts. Choose this option to apply the option from Step 5 to all your podcasts.
• Selected Podcasts. Choose this option to apply the option from Step 5 to just the podcasts you select, as shown in Figure 8.3.
8. Select the check box beside any podcast or podcast episode you want to sync.
9. Click Apply. iTunes syncs the iPad using your new podcast settings.
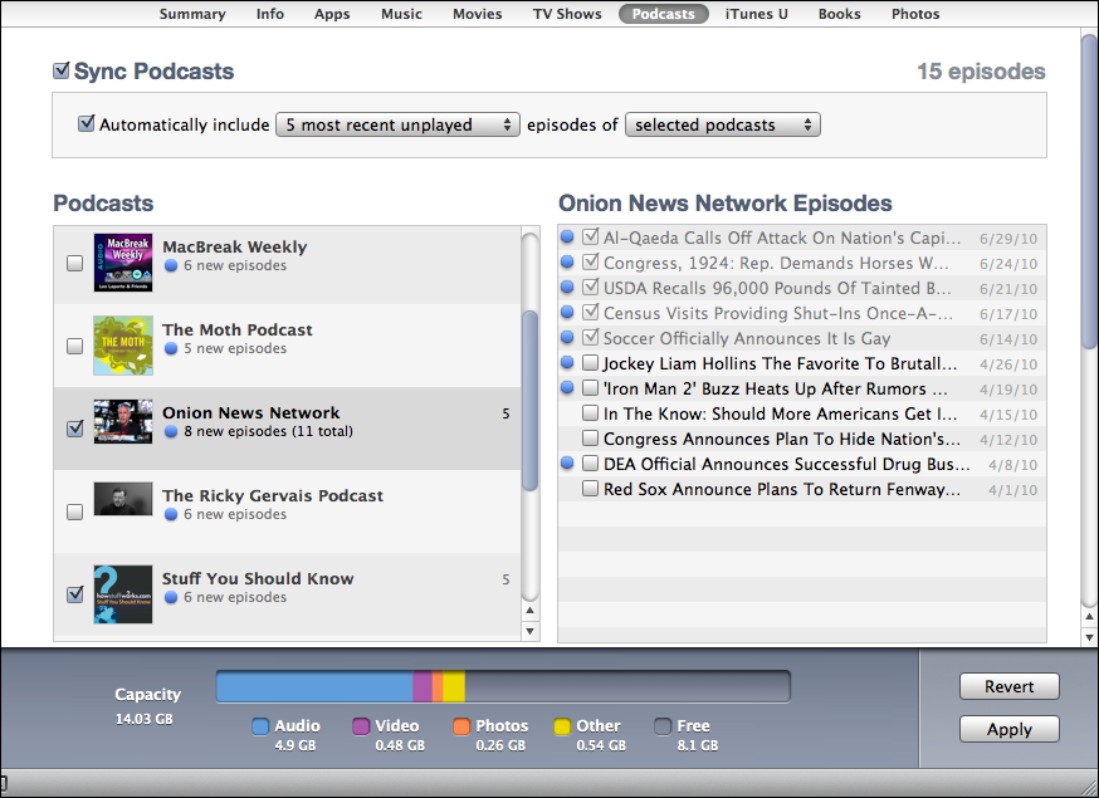
8.3 To sync specific podcasts, choose the Selected Podcasts option and then select the check boxes for each podcast you want synced.
A podcast episode is unplayed if you haven’t yet played at least part of the episode either in iTunes or on your iPad. If you play an episode on your iPad, the player sends this information to iTunes when you next sync. Even better, your iPad also lets iTunes know if you paused in the middle of an episode; when you play that episode in iTunes, it starts at the point where you left off.
To mark a podcast episode as unplayed, in iTunes choose the Podcasts library, right-click (or Control+click on a Mac) the episode and then choose Mark as New.
Syncing audiobooks
The iTunes sync settings for your iPad have tabs for Music, Photos, Podcasts, and Video, but not one for Audiobooks. What’s up with that? It’s not, as you might think, some sort of antibook conspiracy or even forgetfulness on Apple’s part. Instead, iTunes treats audiobook content as a special type of playlist, which, confusingly, doesn’t appear in the iTunes Playlists section. To get audiobooks on your iPad, follow these steps:
1. Connect your iPad to your computer.
2. In iTunes, click your iPad in the Devices list.
3. Click the Books tab.
4. Select the Sync Audiobooks check box.
5. Select the Selected audiobooks option.
6. Select the check box beside each audiobook you want to sync.
7. Click Apply. iTunes syncs your audiobooks to your iPad.
If you’ve opted to manually manage your music and video, you need to choose the Audiobooks category of the iTunes library and then drag and drop on your iPad the audiobooks you want to sync.
Getting More Out of the iPod App
Your iPad is a living, breathing iPod thanks to its built-in iPod app, which you can fire up any time you want by tapping the iPod icon in the Home screen’s menu bar.
You navigate the iPod app using the Library list on the left side of the screen, which displays several default content choices — including Music, Podcasts, Audiobooks, iTunes U, and Music Videos — as well as any playlists that you synced to your iPad. For each type of music-related content, you also see a series of browse buttons on the bottom of the screen — Songs, Artists, Albums, Genres, and Composer — each of which represents a collection of media files organized in some way. For example, tapping the Songs browse button displays a list of all the songs on your iPad or in the currently selected playlist.
In the next couple sections, you learn a few useful techniques that help you get more out of the iPod app.
Rating a song on your iPad
If you use song ratings to organize your tunes, you may come across some situations where you want to rate a song that’s playing on your iPad:
• You used your iPad to download some music from the iTunes Store, and you want to rate that music.
• You’re listening to a song on your iPad and decide that you’ve given a rating that’s either too high or too low and you want to change it.
In the first case, you could sync the music to your computer and rate it there; in the second case, you could modify the rating on your computer and then sync with your iPad. However, these solutions are lame because you have to wait until you connect your iPad to your computer. If you’re out and about, you want to rate the song now, while it’s fresh in your mind.
Yes, you can do that with your iPad:
1. Locate the song you want to rate, and tap it to start the playback. Your iPad displays the album art and the name of the artist, song, and album at the top of the screen. If you don’t see this info, tap the screen.
2. Tap the Details icon in the lower-right corner of the screen. Your iPad “turns” the album art and displays a list of the songs on the album. Above that list are the five rating dots.
3. Tap the dot that corresponds to the rating you want to give the song. For example, to give the song a four-star rating, tap the fourth dot from the left, as shown in Figure 8.4.
4. Tap the album art icon in the lower-right corner. Your iPad saves the rating and returns you to the album art view.
The next time you sync your iPad with your computer, iTunes notes your new ratings and applies them to the same tracks in the iTunes library.
Creating a playlist on your iPad
The playlists on your iPad are those you’ve synced via iTunes, and those playlists are either generated automatically by iTunes or they’re ones you’ve cobbled together yourself. However, when you’re out in the world and listening to music, you might come up with an idea for a different collection of songs. It might be girl groups, boy bands, or songs with animals in the title.
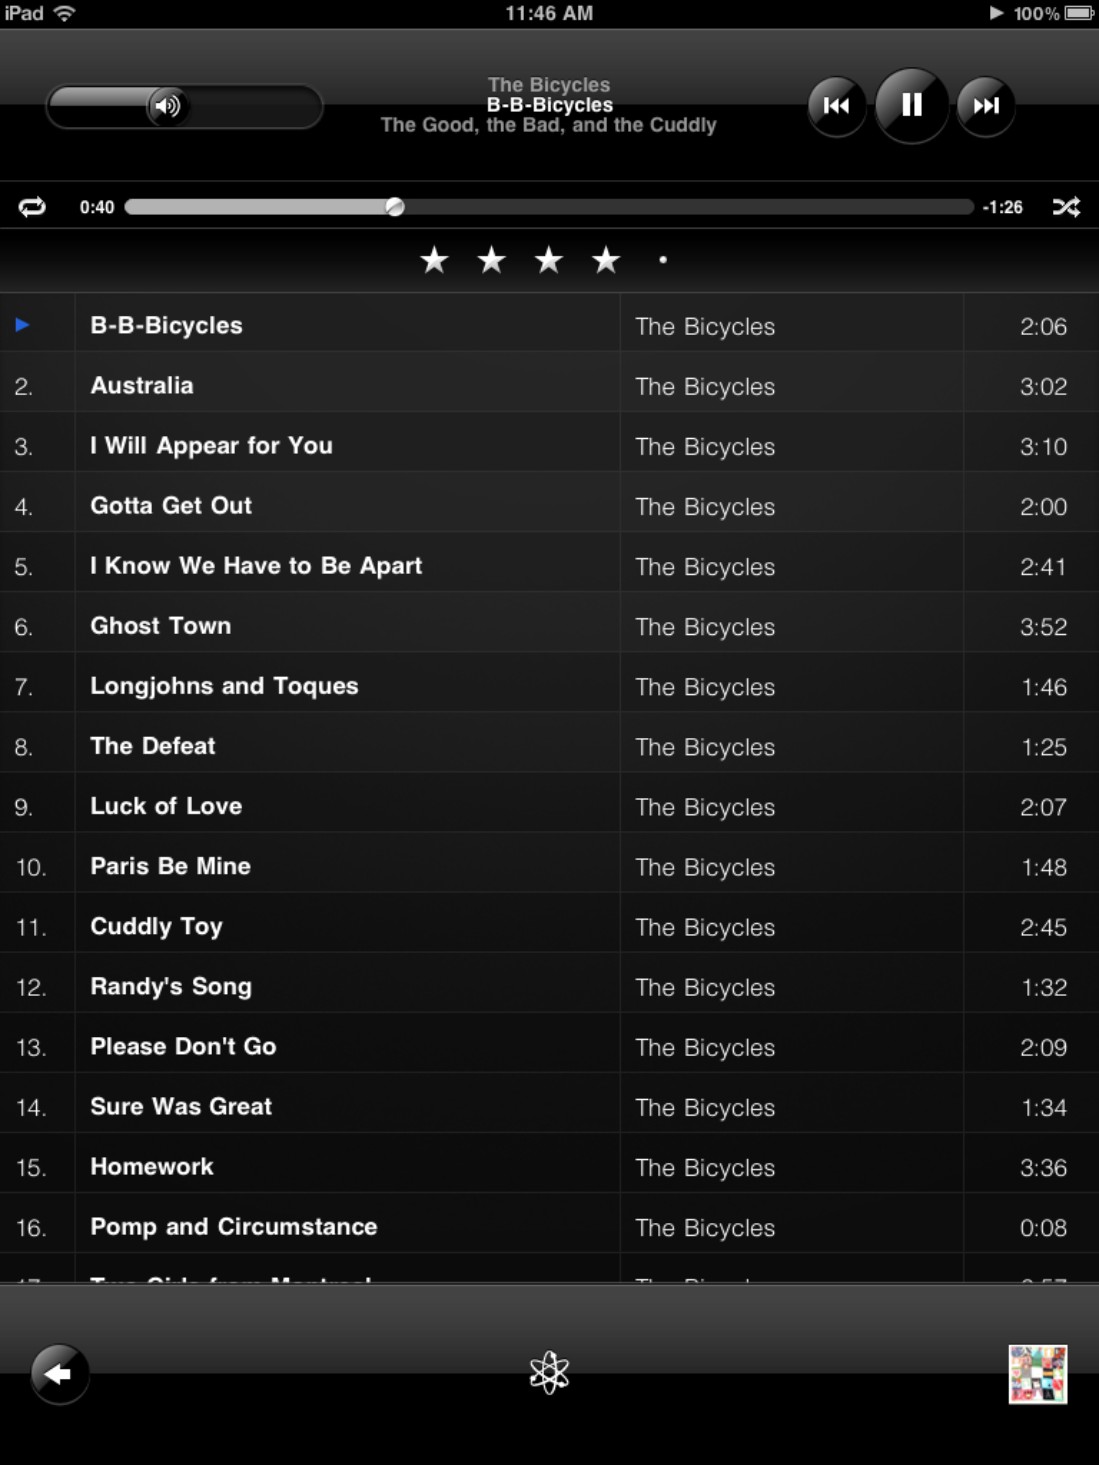
8.4 Tap the dot that corresponds to the rating you want to give the currently playing track.
Whatever your inspiration, don’t do it the hard way by picking out and listening to each song one at a time. Instead, you can use your iPad to create a playlist on the fly. To create a playlist using the iPod app, follow these steps:
1. Open the iPod app.
2. Tap Add Playlist (the + icon in the lower-left corner of the screen). The iPod app displays the New Playlist dialog.
3. Type the name of your playlist, and then tap Save. The iPod app displays the Songs screen, which contains a list of all your songs. You can also click one of the browse buttons to help find your music.
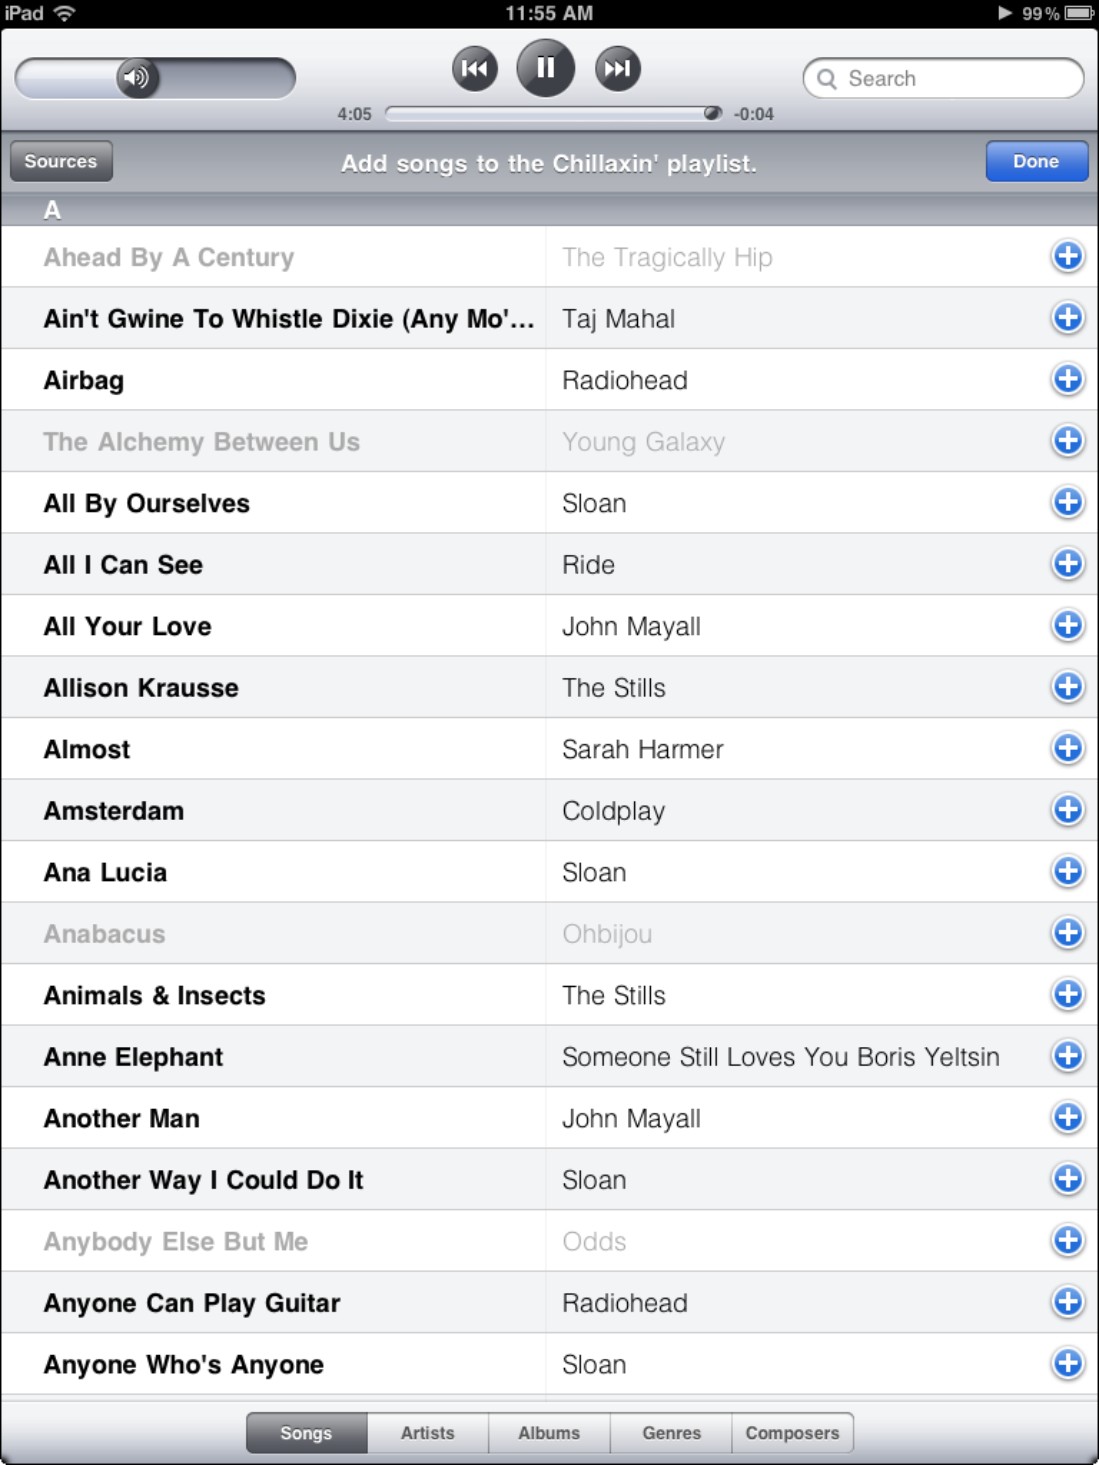
4. Scroll through the list and tap the blue + icon next to each song you want to add to your list. Your iPad turns a song gray when you add it, as shown in Figure 8.5.
5. When you’ve added all the songs you want, tap Done. The iPod app displays the playlist.
8.5 Tap the blue + icons to add songs to your playlist.
Your playlist isn’t set in stone by any means. You can get rid of songs, change the song order, and add more songs. Follow these steps:
1. Open the iPod app.
2. Tap your playlist.
3. Tap Songs. The iPod app displays the playlist tunes.
4. Tap Edit. This changes the list to the editable version, as shown in Figure 8.6.
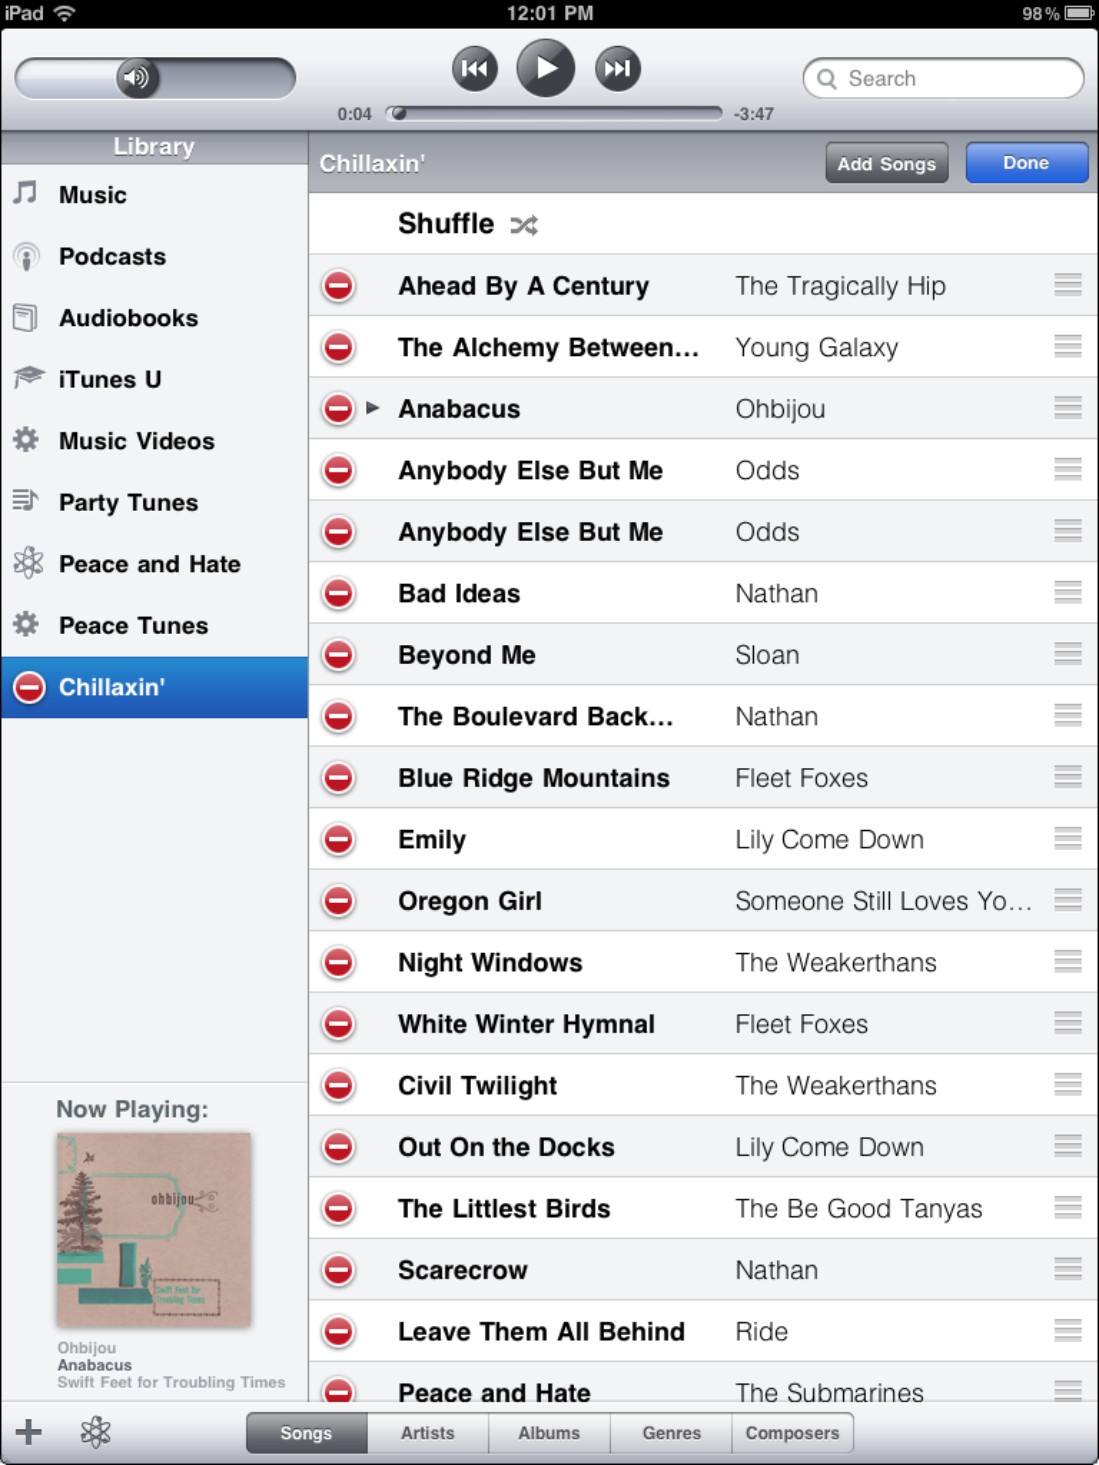
8.6 A playlist in edit mode.
5. To remove a song, tap the red Delete icon to the left of the song, and then tap the Delete button that appears. If you change your mind before you delete the song, tap the red Delete icon again to cancel the deletion.
6. To move a song within the playlist, slide the song’s drag icon (it’s on the right) up or down to the position you prefer.
7. To add more tracks, tap Add Songs, and then tap the blue + icon next to each song you want to add.
8. When you finish editing, tap Done. This sets the playlist.
If your playlist is a bit of a mess, or if your mood suddenly changes, you can delete the entire playlist and start over. Tap the playlist, tap Edit, and then tap the red Delete icon next to the playlist name. Tap the Delete button that appears, and then when your iPad asks you to confirm, tap Delete.
Creating a Genius playlist on your iPad
You saw earlier how to create a Genius playlist in iTunes. You also can use this seemingly magical feature right on your iPad.
Here’s how to create a Genius playlist:
1. Click the Start Genius button in the lower-left corner of the iPod app.
2. Tap the song you want to use as the basis of the Genius playlist.
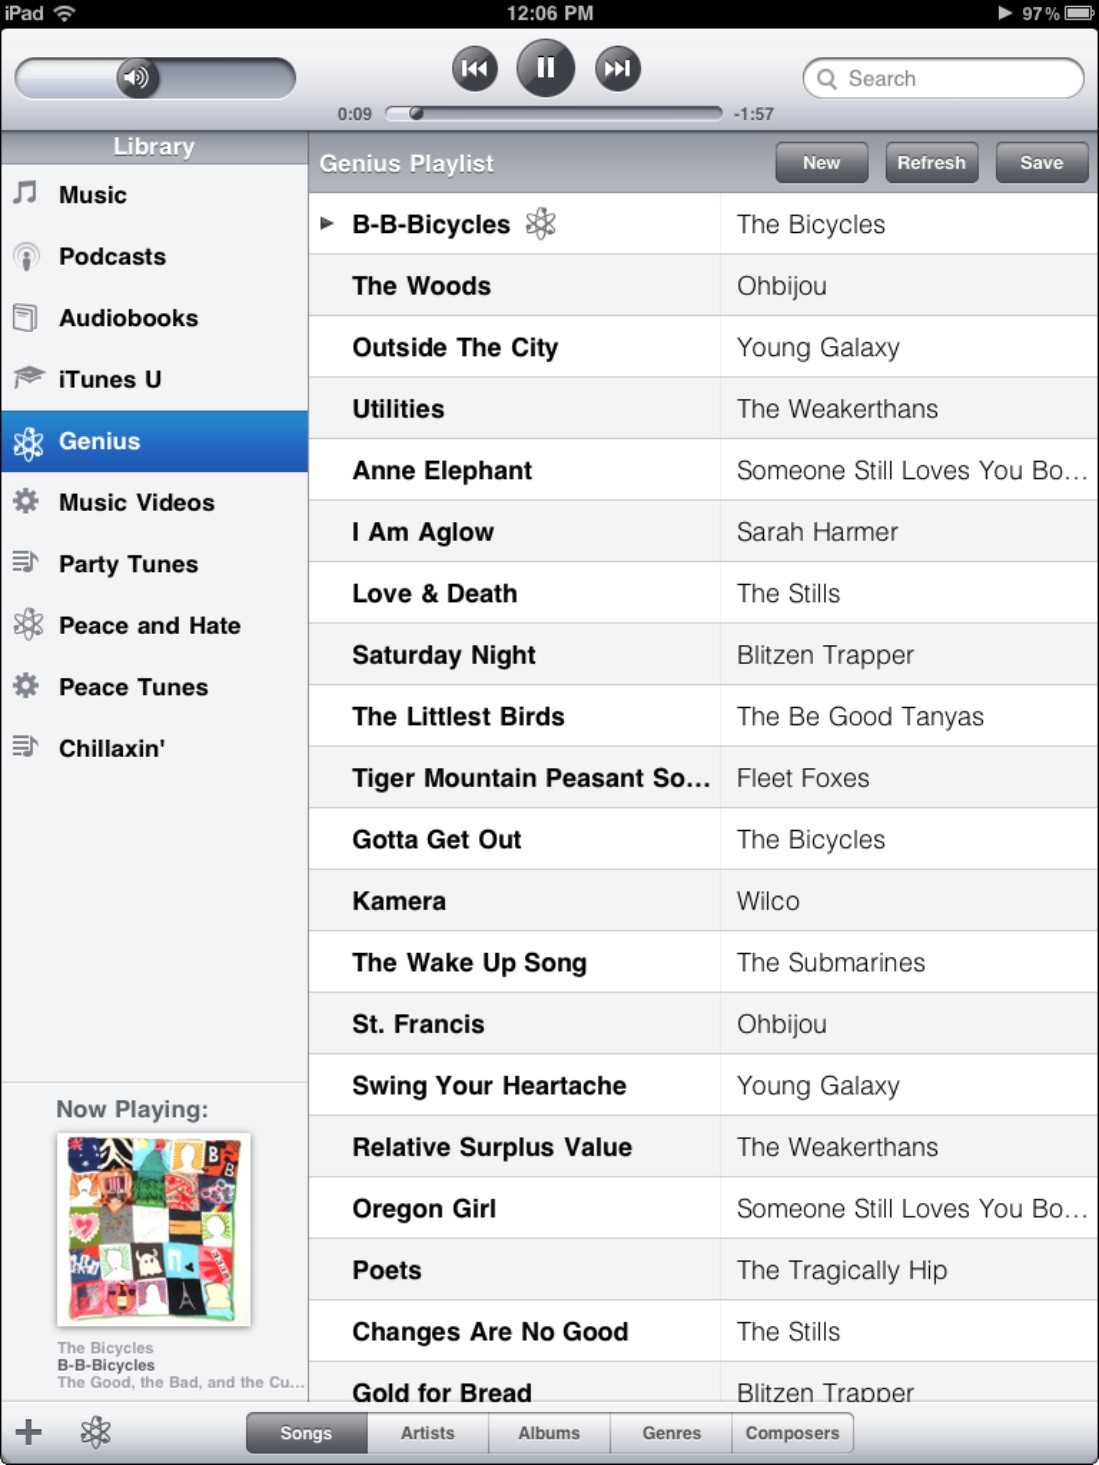
3. iTunes creates the Genius playlist and starts it playing.
4. Click Save. iTunes adds the playlist to the sidebar, and you can tap it to see the list of songs. Figure 8.7 shows an example.
In the Genius screen, you can perform the following actions to mess around with your shiny, new playlist:
• Tap Refresh to re-create the playlist.
• Tap a song to play it.
• Tap Save to save the playlist to the Playlists screen.
• Tap New to crank out a new Genius playlist.
8.7 An example of a Genius playlist.
 Listening to a Shared iTunes Library
You may be familiar with an iTunes feature called Home Sharing that enables you to share your iTunes library with other people on your network, as long as you’re both logged in with the same Apple ID. In iOS 4.3, Home Sharing comes to the iPad, which means you can use your iPad to get wireless access to an iTunes library that’s stored on a Mac or PC.
To set this up, you must first activate Home Sharing in iTunes. Here’s how it’s done:
1. In iTunes on your Mac or PC, choose Advanced→Turn On Home Sharing. iTunes prompts you for an Apple ID.
2. Type your Apple ID and password.
3. Click Create Home Share. iTunes configures your library for sharing on the network.
4. Click Done.
By default, iTunes shares the library with the name User’s Library, where User is the first name of the current user account. To change that, choose iTunes→Preferences, click the General tab, and then use the Library Name text box to type the new name.
With Your iTunes library set up for sharing, your next task is to configure your iPad with the same Home Sharing Apple ID and password. Here’s what you do:
1. On your iPad’s Home screen, tap Settings to open the Settings app.
2. Tap iPod to open the iPod screen.
3. In the Home Sharing section, use the Apple ID and Password boxes to type the same account information that you used to set up Home Sharing in iTunes.
Now open the iPod app on your iPad and tap the Library icon near the upper-left corner. As you can see in Figure 8.8, the iPod app displays the Home Sharing dialog, which lists the available shared libraries. Tap the library you want to access, and the iPod app displays that library’s media instead of your iPad’s media.
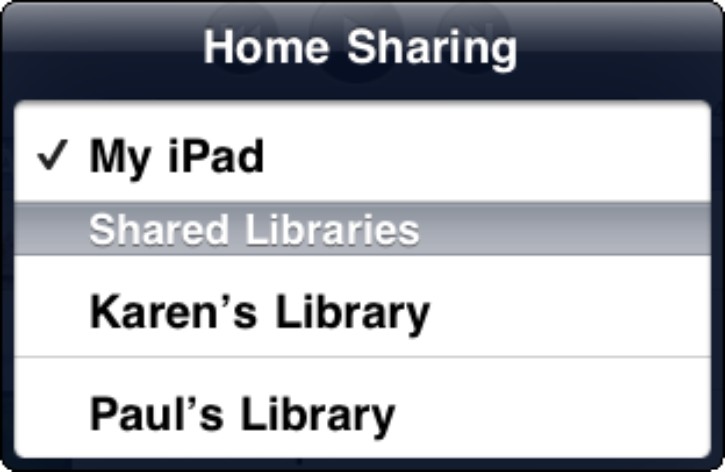
8.8 With Home Sharing configured in both iTunes on your computer and the iPod app on your iPad, tap Library to see a list of the available shared libraries.
Using AirPlay to Stream iPad Audio
If you have an Apple TV that supports AirPlay, you can use AirPlay to stream audio from your iPod to your TV or other audio device. Here’s how it works:
1. Make sure Apple TV is turned on.
2. On your iPad, start the audio you want to stream.
3. Tap the screen to display the controls.
4. Tap the Output button, which appears to the left of the Now Playing info. Your iPad displays a menu of output choices, as shown in Figure 8.9.
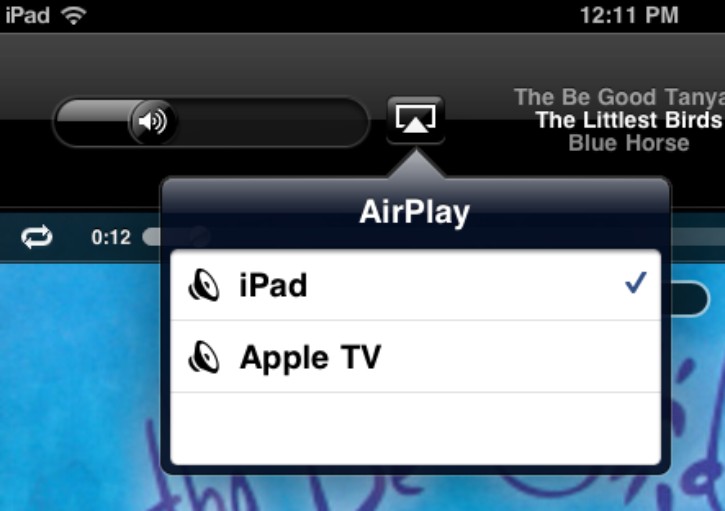
8.9 While playing back audio, tap the screen and then tap the Output button to stream the audio to your Apple TV.
5. Tap the name of your Apple TV device. Your iPad streams the video to that device, and hence to your TV or receiver.
Getting More Out of Your iPad’s Audio Features
To close out this tour of your iPad’s audio features, the rest of this chapter takes you through a few useful techniques for squeezing a bit more out of iPad audio, including redeeming iTunes gift cards, using audio accessories, and customizing the iPad’s audio settings.
Redeeming an iTunes gift card
If you’ve been lucky enough to receive an iTunes gift card or gift certificate for your birthday or some other special occasion (or just for the heck of it), you’d normally use the iTunes Store on your computer to redeem it. However, if you’re not at your computer and the gift card is burning a hole in your pocket, don’t fret: You can redeem the gift card right on your iPad. Here’s how:
1. On the Home screen, tap iTunes to open the iTunes app.
2. Tap Music in the menu bar.
3. Scroll to the bottom of the Music screen and then tap Redeem. iTunes then displays the Redeem dialog shown in Figure 8.10.
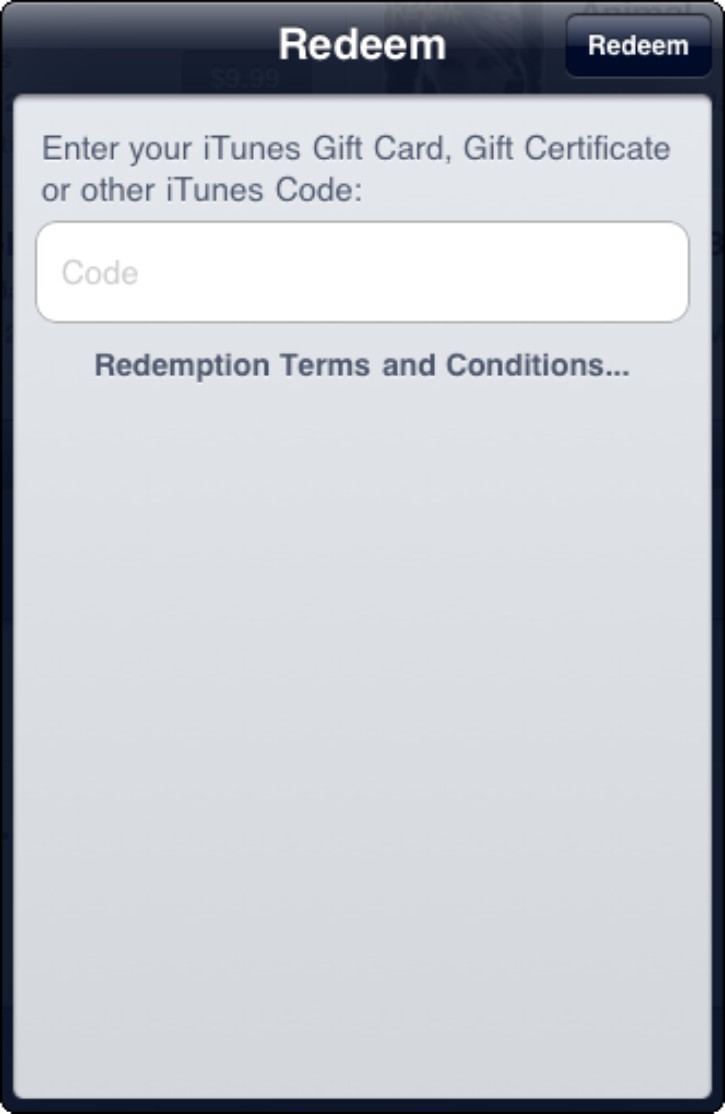
8.10 Use the Redeem screen to redeem an iTunes gift card or gift certificate.
4. Use the Code box to type the code from the gift card or gift certificate.
5. Tap Redeem. iTunes asks you to sign in to your account.
6. Tap Continue. iTunes prompts you for your account password.
7. Type your iTunes password and then tap OK. iTunes redeems the gift code and then displays your current account balance.
Using audio accessories with your iPad
When Apple announced the iPad, it also announced a few accessories, including an iPad-only dock, a keyboard dock, and a case. Of course, third-party vendors want a piece of the iPad pie, so we’re now seeing a rather large cottage industry of iPad accessories, including headsets (wired and Bluetooth), external speakers, FM transmitters, and all manner of cases, car kits, cables, and cradles. Many places scattered all over the web sell iPad accessories, but the following sites are my faves:
• Apple. http://www.apple.com/ipad/accessories/
• Belkin. www.belkin.com/iPad/
• Griffin. www.griffintechnology.com/devices/iPad/
• NewEgg. www.newegg.com/
• EverythingiCafe. http://store.everythingicafe.com/
Keep these notes in mind when shopping for and using audio-related accessories for your iPad:
• Look for the logo. Despite the presence of the iPod app, your iPad is not an iPod dressed up in fancy tablet clothes. It’s a completely different device that doesn’t fit or work with many iPod accessories. To be sure what you’re buying is iPad friendly, look for the “Works with iPad” logo.
• Headsets, headphones, and earpieces. The iPad uses a standard headset jack, so just about any headset that uses a garden-variety stereo mini-plug will fit your iPad without a hitch and without requiring the purchase of an adapter.
• External speakers. You can also use the iPad’s headset jack to connect the iPad to a set of external speakers. Note, too, that if you have either the iPad dock or the iPad keyboard dock from Apple, both come with an audio-out jack that you can use to connect to external speakers. There are also Bluetooth wireless external speakers that you can pair with your iPad.
• FM transmitters. These are must-have accessories for car trips because they send the iPad’s output to an FM station, which you then play through your car stereo. The FM transmitters that work with the iPod don’t generally work with iPads, so look for one that’s designed for the iPad.
• Electronic interference. Because your iPad is a transmitter (of Wi-Fi, Bluetooth, and in some cases 3G signals), it generates a nice little field of electronic interference, which is why you need to switch it to airplane mode when you’re flying (see Chapter 1). That same interference can wreak havoc on nearby external speakers and FM transmitters, so if you hear static when playing audio, switch to airplane mode to get rid of it.
Customizing your iPad’s audio settings
Audiophiles in the crowd don’t get much to fiddle with in the iPad, but you can play with a few audio settings. Here’s how to get at them:
1. Press the Home button to get to the Home screen.
2. Tap the Settings icon. The Settings screen opens.
3. Tap the iPod icon. Your iPad displays the iPod settings screen.
You get four settings to try out:
• Sound Check. Every track is recorded at different audio levels, so invariably you get some tracks that are louder than others. With the Sound Check feature, you can set your iPad to play all your songs at the same level. This feature affects only the baseline level of the music and doesn’t change any of the other levels, so you still get the highs and lows. If you use it, you don’t need to worry about having to quickly turn down the volume when a really loud song comes on. To turn on Sound Check, in the iPod settings screen, tap the Sound Check switch to the On position.
• EQ. This setting controls your iPad’s built-in equalizer, which is actually a long list of preset frequency levels that affect the audio output. Each preset is designed for a specific type of audio: vocals, talk radio, classical music, rock, hip-hop, and lots more. To set the equalizer, tap EQ and then tap the preset you want to use (or tap None to turn off the equalizer).
• Volume Limit. You use this setting to prevent the iPad’s volume from being turned up too high and damaging your (or someone else’s) hearing. You know, of course, that pumping up the volume while you have your earbuds in is an audio no-no, right? I thought so. However, I also know that when a great tune comes on, it’s often a little too tempting to go for 11 on the volume scale. If you can’t resist the temptation, use Volume Limit to limit the damage. Tap Volume Limit, and drag the Volume slider to the maximum allowed volume.
• Lyrics & Podcast Info. Leave this setting On to see extra info about songs and podcasts when you tap the Details button in the iPod app. For example, if you add lyrics for a song in iTunes on your computer (right-click the song, click Get Info, click the Lyrics tab), you see those lyrics in Details view.
If you’re setting up an iPad for a younger person, you should set the Volume Limit. However, what prevents the young whippersnapper from setting a higher limit? You can. In the Volume Limit screen, tap Lock Volume Limit. In the Set Code screen, tap out a four-digit code and then tap the code again to confirm. This disables the Volume slider in the Volume Limit screen.