Can I Use iPad to Manage My Contacts?
One of the paradoxes of modern life is that as your contact information becomes more important, you store less and less of that information in the easiest database system of them all — your memory. That is, instead of memorizing phone numbers like you used to, you now store your contact info electronically. This isn’t all that surprising because it’s not just a landline number that you have to remember for each person; it might also be a cell number, an e-mail address, a website address, and more. That’s a lot to remember, so it makes sense to go the electronic route. And for the iPad, “electronic” means the Contacts app, which is loaded with useful features that can help you organize the contact-management side of your life.
Syncing Your Contacts
Getting Started with the Contacts App
Creating and Editing Contacts
Getting More Out of the Contacts App
Syncing Your Contacts
Although you can certainly add contacts directly on your iPad — and I show you how to do just that a bit later in this chapter — adding, editing, grouping, and deleting contacts is a lot easier on a computer. So a good way to approach contacts is to manage them on your Mac or Windows PC, and then sync your contacts with your iPad.
Creating contact groups
However, do you really need to sync all your contacts? For example, if you only use your iPad to contact friends and family, then why clog your iPad’s Contacts app with work contacts? I don’t know!
You can control which contacts are sent to your iPad by creating groups of contacts and then syncing only the groups you want. Here are some quick instructions for creating groups:
• Address Book (Mac). Choose File → New Group, type the group name, and then press Return. Now populate the new group by dragging and dropping contacts on it.
• Contacts (Windows 7 and Windows Vista). Click New Contact Group, type the group name, and then click Add to Contact Group. Choose all the contacts you want in the group and then click Add. Click OK.

If you’re an Outlook user, note that iTunes doesn’t support Outlook-based contact groups, so you’re stuck with syncing everyone in your Outlook Contacts folder.
Running the sync
With your group (or groups) all figured out, follow these steps to sync your contacts with your iPad:
1. Connect your iPad to your computer.
2. In iTunes, click your iPad in the Devices list.
3. Click the Info tab.
4. Turn on contacts syncing by using one of the following techniques:
• Mac. Select the Sync Address Book Contacts check box.
• Windows. Select the Sync Contacts With check box, and then use the list to choose the program you want to use (such as Outlook).
5. Select an option:
• All Contacts. Select this option to sync all your Address Book contacts.
• Selected Groups. Select this option to sync only the groups you pick. In the group list, select the check box beside each group that you want to sync, as shown in Figure10.1.
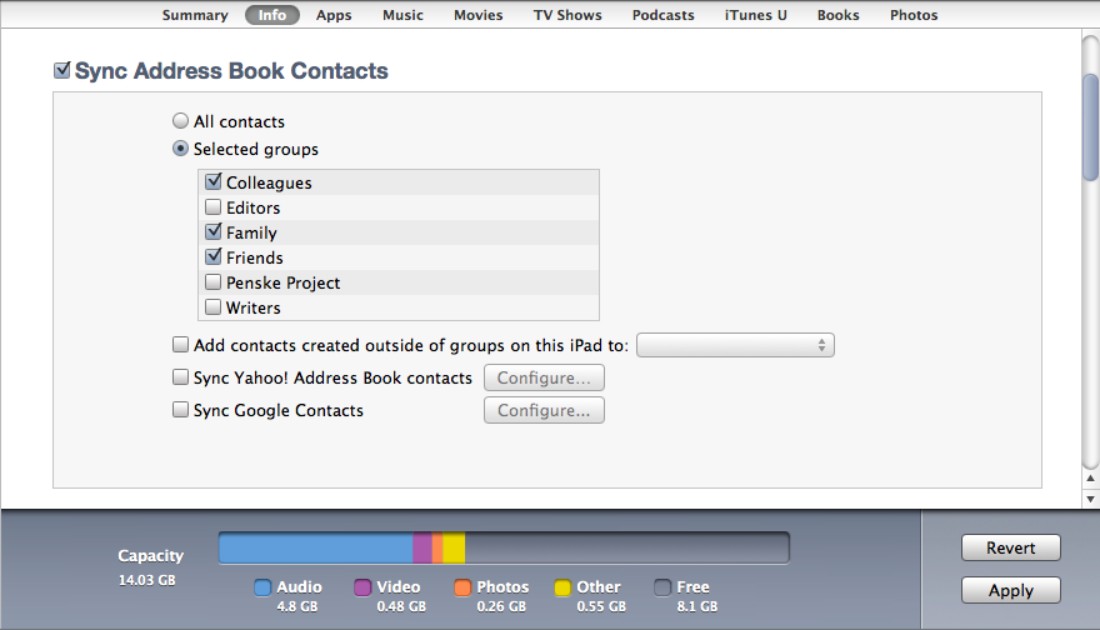
10.1 You can sync selected contact groups to your iPad.
6. If you want to make the sync a two-way street, select the Add contacts created outside of groups on this iPad to check box, and then choose a group from the menu.
7. (Mac only) If you have a Yahoo! account and you also want your Yahoo! Address Book contacts in on the sync, select the Sync Yahoo! Address Book contacts check box, type your Yahoo! ID and password, and click OK.
8. (Mac only) If you have a Google account and you also want your Google Contacts in on the sync, select the Sync Google Contacts check box, type your Google ID and password, and click OK.
9. Click Apply. iTunes syncs the iPad using your new contacts settings.
Getting Started with the Contacts App
You’ll need the Contacts app up and running for this chapter, so head for your iPad’s Home screen and tap the Contacts icon. Figure 10.2 shows the Contacts app.
The Contacts app displays the All Contacts list on the left and the info for the currently selected contact on the right. If you have a healthy number of contacts, you’ll need to know how to navigate the list. You have four choices:
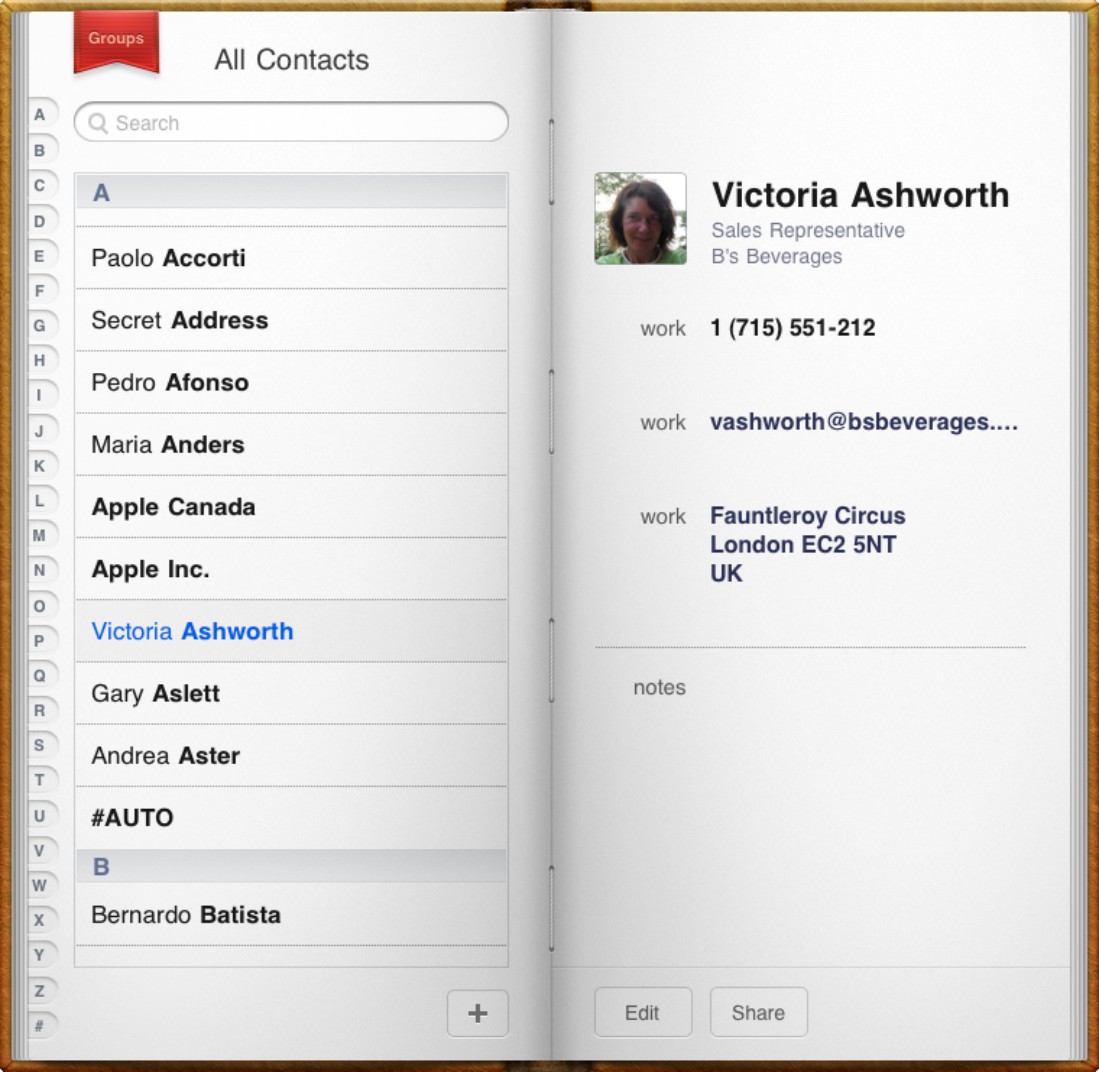
10.2 The iPad’s handsome Contacts app.
• By default the Contacts app displays the All Contacts list. To view a group of contacts, tap the Groups icon in the upper-left corner of the screen, and then tap the group you want to view.
• Flick up and down to scroll through the list.
• Tap a letter to leap directly to the contacts whose last names begin with that letter.
• Use the Search box at the top of the All Contacts list to type a few letters from the name of the contact you want to work with, and then tap the contact in the search results.
Creating and Editing Contacts
Syncing your computer’s contacts program (such as Address Book on the Mac, or Outlook’s Contacts folder) is by far the easiest way to populate your iPad Contacts app with a crowd of people, but it might not include everyone in your posse. If someone’s missing and you’re not around your computer, you can add that person directly to the Contacts app. Similarly, you might be messing around with the Contacts app and notice an error or old info for someone. No problem: You can edit a contact right on the iPad.
Best of all, any changes you make within the Contacts app are automatically synced back to your computer the next time your iPad and iTunes get together for a sync session.
Creating a new contact
The next time you realize someone’s missing from your contacts, you can fire up your trusty iPad and tap that person’s vital statistics right into the Contacts app. Here are the steps to follow:
1. In the Home screen, tap the Contacts icon. Your iPad opens the Contacts app.
2. Tap the + button at the bottom right of the screen. The New Contact screen appears and your iPad displays the keyboard, as shown in Figure10.3.
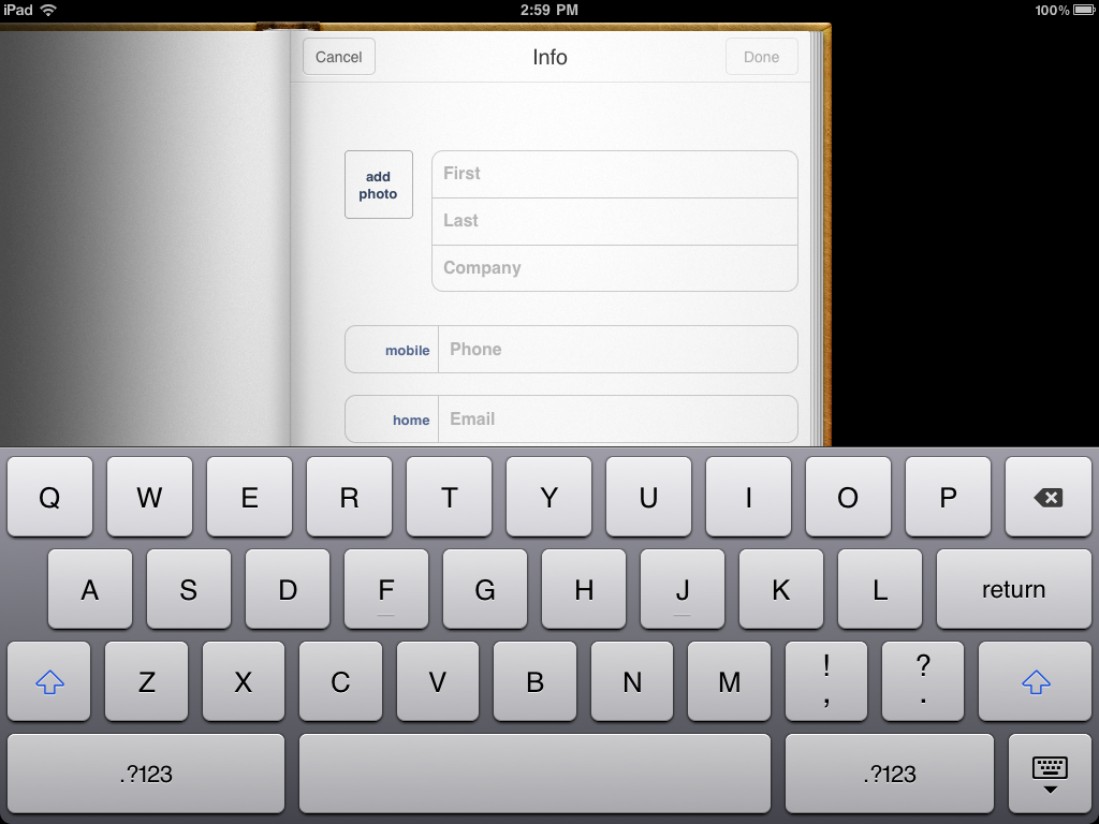
10.3 Use the New Contact screen to tap in the details of your contact.
3. The cursor starts off in the First box, so type the person’s first name. If you’re jotting down the contact data for a company or some other inanimate object, skip to Step 5.
4. Tap the Last box and then type the person’s last name.
5. If you want to note where the person works (or if you’re adding a business to your Contacts list), tap the Company box and type the company name.
Yup, I know there are still plenty of other fields to fill in, and we get to those in a second. For now, though, I want to interrupt your regularly scheduled programming to show you how to edit an existing contact. It will all make sense soon, trust me.
Editing an existing contact
Now that your new contact is off to a flying start, you can go ahead and fill in details such as phone numbers, addresses (e-mail, web, and real world), and anything else you can think of (or have the patience to enter into your iPad; it can be a lot of tapping!). The next few sections take you through the steps for each type of data.
The one technique that I don’t get into here is how to spruce up your contact with a photo. That’s because I cover that in Chapter 6.
However, the steps I show also apply to any contact that’s already residing in your iPad. Here, then, are the steps required to open an existing contact for editing:
1. In the Home screen, tap the Contacts icon to open the All Contacts screen.
2. Tap the contact you want to edit.
3. Tap Edit. Your iPad displays the contact’s data in the Info screen.
4. Make your changes, as described in the next few sections.
5. Tap Done. Your iPad saves your work and returns you to the All Contacts screen.
Assigning phone numbers to a contact
Everyone has a phone number, so you’ll want to augment a contact by entering your contact’s phone data. Sure, but which number? Work? Home? Cell? Pager? Fax? Fortunately, there’s no need to choose just one, because your iPad is happy to store all these numbers, plus a few more if need be.
Here are the steps to follow to add one or more phone numbers for a contact:
1. In the contact editing screen, examine the Phone field’s label box to see if the default label is the one you want. For a new contact, the default label is “mobile,” but you might see a different label if you’re editing an existing contact. If you’re okay with the existing label, skip to Step 4.
2. Tap the Phone field label. The Contacts app displays a list of phone labels, as shown in Figure 10.4.
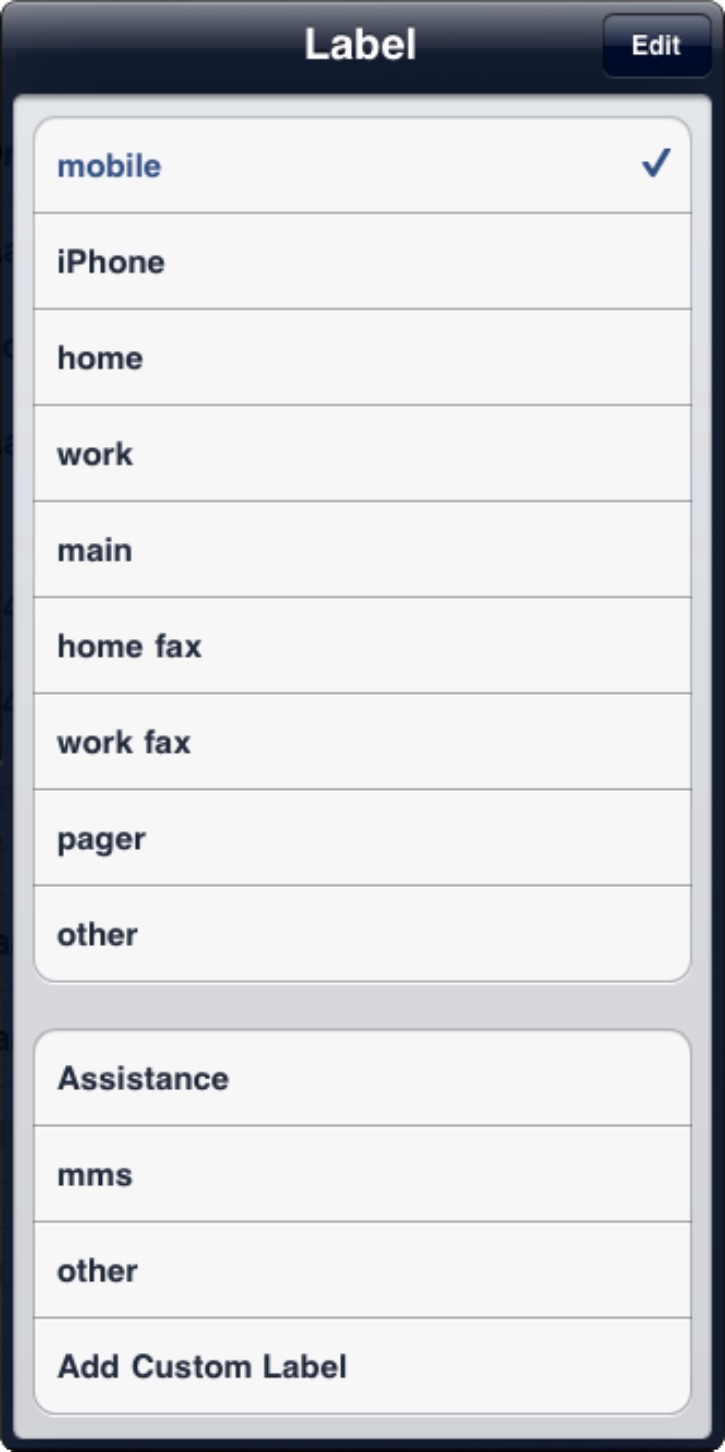
10.4 Tap a phone number label and then tap the label you want to use for the contact’s phone number.
3. Tap the label that best applies to the phone number you’re adding, such as mobile, iPhone, home, or work. The Contacts app displays the new label.
4. Tap inside the Phone field and then type the phone number with area code first. Note that you only need to enter the numbers; Contacts helpfully adds extra stuff like parentheses around the area code and the dash. When you begin entering the phone number, the Contacts app automatically adds another Phone field below the current field.
5. Repeat Steps 1 to 4 to add any other numbers you want to store for this contact.
Assigning e-mail addresses to a contact
It makes sense that you might want to add multiple phone numbers for a contact, but would you ever need to enter multiple e-mail addresses? Well, sure you would! Most people have at least a couple of addresses — usually home and work addresses — and some Type A e-mailers have a dozen or more. Life is too short to enter that many e-mail addresses, but you need at least the important ones if you want to use your iPad’s Mail application to send a note to your contacts.
Follow these steps to add one or more e-mail addresses for a contact:
1. In the contact editing screen, check out the Email field’s default label. For a new contact, the default label is “home,” but you might see a different label if you’re editing an existing contact. If you want to use the existing label, skip to Step 4.
2. Tap the Email field label to display a list of e-mail labels.
3. Tap the e-mail label you want to use, such as home or work. The Contacts app applies the new label.
4. Tap inside the Email field and type the person’s e-mail address. Note that the on-screen keyboard now displays the handy @ and . keys; you need those. While you type the e-mail address, the Contacts app sneakily adds another Email field below the current field.
5. Feel free to repeat Steps 1 to 4 as often as necessary to add other e-mail addresses for this contact.
Assigning web addresses to a contact
Who on earth doesn’t have a website these days? It could be a humble home page, a blog, a Facebook page, a Twitter feed, a home business site, or it could be someone’s corporate website. Some busy web beavers may even have all six! Whatever web home a person has, it’s a good idea to toss the address into his or her contact data because later on you can simply tap the address and your iPad (assuming it can see the Internet from here) immediately fires up Safari and takes you to the site. Does your pal have multiple websites? No sweat: Your iPad is happy to take you to them all.
You can add one or more web addresses for a contact by making your way through these steps:
1. In the contact editing screen, eyeball the URL field’s current label. If you’re okay with the existing label, skip to Step 4.
2. Tap the URL field label to get yourself a list of web address labels.
3. Tap the label that suits the web address you’re entering, such as home page, home, or work. The Contacts app adds the new label.
4. Tap inside the URL field and then tap the person’s web address. In Figure 10.5, note that the on-screen keyboard now includes several useful URL-friendly keys, including slash (/), dot (.), underscore (_), dash (-), and .com. Note, too, that when you start tapping the web address, the Contacts app surreptitiously inserts another URL field below the current field.
5. Repeat Steps 1 to 4 to add other web addresses for this contact, as you see fit.

To save some wear and tear on your tapping finger, don’t bother adding the http:// stuff at the beginning of the address. Your iPad adds those characters automatically anytime you tap the address to visit the site. Same with the www. prefix. So if the full address is http://www.wordspy.com, you need only enter wordspy.com.
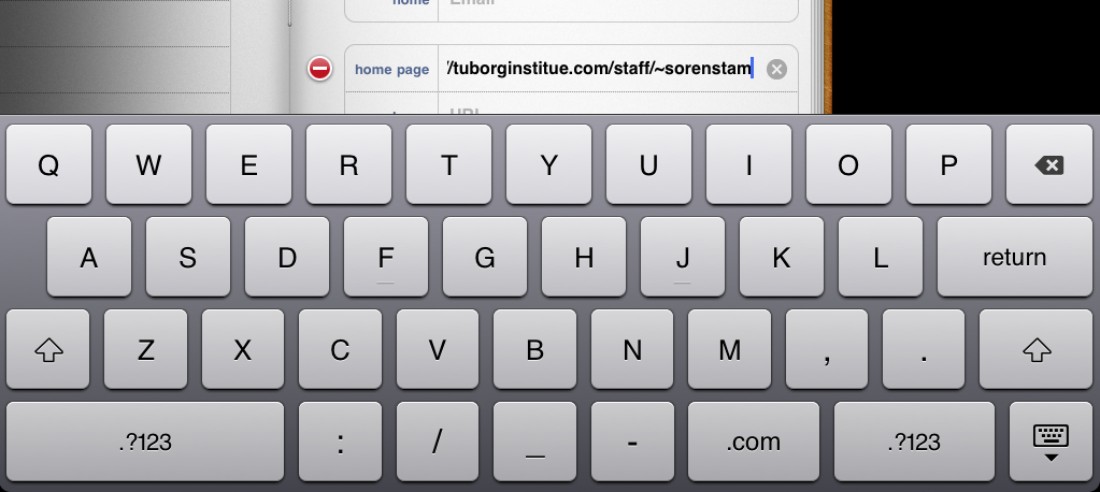
10.5 When you’re tapping away at a web address, don’t forget to take advantage of the on-screen keyboard URL-related keys, such as slash (/) and .com.
Assigning physical addresses to a contact
With all this talk about cell numbers, e-mail addresses, and web addresses, it’s easy to forget that people actually live and work somewhere. You may have plenty of contacts where the location of that somewhere doesn’t much matter, but if you ever need to get from here to there, taking the time to insert a contact’s physical address really pays off. Why? Because you need only tap the address and your iPad displays a Google map that shows you the precise location. From there you can get directions, see a satellite map of the area, and more. (I talk about all this great map stuff in Chapter 12.)
Tapping out a full address is a bit of work, but as the following steps show, it’s not exactly painful:
1. In the contact editing screen, tap Add New Address. The Contacts app displays fields for the street address, city, state, postal code, and country, as shown in Figure 10.6.
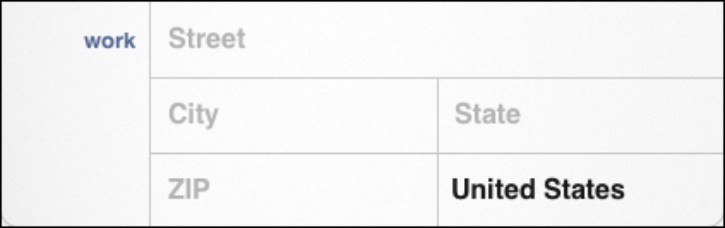
10.6 Use the fields shown here to tap out your contact’s physical coordinates.
2. Examine the address label to see if the default “home” label is the one you want. If you’re okay with the existing label, skip to Step 5.
3. Tap the address label. The Contacts app displays a list of address labels.
4. Tap the label that best applies to the address you’re entering, such as home or work. The Contacts app displays the new label.
5. Tap the Street field and then type the person’s street address. When Contacts realizes you’re typing a street address, it automatically adds a second Street field.
6. If necessary, tap the second Street field, and then type even more of the person’s street address.
7. Tap the City field, and then type the person’s city.
8. Tap the State field, and then type the person’s state. Depending on what you later select for the country, this field might have a different name, such as Province.
9. Tap the ZIP field, and then type the ZIP code. Again, depending on what you later select for the country, this field might have a different name, such as Postal Code.
10. Tap the Country field to open the Country list, and then tap the contact’s country.
11. Repeat Steps 1 to 10 if you feel like entering another address for your contact.
Getting More Out of the Contacts App
Adding and editing data using the Contacts app is blissfully linear: Tap a field label to change the label, and then tap inside a field to add the data. If you remember to take advantage of the on-screen keyboard’s context-sensitive keys (such as the .com key that materializes when you type a web address), then contact data entry becomes a snap.
The Contacts app is straightforward on the surface, but if you dig down a bit, you find some useful tools and features that can make your contact-management duties even better.
Creating a custom label
When you fill out your contact data, your iPad insists that you apply a label to each tidbit: home, work, mobile, and so on. If none of the predefined labels fits, you can always just slap on the generic label: other. You could do that, but it seems so, well, dull. If you’ve got a phone number or address that you can’t shoehorn into any of your iPad’s prefab labels, get creative and make up a label. Here’s how:
1. In the contact editing screen, tap the label for the field you want to work with. The Label list appears.
2. Tap Add Custom Label. The Custom Label dialog appears, as shown in Figure 10.7.
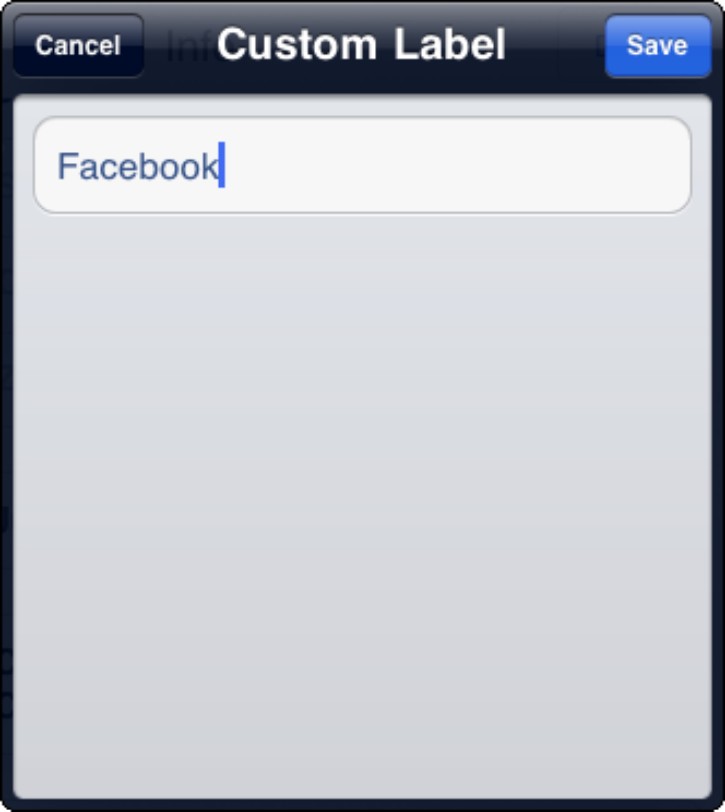
10.7 Use the Custom Label dialog to forge your very own custom label for your contacts.
3. Type the custom label.
4. Tap Save. The Contacts app saves your custom label and returns you to the contact editing screen.
You can apply your custom label to any type of contact data. For example, you can create a label named college and apply it to a phone number, e-mail address, web address, or physical address.
Deleting a custom label
If a custom label wears out its welcome, follow these steps to delete it:
1. In the contact editing screen, tap the label for any field. The Label list appears.
2. Tap Edit. The Contacts app puts the Label list into edit mode.
3. Tap the red Delete icon to the left of the custom label you want to remove. The Contacts app displays a Delete button to the right of the field.
4. Tap Delete.
5. Tap outside the Label list. The Contacts app returns you to the editing screen.
Adding extra fields to a contact
The New Contact screen (which appears when you add a contact) and the Info screen (which appears when you edit an existing contact) display just the fields you need for basic contact info. However, these screens lack quite a few common fields. For example, you might need to specify a contact’s prefix (such as Dr. or Professor), suffix (such as Jr., Sr., or III), or job title.
Thankfully, your iPad is merely hiding these and other useful fields where you can’t see them. There are 11 hidden fields that you can add to any contact:
• Prefix
• Phonetic First Name
• Phonetic Last Name
• Middle
• Suffix
• Nickname
• Job Title
• Department
• Instant Message
• Birthday
• Date
The iPad is only too happy to let you add as many of these extra fields as you want. Here are the steps involved:
1. In the contact editing screen, tap Add Field. The Add Field list appears, as shown in Figure 10.8.
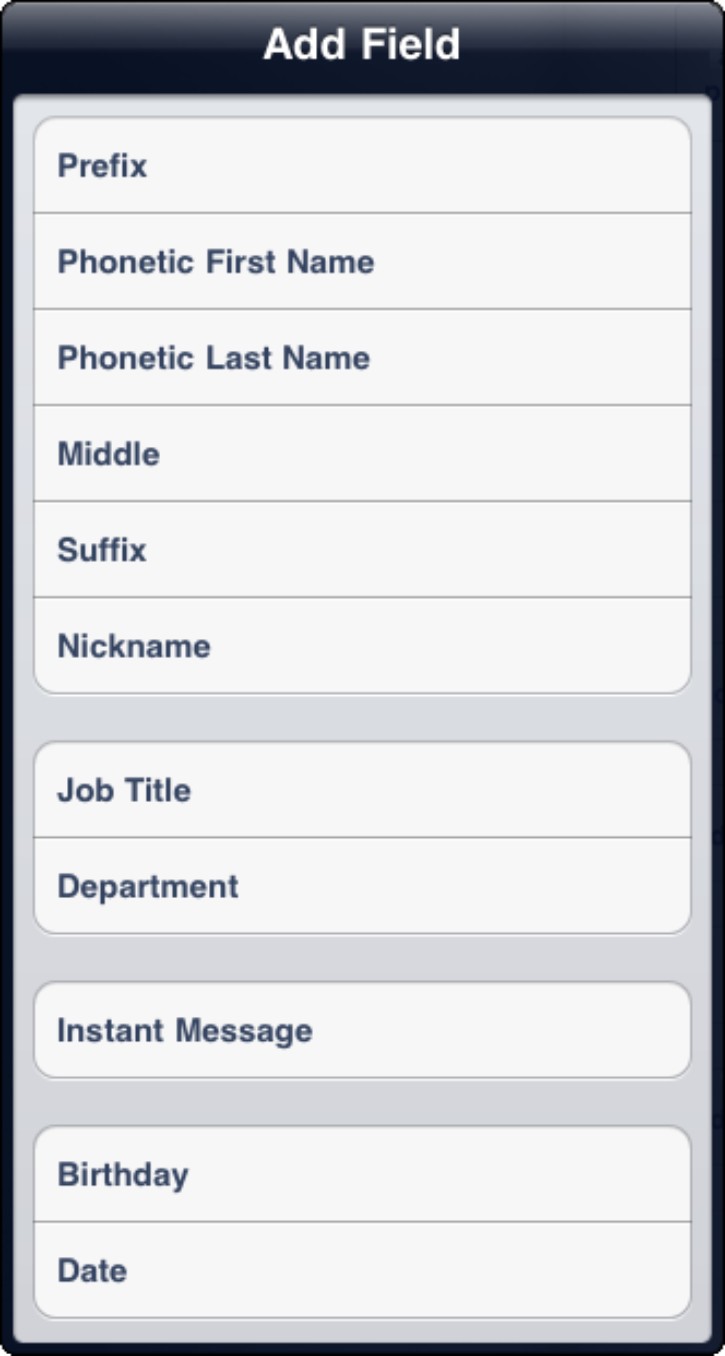
10.8 The Add Field list shows the hidden fields that you can add to any contact.
2. Tap the field that you want to add. The Contacts app adds the field to the contact.
3. If the field has a label, tap the label box to choose a new label, if needed.
4. Type the field data.
5. Repeat Steps 1 to 4 to add more fields as needed.
Keeping track of birthdays and anniversaries
Do you have trouble remembering birthdays? If so, then I feel your pain because I, too, used to be pathetically bad at keeping birthdays straight. And no wonder: These days you not only have to keep track of birthdays for your family and friends, but increasingly often you have to remember birthdays for staff, colleagues, and clients, as well. It’s too much! My secret is that I simply gave up and outsourced the job to my iPad’s Contacts app, which has a hidden field that you can use to store birth dates.
To add the Birthday field to a contact, follow these steps:
1. In the Contacts app, tap the contact you want to work with.
2. Tap Edit. The Info screen appears.
3. Tap Add Field. The Contacts app opens the Add Field list.
4. Tap Birthday. The Contacts app adds a birthday field to the contact and displays the nifty scroll wheels shown in Figure 10.9.
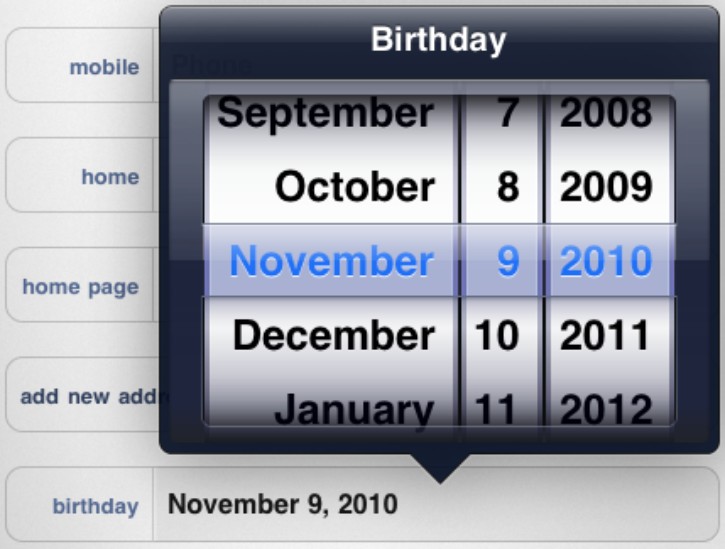
10.9 Use these fun scroll wheels to set the contact’s birth date.
5. Scroll the right wheel to set the day of the month for the birth date.
6. Scroll the middle wheel to set the month for the birth date.
7. Scroll the left wheel to set the year of the birth date.
8. Tap outside of the scroll wheels. The Contacts app saves the birthday info. Everyone has a birthday, naturally, but lots of people have anniversaries, too. It could be a wedding date, a quit-smoking date, or the date that someone started working at the company. Whatever the occasion, you can add it to the contact info so that it’s staring you in the face as a friendly reminder each time you open that contact.
Follow these steps to include an anniversary with a contact:
1. In the Contacts app, tap the contact you want to edit.
2. Tap Edit. The Contacts app shows the Info screen.
3. Tap Add Field. The Add Field list appears.
4. Tap Date. The Contacts app adds a Date field to the contact and displays the same scroll wheels that you saw earlier in Figure 10.9.
5. Scroll the right wheel to set the day of the month for the anniversary.
6. Scroll the middle wheel to set the month for the anniversary.
7. Scroll the left wheel to set the year of the anniversary.
8. The label box should already show the anniversary label, but if not, tap the label box, and then tap the anniversary.
9. Tap outside of the scroll wheels. The Contacts app saves the anniversary.
Although you can only add one birthday to a contact (not surprisingly), you’re free to add multiple anniversaries.
Adding notes to a contact
The standard contact fields all are designed to hold specific data: a name, an address, a date, and so on. Sometimes, however, you might need to enter more free-form data:
• The highlights of a recent client meeting
• A list of things to do for the contact
• How you met the contact or why you added the person to your Contacts list
• Contact data that doesn’t have a proper field: spouse’s or partner’s name, kids’ names, account numbers, gender, hobbies, and on and on
Whatever it is, your iPad offers a Notes field that you can add to a contact and then scribble away in as needed. To add the Notes field to a contact, follow these steps:
1. In the Contacts list, tap the contact you want to work with.
2. Tap Edit. The Info screen appears.
3. Tap inside the Notes field.
4. Type the note data.
Creating a new contact from an electronic business card
Entering a person’s contact data by hand is a tedious bit of business at the best of times, so it helps if you can find a faster way to do it. If you can cajole a contact into sending his or her contact data electronically, then you can add that data with just a couple of taps. What do I mean when I talk about sending contact data electronically? The world’s contact-management gurus long ago came up with a standard file format for contact data: the vCard. It’s a kind of digital business card that exists as a separate file. People can pass this data along by attaching their (or someone else’s) card to an e-mail message.
If you get a message with contact data, you see an icon for the VCF file, as shown in Figure 10.10.
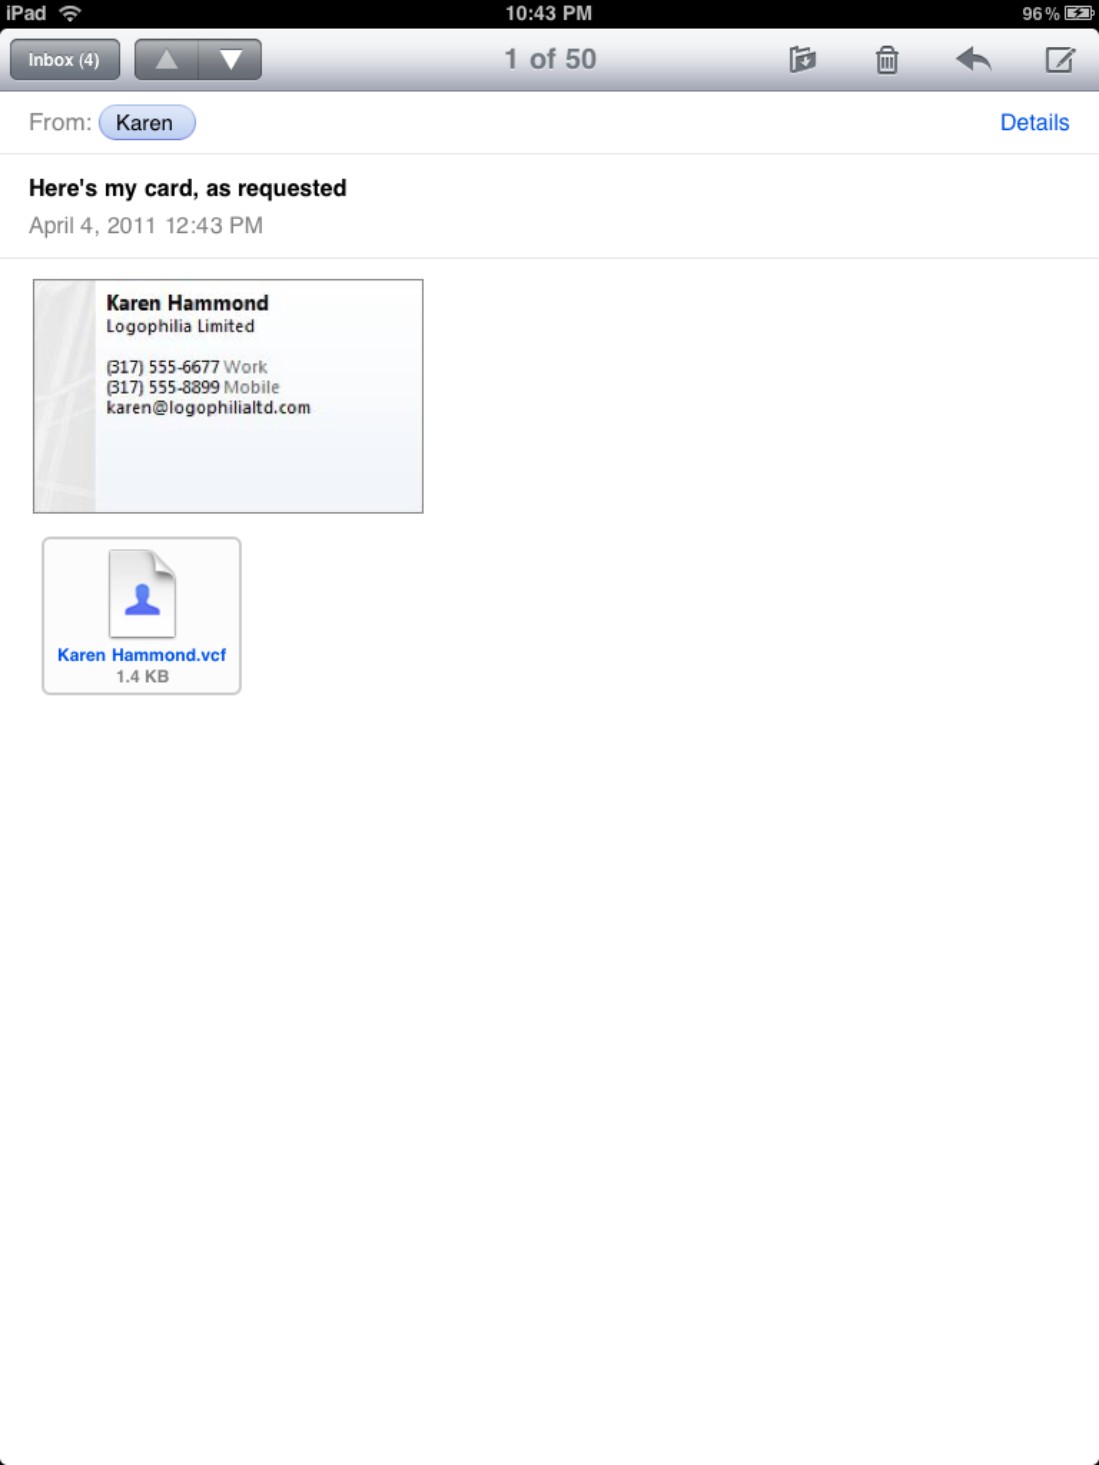
10.10 If your iPad receives an e-mail message with an attached vCard, an icon for the file appears in the message body.
To get this data into your Contacts list, follow these steps:
1. In the Home screen, tap Mail to open the Mail application.
2. Tap the message that contains the vCard attachment.
3. Tap the icon for the vCard file. Your iPad opens the vCard.
4. Tap Create New Contact. If the person is already in your Contacts list, but the vCard contains new data, tap Add to Existing Contact, and then tap the contact.
Sorting your contacts
By default, the Contacts app displays your contacts sorted by last name (or company name, for businesses) and then by first name (to resolve cases where people have the same last name). That makes sense in most cases, but you might prefer a more friendly approach that sorts contacts by first name and then by last name. Here’s how to make it so:
1. Return to the iPad’s Home screen and tab Settings. The Settings screen appears.
2. Tap Mail, Contacts, Calendars. The Mail, Contacts, Calendars screen appears.
3. Scroll down to the Contacts section.
4. Tap Sort Order to display the Sort Order options.
5. Tap First, Last. The Contacts app will now sort your contacts by first name.
Deleting a contact field
People change, and so does their contact info. Most of the time these changes require you to edit an existing field, but sometimes people actually shed information. For example, they might get rid of their pager or fax machine, or they might shutter a website. Whatever the reason, you should delete that data from the contact to keep the Info screen tidy and easier to navigate.
To delete a contact field, follow these steps:
1. In the Contacts list, tap the contact you want to work with.
2. Tap Edit. The Info screen appears.
3. Tap the red Delete icon to the left of the field you want to trash. The Contacts app displays a Delete button to the right of the field.
4. Tap Delete. The Contacts app removes the field.
5. Tap Done. The Contacts app closes the Info screen.
Deleting a contact
It feels good to add new contacts but, life being what it is, you don’t get a lifetime guarantee with these things: Friends fall out or fade away; colleagues decide to make a new start at another firm; clients take their business elsewhere; and some of your acquaintances simply wear out their welcome after a while. You move on, and so does your Contacts list, and the best way to do that is to delete the contact to help keep the list trim and tidy.
Follow these steps to delete a contact:
1. In the Contacts list, tap the contact you want to delete.
2. Tap Edit. The Info screen appears.
3. Tap the Delete Contact button at the bottom of the screen. The Contacts app asks you to confirm the deletion.
4. Tap Delete Contact. The Contacts app removes the contact and returns you to the All Contacts screen.