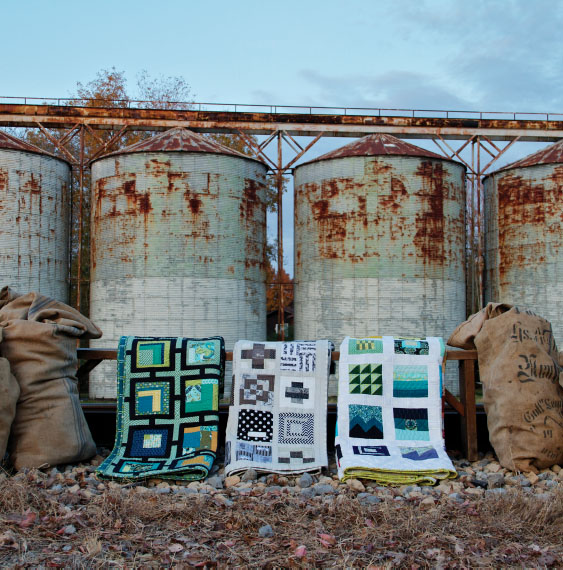
There are many ways to tackle the finishing of your quilt, and I have provided you with five possible solutions in various sizes, and with minimal complexity. Each possibility will require a different number of blocks and setting fabrics, and each is designed to let your blocks shine.

Choosing a limited palette means that you’re working with only a few colors. Don’t let the name fool you—there is a lot of room to move around within a limited palette.
In Trellis, I chose to work with only blues, greens and yellows. Within that palette of three colors, I had the option of pulling in hundreds of shades of those colors. Because all three are next to each other on the color wheel, I knew they would blend seamlessly into one another. This gave me a lot of options. From blue I could pull in everything from navy to a soft sky blue; add green, and I can pull in all the colors that fall between blue and green, like aqua and teal. I added a third color, yellow, to bring a little sunshine to the color scheme. Yellow sits next to green on the color wheel and allowed me to add some lime and more yellow-hued greens.

Mono, meaning single, and chroma, meaning color, put together simply mean a single color. The monochromatic palette is all about your lights and your darks.
In Skyline, I focused on gray as the single color of the quilt. Gray at its darkest is black and at its lightest is white. This scale of dark to light is called the value or the shade of a color. Having every shade between white and black also gave me a lot to work with when making my blocks. Add in the option of prints, dots, stripes and solids, and that pool of options gets even deeper.
When making a monochromatic quilt, value is king! The success of each block comes down to putting enough contrast into each piece. If I put two white fabrics next to each other, you won’t see the block. But if I put a black and white next to each other, that might be too much. There must be a balance so that you can see the shapes in each block without creating an optical illusion that might make you dizzy!
The Scrap Happy palette is for the person who throws all the chips in the air just to see where they fall.
I approached Gridlock this way. I looked at each block and made them one by one without looking at the block I made before or looking ahead to the blocks I was going to make. I knew I wanted my finished quilt to blend from one color to the next, and for that to happen I needed every variation of every color. For each block I began with a main fabric that was going to be the star of the block and then added in little pieces that complemented it. This method of fabric selection will make the whole worth more than the sum of its parts. Each individual block was nice, but when all of the blocks were put together, it made a spectacular rainbow of fabrics and pieces.
• Rotary cutter
• Cutting mat
• Ruler
• Marking tools (such as chalk pencils, disappearing ink pens, etc.)
• Scissors
• Thread
• Sewing machine (although you can hand sew, but it will take forever)
• Iron
• Ironing board
• Seam ripper
• 61⁄2" × 61⁄2" (16.5cm × 16.5cm) ruler for squaring up your blocks
• 1⁄4" (6mm) machine foot with guide (this will make your seams more accurate)
• Spray starch alternative (great for making crisp seams and taking the stretch out of fabrics)

A design wall is a great thing to have for laying out your blocks and deciding how to arrange them. Making a design wall is easy. Fabric will adhere to a number of fibrous surfaces like felt or fleece. The easiest way to make a temporary or permanent design wall is to tack a sheet of batting to a clear space on the wall. Batting comes in larger sizes, so you don’t have to piece together lengths off the bolt like you do with fleece or felt. Your cotton fabric pieces will “stick” to the wall but are easily removed, allowing you to move blocks around until you find the best arrangement.
Separate and label all of your pieces, and set aside everything but the pieces you are using. This will help keep everything organized and cut down on errors while sewing. Think of this as a meditation. Setting your blocks together is a repetitive activity. Put on some music and zone out to the gentle hum of your sewing machine. If you happen to thrive on chaos, then still keep your pieces organized but turn up the volume.
Generally you will press your seams to one side. However, follow the path of least resistance when pressing. If you have a lot of seams on one side and none on the other side of your seam, then press to the side without any seams. If you have a lot of seams on both sides, then press that seam open.
Be sure to use accurate 1⁄4" (6mm) seams in all constructions!
When using this method of creating triangles, you will end up with a scrap set of small triangles for every triangle you create. The excess triangle pieces that get trimmed away have two very important characteristics: They are already paired and right sides together, and they are already trimmed and exactly the same size as each other. Instead of throwing these seemingly useless, yet completely adorable little triangle pairs in the trash, re-purpose them! Get in the habit of sewing them together on the longer bias edge and set them aside. When all the blocks from the triangle chapter are complete, get them back out and press them, seams open. There are an infinite number of ways to arrange this little triangle scrap block. You can use them as a coordinating throw pillow for your final quilt or just piece them into your backing for a two-sided quilt!
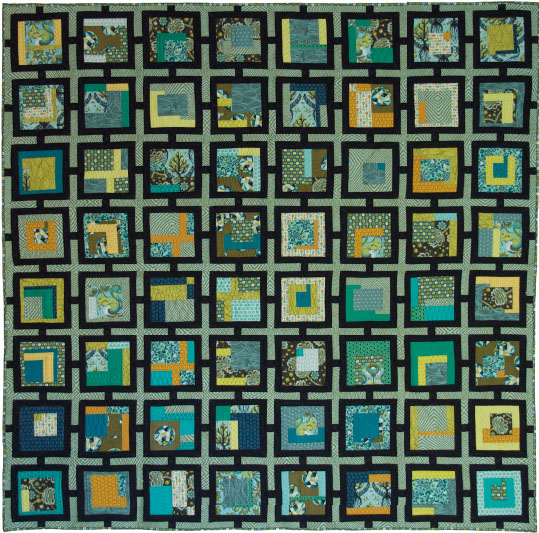
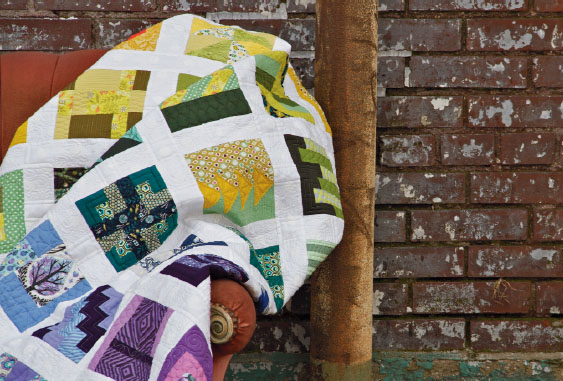
The Trellis quilt is a throw-sized quilt that makes a perfect rainy-day-lounge-on-the-couch-curled-up-with-a-good-book quilt. The design of Trellis frames and highlights each block as a small jewel to be admired while creating a larger pattern on its own.

Finished Size: 73" × 73" (185.4cm × 185.4cm)
Number of Blocks: 64
(Based on 44"/45" [111.8cm/114.3cm] fabrics)
Block Frame: 21⁄2 yds. (2.3m)
Sashing: 13⁄4 yds. (1.6m)
Binding: 5⁄8 yds. (.6m) (cut 8 strips)
Backing: 41⁄2 yds. (4.1m)
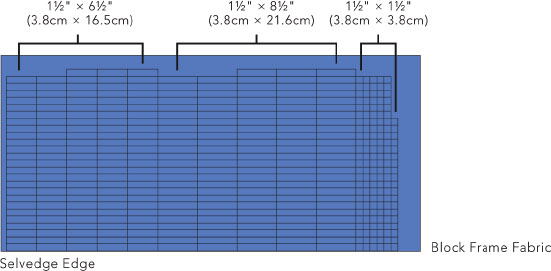
From Block Frame Fabric Cut:
(128) 11⁄2" × 61⁄2" (3.8cm × 16.5cm)
(128) 11⁄2" × 81⁄2" (3.8cm × 21.6cm)
(144) 11⁄2" × 11⁄2" (3.8cm × 3.8cm)
From Sashing Fabric cut:
(144) 4" × 11⁄2" (10.2cm × 3.8cm)
(63) 81⁄2" × 11⁄2" (21.6cm × 3.8cm)
(18) 5" × 11⁄2" (12.7cm × 3.8cm)

Cutting Diagrams
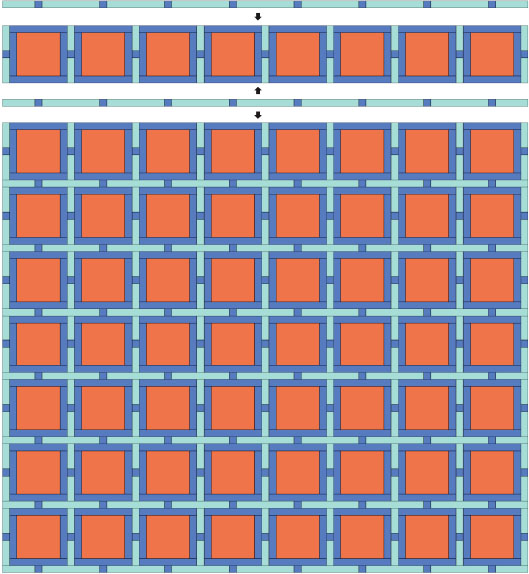
Find the center of each framed block and mark it with a straight pin. You can find the center by folding the block in half and matching the seams. Use your finger to make a small crease where the center is. Line up the center of each frame square on your sashing strip with the center of each frame block and use the pin that marks the center of your frame block to pin those points together. Pin each end of your block row and sashing strip, lining up the raw edges. I know this seems like a lot of pinning, but it will ensure that your quilt top is square, lays flat and that all the pieces line up in the end.
Use accurate 1⁄4" (6mm) seams in all constructions.

STEP 1: Sew one 11⁄2" × 61⁄2" (3.8cm × 16.5cm) frame piece to the right side of your block, right sides together (RST), making sure to line up your edges. Press toward the frame piece.

STEP 2: Sew another 11⁄2" × 61⁄2" (3.8cm × 16.5cm) frame piece to the left side of your block, RST, making sure to line up your edges. Press toward the frame piece.

STEP 3: Sew one 11⁄2" × 81⁄2" (3.8cm × 21.6cm) frame piece to the top of the unit competed in step 2, RST, making sure to line up your edges. Press towards the frame piece.

STEP 4: Sew one 11⁄2" × 81⁄2" (3.8cm × 21.6cm) frame piece to the bottom of the unit completed in step 3, RST, making sure to line up your edges. Press towards the frame piece.

STEP 5: Repeat steps 1 through 4 to frame all 64 blocks for your quilt.

STEP 6: Sew one 4" × 11⁄2" (10.2cm × 3.8cm) sashing piece to one 11⁄2" × 11⁄2" (3.8cm × 3.8cm) frame piece, RST, along the short edges. Press toward the framed block.

STEP 7: Sew another 4" × 11⁄2" (10.2cm × 3.8cm) piece to the opposite edge of the sashing unit completed in step 6, RST. Press toward the framed block.

STEP 8: Repeat steps 6 and 7 to make a total of 72 vertical sashing units.
STEP 9: Using nine vertical sashing strips and eight framed blocks, build your row by alternating these units beginning and ending with a vertical sashing strip.

STEP 10: Repeat steps 6 through 9 to make a total of eight rows.
STEP 11: Sew one 5" × 11⁄2" (12.7cm × 3.8cm) sashing piece to one 11⁄2" × 11⁄2" (3.8cm × 3.8cm) frame piece.

STEP 12: Using seven 81⁄2" × 11⁄2" (21.6cm × 3.8cm) sashing pieces and seven 11⁄2" × 11⁄2" (3.8cm × 3.8cm) frame pieces, sew your sashing, RST, by alternating the two pieces beginning with a sashing piece and ending with a frame piece. Press all seams toward the frame pieces.

STEP 13: Sew the unit made in step 11 to the beginning of the unit in step 12, RST. Press seams toward the frame piece.

STEP 14: Sew one 5" × 11⁄2" (12.7cm × 3.8cm) sashing piece to the end of the unit made in step 13, RST.

STEP 15: Repeat steps 11 through 14 to make a total of nine horizontal sashing strips.
STEP 16: To complete your quilt top, sew your horizontal sashing strips and your block rows, right sides together, according to the assembly diagram.
Quilted by Angela Walters
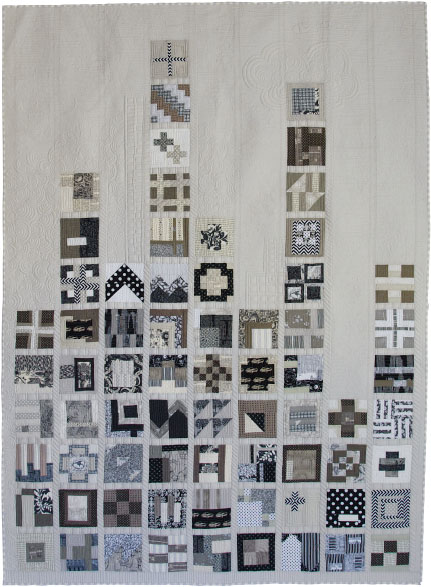
Skyline is a twin-sized option that mimics a city skyline. When I am walking through city streets at night, I love it when people leave the lights on in their apartments, and you get a small glimpse into the way other people live. Think of each block as a peek behind the curtain.
Twin
Finished Size: 66" × 89" (167.6cm × 226.1cm)
Number of Blocks: 70
(Based on 44"/45" [111.8cm/114.3cm] fabrics)
Sashing: 31⁄4 yds. (3m)
Binding: 5⁄8 yds. (.6cm) (cut 8 strips)
Backing: 51⁄2 yds. (5m)
From Sashing Fabric cut:
A - (2) 871⁄2" × 21⁄2" (222.3cm × 6.4cm)
(side borders)
B - (1) 661⁄2" × 21⁄2" (168.9cm × 6.4cm)
(bottom border)
C - (8) 871⁄2" × 11⁄2" (222.3cm × 3.8cm)
(vertical sashing strips)
D - (1) 461⁄2"× 61⁄2" (118.1cm × 16.5cm)
E - (1) 251⁄2" × 61⁄2" (64.8cm × 16.5cm)
F - (1) 391⁄2" × 61⁄2" (100.3cm × 16.5cm)
G - (1) 41⁄2" × 61⁄2" (105.4cm × 16.5cm)
H - (1) 321⁄2" × 61⁄2" (54.6cm × 16.5cm)
I - (1) 461⁄2" × 61⁄2" (118.1cm × 16.5cm)
J - (1)111⁄2" × 61⁄2" (29.2cm × 16.5cm)
K - (1) 601⁄2" × 61⁄2" (153.7cm × 16.5cm)
L - (1) 391⁄2" × 61⁄2" (100.3cm × 16.5cm)
M - (61) 61⁄2" × 11⁄2" (16.5cm × 3.8cm)

Cutting Diagram
In this layout option, every column of blocks is assembled differently, which means that almost every piece is cut at a different length. Cut your sashing and column strips, lengthwise, from the fabric so that you don’t have to piece them together. This will allow your quilt top to come together more smoothly and eliminate those pesky extra seams.
As you cut your strips, assign a letter that corresponds to that strip. Mark your strips by writing the letter on a scrap of paper and pinning it to that strip
When sewing long, skinny strips, use a lot of pins! Begin by finding the center of the strip and line that center up with the center of your column. Pin. Then pin each end of the strip to the end of the column. It’s likely that the columns and sashing strips will be slightly different lengths. Distribute any extra length evenly through the sashing strip and pin every 3 or 4 inches (7.6cm–10.2cm). This is good practice any time you are sewing long seams such as borders. Pin! Pin! Pin! It’s worth the extra effort.
Use accurate 1⁄4" (6mm) seams in all constructions.
Assembly Diagram
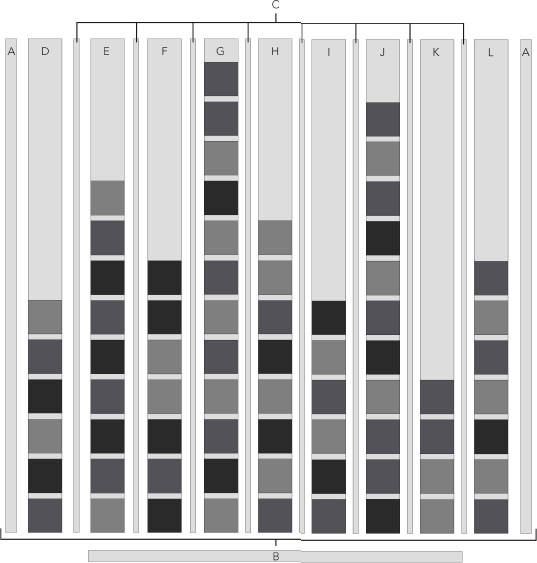
Since Skyline is not based on a traditional block structure, we’re going to put this one together a little differently.
Each column has a recipe that consists of sashing strips (M), 61⁄2" (16.5cm) blocks and a corresponding 61⁄2" (16.5cm) strip based on the letters that you assigned to each piece when you were cutting (e.g. D, E, F, etc). The column letter and the 61⁄2" (16.5cm) strip letter are the same.
Always press toward the sashing fabric.
Sew the bottom strip (B) on last, after all of your columns are completed and sewn together.
Use the Column Recipes to assemble the columns, always sewing right sides together and pressing toward the sashing.
D: 6 blocks, 5 sashing strips (M)
E: 9 blocks, 8 sashing strips (M)
F: 7 blocks, 6 sashing strips (M)
G: 12 blocks, 11 sashing strips (M)
H: 8 blocks, 7 sashing strips (M)
I: 6 blocks, 5 sashing strips (M)
J: 11 blocks, 10 sashing strips (M)
K: 4 blocks, 3 sashing strips (M)
L: 7 blocks, 6 sashing strips (M)
Quilted by Angela Walters
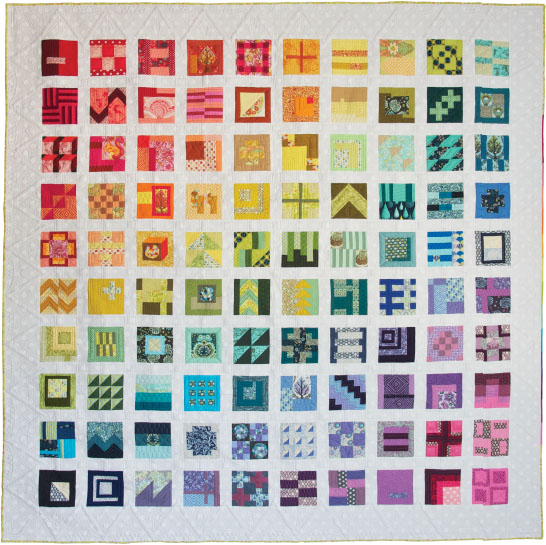
The Gridlock quilt is, perhaps, the simplest of all the quilt layouts. One hundred blocks are evenly spaced and set within this queen-sized option. This quilt is about the blocks and nothing else. The background simply falls away, allowing each block to shine on its own.
Finished Size: 90" × 90" (228.6cm × 228.6cm)
Number of Blocks: 100
(Based on 44"/45" [111.8cm/114.3cm] fabrics)
Sashing & Borders: 41⁄2 yds. (4.1m)
Binding: 5⁄8 yds. (.6m) (cut 9 strips)
Backing: 81⁄4 yds. (7.5m)
From Sashing & Border Fabric cut:
(18) 21⁄2" (6.4cm) × Width of Fabric (WOF)
(2) 901⁄2" × 61⁄2" (229.9cm × 16.5cm)
(2) 781⁄2" × 61⁄2" (199.4cm × 16.5cm)
(90) 61⁄2" × 21⁄2" (16.5cm × 6.4cm)
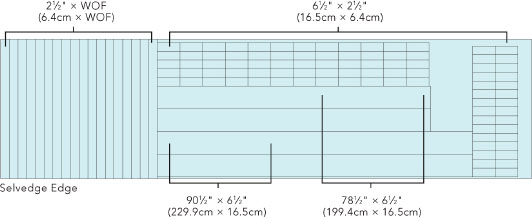
Cutting Diagram
Use accurate 1⁄4" (6mm) seams
STEP 1: Sew two 21⁄2" (6.4cm) × WOF strips with right sides together, along the short ends, to create nine long 781⁄2" × 21⁄2" (199.4cm × 6.4cm) sashing strips.
STEP 2: Sew one 61⁄2" × 21⁄2" (16.5cm × 6.4cm) sashing piece to the right side of one 61⁄2" × 61⁄2" (16.5cm × 16.5cm) pieced block. Press towards the sashing fabric.

STEP 3: Repeat step 2 until your row consists of ten 61⁄2" × 61⁄2" (16.5cm × 16.5cm) pieced blocks and nine 61⁄2" × 21⁄2" (16.5cm × 6.4cm) sashing pieces, beginning with a pieced block and ending with a pieced block. Press all seams toward the sashing fabric.

STEP 4: Repeat steps 1–3 to create a total of ten rows.
STEP 5: With RST, sew one 781⁄2" × 21⁄2" (199.4cm × 6.4cm) sashing strip to the bottom edge of a block row. Press toward the sashing fabric.

STEP 6 Repeat step 5, adding a sashing strip to a block row to create a total of 9 units.

Assembly Diagram
STEP 7: With RST, sew all 9 blocks/sashing rows together Sew block row 10 to block/sashing row 9 last. Make sure to line up your blocks so that the vertical columns line up as well as the horizontal rows. Use a lot of pins! (See Assembly Diagram.)
STEP 8: Sew a 781⁄2" × 61⁄2" (199.4cm × 16.5cm) border strip to the left edge of quilt, RST. Press toward the border fabric.
STEP 9: Sew a 781⁄2" × 61⁄2" (199.4cm × 16.5cm) border strip to the right edge of your quilt, RST. Press toward the border fabric.
STEP 10: Add the top and bottom borders last. Press toward the border fabric.

*Your quilt top center should consist of 10 block rows and 9 sashing strips, beginning and ending with a block row.
Quilted by Angela Walters
The City Planner quilt brings to mind an aerial view of the perfect neighborhood, with wide, clean streets and well-manicured yards. This one-hundred-block option serves as an organized little community of blocks all in a row. The two-toned setting fabrics will create a stripe effect that will allow your blocks to nestle comfortably into place.
Finished Size: 104" × 104" (264.2cm × 264.2cm)
Number of Blocks: 100
(Based on 44"/45" [111.8cm/114.3cm] fabrics)
Sashing no.1: 35⁄8 yds. (3.3m)
Sashing no.2: 31⁄2 yds. (3.2m)
Binding: 7⁄8 yds. (.8m) (cut 9 strips)
Backing: 93⁄8 yds. (8.6m)
From Sashing no.1 Fabric cut:
(6) 1041⁄2" × 41⁄2" (265.4cm × 11.4cm)
(110) 41⁄2" × 31⁄2" (11.4cm × 8.9cm)
From Sashing no.2 Fabric cut:
(5) 1041⁄2" × 41⁄2" (265.4cm × 11.4cm)
(110) 41⁄2" × 31⁄2" (11.4cm × 8.9cm)
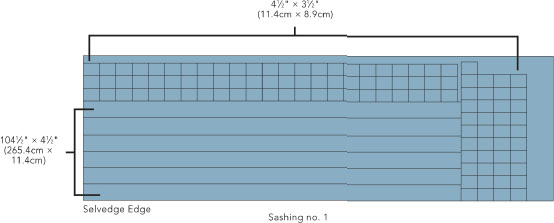
Cutting Diagram
Use accurate 1⁄4" (6mm) seams in all constructions.
STEP 1: Sew one 41⁄2" × 31⁄2" (11.4cm × 8.9cm) (sashing no. 1) to one 41⁄2" × 31⁄2" (11.4cm × 8.9cm) (sashing no. 2), RST, along the 41⁄2" (11.4cm) edge. Press your seams open. (Pressing the seams open here will cut down seam bulk when they are sewn to your pieced blocks.)

STEP 2: Repeat step 1 to make a total of 110 units. This is your block sashing.

STEP 3: Sew one sashing unit to the left side of one pieced block, RST. Press toward the sashing unit.

STEP 4: Repeat step 3, sewing a total of ten block/sashing units.
STEP 5: Sew all ten block/sashing units together, RST, adding one final sashing unit (as sewn in step 1) to the end of your row. Press all seams toward the sashing units.

STEP 6: Repeat steps 3 through 5, this time making sure that sashing fabric no. 2 is reversed and at the top of each sashing unit.

STEP 7: Sew one 1041⁄2" × 41⁄2" (265.4cm × 11.4cm) sashing fabric no. 2 strip to the bottom edge of row one, RST. Press toward the sashing strip.

STEP 8: Sew the unit completed in step 7, RST, to one pieced block/sashing unit completed in step 6. Press toward the sashing strip. (This is your completed row 1.)

STEP 9: Repeat steps 1 through 8 to make a total of five completed rows.
STEP 10: With RST, sew one 1041⁄2" × 41⁄2" (265.4cm × 11.4cm) sashing no. 1 piece to row 1.
STEP 11: Repeat step 10 with rows 2 though 5.
STEP 12: Add the remaining 1041⁄2" × 41⁄2" (265.4cm × 11.4cm) sashing no. 1 piece to the lower edge of row 5.
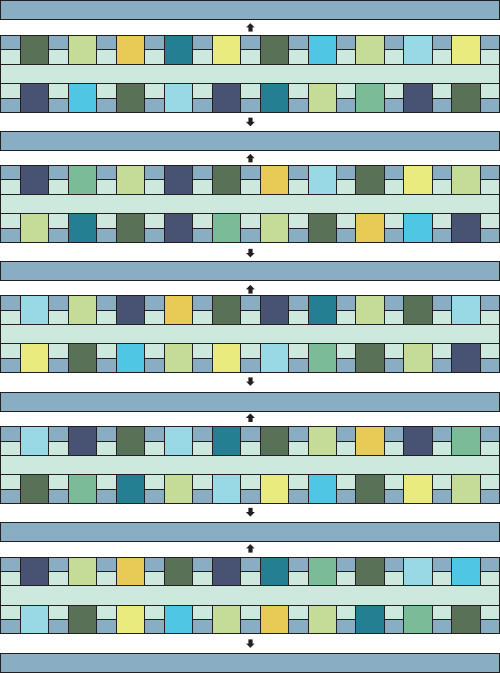
Assembly Diagram
Top to bottom: top sashing, row 1, row 2, row 3, row 4, row 5, bottom sashing

Sliding Scale is another queen-sized option that highlights your blocks while setting them slightly off balance. If perfection isn’t your thing, and lining everything up perfectly sounds a little boring to you, then this might be your best fit.
Finished Size: 80" × 93" (203.2cm × 236.2cm)
Number of Blocks: 70
(Based on 44"/45" [111.8cm/114.3cm] fabrics)
Sashing: 41⁄2 yds. (4.1m)
Binding: 5⁄8 yds. (.6m) (cut 9 strips)
Backing: 81⁄2 yds. (7.8m)
From Sashing Fabric cut:
(11) 801⁄2" × 31⁄2" (204.5cm × 8.9cm)
(10) 181⁄2" × 61⁄2" (47cm × 16.5cm)
(10) 81⁄2" × 61⁄2" (21.6cm × 16.5cm)
(60) 61⁄2" × 21⁄2" (16.5cm × 6.4cm)
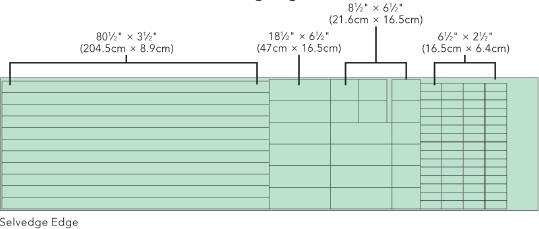
Cutting Diagram
Use accurate 1⁄4" (6mm) seams in all constructions.
STEP 1: Sew seven 61⁄2" × 61⁄2" (16.5cm × 16.5cm) pieced blocks and six 61⁄2" × 21⁄2" (16.5cm × 6.4cm) sashing pieces, RST, beginning with a pieced block and ending with a pieced block. Press toward the sashing fabric.

STEP 2: Repeat step 1 to make a total of ten rows.
STEP 3: Sew one 61⁄2" × 181⁄2" (16.5cm × 47cm) piece, RST, to the beginning of rows 1, 3, 5, 7 and 9. Press toward the sashing fabric.

STEP 4: Sew one 61⁄2" × 81⁄2" (16.5cm × 21.6cm) piece, RST, to the end of rows 1, 3, 5, 7 and 9. Press toward the sashing fabric.

STEP 5: Sew one 61⁄2" × 81⁄2" (16.5cm × 21.6cm) piece, RST, to the beginning of rows 2, 4, 6, 8 and 10. Press toward the sashing fabric.

STEP 6: Sew one 61⁄2" × 181⁄2" (16.5cm × 47cm) piece to the end of rows 2, 4, 6, 8 and 10. Press toward the sashing fabric.

STEP 7: Assemble your quilt according to the assembly diagram alternating sashing strips and block rows. Begin and end with a sashing strip. Always press toward the sashing fabric.

Assembly Diagram
No matter which method of quilting you choose, your batting and backing should measure at least six to eight inches (15.2cm to 20.3cm) larger than your quilt top.
Every method of quilting besides long-arm machine quilting will require you to baste your quilt top, batting and backing before you begin quilting. Basting is achieved with long stitches or curved safety pins to hold all three layers together, and to eliminate the shifting of these layers during the actual quilting process.
Choosing a method of quilting is as important as the quilt top itself. There are many factors that go into making this decision, the two biggest of which are time and money. Sending your quilt top to a long-arm quilter can be expensive, but it can also yield gorgeous results when sent to someone with real talent. Hand quilting won’t cost you a lot of money, but it can take months, or sometimes years, to complete. It is important to evaluate the quilt top and decide which method would best compliment it. The quilting should enhance the piecing.
STEP 1: Cut the binding strips 21⁄4" (5.7cm) wide. Join all the strips with diagonal seams. Cut off excess seam allowances and press the seams open.
STEP 2: Press one end under in a 45° angle.
STEP 3: Fold and press the binding strips in half lengthwise with wrong sides together, starting with the folded corner.
STEP 4: Place the binding along one edge of the project with raw edges together. Using a 1⁄4" (6mm) seam, start sewing along the edge, leaving several inches of tail at the beginning. Stop sewing 1⁄4" (6mm) away from the corner and backstitch.
STEP 5: Fold the binding away at a 90° angle.
STEP 6: Fold the binding back along the second straight edge.
STEP 7: Continue sewing along the second edge, starting 1⁄4" (6mm) away from the corner and backstitching at the beginning.
STEP 8: Continue in this way around the entire project. Cut the end of the binding strip even with the point where you started stitching.
STEP 9: Tuck the end of the binding into the folded corner at the beginning. Continue sewing, ending just past the point where you started.
STEP 10: Fold the binding to the back of the quilt, being sure the fabric covers the stitched seam. Use one length of thread to blindstitch the binding down to the back of the quilt. Stitch up the through the binding fold and back down underneath the binding so your stitches are concealed.
STEP 11: Tuck in the corners as you get to them.