Chapter 8
Knitting in the Round
In This Chapter
Selecting circular and double-pointed needles
Discovering how to cast on in circular knitting
Getting started by joining and working basic stitches
Experimenting with steek methods
Figuring out your gauge
Knitting in the round, in which you knit around and around on a circular needle to create a seamless tube, is deceptively simple, and many knitters of all skill levels prefer it to flat knitting. Why? For a variety of reasons, but the two most common reasons for beginners are that knitting proceeds faster because you don’t have to turn your work and that you can create stockinette stitch — a common stitch in many beginner and intermediate patterns — without having to purl. More advanced knitters, especially those who make garments (sweaters, socks, gloves, and so on), like knitting in the round because it cuts down on garment assembly. For these reasons, circular knitting is growing in popularity, and many books for beginning knitters include knit-in-the-round patterns.
This chapter explains everything you need to know to successfully knit in the round. For projects that use this technique, head to Chapters 9 and 18.
How Going in Circles Can Be a Good Thing
When you knit in the round (often called circular knitting), you work on a circular needle or double-pointed needles (dpns) to knit a seamless tube. Years ago, circular knitting was a technique associated with more-experienced knitters. These days many popular patterns for beginners are written in the round. Many knitters — beginner and advanced — prefer knitting in the round because of its benefits, which include the following:
The right side always faces you. If you’re averse to purling for some reason, knitting in the round allows you to skip it entirely — as long as you stick to stockinette stitch. Having the right side face you also makes working repeating color patterns easier because your pattern is always front and center; you’re never looking at the back and having to flip to the front to double-check what color the next stitch should be.
Although circular knitting is great for sweater bodies, sleeves, hats, socks, and mittens, you’re not limited to creating tubes. By using something called a steek — a means of opening the tube of knitted fabric with a line of crocheted or machine-sewn stitches — you also can create a flat piece after the fact. And that’s good for such things as cardigans.
You can reduce the amount of sewing required for garments. When you knit back and forth on straight needles, you make flat pieces that have to be sewn together. Circular knitting eliminates many of these seams. In fact, some patterns let you make an entire sweater from bottom to top (or top to bottom) without having a single seam to sew up when the last stitch has been bound off.
Choosing Needles for Circular Knitting
Circular and double-pointed needles are designed for knitting in the round and, as Chapter 2 explains, come in the same sizes as regular knitting needles. When you select circular or double-pointed needles for your projects, keep these things in mind:
Circular needle: The needle length you choose for your project must be a smaller circumference than the tube you plan to knit; otherwise, you won’t be able to comfortably stretch your stitches around the needle. For example, to knit a hat that measures 21 inches around, you need a 16-inch needle because 21 inches worth of stitches won’t stretch around 24 inches of needle (which is the next size up from a 16-inch needle). We know it sounds counterintuitive to need a needle smaller in circumference than the knitted project, but the problem is that, because there’s no break — no first stitch or last stitch (after all you’re knitting a tube) — you can only stretch the fabric as far as you can stretch any two stitches. A 21-inch circular project won’t knit comfortably on a 24-inch circular needle because you can’t easily stretch 2 stitches 3 inches apart.
 When you first take a circular needle from its package, it will be tightly coiled. Run the coil under hot water or immerse it in a sink of hot water for a few moments to relax the kinks. You can even hang it around the back of your neck while you get your yarn ready; your body heat will help unkink the needle.
Double-pointed needles: Lengths vary from 5 to 10 inches. The shorter ones are great for socks and mittens, and the longer ones work well for hats and sleeves. Aim for 1 inch or so of empty needle at each end. If you leave more than 1 inch, you’ll spend too much time sliding stitches down to the tip so that you can knit them; if you leave less than 1 inch, you’ll lose stitches off the ends.
 If you’ve never used double-pointed needles before, choose wooden or bamboo ones. Their slight grip on the stitches will keep the ones on the waiting needles from sliding off into oblivion when you’re not looking.
Casting On for Circular Knitting
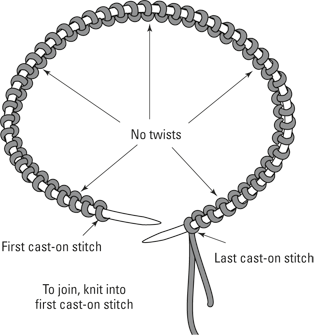
To knit on a circular needle, cast your stitches directly onto the needle as you would on a straight needle. (For a refresher on how to cast on, see Chapter 4.) Here’s the important bit: Before you start to knit, make sure that the cast-on edge isn’t twisted around the needle; if you have stitches that spiral around the needle, you’ll feel like a cat chasing its tail when it comes time to find the bottom edge. The yarn end should be coming from the RH needle tip, as shown in Figure 8-1.
Figure 8-1: Ready to knit on a circular needle.
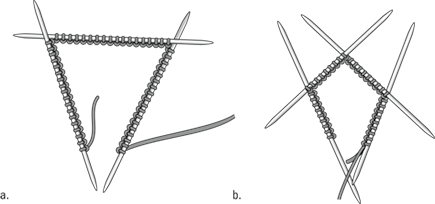
If you’re using a set of four double-pointed needles, use three needles for your stitches: Form them into a triangle (see Figure 8-2a) with the yarn end at the bottom point. Save the fourth (empty) needle for knitting. If you’re using a set of five needles, put your stitches on four needles, as shown in Figure 8-2b, and knit with the fifth (empty) needle.
Figure 8-2: Dividing stitches among three (a) and four (b) double-pointed needles.
Joining the Round
Whether you’re knitting in the round on a circular or double-pointed needles, after you cast on, pattern instructions tell you to join and begin knitting. “Joining” simply means that when you work the first stitch, you bring the first and last cast-on stitches together, joining the circle of stitches.
Joining on a circular needle
To work the first stitch of the round, follow these steps:
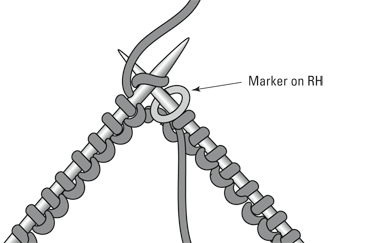
1. Place a marker on the RH needle before making the first stitch if you want to keep track of the beginning of the round.
Many in-the-round patterns tell you to place a marker to indicate the beginning of a round. When you’re doing color work or any sort of repeating pattern, knowing where one round ends and another begins is vital. And if you have to place other markers later (common with pieces that require shaping), do something to differentiate your “beginning” marker from the others: Make it a different color than the other markers you use, or attach a piece of yarn or a safety pin to it.
2. Insert the tip of the RH needle into the first stitch on the LH needle (the first cast-on stitch) and knit or purl as usual.
Figure 8-3 shows the first stitch being made with a marker in place.
Figure 8-3: The first stitch in a round.
Joining on double-pointed needles
For double-pointed needles, use the empty needle to begin working the first round. If the first stitch is a knit stitch, make sure that the yarn is in back of your work. If the first stitch is a purl stitch, bring the yarn to the front between the needles, bring the empty needle under the yarn, and insert it to purl into the first stitch on the LH needle. After the first couple of stitches, arrange the back ends of the two working needles on top of the other needles. (Do you feel like you have a spider by one leg?) The first round or two may feel awkward, but as your piece begins to grow, the weight of your knitting will keep the needles nicely in place and you’ll cruise along.
Tidying up the first and last stitches
Whether you’re working on a circular needle or double-pointed needles, the first and last cast-on stitches rarely make a neat join. To tighten up the connection, you can do one of the following:
Cast on an extra stitch at the end, transfer it to the LH needle, and make your first stitch a k2tog, working the increased stitch with the first stitch on the LH needle.
Before working the first stitch, wrap the yarn around the first and last cast-on stitches as follows:
1. Transfer the first stitch on the LH needle to the RH needle.
2. Take the ball yarn from front to back between the needles, and transfer the first 2 stitches on the RH needle to the LH needle.
3. Bring the yarn forward between the needles, and transfer the first stitch on the LH needle back to the RH needle.
4. Take the yarn to the back between the stitches, and give a little tug on the yarn.
You’re ready to knit the first stitch.
Working Common Stitches in the Round
As we mention earlier in the chapter, when knitting in the round, the right side is always facing you — which is a good thing as long as you understand how it affects the stitches you make. For example, whereas in flat knitting you create a garter stitch by knitting every row, knitting every round in circular knitting produces stockinette stitch. So here’s a quick guide to getting the stitches you want:
For garter stitch: Alternate a knit round with a purl round.
For stockinette stitch: Knit all rounds.
For rib stitches: In round 1, alternate knit and purl stitches in whatever configuration you choose (1 x 1, 2 x 2, and so on). In subsequent rounds, knit over the knit stitches and purl over the purl stitches.
The trick is simply knowing how the stitch is created in flat knitting and then remembering the principle. For example, in seed stitch you knit in the purl stitches and purl in the knit stitches. Well, you do the same in circular knitting.
Using Steeks for a Clean Break
Steeks are an excellent way to open up a knitted tube. Traditionally, Nordic-style ski sweaters were knit in the round and then steeked to open the cardigan front and sleeve openings. You can use steeks for this type of project or anywhere else you’d like to cut open a line of knit stitches.
You can steek with a sewing machine or a crochet hook, depending on your comfort level with either and whether or not you have access to a machine. Crocheted steeks are generally simpler to work with for beginners because they’re easy to tear out if you make a mistake.
Sewing in a steek
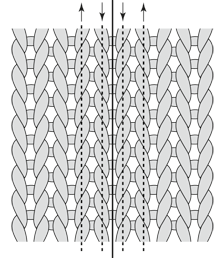
To make a steek with a sewing machine, sew two vertical lines of stitches an inch or so apart (see Figure 8-4). Be sure to keep the line of machine stitching between the same two columns of knit stitches all the way down. Use a sturdy cotton/poly blend thread and a stitch length appropriate to the knitted stitches (shorter for finer-gauge knits, slightly longer for chunkier knits).
Figure 8-4: Sew two vertical lines.
Crocheting a steek
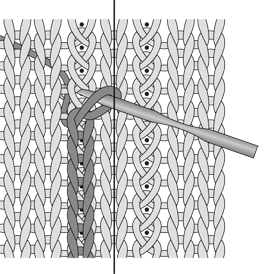
To make a steek with yarn, crochet two vertical columns of stitches an inch or more apart using a slip stitch (see Figure 8-5). Fold the sweater at the line you plan to stitch so the vertical column of stitches looks like the top of a crochet chain, then insert your hook into the first V, yarn over the hook, pull the new loop through the V, and move to the next stitch on your left, repeating as you go. Be sure to work only your crocheted stitches on the same column of knit stitches; if you veer to the left or right, your steek will be crooked.
Figure 8-5: Crocheting a steek in place.
Cutting your fabric after you steek
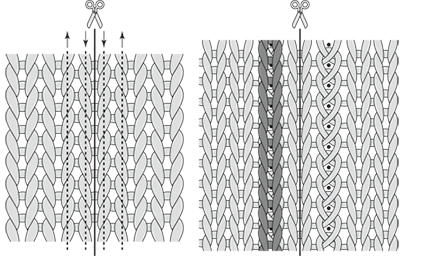
After you’ve sewn or crocheted the steek in place, it’s safe to cut your knitted fabric between the two lines of stitching, as shown in Figure 8-6. Then you can continue with your pattern as directed.
Figure 8-6: Cut between the two lines to open the fabric.
Measuring Gauge in the Round
Knitting stockinette stitch in the round can give you a different gauge than if you were knitting the same stitch flat (back and forth on straight needles). Here’s why: A purl stitch is very slightly larger than a knit stitch. When you work stockinette stitch on straight needles, every other row is a purl row, and the difference in the sizes of your knits and purls averages out. However, when working stockinette stitch in the round, you always make knit stitches, which can result in a slightly smaller piece even though you’re knitting the same pattern over the same number of stitches. (See Chapter 3 for more on gauge.)
When the gauge for a project worked on a circular needle must be exact, make your gauge swatch by working all the rows from the right side as follows:
1. Using the same needle you plan to use in your project, cast on 24 stitches or so and work 1 row.
Don’t turn the work.
2. Cut the yarn and slide your knitting, with the right side facing, back to the knitting end of the needle.
3. Knit another row, and cut the yarn.
4. Repeat Steps 2 and 3 until you’ve completed your swatch, and then measure your gauge.
