Chapter 12
Let the Sun Shine In: Knitting Lace
In This Chapter
Decoding lace charts
Getting acquainted with various lace patterns
Enhancing garments and other projects with lace
Correcting your mistakes with confidence
Taking your lace-making skills for a test-drive
Knitted lace is versatile. It can be the fabric of an entire garment, the edging on a sleeve, a panel down the front of a sweater, or a single motif in a yoke, to name a few ideas. In a fine yarn on a small needle, it can be intricate and delicate. Worked randomly in a heavy, rustic yarn, it can be minimalist and modern. It can be a small eyelet motif sparsely arranged over an otherwise solid fabric, or it can be light, airy, and full of holes.
And believe it or not, even beginning knitters can make lace. If you can knit and purl, knit 2 stitches together (which we sometimes do inadvertently!), and work a yarn over (explained in Chapter 6), you can make lace. The hardest thing is to keep track of where you are in the pattern (which isn’t really a knitting skill . . .).
To familiarize yourself with knitted lace, sample the patterns in this chapter and look closely at your work while you do so. When you can identify a yarn over on your needle and see the difference between an ssk and a k2tog decrease in your knitting (both are explained in detail in Chapter 8), you’re on your way to becoming a lace expert.
Reading Lace Charts
Knitted lace makes use of two simple knitting moves — a yarn over (an increase that makes a small hole) and a decrease — to create myriad stitch patterns. Every opening in a lace fabric is made from a yarn-over increase, and every yarn over is paired with a decrease to compensate for the increase. When you understand the basis of lace’s increase/decrease structure, even the most complicated lace patterns become intelligible. Of course, you can follow the instructions for a lace stitch without understanding the underlying structure, but being able to recognize how the pattern manipulates the basic yarn over/decrease unit is a great confidence builder.
Yarn-over increase and decrease symbols
Like other charts for knitted stitch patterns, charts for knitted lace “picture” the patterns they represent. As you may expect, the two symbols you find most often in lace charts are the one for a yarn-over increase (usually presented as an O) and some kind of slanted line to mimic the direction of a decrease. Take a look at Figure 12-1 for an example. It shows the chart for the cloverleaf lace pattern (you can find instructions for this pattern in the later section, “Knitting Different Kinds of Lace”).
Figure 12-1: Chart for the cloverleaf pattern.
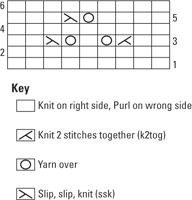
Notice that the decrease symbol appears in only one square even though a decrease involves 2 stitches. Charting the decrease this way allows the yarn-over symbol to occupy the square for the decreased stitch. Sometimes the yarn over shows up adjacent to the decrease, as it does in this pattern. Other times, the yarn over isn’t placed directly before or after the decrease but rather somewhere else entirely in the pattern row. In either case, in most patterns the number of decrease symbols is the same as the number of yarn-over symbols because, as stated before, every increase has a corresponding decrease.
No-stitch symbol
A lace chart sometimes has to show a changing number of stitches from one row to the next. To keep the stitches lined up on the chart the way they are in the fabric, the chart indicates that a stitch has been eliminated temporarily from the pattern by using the no-stitch symbol in the square that represents the decreased stitch. This symbol repeats in a vertical row until an increase is made and the stitch is back in play, as shown in Figure 12-2.
The chart in Figure 12-2 shows a pattern in which one stitch is decreased and left out for 10 rows and then created again and left in for the next 10 rows. The take-out/put-back-in pattern repeats every 20 rows. The black squares in the chart hold the place of the disappearing and reappearing stitch. Using the no-stitch symbol allows the grid to remain uniformly square. Otherwise the edges of the grid would have to go in and out to match the number of stitches in each row.
Figure 12-2: Chart of a pattern that includes the no-stitch symbol.
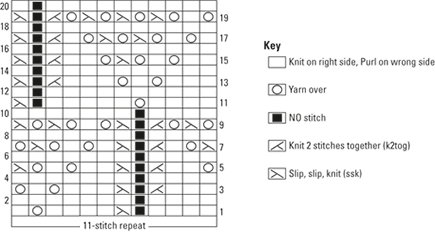
When you’re working from a chart that uses the no-stitch symbol, skip the symbol when you get to it and work the next stitch on your needle from the chart square just after the no-stitch symbol.
Designing your own lace
If you can work eyelet patterns, there’s no reason not to try designing your own lace. On a sheet of graph paper, plot yarn overs with adjacent decreases in any arrangement you think is attractive. Keep the following in mind:
Horizontal eyelets should be spaced 1 stitch apart.
Vertical rows should be spaced 4 rows apart.
Diagonal eyelets can be spaced every other row.
Knitting Different Kinds of Lace
Knitted lace is varied enough that different categories have been created to describe (loosely) the different types, such as eyelet lace, open lace, and faggot lace.
The divisions between one kind of lace and another are porous. Better to think of lace patterns as belonging on a continuum — the more solid fabrics with scattered openings (eyelet) at one end, the lacy and open fabrics (allover and faggot patterns) at the other. The lace patterns in this section provide a good introduction to lacework for both beginning and intermediate knitters.
If you’re really interested in lacework, here’s a project that gives you a lot of practice and lets you create something useful: Make a series of swatches using all the patterns in this section and then sew them together — or simply work one pattern after the other — to create a great scarf. Use the same yarn throughout unless you want to observe the effect of different yarns on the same pattern. Lace worked on light-weight yarns intended for lace looks very different than lace worked with a worsted-weight or chunky yarn.
For your first forays into lace knitting, choose easier patterns. Specifically look for
Patterns that tell you right at the beginning to purl all the wrong-side rows: In general, the simplest lace patterns call for yarn-over/decrease maneuvers on right-side rows only. More advanced patterns have you make openings on every row.
Patterns made from vertical panels: It’s fairly easy to tell if a pattern is organized as a series of vertical repeats because you’ll see “lines” running up and down the fabric. You can place a marker after each repeat and keep track of one repeat at a time.
Patterns that maintain the same number of stitches on every row: To maintain the number, for every yarn-over increase there’s a decrease on the same row. Other patterns call for a yarn-over increase on one row and the corresponding decrease on another. In these patterns, the stitch count changes from row to row. Often, the pattern alerts you to these changes and tells you which rows you have to look out for, but even at that, this type is still a bit more challenging.
Eyelet patterns
Eyelet patterns generally have fewer openings than out-and-out lace patterns and are characterized by small openwork motifs distributed over a solid stockinette (or other closed-stitch pattern) fabric. The increase/decrease structure is usually easy to see in eyelet patterns, making them a good place to begin your lace exploration.
Ridged ribbon eyelet
You can thread a ribbon through these eyelets or use them in a colored stripe pattern. Figure 12-3 shows both a chart and a sample of this pattern.
Figure 12-3: Ridged ribbon eyelet and chart.
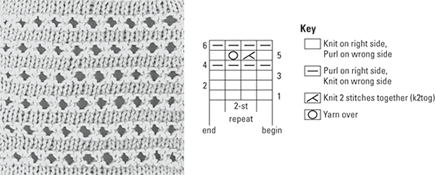
You work this pattern as follows:
Cast on an odd number of sts.
Rows 1 and 3 (RS): Knit.
Row 2: Purl.
Rows 4 and 6: Knit.
Row 5: * K2tog, yo; rep from * to last st, k1.
Cloverleaf eyelet
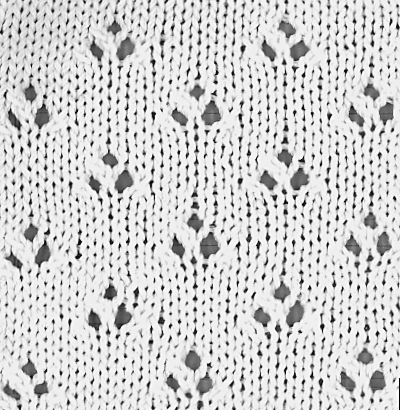
Figure 12-4 shows a three-eyelet cloverleaf arranged over a stockinette background.
This cloverleaf pattern requires a multiple of 8 stitches, plus 7 more. You work a double decrease between the two bottom eyelets. To knit this pattern, follow these steps (and refer to 12-1 to see the chart for this pattern):
Cast on a multiple of 8 sts, plus 7 sts.
Row 1 (RS): Knit.
Row 2 and all WS rows: Purl.
Row 3: K2, yo, sl 1, k2tog, psso, yo, * k5, yo, sl 1, k2tog, psso, yo; rep from * to last 2 sts, k2.
Row 5: K3, yo, ssk, * k6, yo, ssk; rep from * to last 2 sts, k2.
Row 7: K1, * k5, yo, sl 1, k2tog, psso, yo; rep from * to last 6 sts, k6.
Row 9: K7, * yo, ssk, k6; rep from * to end of row.
Row 10: Purl.
Rep Rows 3–10.
Figure 12-4: Cloverleaf eyelet pattern.
Open lace patterns
Out-and-out lace patterns have more openings than solid spaces in their composition. They’re frequently used in shawls or any project that cries for a more traditional lace look.
The patterns in this section are more open — meaning that they have more holes — than the eyelet patterns in the previous section. Try them in fine yarns on fine needles (think elegant cashmere scarves) or in chunky yarn on big needles for the unexpected.
Arrowhead lace
Arrowhead lace (see Figure 12-5) requires a multiple of 6 stitches, plus 1. Row 4 of this pattern uses the double decrease psso, meaning “pass slipped stitch over.” “P2sso” means “pass 2 slipped stitches over.” (Flip back to Chapter 6 for a refresher on how to make this decrease.)
Figure 12-5: Arrowhead lace and chart.
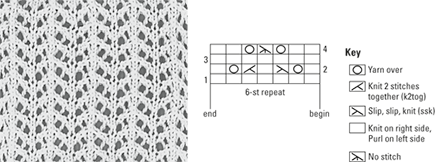
Knit this pattern as follows:
Cast on a multiple of 6 sts, plus 1 st.
Rows 1 and 3 (WS): Purl.
Row 2: K1, * yo, ssk, k1, k2tog, yo, k1; rep from * to end of row.
Row 4: K2, * yo, sl 2 kwise, k1, p2sso, yo, k3; rep from * to last 5 sts, yo, sl 2 kwise, k1, p2sso, yo, k2.
Rep Rows 1–4.
Miniature leaf pattern
Figure 12-6 shows a simple miniature leaf pattern in which each little “leaf” is surrounded by lace openings.
Figure 12-6 Miniature leaf open lace pattern.
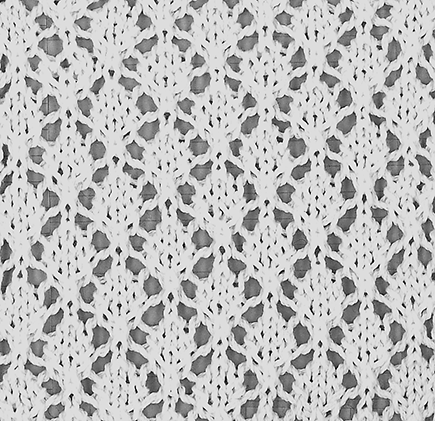
Knit this pattern as follows (if you find it easier to follow charts than written instructions, see the chart in Figure 12-7):
Cast on a multiple of 6 sts, plus 1 st.
Row 1 and all WS rows: Purl.
Row 2: K1, * k2tog, yo, k1, yo, ssk, k1; rep from * to end of row.
Row 4: K2tog, * yo, k3, yo, sl 2 kwise, k1, p2sso; rep from * to last 6 sts, yo, k3, yo, ssk.
Row 6: K1, * yo, ssk, k1, k2tog, yo, k1; rep from * to end of row.
Row 8: K2, * yo, sl 2 kwise, k1, p2sso, yo, k3; rep from * to last 7 sts, yo, sl 2 kwise, k1, p2sso, yo, k2.
Rep Rows 1–8.
Figure 12-7: Chart for the miniature leaf pattern.

Faggot lace
Faggot patterns (basic lace) are really a category unto themselves. They’re composed of nothing but the simplest lace-making unit: a yarn over followed (or preceded) by a decrease. A faggot unit can be worked over and over for a very open mesh-like fabric, as shown in Figure 12-8a. Or a faggot grouping can be worked as a vertical panel in an otherwise solid fabric or as a vertical panel alternating with other lace or cable panels, as shown in Figure 12-8b.
Figure 12-8: Faggot lace by itself (a) and combined with another lace pattern (b).
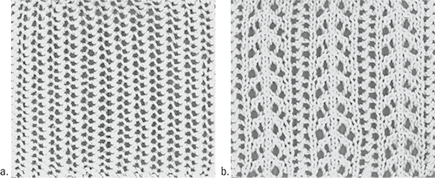
You can work faggot patterns with a knitted decrease (ssk or k2tog) or a purled decrease. The appearance of the lace changes very subtly depending on the decrease you use.
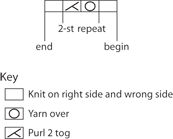
Basic faggot is made by alternating a yarn over and an ssk decrease. We find this variation (called purse stitch) faster and easier to work than others. Follow these instructions (or see the chart in Figure 12-9):
Cast on an even number of sts.
Every row: K1; * yo, p2tog; rep from * to last st, k1.
Figure 12-9: Chart for faggot lace.
Incorporating Lace into Other Pieces
If you want to incorporate knitted lace into a sweater and can’t find a pattern that appeals to you, you can work in a lace pattern without a specific set of pattern instructions.
Lace insertions
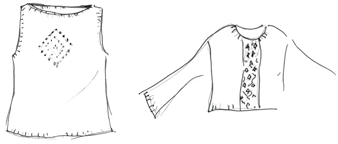
The simplest way to incorporate lace into a knitted project is to work a vertical lace panel or eyelet motif (otherwise known as a lace insertion) into a plain stockinette or simple stitch sweater. Place the panel or motif anywhere in your sweater body, far enough away from a shaped edge so that the panel won’t be involved in any increases or decreases. This way, you can concentrate on the lace stitches and avoid having to work any garment shaping around the yarn overs and decreases of your lace stitch. Figure 12-10 shows two examples of lace insertions.
Figure 12-10: Designing with lace insertions.
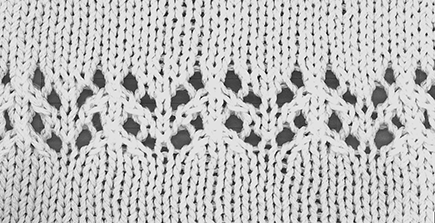
You also can add lace as a horizontal insertion. Figure 12-11 shows arrowhead lace, but this time several row repeats have been inserted across a piece of stockinette stitch fabric.
Figure 12-11: Arrowhead lace used as a horizontal insertion.
Lace edgings
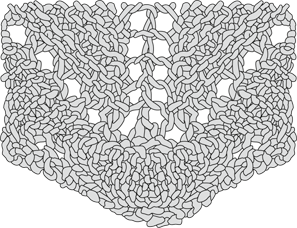
Dress up any sweater by adding a lace edge at the bottom of the sweater body or sleeve (see Figure 12-12). Knitted lace edgings are borders designed with a scalloped or pointed edge. Frequently, they’re made in garter stitch to give body to the edging and to ensure that it lies flat. Some edgings, such as hems and cuffs, are worked horizontally; you cast on the number of stitches required for the width of your piece, work the edging, and then continue in stockinette or whatever stitch your garment pattern calls for.
Figure 12-12: Lace edging.
Other edgings are worked vertically and then sewn on later. In this case, you simply cast on the number of stitches required for the depth of the lace edging (from 7 to 20 sts, depending on the pattern) and work the edging until its length matches the width of the piece to which you plan to attach it. Then you bind off, turn the edging on its side, and sew it onto the edge of your project. Or, better yet, you can pick up stitches along the border of the edging itself and knit the rest of the piece from there. (See Chapter 17 for details on how to pick up stitches.)
Avoiding and Correcting Mistakes When Working Lace Patterns
The best way to avoid mistakes in lace-making is to envision how the yarn overs and decreases combine to create the pattern. Take, for example, the cloverleaf eyelet pattern (refer to Figure 12-1 to see its chart). This pattern creates the lace shown in Figure 12-13.
Looking at the end product closely, you can see how the increases and decreases work. The eyelets (the holes) are made with yarn over increases, and their compensating decreases are worked right next to them. The decreases look like slanted stitches and come before and after the two eyelets on the bottom of the cloverleaf and after the eyelet on the top. Simply by knowing what’s happening with the increases and decreases, you can anticipate what stitch comes next and, in so doing, better avoid missing a yarn over or decrease.
Figure 12-13: Detail of the cloverleaf eyelet pattern.
Finding the error
Sometimes mistakes happen despite your best efforts. In knitting lace, you may “feel” the mistake before you see it. That is, your count will be off, or you’ll get to the last stitches in a row and not have enough (or have too many) to knit them according to the pattern, or you’ll realize that the hole you’re creating is in the wrong place. When this happens, the first thing you need to do is find the error.
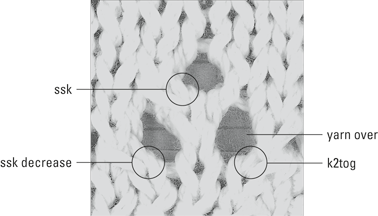
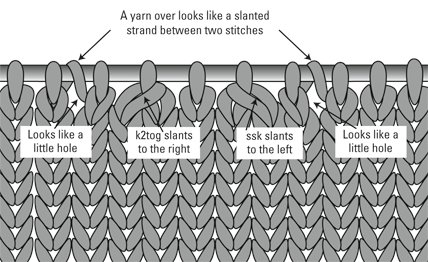
The way to do that is to go to the stitches on your needle and check each repeat for the right number of stitches. This is where it really helps to be able to recognize yarn overs and decreases. Figure 12-14 illustrates a yarn over, an ssk decrease, and a k2tog decrease.
Figure 12-14: Recognizing yarn overs and decreases on your needle.
Ripping out lace
If you make a mistake in a lace pattern and have to rip out stitches, take your time when picking up the recovered stitches. Yarn overs and decreases can be tricky to catch. (See Chapter 7 for information about ripping out and picking up recovered stitches.)
As you go, check that stitches end up in the ready-to-work position. Before starting work on your pattern again, read the last pattern row and compare it with the stitches on your needle to make sure that they’re all there and all yarn overs and decreases are in the right place.
Blocking Lace
Lace fabrics need to be blocked for their patterns to show up well. The best way to block a lace piece is to wet-block it: Get it wet and spread it out in its final shape to dry. (See Chapter 16 for additional tips to block like a pro.)
Whether you wet-block or steam your piece, spread out the fabric in both directions, using blocking wires if you have them. If the bottom edges are scalloped or pointed, pin these shapes out to define them before blocking.
Practice Lace Projects
Scarves are natural projects for practicing lace patterns: There’s no shaping to consider, and the flat panels really showcase the lace patterns. Try making the scarves in this section and not only will you improve your lace-making techniques, but you’ll also have a terrific scarf or two when you’re through!
Scarf with Faggot Lace
This scarf is simple to make. Work it up in a soft, cozy yarn and you’ll never want to be without it — except perhaps in the heat of summer. You can see it pictured in the color insert.
Materials and vital statistics
Measurements: 9 inches x 52 inches; can be shortened or lengthened as desired
Materials: Classic Elite Lush; 124 yards per 50 grams; 3 skeins; or similar yarn
Needles: One pair of size US 9 (51⁄2 mm) needles
Directions
Cast on 36 sts.
Row 1 (RS): K5, * yo, p2tog, k4; rep from * to last 5 sts, k5.
Row 2: K2, p3, * yo, p2tog, p4; rep from * to last 5 sts, p3, k2.
Rep Rows 1 and 2 until the scarf reaches the desired length.
Variations
To make a different scarf on the same theme, try one of the following variations:
Make the scarf in a different yarn. Use a light-weight yarn for a more delicate scarf or a heavier yarn for an entirely different fabric and feel.
Add tassels or fringe to the ends of the scarf.
Instead of stockinette stitch between the faggot panels, work garter or moss stitch. (See Chapter 5 for garter stitch and Appendix A for moss stitch.)
Instead of the k4 panel in the pattern, work a cable panel between the faggot patterns. For an entire selection of cable patterns, head to Chapter 11.
Felted Scarf in Horseshoe Lace
This scarf is made from a “lite” version of Icelandic Lopi. A quick spin in the warm cycle of your washing machine will give it a light felting, making it soft and fluffy (see it pictured in the color insert). You make the scarf in two identical sections rather than in one long piece in order to achieve a pointed edge on either end.
Materials and vital statistics
Measurements: 9 inches x 50 inches; size may vary depending on needle size and how much the fabric contracts in the felting process
Materials: Lite Lopi (100% wool); 109 yards per 50 grams; 4 skeins
Needles: One pair of size US 10 (6 mm) needles
Directions
Cast on 43 sts.
Preparation rows: Knit 2 rows for a garter stitch border.
Row 1 (RS): K2, * yo, k3, sl 1, k2tog, psso, k3, yo, k1; rep from * to last st, k1.
Row 2: K2, p39, k2 (43 sts).
Row 3: K2, * k1, yo, k2, sl 1, k2tog, psso, k2, yo, k1, p1; rep from * to last rep, end last rep with k3 instead of k1, p1.
Rows 4, 6, and 8: K2, * p9, k1; rep from * to last rep, end last rep with k2 instead of k1.
Row 5: K2, * k2, yo, k1, sl 1, k2tog, psso, k1, yo, k2, p1; rep from * to last rep, end last rep with k2 instead of p1.
Row 7: K2, * k3, yo, sl 1, k2tog, psso, yo, k3, p1; rep from * to last rep, end last rep with k2 instead of p1.
Rep Rows 1–8 until piece measures approximately 26 inches from the beginning. End by making Row 8 the last row.
With a tapestry needle, thread a piece of scrap yarn through the stitches on the needle.
Work a second scarf piece in the same manner as the first one.
Finishing
When you have two identical scarf halves, you can either sew them together or graft the pieces at the center back for a more knitterly finish (see Chapter 16 for details on grafting). Finally, wash your scarf in warm water on the gentle cycle in a washing machine. Lay it flat to dry.
 Knitted lace is a fabric made with yarn overs and decreases, but there are other ways to get lace-type fabrics. Using a very large needle with a fine yarn makes an open and airy piece of knitting. Our favorite shawl pattern is a simple garter stitch triangle (with increases worked at either end of every row) made in a fingering- or sport-weight yarn and worked on size US 13 (8 mm) needles. For extra visual interest, use a self-patterning sock yarn. Try it!
 A k2tog (knit 2 stitches together) decrease slants to the right. An ssk (slip, slip, knit) decrease slants to the left. For instructions on these techniques, refer to Chapter 6.