Chapter 16
Getting It Together: Blocking and Assembling Your Pieces
In This Chapter
Weaving in yarn tails
Blocking (shaping and smoothing) your pieces
Seaming your pieces together
Assembling a sweater
When you finish making the various pieces of your project, whether it’s the back and front panels of a pillow or the sleeves of a sweater, you’ve reached the Cinderella moment: It’s time to turn those crumpled, curling, lumpy knitted pieces sprouting the odd end of yarn into smooth, flat, even pieces waiting to be joined into a beautifully crafted item. No matter what’s gone before, the finishing is what makes or breaks the final product.
For people who love to knit, weaving in ends, blocking, and seaming aren’t exciting because they aren’t knitting. However, when you know how to finish your pieces neatly, you have the expertise necessary to make the finishing process, if not exactly a pleasure, at least a manageable interval between the end of knitting one project and the beginning of a new one. And the pleasure that comes from seeing your Fairy Godmother–powers at work will inspire kinder feelings toward this part of the process.
The purpose of this chapter is to introduce you to the techniques you need to complete the three basic finishing tasks:
Weaving in the loose ends of yarn that you left hanging when you changed colors or when you had to start a new ball of yarn
Blocking your knitting to smooth out your stitches and to set the shapes of your pieces
Joining your knitted pieces together if you’re making anything more complicated than a scarf or a potholder
Tying Up Loose Ends
The first step in the finishing process is taking care of all the loose ends hanging about. If you’ve managed to make all the yarn changes at the side edges, that’s where you’ll find most of the ends. Otherwise, you’ll have loose ends scattered here and there that require different techniques for successfully making them disappear.
Although various techniques exist for weaving in ends (and weave you must; there’s no getting around it because knots will show on the right side of the work and may unravel over time), keep in mind that your goal is a nice smooth fabric without glitches or an unattractive ridge in the middle of your knitting. You can hide your loose ends by doing any of the following:
Weaving them vertically up the side edges
Weaving them in sideways on the wrong side of the fabric
Weaving them in along a bound-off edge
Use whichever method safely tucks in your ends and results in a smooth, unblemished right side. Every situation (thickness of yarn, location of join) is different. Try the techniques in this section, and if you discover something that works better in a given circumstance, use it.
Weaving them up the sides
If you joined yarns at the side edges by tying the two ends together in a bow, follow these steps to weave in the ends:
1. Untie the bow.
Don’t worry. Your knitting won’t unravel.
2. Thread one end through the tapestry needle and weave it down the side loops at the edge of your knitting.
3. Thread the other end through the tapestry needle and weave it up the side loops at the edge of your knitting (see Figure 16-1.)
Figure 16-1: Weave the yarn end through the side loops.
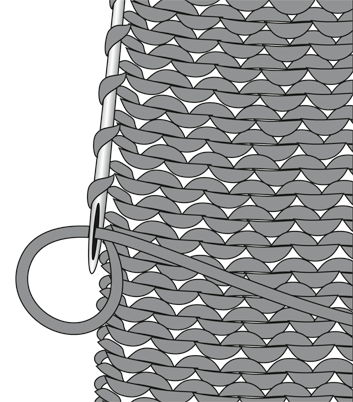
If instead of tying your two ends together you joined them by working the two strands together for the edge stitch, use a tapestry needle to pick out one of the ends and then weave it up the side as outlined in the preceding steps. Weave the other end in the opposite direction. If the two strands are thin and won’t add much bulk to the edge stitch, don’t bother to pick out one of the ends. Just weave each end into the sides in opposite directions.
Weaving the ends horizontally
If you switched yarns in the middle of a row and have loose ends dangling there, you need to weave the ends in horizontally. Untie the knot or pick out one of the stitches if you worked a stitch with a double strand of yarn.
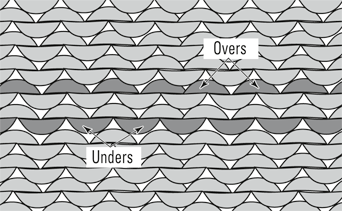
Take a careful look at those by-now very familiar purl bumps. You’ll notice that the tops of the purl stitches look like “over” bumps, and the running threads between the stitches look like “under” bumps (see Figure 16-2).
Figure 16-2: Identify the over and under parts of the stitches on the purl side.
Using a tapestry needle, weave the ends in as follows:
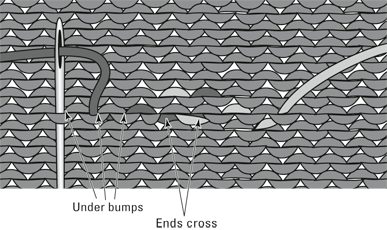
1. Weave the end on the right in and out of the under bump; then continue working to the left.
2. Weave the end on the left in and out of the under bump; then continue working to the right.
The ends cross each other, filling in the gap between the old yarn and the new, as shown in Figure 16-3.
Figure 16-3: Thread the strand through the under bumps on the purl side.
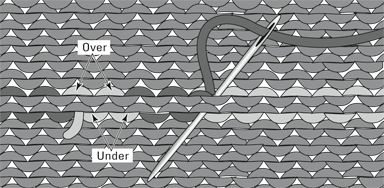
Work fairly loosely so as not to pull the fabric in any way. Check the right side of the fabric to make sure that it looks smooth.
Figure 16-4: Follow the path of the stitch.
After you work your ends into the fabric, snip them about 1⁄2 inch from the surface and gently stretch and release the fabric to pull the tails into the fabric.
Weaving ends into a bound-off edge
When you’re weaving in an end at a bound-off edge that forms a curve, you can weave in the end in a way that creates an uninterrupted line of bound off stitches. You can use this technique, for example, where you’ve joined a second ball of yarn at the start of neckline shaping or on the final bound-off stitch of a neckband worked on a circular needle. Follow these steps:
1. Thread a tapestry needle with the yarn end.
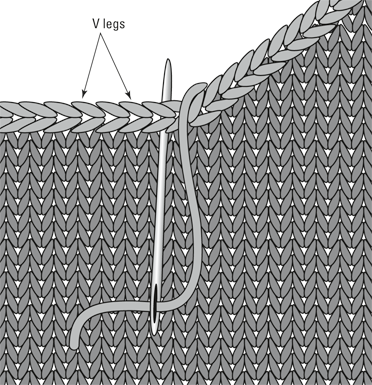
2. Find the chain of interconnected Vs that form the bound-off edge (shown in Figure 16-5).
3. Insert the needle under the legs of the first of the interconnected Vs, and then take it back through the initial stitch, mimicking the path of a bound-off stitch (see Figure 16-5).
Remember to start at the V next to the loose end.
4. Finish weaving in the end by running the needle under the series of V-legs along one side of the bound-off edge.
Figure 16-5: Weave in an end along a bound-off edge.
Better Blocking
When you block a piece of knitting, you wet it down or steam it to coax it into its final shape, letting the moisture and/or heat smooth out all the uneven stitches and straighten out wavy, rolling edges. Blocking is crucial to the final look of your work. All those long hours of careful stitch creation deserve your best efforts now.

Tweaking Vs
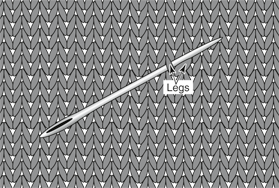
As you’re weaving in ends, keep an eye out for loose or misshapen stitches on the right (front) side of your fabric. While you’re holding the tapestry needle, you can tweak them back into line by using the tip of your needle to adjust the legs of the stitch, as shown in the following figure.
Remember that a row of stitches is connected. If you have a loose or sloppy stitch, you can pull on the legs of the neighboring Vs in either direction for as many stitches as you need to in order to redistribute the extra yarn. If one side of the V is distorted or larger than the other, pull slightly on the other side or tweak the stitch in whatever way is necessary to even it out.
You don’t need to get too fussy about the appearance of every single stitch. Blocking straightens any general and minor unevenness, but sometimes, especially in color work, the stitches around the color changes can use a little extra help.
Getting your blocking equipment together
You can block any knitted fabric as long as you have a tape measure and a large, flat surface on which to spread out your pieces, such as a bed or a spot on the floor that pets or children won’t disturb. But you’ll find the job more pleasant — and you’ll get better results — if you invest in some blocking equipment. See Chapter 2 for more information on any of the specialized equipment presented in this section. You need the following whether you wet block or steam your pieces:
A large, flat, preferably padded surface for laying out your pieces: It should be at least a little larger than the knitted piece itself. Many knitting stores sell boards specifically for blocking, but you also can find directions online that show you how to make your own. Just type “knitting blocking board” or something similar into your favorite search engine.
Blocking wires: You can block your pieces without these, but you’ll have much nicer results if you invest in a set.
Pins (preferably T-pins): They hold your knitted fabric to the blocking board. Don’t use pins with colorful plastic heads because the steam will melt them.
A tape measure: After all the trouble you went to knitting to gauge and specific measurements, you want to block your pieces to the correct size, don’t you? (We hope the answer is yes!)
A steam iron or spray bottle for water.
A large towel if you’re wet blocking.
Schematic drawings of your pieces: These help you determine the exact shape you need.
Steam, dunk, or spray? Deciding which blocking method to use
The best blocking method for your project depends on the fiber of your yarn, the amount of time you have, and the stitch pattern you’ve used. You can wet block just about anything that’s colorfast with superb results. Steam blocking is faster than wet blocking and is fine for sweaters in stockinette stitch and that were worked in a yarn not susceptible to steam damage. But don’t use it on acrylics or for stitch patterns with texture you want to highlight — especially cables. Read the following list to identify your blocking options for different kinds of yarn, and then go on to the appropriate sections later in this chapter to find out exactly how to steam or wet block.
Noncolorfast yarns: You can wet or spray block just about anything with superior results — except yarn that you suspect may be less than colorfast. Before blocking a striped or color-patterned sweater, wet a 20-inch sample of each color and wrap the strands around a paper towel. Let them dry. If any of the colors bleed onto the paper, forget wet blocking. Steam the pieces and send the completed sweater to the dry cleaner when it needs a wash.
Mohair and other fuzzy yarns: Wet block fuzzy yarns such as mohair. Steam will flatten them. When the pieces dry, you can gently run a special mohair brush, or your own hairbrush, over them to fluff up the fibers again; just be sure to use a light touch.
Wool, cotton, and blended yarns: You can steam block wool, cotton, and many blends with great success. Steaming is quicker than wet blocking because the drying time is significantly reduced, but it requires care and attention because you have a hot iron up-close-and-personal to knitted fabric.
 Synthetic yarns: Don’t steam a synthetic yarn. It will die before your eyes. Too much steam-heat destroys a synthetic yarn’s resilience. Wet or spray block this yarn instead.
No matter the fiber, cabled and/or richly textured sweaters are best wet blocked with the right side facing up. While the sweater pieces are damp, you can mold and sculpt the 3-D patterns. Steaming will flatten them somewhat.
Wet blocking
When you wet block a knitted piece, you get it completely wet in a sink or basin of water. You can take this opportunity to add a little gentle soap or wool wash to the water and swish out whatever dirt and grime your piece may have picked up while you worked on it. (Wool washes sold at yarn stores not only clean the fiber but also include lanolin and other fiber conditioners.) Just be sure to give it several good rinses, unless you use a no-rinse formula. Have a large towel at the ready and follow these steps:
1. Get as much water out of your sweater as you can without stretching or wringing it out.
Some ideas:
• Press the piece against the empty sink basin to eliminate some of the water.
• Press the piece between your palms to squeeze a little more water out of it, but don’t wring it out.
 When you lift the piece out of the sink, lift it out in both hands, making sure not to let any part of it stretch down.
2. Without stretching the piece, spread it out on the towel and fold the ends of the towel over it; then gently and loosely roll up the towel to absorb more water.
You don’t want to get the piece too dry. It should be more wet than damp — just not dripping wet — when you lay it out to block. Plus if you roll too tightly, you’ll have creases in your knitted piece.
3. If you’re using blocking wires, unroll the piece and weave in the wires along the edges.
Blocking wires come with instructions on how best to do this.
4. Gently lay your piece out on the blocking board.
For a stockinette piece, lay it face down on the blocking board; for a textured or cabled sweater, lay it right side up. If your board has a cover with a grid, line up the centerlines of your pieces with the grid.
5. Spread your piece out to the correct dimensions without distorting the direction of the stitches.
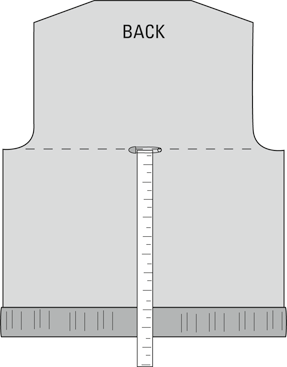
Using your schematic for reference and the grid as a guide, start at the center. If you’re blocking a sweater, check that your piece is the right width and the correct length from the bottom edge to the beginning of the armhole and from the beginning of the armhole to the shoulder (see Figure 16-6).
6. Pin and smooth all pieces.
You need to pin in only a few places to keep the piece flat. Run your palms lightly over the piece to help keep everything smooth and even.
Figure 16-6: Block a sweater back to the correct dimensions.
7. Sculpt your piece while it’s wet.
• If your design has a ribbed border, decide how much you want the rib to hug you. If you want it to pull in as much as possible, keep the rib compressed. If you want it to pull in only slightly or to hang fairly straight, pin it out completely to the width of the piece.
• If you’re blocking a cabled or highly textured piece, pinch and mold the contours of the cable crossings to highlight their three-dimensional qualities.
• If your piece is lace, spread out the fabric so that the openings are really open.
• If the bottom edge of your piece is scalloped or pointed, pin out the waves or points.
8. Go away and start another sweater while this one dries.
Drying may take a day or so.
Wet blocking identical pieces
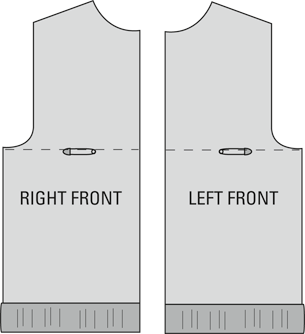
When you’re blocking two pieces that should be identical — cardigan fronts and sleeves, for example — lay them out side by side if you have enough space, and either measure back and forth or line them up on symmetrical gridlines for comparison. Figure 16-7 shows you how to line up cardigan fronts.
Figure 16-7: Block cardigan fronts.
If you’re short on blocking space, you can lay out fronts and sleeves one at a time on top of each other to ensure that they’ll be identical when dry. When they’re still damp, but not dry, move the top piece off and lay it down gently to the side for the last stages of drying.
Spray blocking
Spray blocking is much like wet blocking. (Read the preceding two sections for a few more details.) Just follow these steps:
1. If you’re using blocking wires, thread them along the side edges.
2. Spread out your knitted piece(s) on your blocking board, wrong-side up for stockinette or right-side up for texture and cables.
3. Align and measure until you have everything straight and matching your schematic.
4. Pin the edges every few inches (if you’re not using blocking wires), or closer together if you see that the edge is rolling severely between pins.
5. With a clean spray bottle filled with room-temperature water, spray your piece until it’s saturated.
6. Press gently with your hands to even out the fabric, pinching and molding any three-dimensional details.
7. Let the sweater dry.
This usually takes a day or two depending on the thickness of the project, general humidity, and so on.
8. When your piece is dry, remove it from the blocking board.
Steam blocking
Follow these steps to steam block a piece:
1. Lay out your knitted piece as described in the “Wet blocking” section.
2. Hold a steam iron over the piece about 1⁄2 inch away from the surface.
You want the steam to penetrate the piece without the weight of the iron pressing down on it. If your knitting is cotton, you can let the iron touch the fabric very lightly, but keep it moving and don’t let the full weight of the iron lay on the surface.
3. After steaming, let your piece rest and dry for at least 30 minutes.
Three-dimensional blocking
Not all knitting is flat. Still, all knitting needs to be blocked.
For sweaters worked in the round, you can use wet blocking, spray blocking, or steam blocking. Lay out the completed sweater, arranging it according to the dimensions of your schematic. If you plan to make most of your sweaters in the round, consider investing in a wooly board, an adjustable wooden frame with arms that you can dress in your wet sweater. After the sweater dries, take it off the frame and — voilà! — your sweater is flat, smooth, and even.
You can steam block hats while they lie flat, one side at a time. Or find a mixing bowl that’s the right size, wet your hat, and drape it over the upside-down bowl to dry. Styrofoam heads designed to hold wigs are also great for blocking hats. If you’ve made a tam or beret, you can block it over a dinner plate. Be inventive!
If you plan to knit a lot of socks and mittens, add blockers to your next Christmas or birthday list. Blockers are wooden sock and mitten-shaped templates with biscuit-type holes cut out to aid air circulation. They come in various sizes for your different projects. Simply wet down your socks or mittens, pull them on over the forms, and let them dry to smooth perfection.
Basic Techniques for Joining Pieces
After you block your sweater or project pieces, it’s time to put them together. You can choose between techniques that mimic and work with knitted stitches or traditional sewing methods.
If you choose the more knitterly techniques, the ones you use will be determined by how the stitches are coming together: head to head, side to side, or head to side, all of which are shown in Figure 16-8.
If you opt for the sewing method, the section, “Sewing seams with backstitch,” later in this chapter explains the backstitch and how to use it to sew sweater pieces together.
Figure 16-8: Assess how stitches are lined up for assembly.
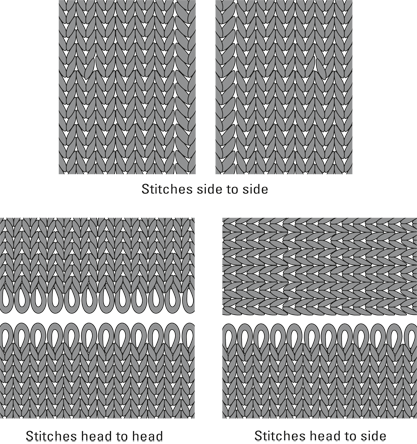
The techniques in the following sections help you join your pieces together in ways becoming to knitting. These techniques work with the structure of the stitches, creating seams that are smooth and flexible.
Three-needle bind-off (head to head)
Use the three-needle bind-off when you’re joining stitches head to head (refer to Figure 16-8). The technique is the quickest and easiest joining method and creates a stable — and visible — seam. With a three-needle bind-off, you get to do two things at once: bind off and join two pieces together — perfect for joining shoulder seams.
For the three-needle bind-off, you need three needles: one each to hold the shoulder stitches and one for working the actual bind-off. If you don’t have three needles of the same size, use a smaller one for holding the stitches of one or both of the pieces to be bound off, and use a regular-size needle for binding off.
To work the three-needle bind-off, thread the open stitches of your pieces onto a needle — one for each piece. If you’ve left a long tail end (about four times the width of the stitches to be joined), you can use it to work the bind-off. Thread your first needle through the stitches on the first piece so the point comes out where the tail is. When you’re threading the second needle through the second piece, make sure your needle tips will point in the same direction when your pieces are arranged right sides together (see Figure 16-9). If you haven’t left a tail end for this maneuver, you can start working with a fresh strand and weave in the end later.
Figure 16-9: Right sides together, needles pointing to the right, stitches aligned.
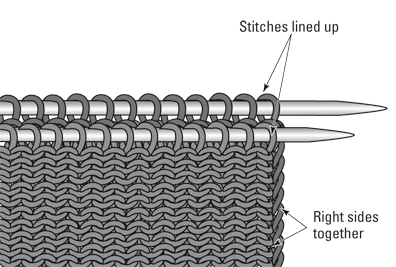
For this method, you knit and bind off the usual way, but you work stitches from two LH needles at the same time. Follow these steps:
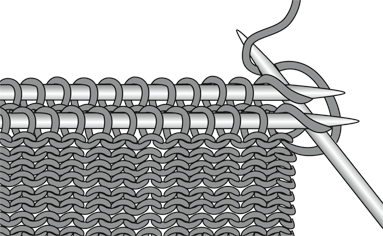
1. Insert the third needle knitwise (as if you were knitting) into the first stitch on both needles, as shown in Figure 16-10.
2. Wrap the yarn around the RH needle as if to knit, and draw the loop through both stitches.
3. Knit the next pair of stitches together in the same way.
Figure 16-10: Insert the RH needle into the first stitch on both needles.
4. Using the tip of either LH needle, go into the first stitch knitted on the RH needle and lift it over the second stitch and off the needle, as shown in Figure 16-11.
Figure 16-11: Bind off the first stitch on the RH needle.
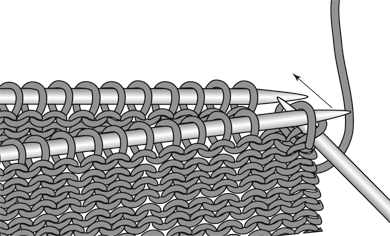
5. Continue to knit 2 stitches together from the LH needles and bind off 1 stitch.
Grafting stitches (the Kitchener stitch)
Grafting (also known as the Kitchener stitch) is another way to join two knitted pieces. It’s a way to mock knitting by using a tapestry needle, and it creates a very stretchy and almost invisible join. It’s a good technique to use when you want to give the illusion of uninterrupted fabric, such as when joining the center back seam of a scarf you’ve worked in two pieces.
You can graft stitches together when you want to join pieces head to head or head to side, as the following sections explain.
Grafting head to head
The smoothest join — and also the stretchiest — is made by grafting together “live” stitches (stitches that haven’t been bound off yet). But you also can graft two bound-off edges if you want more stability. Just work the same steps for grafting live stitches, working in and out of the stitches just below the bound-off row.
If you plan to graft live stitches, don’t bind off the final row. Instead, leave a yarn tail for grafting about four times the width of the piece and, with a tapestry needle, run a piece of scrap yarn through the live stitches to secure them while you block your pieces. Blocking sets the stitches, enabling you to pull out the scrap yarn without fear of the stitches unraveling. If you’re working with a slippery yarn and the stitches want to pull out of their loops even after blocking, leave the scrap yarn in the loops and pull it out 1 or 2 stitches at a time as you graft them.
Follow these steps to graft your pieces:
1. Line up the pieces right sides up with the stitches head to head.
2. Thread a tapestry needle with the working yarn.
If you left a tail on the side that you want to begin grafting from, use it. If not, start a fresh strand and weave in the end later. You graft the stitches from right to left, but if you’re more comfortable working left to right, or if your yarn tail is at the other end, you can reverse direction.
 Use a tapestry needle with a blunt tip for any kind of seaming on knits. Sharp points can pierce the yarn too easily. Always aim to go in and out and around stitches when you sew pieces together.
3. Starting in the bottom piece, insert the needle up through the first loop on the right, and pull the yarn through.
4. Insert the needle up through the first right loop on the upper piece, and pull the yarn through.
You can see Steps 3 and 4 in Figure 16-12.
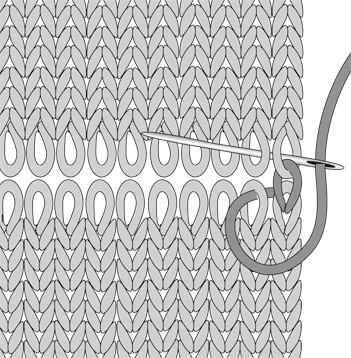
5. Insert the needle down into the first loop on the bottom piece (the same loop you began in) and come up through the loop next to it. Pull the yarn through.
6. Insert the needle down into the first loop on the upper piece (the same one you came up through in Step 4) and up through the stitch next to it. Pull the yarn through.
You can see Steps 5 and 6 in Figure 16-13.
Figure 16-12: Insert the needle up through the edge stitches to start grafting.
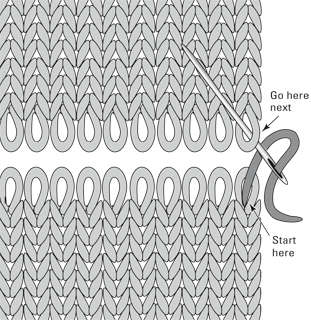
Figure 16-13: Insert the needle down through the first loop and up through the one next to it.
7. Repeat Steps 5 and 6 until you come to the last stitch on both pieces.
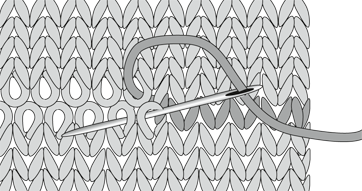
Follow the rhythm down and up, down and up, as you move from one piece to the other. Once you get going, you’ll be able to see the mock stitches you’re making, as shown in Figure 16-14.
Figure 16-14: Completed grafting stitches.
8. When you come to the last stitch, insert the needle down into the last stitch on the bottom piece and then down into the last stitch on the top piece. Run the end along the side loops and snip.
With the exception of the first grafting stitch (Steps 3 and 4) and the last one (Step 8), you go through 2 stitches on each piece — the stitch you’ve already come up through and the new stitch right next to it — before changing to the other piece. Work with even tension, trying to match the size of the stitches you’re marrying. If, after you finish, you find any grafted stitches that look out of kilter with the rest, you can go back with the tip of your needle and tweak them, working out any unevenness.
Grafting head to side
Grafting head to side makes a smooth and weightless seam. As in head-to-head grafting, you make a mock knit stitch, but instead of going in and out of stitches lined up head to head, you graft the heads of stitches on one piece to the sides of stitches on the other piece. (Actually, as in the mattress stitch, you pick up running threads when you’re joining to the sides of the stitches; the next section covers the mattress stitch.) It’s a great method for joining a sleeve top to a sweater body on a dropped shoulder sweater, which has no shaped armhole or sleeve cap.
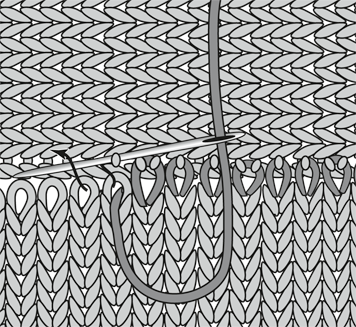
Before working this graft, make sure that you can recognize the running thread between the 2 side stitches. (See the later section, “Mattress stitch,” for help identifying running threads.) Then line up your pieces, heads on the bottom and sides above, as shown in Figure 16-15.
Follow these steps to graft heads of stitches to sides of stitches:
1. With a tapestry needle and yarn, come up through the first head stitch on the right or left end of your work.
Figure 16-15 shows how to work from right to left, but you can work in either direction.
2. Go around the running thread between the first 2 side stitches (see Figure 16-15).
Figure 16-15: Graft heads of stitches to sides of stitches.
3. Go back down into the same head stitch you came out of and up through the next head stitch — the stitch to the right if you’re traveling in that direction or to the left if you’re going that way.
4. Repeat Steps 2 and 3.
The best version of this seam is made by grafting live stitches to the armhole edge, but you can use it with a bound-off edge as well. Just go into the stitches (heads) directly below the bound-off edge.
Mattress stitch
Mattress stitch makes a practically invisible and nicely flexible seam for joining pieces side to side. You can’t use it successfully, however, on pieces that don’t have the same number of rows or a difference of only 1 or 2 rows. It’s worth keeping track of your rows when working backs and fronts to be able to join them at the sides using this wonderful technique.
To join knitted pieces with the mattress stitch, lay out your pieces next to each other, right sides facing up, bottom edges toward you. You seam from the bottom edge up. If you’ve left a tail of yarn at the cast-on edge, you can use it to get started.
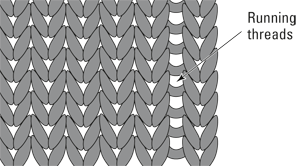
Figure 16-16: Identify the running threads.
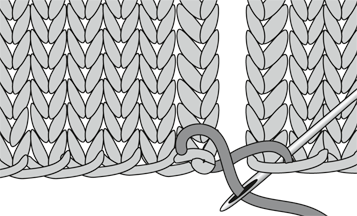
Thread the tail of yarn or a fresh piece on a tapestry needle. Working through the two threads on the cast-on row, join the bottom edges of the pieces using a figure eight, as shown in Figure 16-17. The direction you work the figure eight depends on whether you begin on the right or left side. If you begin from the right piece, you work your figure eight to the left; if you begin from the left piece, you work to the right.
Figure 16-17: Join the bottom edges with a figure eight for mattress stitch.
To work the mattress stitch, follow these steps:
1. Locate the running thread between the first and second stitches on the bottom row of one piece (refer to Figure 16-16).
2. Bring your needle under the thread; then pick up the running thread between the first and second stitches on the opposing piece, as shown in Figure 16-18.
Figure 16-18: Pick up the running thread in mattress stitch.
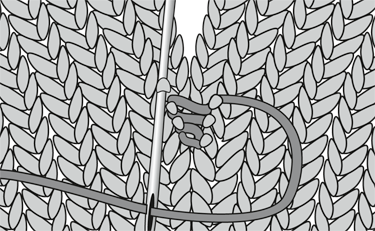
3. Work back and forth from running thread to running thread to running thread, keeping the tension easy but firm.
Check the tension by pulling laterally on the seam from time to time. The amount of give should be the same as between 2 stitches.
When you’ve finished your seam, take a moment to admire it.
Mattress stitch on other stitches
As long as you can find the running threads between the first 2 edge stitches, you can use the mattress stitch invisibly on a variety of knitted fabrics.
Reverse stockinette: By now, you’re probably familiar with purl bumps. If you look closely at the back of stockinette fabric, you see that the purl (or “over”) bumps are separated by “under” bumps. The under bumps are the running threads between stitches. For the mattress stitch, locate the under bump between the two edge purl bumps and alternate picking them up on each piece.
Garter stitch: For garter stitch, you need to pick up only one running thread every other row — the one that’s easy to see. The rows in garter stitch are so condensed that the fabric will actually stretch along the seam if you try to pick up the running stitch on every row. So give yourself a break.
Ribbed borders: Working the mattress stitch on a ribbed border is no different from working it on stockinette or reverse stockinette. Study the stitches until you can recognize the column of running threads between the first 2 stitches (knit or purl). Then pick up one running thread at a time as you go back and forth between pieces.
Always take the time to figure out how your ribs will come together where they meet so that your rib pattern will circle around unbroken. If you’re working a knit 2, purl 2 rib, begin and end each piece with 2 knit stitches. When you seam them by using the mattress stitch, you’ll have a single 2-stitch rib. For a knit 1, purl 1 rib, as long as you begin with a knit stitch and end with a purl stitch, you’ll have an unbroken sequence when seamed.
Sewing seams with backstitch
When you join knitted pieces by using backstitch, you sew them together in the conventional manner: right sides together with your tapestry needle moving in and out along the seam line. Try to maintain a knitterly frame of mind and, when possible, work the stitches consistently — either in the trough of running threads between the first two stitches when you’re working vertically or along the same row of stitches when you’re working with a horizontal edge.
Follow these steps to complete the backstitch:
1. Pin the pieces right sides together.
If you haven’t counted rows and one piece is slightly longer or wider than the other, you have to ease in the extra fabric so the pieces begin and end in the same place. If you blocked the front and back to the same dimensions, they should line up fairly well even if one piece has more rows than the other.
2. With a tapestry needle and yarn, bring the needle from the bottom up through both layers 1 stitch in from the edge. Go around the edge, come out in the same spot to secure the end of the yarn, and bring the bottom edges of the pieces together.
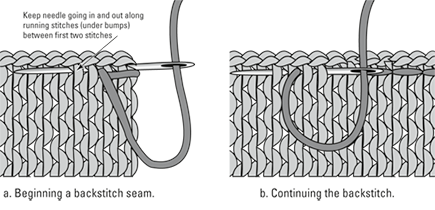
3. Go around again and come out 1 stitch farther up from the initial stitch, as shown in Figure 16-19a.
4. Insert the needle back through the initial stitch and bring the tip out through both layers again, a few stitches from where it last came out, as shown in Figure 16-19b.
Figure 16-19: Work a backstitch seam.
5. Continue in this manner — going forward, coming back — and keep an even tension.
Bring your needle in and out in the spaces between stitches and avoid splitting the working yarn as well. Also give your knitting a gentle stretch as you work to keep it flexible.
Determining the Order of Sweater Assembly
As you assemble sweaters, you usually follow a fairly predictable order of assembly that goes something like this:
1. Tack down any pockets and work pocket trims or embroidery details on sweater pieces before seaming them together.
2. Sew the shoulder seams. Sew both shoulders for a cardigan or a pullover with a neckband picked up and worked on a circular needle. Sew only one shoulder if you want to work the neckband on straight needles, and then seam the second shoulder and neckband together.
3. Work the neckband and front bands on cardigans.
4. Sew the tops of sleeves to the sweater front and back.
5. Sew the side seams.
6. Sew the sleeve seams.
7. Sew on buttons on cardigans.
If you’ve worked your sweater in a medium or lightweight plied yarn, you can use the same yarn for seaming the parts. If the yarn is heavy or a single ply that shreds, use a finer yarn in the same fiber in a similar color.
Joining back to front at the shoulder
The first pieces to join after blocking are the front and back at the shoulder (stitches head to head). You have three choices for this seam:
Use the three-needle bind-off, which makes it possible to bind off the edges of two pieces and seam them together at the same time.
Graft the shoulder stitches together.
Use the backstitch to seam the pieces together.
Because most knitters would rather knit than sew, the first option is a good one to learn as you develop your finishing repertoire. Refer to the earlier section, “Basic Techniques for Joining Pieces,” for instructions on how to work any of these joins.
Attaching a sleeve to a sweater body
How you attach the sleeves to your sweater body depends on the design of your sleeve cap and armhole. If you’re making a dropped-shoulder sweater or one with an angled armhole and straight cap, you can use the head-to-side grafting technique explained in the “Grafting head to side” section earlier in this chapter. If you’re making a sweater with a set-in sleeve, you need to use the backstitch for seaming; see the earlier section, “Sewing seams with backstitch,” for instructions.
To attach a set-in sleeve to a sweater body, follow these steps:
1. Mark the center of the sleeve cap at the top edge and align it with the shoulder seam on the sweater body, as shown in Figure 16-20.
Figure 16-20: Align the set-in sleeve and armhole.
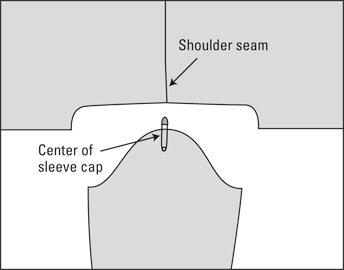
2. With the right sides together, pin the center top of the sleeve cap to the shoulder seam.
3. Working on only one side at a time, line up the bound-off stitches at the beginning of the armhole, shaping both the sleeve and sweater body, and pin the pieces together there.
4. Pin the sleeve cap edge to the armhole every inch or so between the bound-off stitches and the shoulder, as shown in Figure 16-21.
Figure 16-21: Pin the sleeve cap to the armhole.
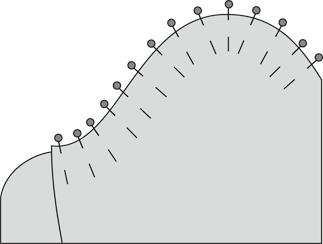
5. Use the backstitch to sew the pieces together along the edge from the bound-off stitches to the shoulder.
When you come to the vertical section of the armhole in the sweater body, keep your stitches in the trough between the first 2 stitches.
6. When you reach the shoulder, pin the other half of the armhole and sleeve, and sew from the shoulder to the bound-off stitches.
7. Steam your seam well, pressing down on it with your fingertips as the moisture penetrates.
Making side and sleeve seams
After you complete the shoulder seams and neckband and attach the sleeves to your sweater body, the rest is all downhill. If you counted rows and you have the same number (almost) on the front and back pieces, you can use the mattress stitch to seam your pieces together — and you won’t believe how good they look.
If your front(s) and back have a different number of rows (off by more than 2), use the backstitch technique to seam them together.