Chapter 2
The Character Portrait: Sculpting the Alien Mystic
In this chapter we will look at the process I take to design a character I call the alien Mystic. We will look at how I create this character based on instructions from a director called “a brief.” In the process of designing, we will see how basic shape language is used to create an interesting silhouette, which in turns helps to create an interesting character design. We will see how natural human anatomy can be pushed into the uncanny valley to create an alien face that has a basis in reality. This anchoring of fantasy characters in real-world anatomy helps the viewer accept the creature as a biologically viable creature and not just a blob of fantastic shapes with no physiological veracity. Over the course of this chapter, you will see the design process we have discussed so far in action as it unfolds within ZBrush. It is my hope that by seeing what changes I make to the character head at various points in the process, you will come to understand how I employ many of the design concepts we discussed in Chapter 1, “ZBrush as a Character Design Tool.” In this design, we will be particularly focused on silhouette, shape language as expressed between the various masses of the head, creative manipulation of human facial anatomy, and how the lines of the sculpture flow and guide the eye through the design.
You may recognize this character (Figure 2-1) from the cover of my book ZBrush Character Creation, 2nd edition. I am excited to now be able to show you how I went about designing this character in ZBrush. Instead of focusing on the technical aspects of sculpting and working in the program, we will look at the design methodology I used to guide my process while sculpting this character.
Figure 2-1: The final Alien Mystic design bust
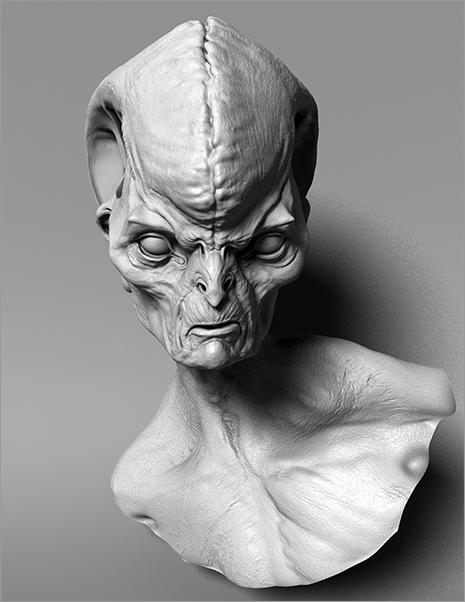
This chapter is intended to focus on the considerations to keep I mind when sculpting a design. We will not be concerned with color and paint yet—that’s for our next character. This lesson is intended to help you see how I think about a character design when it is in it sculptural stages. How shape language, silhouette, form, and proportion are used to help communicate a dynamic and interesting character.
The Importance of Reference
Throughout this book we will be creating a variety of different kinds of characters and creatures. As mentioned in Chapter 1, it is of paramount importance to always have a reference. A professor of mine in college, Paul Hudson, explained the need for reference well. He said, “Never lie. A viewer can tell when you are lying and making up details with no reference, and they will judge the work harshly for it.”
Keep a reference folder of images from the Internet: people, faces, animals, textures—any interesting thing that you can file away for future use. When you are working on a face or body part, having a reference can be the difference between a plain and uninspiring sculpture and a really interesting shape that has details in flesh and weight that you just wouldn’t have considered without that photo reference.
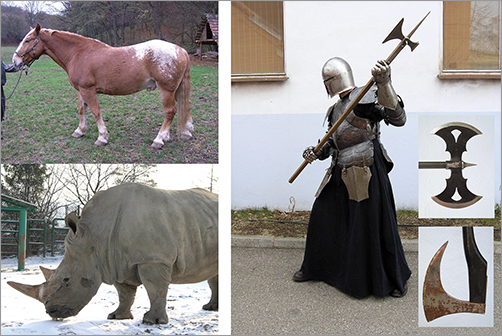
I recommende 3d.sk as a fantastic reference source. The 3d.sk site and its sister sites are the largest collection of photo references for artists on the Internet. I highly recommend a membership for any artist professional or student. The easy access to high-resolution reference imagery will improve your work immediately. Less time seeking out good references means more time you can spend using them. Figures 2-2 and 2-3 show prime examples of available imagery.
Figure 2-2: These human figures were downloaded from the exceptional reference site 3d.sk and its sister site photo-reference-for-comic-artists.com.
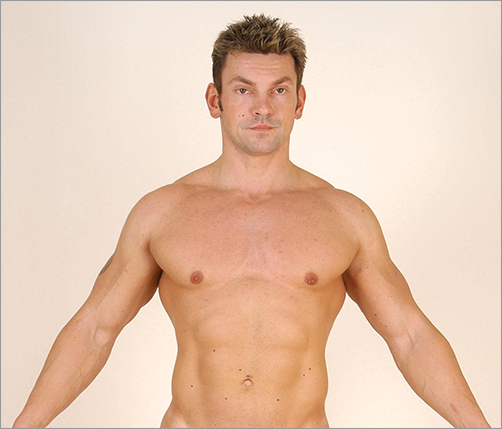
© Peter Levius www.3D.sk
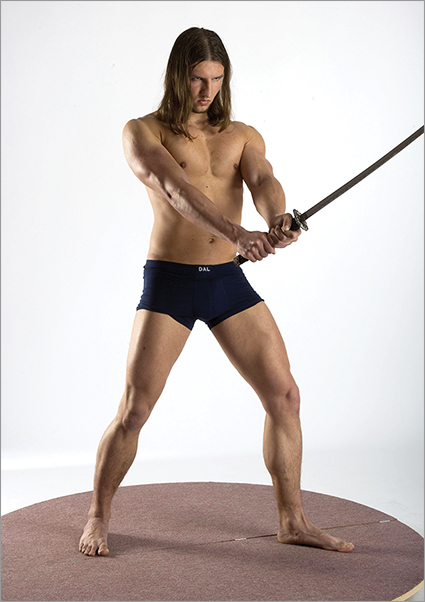
Figure 2-3: The 3d.sk site also offers animal reference images from various angles as well as armor and weapons references.
© Peter Levius www.3D.sk
Designing a Character Bust: Getting Started
I often find that you can start a character design by working on a bust. This allows you to define the attitude and presence of the character quickly without getting lost in the body details. By bringing the viewer in to a close-up, you also give them a more intimate picture of the individual. Busts are quick to sculpt, and I can generally finish a design in about a day from sculpt to finished paint up. For this reason, we will start the book by doing a bust design. If you find the bust is successful, you can then move on to designing a body for the character.
The Brief: A Character Study
The brief for this lesson is a character study of an ancient alien being. He is extremely intelligent with advanced technology. This character feels no allegiance to humanity, but he is not at war with Earth. This character seems to display a general contempt for humans and should be considered dangerous. He needs to appear to have evolved along similar lines to humans, but perhaps with advanced senses or mental abilities.
Thumbnails
One of the first steps to a good design is sketching ideas. You should always sketch in some form, such as a ZBrush doodle or even a series of thumbnails on a piece of paper at your desk. This allows you to work out ideas and poses quickly so that you don’t waste time at the computer. Figure 2-4 shows a finished image and the original sketches. Notice that the sketches can be very rough. The idea is to work out the rough ideas on paper, where you can think quickly and are not bogged down in technical considerations.
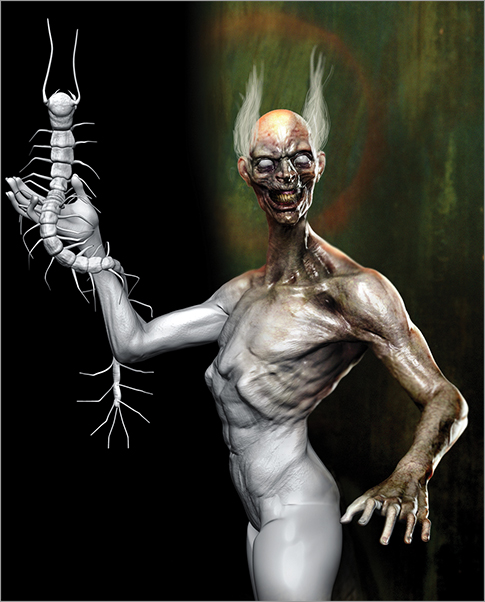
Figure 2-4: Here you can see my Centipede Magus illustration next to the original thumbnail. The ideation sketch need not be elaborate. A simple rough figure will do to work out big ideas.
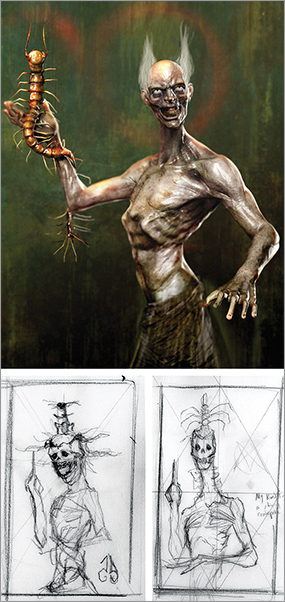
Thumbnail sketches are an important part of the design process. Thumbnails help to dial in the silhouette of the figure quickly. They also allow you to work through a variety of ideas very quickly. I consistently find that my first ideas are the weakest and only after I spend some time doing the “expected,” conventional approaches in my sketches do I come upon a new and fresh idea. It usually takes some time to work to this point in ZBrush, but if you work this process out on paper, you will start further ahead in your sculpting. I have also found that in the last hour of work on a piece I sometimes make a sudden and drastic change that pushes the design into a new realm.
Thumbnail sketches are often created with a chisel tip marker in black and white.
A Thumbnail Process for ZBrush
This same approach of creating black-and-white thumbnails is possible within ZBrush as well. It allows you to explore several options quickly in thumbnail form. This kind of approach is important because 3-D makes it easier to get locked into an idea too early because you are often starting from an existing mesh or volume.
The thumbnail approach has the added benefit of introducing a level of spontaneity or “happy accident” to the sculpting process, which is often absent from digital workflows.
One plug-in that will be useful in this lesson, as well as throughout the book, is Svengali’s QuickSave plug-in. This can be found on the DVD or downloaded from zbrushcentral.com. This plug-in allows you to save iterations of your model with a numerical file extension by pressing a hot key. This means you can save models with a three-digit numerical extension such as _001, _002, and _003 by simply pressing your save hot key. As you will see, this functionality can speed work along nicely. I highly recommend that you download and install this plug-in. I have included the plug-in on the DVD or download files, but you should check the forum at www.zbrushcentral.com to be sure you have the newest version. Svengali updates his plug-ins. Follow these steps to add the plug-in to ZBrush:
1. From the DVD or download files, browse to the file QuickSave4.zsc. This is the QuickSave plug-in file. Copy this into the ZBrush scripts folder so that it will load when ZBrush starts.
2. Right click and copy the file. Now browse to the root ZBrush plug-in folder. This folder is located at C:\program files\pixologic\ZBrush4\Zstartup\ZPlugs. Paste the file into the ZPlugs folder. Be sure it is not in a subfolder. It must remain in the root ZPlugs directory. For a Mac, this will be Applications/ZBrush 4/ZStartup/ZPlugs.
3. Restart ZBrush. If it was open, be sure to shut it down completely and restart. When ZBrush opens again, a new menu will be found under the Zplugin menu. This menu will be titled Svengali.
4. Click on the Svengali menu to open it. This is where the QuickSave options will be found (Figure 2-5).
Figure 2-5: The QuickSave plug-in
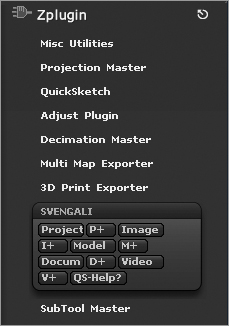
The plug-in functions by using two buttons for each thing that can be saved. Project will save your initial project file. This is where you specify the filename you want to save the project as. For example, press the Project button and name your file thumbnails_001. Now when you press the P+ button, the script will save a new version of your file, appending the next digit onto the filename. If you press P+, it will automatically save a new project as thumbnails_002. This protects against file corruption because you are not saving the same file over itself. We will use the Model save function to save automatic increments of our model as we create silhouette variations of it. Before we move on, we will set a hot key for the save button to speed workflow.
1. Press and hold the Ctrl and Alt keys and click the M+ button. ZBrush will prompt you for a hot key assignment (Figure 2-6).
2. Any key you press now will be assigned as the QuickSave model hot key. I chose Alt S. I try to keep my hot keys clustered around the Alt key and the left side of the keyboard so that I can press them quickly while I work.
Figure 2-6: ZBrush prompts for a hot key assignment.

We are now ready to move into the process of making a thumbnail sheet. Follow the steps below to start generating thumbnails using ZBrush:
1. In ZBrush, set a large document size. In this case, I have set the document window to 1920 × 1440. This larger document size will allow us to create several thumbnails on the same page (Figure 2-7).
2. Select the color white from your color picker and press the Back button under the Document menu to set white as the background color of the document. This will allow us to see our thumbnail studies as black on white (Figure 2-8).
3. On the upper right sidebar, click the AAHalf button. This will cause the full screen to be visible. You can also use the Zoom button to make sure the whole document is visible. This will make it easier to place our thumbnails as we work.
Figure 2-7: Set your document size to 1920 × 1440.
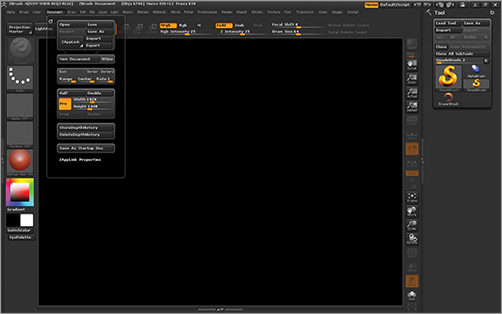
Figure 2-8: The background set as white.
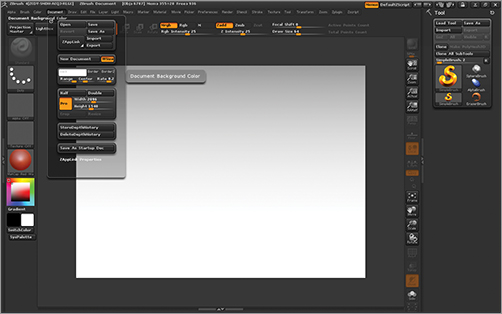
The document is now prepared. In the next steps we will open a generic head ZTool and change its material to a black silhouette. By removing all details from the inner forms, we are forced to look only at the silhouette. By using the Move brush, we will then quickly shape the character into a variety of interesting shapes. Each one will be dropped to the canvas as a snapshot and the model saved. In this way, we will build up a selection of thumbnails and associated models.
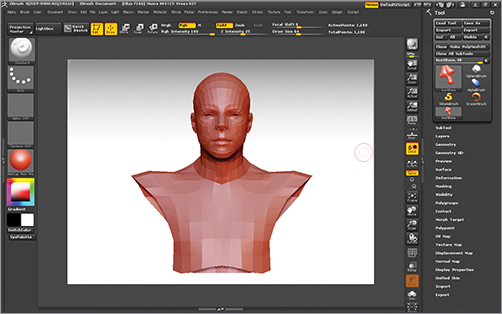
1. For this section, we will use the generic ZBrush bust I have covered in my previous book, ZBrush Character Creation. You will find this ZTool on the DVD or download files. Load the tool and draw it on the canvas. Press T to enter edit mode (Figure 2-9).
Figure 2-9: The generic head ZTool on the canvas in edit mode
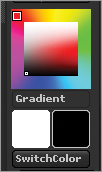
2. In default mode, the material is a red wax shader. We want to change this to a solid black material so that we can manipulate the model with the silhouette as our only concern. To do this, we will change to the flat color material. Open the Material menu and select Flat Color (Figure 2-10). Set the active SwitchColor to black (Figure 2-11). If the model’s material does not change, that means the material channel has been filled. To correct this, select the flat color material, turn on the M button at the top of the screen, and then click Color Fill Object. This will clear the material channel so that whatever material is selected will display on the ZTool. This technique will also correct models that have material applied to some areas and not others.
Figure 2-10: Set the material to Flat Color.
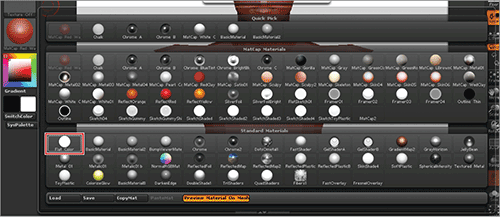
Figure 2-11: Select black as the active SwitchColor.
3. Now the model will display as a black silhouette on screen (Figure 2-12). Save the model using the QuickSave Model button as thumbnail _000. This will set a base filename and allow you to increment numbers as you save.
4. Select the Move brush and start changing the shape of the model. You will see how interesting forms can be created by merely dealing with the outline of the character (Figure 2-13).
Figure 2-12: The bust in silhouette
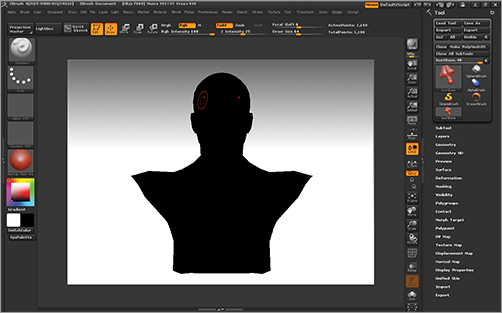
Figure 2-13: Using the Move brush, shift the model around and create new and interesting silhouettes.
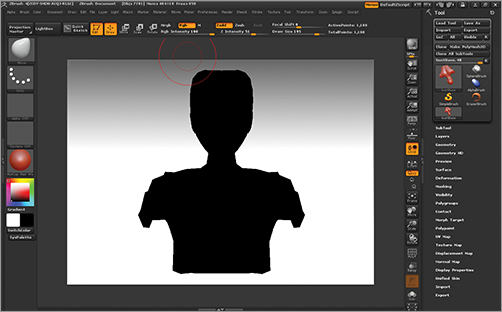
5. When you have a new shape, size the model down and snapshot it to the canvas by pressing the Shift S hot key. Shift S will take a snapshot image of the ZTool in its current position and display it in the document window. Once you have snapshot the image to the canvas, press the QuickSave hot key, Alt S. This will save your model with a 001 extension.
You can also save images with the hot key, but this does not allow you to compare the thumbnails on a sheet together, which is an important part of the process.
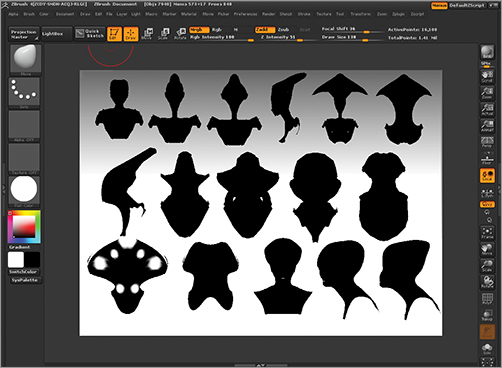
6. Continue to work your way across the page, making new shapes with the Move brush. You may also add new subdivision levels while you work if you need more resolution in the silhouette. As you work your way across, save new versions of the model for each snapshot you drop to the canvas so that you can easily recover the corresponding model later. Alternately, you can create a new layer for each thumbnail (Figure 2-14). Because you are using the QuickSave plug-in, you can find the model that corresponds to a thumbnail by comparing the number of its filename with the thumbnail on the page: the fifth thumbnail across will correspond with file_005.
Figure 2-14: A selection of thumbnails. There is a model saved for each version, from left to right.
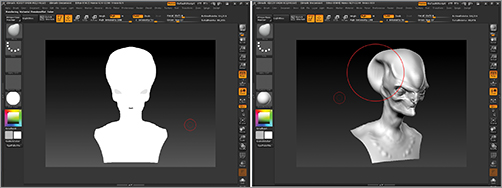
7. While you work, you can switch to the basic material again to see what strange internal forms your Move brush has created. In Figure 2-15, I find that some strange wing forms have been created entirely by accident on the sides of the head.
Also remember you can still add geometry or step down the Subdivision levels as needed while you sculpt these silhouettes. Stepping down subdivision levels can be accomplished with the Shift D hot key.
At this stage I often walk away from my work and come back after a short break or a night’s sleep. This allows me to evaluate the silhouettes with fresh eyes. When you come back, determine what shapes are the most interesting. Look for new ideas in the sheet. This is not unlike Rorschach inkblot tests. Try to find something new and interesting. I made my choice based partly on the silhouette and partly on the interesting ear/skull form created randomly by my use of the Move brush. With the model selected, we are ready to move on to sculpting our character portrait.
Figure 2-15: Happy accidents can be encouraged by sculpting these rough shapes with the flat color material on. The ear structures seen here were a random occurrence but they carry over into the design.
Another Approach to Thumbnail Ideation with Guest Artist Bryan Wynia
In this section, Los Angeles–based character artist Bryan Wynia will demonstrate his approach to thumbnail ideation in ZBrush and Photoshop. Currently working as a senior character artist at Sony Santa Monica, Bryan started his career with me at Bill Johnson’s Lone Wolf Effects in Atlanta, Georgia.
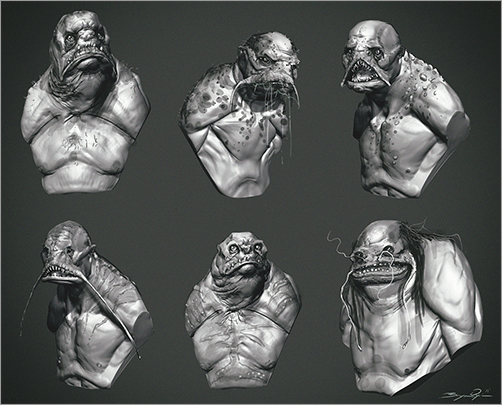
I will share my techniques for generating ideation drawings, or thumbnails, using ZBrush and Photoshop. Figure 2-16 shows a selection of character designs based on an amphibious monster theme. When designing a character or creature, I find it very useful to use thumbnails to explore my designs. I can quickly generate new ideas and steer my design down a successful path. It’s rare that the first idea you have is the best idea. Take the time to explore and evolve the character.
Figure 2-16: A selection of design variations generated quickly in ZBrush and Photoshop
1. When I receive a character description, I will quickly gather reference and jump right into ZBrush. Starting from a simple mesh, I create a design sculpture, also known as a speed sculpt (Figure 2-17).
2. Depending on the time frame and project, I will create multiple speed sculpts. Each sculpt allows me to explore new silhouettes, shapes, and characteristics. Using the Best Preview Render function, I do a simple render of each speed sculpt.
3. I then bring the renders into Photoshop to start the thumbnail process (Figure 2-18).
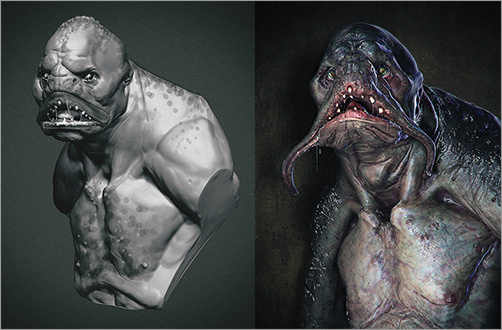
4. I will create a row for each speed sculpt. You can hold Ctrl+Alt+Shift to quickly duplicate each layer in Photoshop. The first render will remain similar to the speed sculpt. I usually paint only eyes, hair, and accessories. Figure 2-19 shows an example of a quick paintover as well as the final illustration further developed in Photoshop.
Figure 2-17: The initial speed sculpt
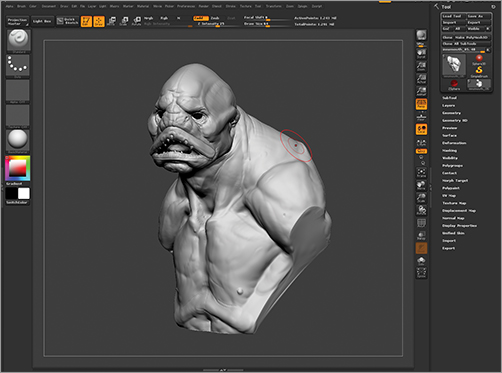
Figure 2-18: BRP renders of each variation, ready to paint
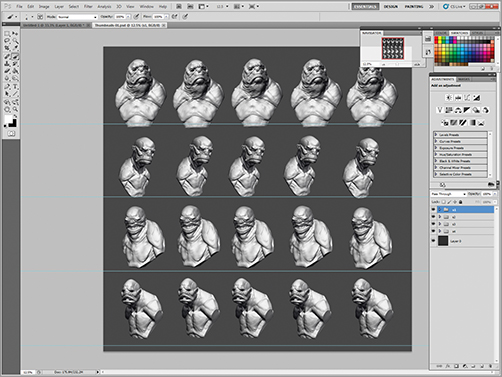
Figure 2-19: An example of a quick paintover and a final illustration developed from the same speed sculpt base
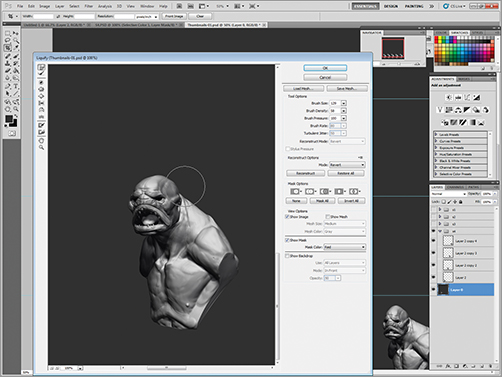
5. For the remaining layers, I will start by using the Liquify tool found in the Filter tab (Figure 2-20). I use this very much like the Move brush in ZBrush. It’s a great tool for creating a new silhouette. At this point, the Transform and Warp functions are very useful as well. I’m trying to create new options with each image. Perhaps one version is thin and agile and the next is more defined and has larger eyes. Use this time to explore and expand on your character.
Figure 2-20: Using the Liquify tool to make further changes to the design
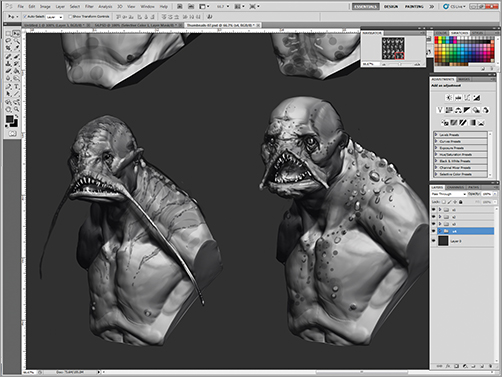
6. I will sample color from the render to paint new shapes on the character (Figure 2-21). You can do everything from adjusting bone structure to extending the length of the ears, and so on. Most of the thumbnails I create are in grayscale, as I’m only focusing on the character’s forms and shapes at this point. Depending on the design, I will use a simple brush to suggest hair, fur, or clothing. When painting, I also try to use value to create areas of interest on my character. For example, perhaps the skin around the eyes and mouth are darker and have more specular highlights.
Figure 2-21: Sampling color to paint new shapes and highlights into the image
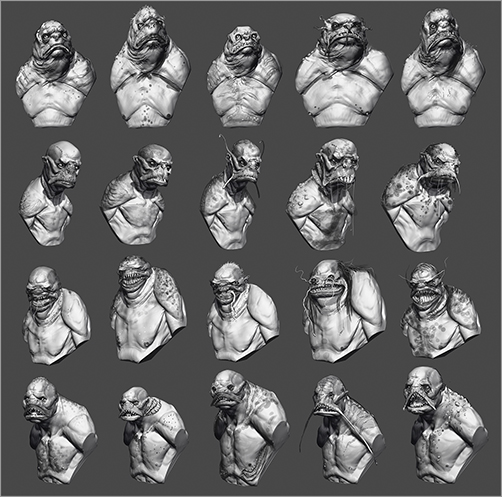
The more thumbnails you create, the better! I like to leave no stone unturned when it comes to ideas (Figure 2-22). Investing this time to properly explore your character can only benefit your designs and creative process.
Figure 2-22: Here is a large selection of ideas generated from the initial design mesh
You can find out more about Bryan and his artwork at bryanwynia.blogspot.com.
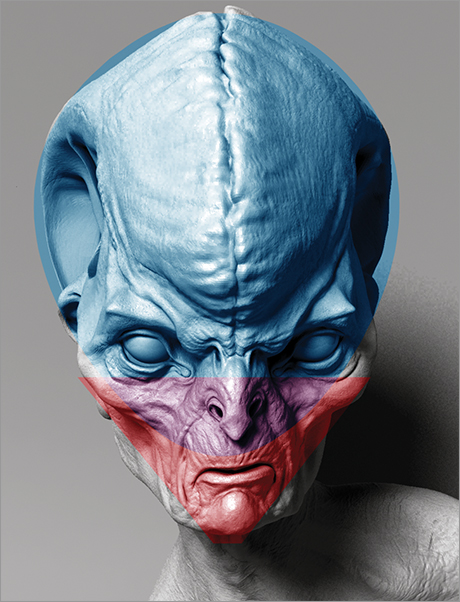
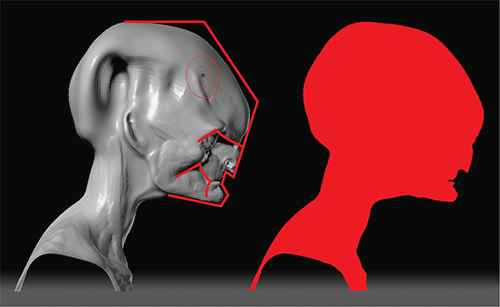
With the bust base selected from the page of thumbnails, we are ready to start sculpting more refined forms from the base model. At this stage we will think about the anatomy of the character as well as the relationships between the shapes of the head, for example, how the forms of the cheekbones relate to the sphere of the head. These relationships will be different for each character. It’s important to consider how the base shapes interlock and relate. One good rule of thumb is to avoid equal distributions of shapes. In this character, I make the head essentially two shapes—an oval and a triangle (Figure 2-23). The triangle is about 1/3 the size of the head as a whole.
Figure 2-23: The most simplified shape of the head is an oval and a triangle 1/3 the size of the head as a whole.
Shaping the Head and Facial Features
We’ll start by roughing in some details to the character’s head, eyes, cheekbones, and other areas:
1. Using the Move brush, continue to shape the head. I try to create a narrow facial wedge suspended under the bulbous head. Immediately, I am thinking about how the head is broken into at least two shapes and how those two shapes will relate. At this stage I am almost entirely using the Move brush to create these shapes. (See Figure 2-24.)
2. Using the Standard brush I sketch in cheekbones (Figure 2-25). This is a very quick, rough stroke. The only point is to start to define the edges of the face and its shape. Don’t spend too much time working on skeletal anatomy yet. We are too early in the process to think about secondary anatomical forms in detail. Right now, we want big shapes and their relationships to each other.
3. Add a sphere for the eye by appending a Polysphere into the SubTool stack. Use the Transpose Move tool to place the eye where you want it. I chose to place them wide and just below the midpoint of the head. Place the spheres for the eyes early so that you can be sure as you sculpt the anatomy of the eye, both the bony and fatty forms, that they will be relating back to the eye’s spherical shape. Otherwise you will make it far harder on yourself to be accurate because you have no point of reference. Changing their position later is extremely easy with Transpose and the Move brush.
When the eye is roughly placed, use the ZScript SubTool Master to mirror it across the X axis. Press the Mirror button and choose the options Across X axis and Merge into one SubTool. SubTool master must be installed and is available for free from www.pixologic.com. Here we see the eye after mirroring with the ZScript SubTool Master (Figure 2-26).
Using the Standard brush in conjunction with Clay Tubes and Polish, refine the shape of the eyelids and cheekbones (Figure 2-27). Be sure to use Transparency mode as you work, With Transparency and Ghost buttons turned on, you will be able to see both the eyelid and the shape of the sphere beneath it. This is invaluable to help conform the eyelids around the sphere of the eyeball. If you cannot see through the SubTools as shown in the image below, be sure to turn on Ghost mode. The button is located on the right of the screen just below the Transp button.
Figure 2-24: The base forms of the head roughed in
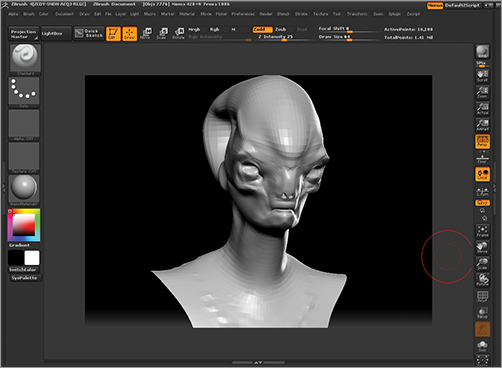
Figure 2-25: Sketching in the shape of the cheekbones
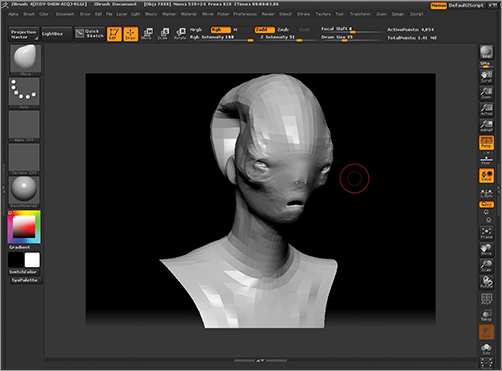
Figure 2-26: Placing the eyes

Figure 2-27: Work the shape of the eyelids.
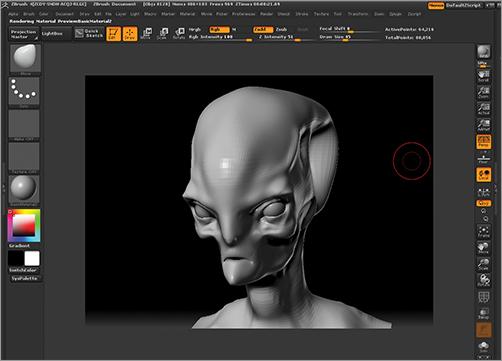
4. I continue working the head and face. At this stage a theme is emerging of sharp angles pointing downward. These can be seen here in the shape of the nose mouth and chin. This repetition creates a rhythm between the elements. It is not something I necessarily consciously chose, but a development of arranging the forms until they felt more appealing. Notice also how the eyes are slightly tilted, giving an air of malevolence to the head. This effect is lessened considerably before the head is completed. Little touches such as the tilt of the eye and angle of the upper lid can communicate so much about a personality (Figure 2-28).
At this point I want to create an interesting nose shape (Figure 2-29). Because this head is based on a human face, we want to break as many conventions as we can: adding extra nostrils and enlarging and shrinking elements will help. The hope is to push it away from human while retaining enough elements that it is relatable as a humanoid character.
Figure 2-28: The eyes of the character modified. With these angles in the facial features, he takes on a sense of malicious intent.
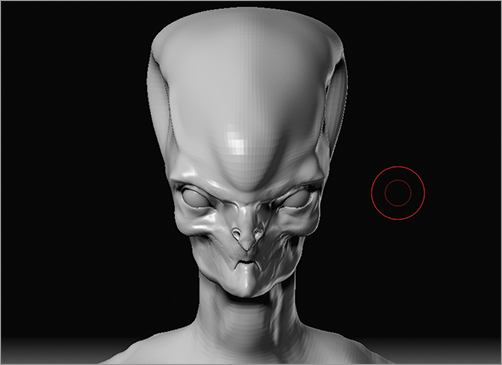
Figure 2-29: Working on the shape of the nose
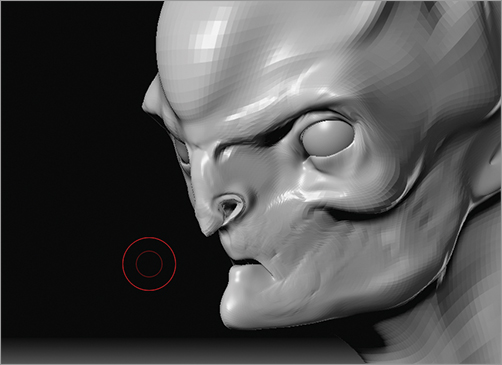
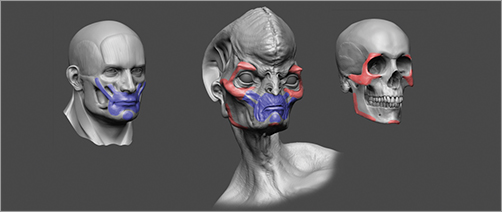
5. We have enough of the head’s primary forms now that we can start to think about smaller shapes. I further break up the shapes of the head by adding some secondary forms. Here you can see how the structure of the cheekbones have been brought out from the skull and further refined. I use these forms to both frame the large eyes and create a sense of tension in the face. Skin can stretch from these sharp cheekbones down to the mouth, creating some dynamic lines later in the sculpture. These two facial landmarks also serve to be a point of reference between human and alien anatomy (Figure 2-30).
Figure 2-30: By relating the anatomy of the human face to the alien cheekbone and facial muscle structure, you can add a sense of veracity to the design.
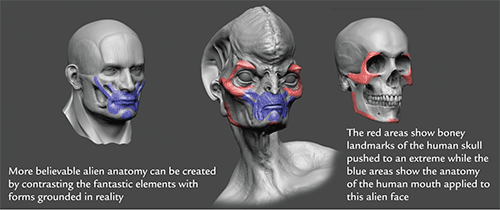
6. At this stage, you can see some implied lines developing in the head. I will use these lines to guide the eye through the design. (See Figure 2-31.) It’s like pictorial composition but in three dimensions. Just like a painting or illustration has lines that guide you through the design of the picture plane, you can use implied lies in your sculpture to create interesting shapes and guide the eye along the forms. Remember that, in most cases, this sculpture will be seen as a painted 2-D image, so thinking in compositional terms early on will help.
Changes to the overall shape create a more interesting look. In Figure 2-32, you can see the head at this stage from the front view. I have sought to use the lessons we have learned so far to make sure the head is composed of basic shapes that relate together in interesting ways. The facial anatomy is suitably removed from human while retaining humanoid elements, and the overall silhouette is strong (Figure 2-33).
Figure 2-31: Be aware of the internal, implied lines in the shapes of the sculpture.
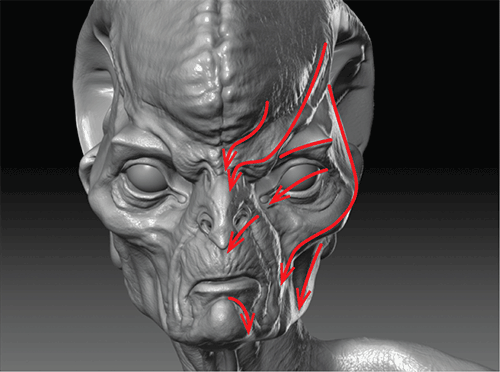
Figure 2-32: Working on the shape of the head from the front
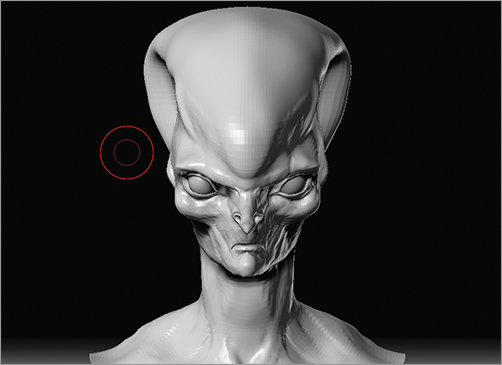
Figure 2-33: The profile includes several strong graphic forms with the angles shown here.
7. Returning to anatomical considerations, we look at the mouth. I want to give the mouth a sense of being an actual orifice with skin and folds. The best way to approach this is to look at the anatomy of a human mouth and push those elements. The mouth is defined by the forms of the zygomaticus major and minor and the orbicularis oris muscles (Figure 2-34). I push these shapes to fit the extremely tapered jaw line and to accentuate their prominence to create some variation in the shape around the mouth.
At this point, I zoom back and take inventory of the changes I have made. Figure 2-35 shows the character from the front and three-fourths views. Notice how the face wedge is subordinate to the great sweeping arc of the cranium in the second image. Shape relationships like this, while abstract, can make the character more interesting if you are aware of them and try to explore and exploit them. Notice also that I make sure the cheekbones break the silhouette from the front view. This creates variety and interest in what would otherwise be an egg shape.
Remember that the mouth and eye areas are based on very human shapes (Figure 2-36). This is intended to ground the character in some elements the viewer may find empathy with. By giving an alien some human aspects, it can more easily communicate emotion or calculated menace to the viewer.
Figure 2-34: Once again, I reference the muscular anatomy of the face to create the shapes seen here around the mouth.
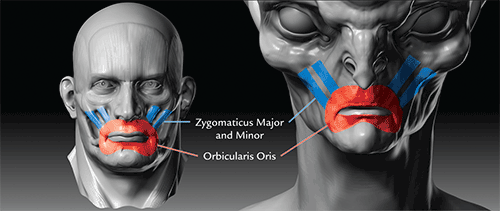
Figure 2-35: Front and three-fourths views
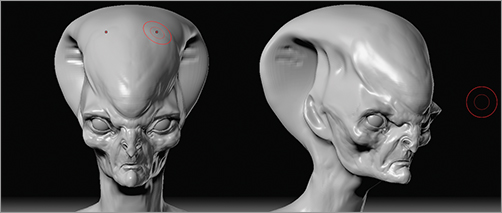
Figure 2-36: The mouth and eyes are based on very human shapes to help the viewer relate to the character.
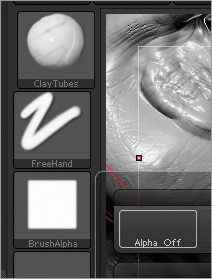
To add a sense of fleshiness, I use the Clay Tubes brush. One of the secrets to creating a soft fleshy feeling in a sculpt is to avoid deep, dark divisions between all your forms. The Clay Tubes brush is chosen because it adds into the recesses first and makes the undulations on the surface of the sculpture more subtle. Figure 2-37 shows a fold at the side of the mouth before and after being softened with the Clay Tubes brush. Make sure to turn off the Alpha on the brush to get the softening effect (Figure 2-38).
Figure 2-37: By brushing into the spaces between folds with the Clay Tubes brush, you can accentuate the appearance of soft flesh.
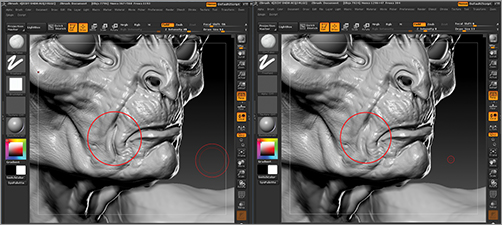
Figure 2-38: Be sure to turn off the Alpha on the Clay Tubes brush to get the maximum softening effect of the brush.
Further Refining
Now I will rough in most of the angles and forms. At this stage in the tutorial, I hope you are getting an idea of how I am considering these shapes and what I am going for with the mesh as I move it. For me, the design process is a constant push and pull of shapes as I try to make each decision serve the overall look and intention of the character. In Figure 2-39, you can see how I am considering the triangular shapes that make up the whole character head and the overall silhouette as well as the basic form language, or how the volumes of the head interrelate.
Using the Clay Tubes brush, I quickly stroke some folds into the face (Figure 2-40). These are intentionally sketched in a quick, gestural manner so that they draw the eye down into the angles of the mouth and chin. The lower portion of this creature’s face is all about tightening angles and points. I also suggest the anatomy of the neck and collarbones (Figure 2-41). Notice how I have just quickly suggested these with two strokes of the brush. I think that this kind of quick, confident approach is important in ZBrush, just like it is in drawing and painting. If you have a clear idea where a muscle starts and ends, you can easily sketch its form on the surface. If you are able to learn about the anatomy enough that you can suggest muscles and bones with short, confident strokes, your sculpture will appear less overworked and more spontaneous. I always try to be confident when I sculpt, even when I am not confident in where it is going. In the end, a bold sculpture will look better than a weak and overworked one.
Figure 2-39: This image illustrates the interplay of angles in this character head.
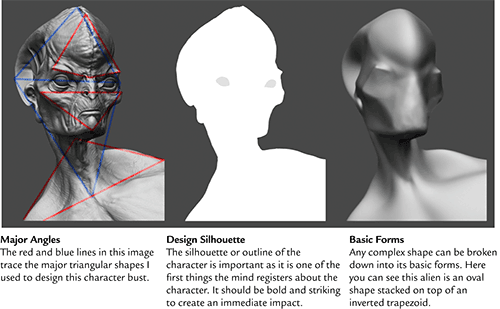
Figure 2-40: Face folds sketched in. The overlay shows the flow.
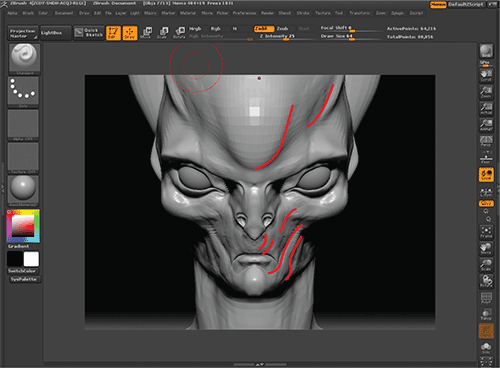
Figure 2-41: Sketching in the anatomy of the neck in a few strokes
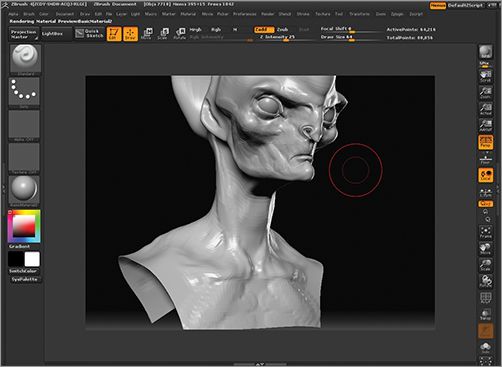
With the Standard brush, I sketch in some negative spaces in the temple area and deepen the large ear wings. These large auditory organs are photosensitive and translate color into sound. This alien being can actually hear the harmonies of color around us. This kind of organ is a complex construct, and I suggest these kinds of complexities with narrow pits along the side of his head (Figure 2-42). Using the Standard and Inflate brushes, I further refine these forms and add radiating lines from the pits out along the wing shapes on the sides of the head.
This structure is inspired by the abstract form of a clamshell, but the organic function of these lines represents rows of photosensitive cells that gather color information from the creature’s surroundings. You will notice I also add a more natural-looking ear shape where the human ear might be found. This is shaped using the Standard and Inflate brushes. I add this more traditional ear structure to keep the head from looking unpleasantly odd (a humanoid head lacking any kind of ear shape might be unusually truncated on the sides of the head) and to suggest that the character is capable of hearing sounds as well.
Figure 2-42: Etching in narrow trenches on the sides of the head for the auditory organ of the head. Figure b shows the ear itself further refined with the Inflate brush to create the shape of the lobes.

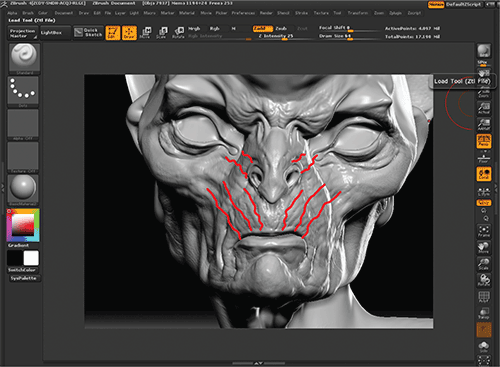
At this stage, I want to give the flesh of the face more character. To do this, I will sketch in a pattern of wrinkles freehand. I will use these wrinkles to follow the overall flow of the face to suggest the kinds of expressions the character makes by defining where the skin is folding from use. Select the Standard brush and Alpha 01 for this wrinkle pass. Sketch in lines that radiate out from the mouth as seen in Figure 2-43. Use the Inflate brush with a low ZIntensity setting on the spaces between the lines to pucker up the mesh into folds of flesh.
Figure 2-43: Sketch in the wrinkles of the face with the Standard brush.
I now stretch the eye shape further by changing the shape of the tear duct, or medial canthus (Figure 2-44). By elongating and enlarging this shape, I can change the size of the eye without changing the eyeball. It’s also a way to make the eye seem more alien while retaining human characteristics. This is essentially accentuating and misshaping human anatomy, unlike the next step where we add new anatomy.
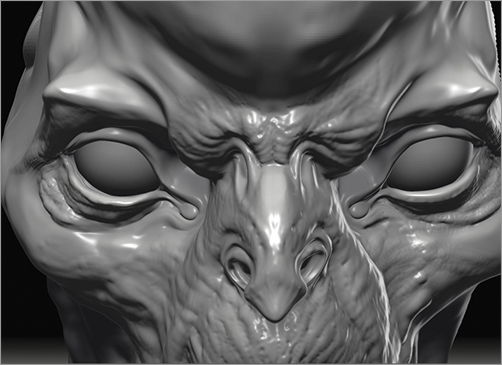
At the bridge of the nose, I add a new nasal structure. This is actually a somewhat subtle addition, but these extra breathing passages are not at all human. They introduce an entirely fantastic element to the face, and I like how they are subtle enough that they may slip past the initial viewing (Figure 2-45).
Figure 2-44: Elongate the medial canthus of the eye to give it an otherworldly feel.
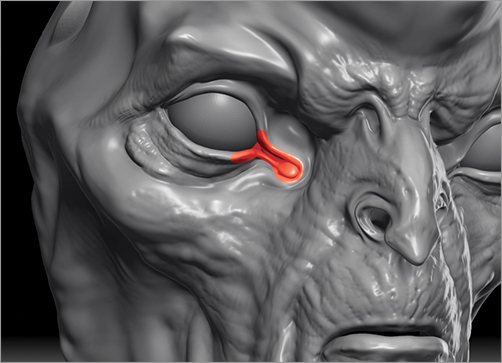
Figure 2-45: The new nasal structure
The Final Design
The design sculpt is now complete. I chose to offset the head and shoulders to give a sense of attitude and make the image more interesting before I paint over it in Photoshop. This character represents my interpretation of the design brief, a slightly menacing, highly intelligent alien. This creature has highly developed chromasensitive wings on his head that translate color wavelengths to sound. This allows him to hear color and, therefore, combine his superior vision with his ability to hear and locate objects and individuals via color sound—an interesting take on evolved senses.
We will now move on to another design problem. This chapter has set down many of the basic tenets that will inform the rest of our decisions in the book. We will consistently refer back to the concepts and ideas put into practice in this lesson.
Figure 2-46 shows the final design with color applied and post processing in Photoshop. I have included the layered PDF files on the DVD or download files for this book for your reference as well as the ZTools. We will now move on to a full body character. This next design we will take from sculpt to pose, and all the way to final painting!
Figure 2-46: The final design sculpt with Photoshop paintover

DVD Bonus Content
As a bonus for Chapter 2, please see the DVD or download files, where I have included ZTools, Photoshop files, and videos on the creation of my Centipede Magus image (Figure 2-47). It was originally offered as a Gnomon Master Class. I have included materials to help you understand the creation process using many of the same ideas and concepts from this chapter from initial concept through to final painting.
Always be thinking while you work, and whenever possible make changes for a reason. Have a clear idea in your mind of where you are headed as opposed to blindly moving shapes until it “looks right.” Starting with a clear and basic graphic idea of the character will be a huge benefit to the process.
Figure 2-47: See the DVD or download files for extra materials on the Centipede Magus character design seen here.
