LIVING SPACES
Your choice of interior fixtures and furnishings is a statement of your individuality and helps turn your house into a home. These big-ticket items are subject to heavy everyday wear and occasional spills, knocks, and tears; most can be restored or maintained in good condition at minimal cost.
CURTAINS, BLINDS, CARPETS, AND FLOORS
A scratch on your new wooden floor, a glass of red wine spilled on a cream carpet, or a collapsed curtain needn’t ruin your day. Quick and inexpensive fixes using everyday household items can restore your pride in your home.
My curtain rod has fallen down
Strengthen the fixtures and reattach the rod
A fallen curtain rod can mean that the original hardware fittings were too weak or that the plaster that they were screwed had “blown” or crumbled with age.
- • Tap the wall above the window: if the plaster sounds hollow, it has probably blown—meaning that it has become detached from the wall. If there is an adjacent area of sound plaster, simply reposition the brackets. If not, screw a long batten to the top edge of the window and fix the rod brackets to the batten to spread the load.
- • If the plaster is sound, you can reuse the existing holes. Drill the holes deeper with a power drill so that they can accommodate a heavier-duty wall plug. Use a vacuum cleaner to suck any plaster dust from the enlarged holes. Squirt some quick-drying, strong adhesive into the hole, then push in the new plug and allow it to set overnight. Reinstall the curtain rod with new, longer screws.
My curtains don’t hang straight
Train your curtains or weight the seams with coins
If your curtains just won’t hang in neat pleats, it’s time for a little training—“teaching” the fabric how to move.
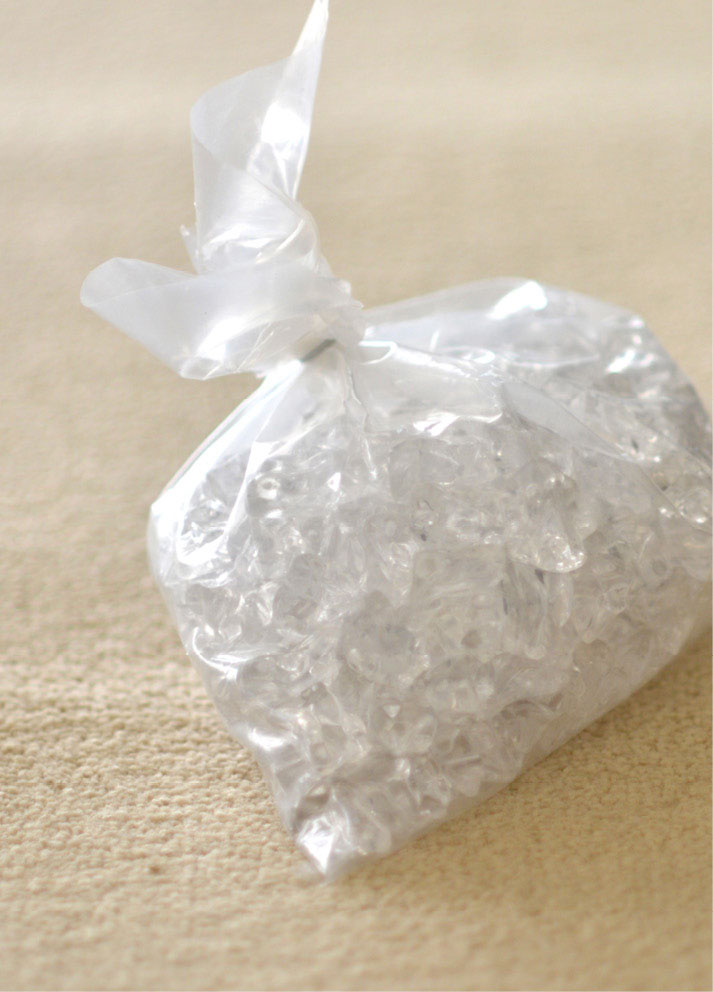
- • Hang your curtains on the rod or track and open them fully. Push the fabric into the desired wave shapes until you are happy with the depth and interval of the folds. Then, use a strip of plastic wrap to make a loop around the bunched curtain, holding it in position. Secure a band of plastic wrap every 24 inches or so down the length of the curtain, and leave the curtains tied in this way for three days. When you release the fabric, it should have “learned” its new shape.

Secure plastic wrap around the pleats in your curtains and leave for a few days to train them how to hang.
- • If you have a steam cleaner, close the curtains and direct steam from the nozzle, working evenly from the header to the hemline. Open the curtains before they have cooled, and tie them with plastic wrap as above; leave for three days.
- • If your curtains are lined, try sliding a coin or fishing weight into the hem, where the lining and panel hem meet. The extra weight will encourage the curtains to hang straight down.
The curtains stick
Clean and straighten the curtain track
Curtains that run on tracks should open and close smoothly; if they stick, the track itself could be bent or the rollers and pulleys that carry the curtains could be jammed.
- • Close your curtains to the point at which they stick. Using a stepladder, climb up and inspect the track at this point. If it is visibly bent, use some pliers to gently work it back into shape.
- • Move the pulleys and roller with your fingers—if any of them is stuck, give it a squirt of WD-40 and manipulate it until it is free.
- • Make sure there are no knots in the cords used to open and close the curtains, and use the brush attachment of a vacuum cleaner to clean any dust or debris from the curtain tracks.
My blinds won’t open or close
Unjam the locking mechanism
If your venetian blinds sag at one side or won’t move up or down at all, the gear that grips the control cord has probably seized.
- • Try exaggerating the action you use to operate the blinds, pulling the cord high up to the left and then to the right to free it from the gear.
- • If this doesn’t work, erect a stepladder and climb up so that you are at eye level with the top bar of the blinds. Peer into the hole where the control cord enters the bar; you should be able to see a small metal lever or gear. Use a small flat-head screwdriver to lift this mechanism and free the cord.
My window shade has lost tension
Adjust the tension by hand
Sprung roller shades are made of an aluminum tube that encloses a coiled spring. When you pull down on the shade, the tension on the spring increases; when you stop pulling, a ratchet engages with a pin to keep it extended until the tension is released and the shade rolls back up. If your shade won’t roll up, there’s a simple solution.
- • Unroll the shade a further 24 inches, then lift it off its mounting brackets. Roll up the shade evenly by hand and replace it in the bracket. Repeat the process until it rolls up freely.
- • Conversely, if the shade won’t stay down, the tension is too tight. Take down the shade, unroll it by about 24 inches, then replace it and test the tension by opening and closing it. Repeat if necessary until the blind operates perfectly.
Someone’s treaded gum into my carpet
Cool the gum to remove the problem
Lay a freezer block, a handful of ice cubes wrapped in a plastic bag, or a packet of frozen peas over the chewing gum to chill it. Then just peel off the gum.
Using an ice pack to cool gum makes it lose its grip on carpet fibers, allowing you to pick it off with ease.
I’ve singed my carpet
Snip away the damage
If the burn isn’t too deep, try cutting off the burnt tips of the carpet’s pile with a sharp pair of scissors, leaving the good fibers underneath. You can try the same approach with a stain if it doesn’t go deep into the pile.
There’s a deep burn on my carpet
Match it and patch it
If the damage is too deep for a quick fix (see above), you can make and fit a patch to improve the carpet’s appearance. You’ll be glad if you’ve kept some offcuts of carpet, but don’t fret if not—you can cut a patch from an out-of-the-way place, such as under the sofa. If your carpet is patterned, cut a patch that duplicates the pattern of the damaged piece.
Time needed 1 hour
You will need trimming knife, metal ruler, hammer, carpet adhesive, double-sided sticky tape
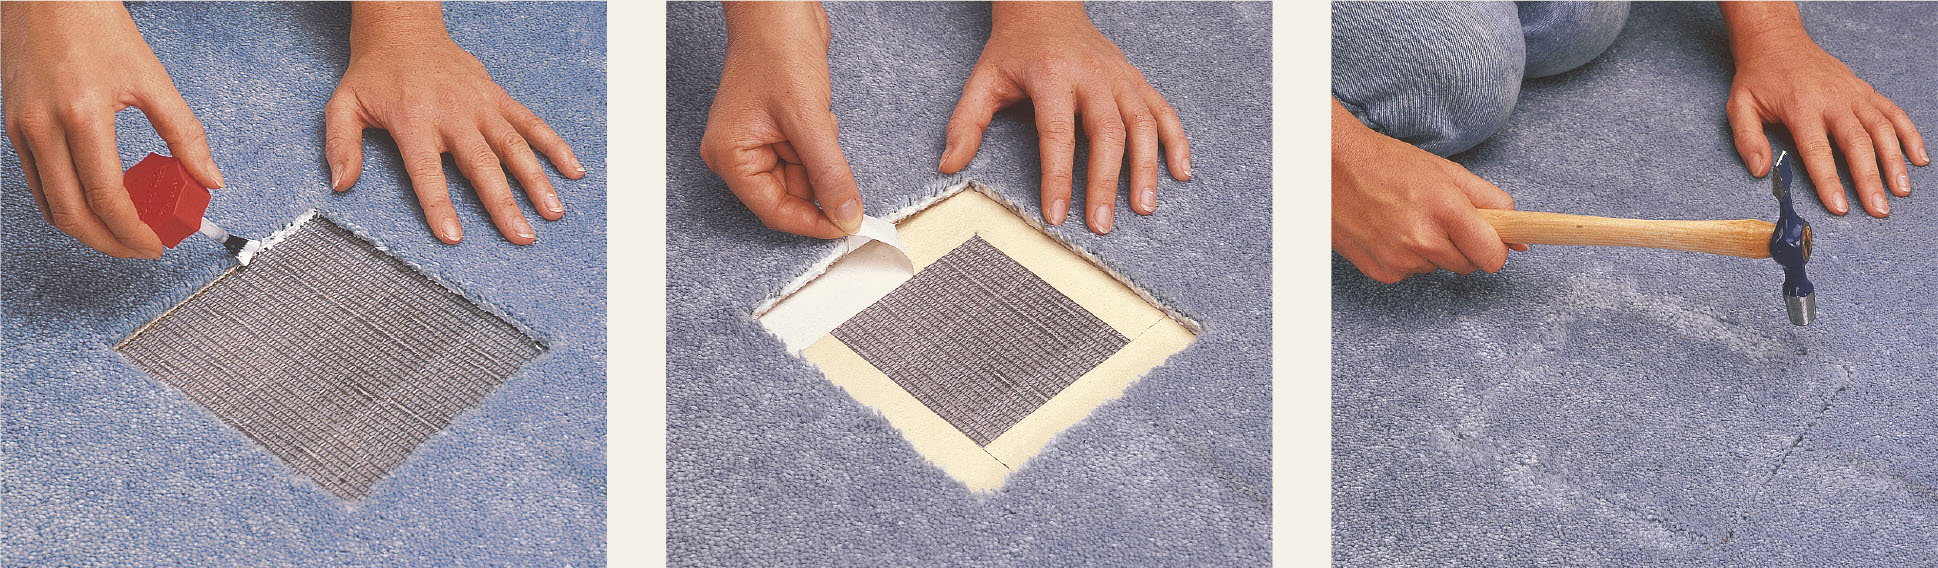
- 1 Using the trimming knife, cut a square patch slightly larger than the damaged area. Use the ruler to keep the edges neat. Lay the patch over the burnt area, making sure that the pile of both runs in the same direction. Run your hand over the carpet—the smoothest direction is the run of the pile. Hold the patch down firmly with the ruler and cut in a straight line through both the patch and the carpet beneath with the knife.
- 2 Lift out and remove the damaged piece of carpet, revealing the floor underneath. Squeeze carpet adhesive around the edges of the hole, no more than halfway up the pile of the carpet (see below, left). Do the same along the edges of the patch for maximum adhesion.
- 3 Lay down a rectangle of double-sided tape under the edges of the hole so that half of the tape width is under the carpet and half protrudes into the hole (see below, center). Peel the backing off the tape and press the carpet down firmly.
- 4 Place the patch in position and press down firmly to stick the patch to the protruding tape. Finally, tap lightly round the join with the hammer to secure the patch (see below, right).
Furniture has left dents in my carpet
Iron out the problem and make the room look great
The pressure of heavy furniture will leave long-lasting dents in carpets that become glaringly obvious when you rearrange the room. For a quick fix, try putting an ice cube on the indentation. Allow it to melt and dry. If the dent is more stubborn, try the following:
- • Plug in your steam iron near the dent, setting it to a medium heat. Dampen a clean cotton rag with water and place it over the dent.
- • Lightly run the iron over the dent; the fibers should spring back up.
- • Allow the carpet to dry fully, then run over the edges of the dent with the side of a coin to fluff up the final reluctant fibers.

ALWAYS TEST YOUR CLEANING SOLUTION ON AN INCONSPICUOUS AREA OF CARPET BEFORE USING IT ON THE STAIN
My rug slips on the wooden floor
Make it safe with an old inner tube
A sliding rug can be a real hazard. A quick and temporary way to stop it moving across the floor is to spray the underside of the rug with hair spray. For a more permanent fix, try the following:
- • Cut an old bicycle inner tube lengthways and flatten it out. Use a rubber-based adhesive to glue the rubber strips to the edges of the rug.
- • For the best, if not the cheapest, solution, buy a roll of rubber mesh from a carpet store, cut this to the size of your rug and place it between the rug and the hard floor. The mesh provides a little space between the floor and the rug, allowing it to “breathe.”
The rug looks faded and lifeless
Restore it with salt treatment
If your rug has started to look past its best, you can refresh it with a salt wash.
- • First, thoroughly vacuum the rug.
- • Test the process on a corner of the rug to ensure color fastness.
- • Stir around 1 cup of table salt into a gallon of warm water.
- • Wet a microfiber cloth in the concentrated salt solution. Wring out the cloth—it should be damp, not dripping.
- • Rub the rug vigorously with the damp cloth; allow it to dry thoroughly and vacuum it once more to remove any salt crystals.
The floorboards squeak
Get some peace with powder and a brush
Noisy boards are easy to silence—when you can get at them. If they are covered by carpet or other flooring materials, don’t risk putting a nail or screw through “blindly” as you could hit a water pipe or an electrical cable. Once the carpet is out of the way:
- • Walk slowly over the floor to locate the source of the squeak. Sprinkle talcum powder between the floorboards in the squeaky area; this will help boards move past one another silently.
- • Boards will squeak if they are not fixed firmly to the supporting joists. Find the loose board and try hammering the nail back into the joist. Use a nail punch to help you to drive the nail below the surface of the board. If it will not hold, drive a new nail into an adjacent area of wood.
I’ve scratched my wooden floor
Disguise the damage
Wooden floors are usually protected by layers of wax or a coat of tough polyurethane varnish. Waxed floors are especially vulnerable to scuffs, scratches, and staining.
- • Polish out light scuff marks with a damp cloth, then apply a little shoe polish in a matching shade to disguise them even further.
- • Rub over a deeper scratch with the edge of a penny—this will soften the hard sides of the gouge enough to make it less noticeable.
- • Choose a marker or felt-tipped pen in a color that matches your floor, and color in the exposed wood left by a deep scratch.
- • Wood floors can be dented by stiletto heels or by dropped objects. If your floor is untreated or waxed, try dampening a microfiber cloth and leave it over the dent for a few hours—this may plump up the wood fibers and level the surface.
There’s a stain on the wooden floor
Use some abrasive to remove the marks
Most stains and heat marks on waxed wooden floors can be removed by rubbing the surface with fine steel wool or sandpaper (for deeper stains) and then feathering in wax to finish.
- • If the stains are dark, use a clean cotton cloth to apply some pure white vinegar to the spots after rubbing them with steel. Hold it in place for 5 minutes before sanding again. Allow to dry and reapply wax to finish.