Following are the simple steps to get started:
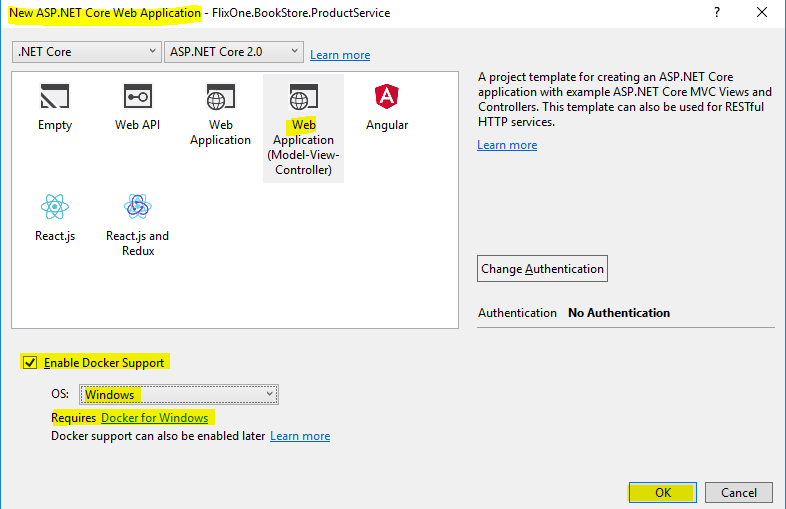
- Create a new project by navigating to File | New Project | .NET Core | select ASP.NET Core Web Application, refer to the following screenshot:

- From the New ASP.NET Core Web Application window, select .NET Core and ASP.NET Core 2.0.
- Select Web Application (Model-View-Controller) from available templates.
- Check Enable Docker support.
- As we are demonstrating it for Windows select OS as Windows (if you did not install Docker as mentioned in the previous section, here you need to install Docker for Windows).
- Click Ok to proceed, refer to the following screenshot:
The preceding steps will create the FlixOne.BookStore.ProductService project with Docker support. Following is the screenshot showing our project structure:

The following files are added to the project:
- Dockerfile: The Dockerfile for ASP.NET Core applications is based on the microsoft/aspnetcore image (https://hub.docker.com/r/microsoft/aspnetcore/). This image includes the ASP.NET Core NuGet packages, which have been prejitted, improving startup performance. When building ASP.NET Core applications, the Dockerfile FROM instruction (command) points to the most recent microsoft/dotnet image (https://hub.docker.com/r/microsoft/dotnet/) on the Docker hub. Following is the default code-snippet provided by the template:
FROM microsoft/aspnetcore:2.0
ARG source
WORKDIR /app
EXPOSE 80
COPY ${source:-obj/Docker/publish} .
ENTRYPOINT ["dotnet", "FlixOne.BookStore.ProductService.dll"]
The preceding code is basically a set of instructions and these instructions are as follows:
FROM tells Docker that to pull the base image on the existing image, call microsoft/aspnetcore:2.0. This image already contains all the dependencies for running the ASP.NET Core on Linux, so we don't have to set it.
COPY and WORKDIR copy the current directory's contents to a new directory inside the called/app container and set it to the working directory for subsequent instructions.
EXPOSE tells Docker to expose the product catalog service on port 80 of the container.
ENTRYPOINT specifies the command to execute when the container starts up. In this case, it's .NET.
- Docker-compose.yml: This is the base Compose file used to define the collection of images to be built and run with Docker-compose build/run.
- Docker-compose.dev.debug.yml: This is an additional Compose file for iterative changes when your configuration is set to debug. Visual Studio will call -f docker-compose.yml and -f docker-compose.dev.debug.yml to merge them. This Compose file is used by Visual Studio development tools.
- Docker-compose.dev.release.yml: This is an additional Compose file to debug your release definition. It will load the debugger in isolation so it does not change the content of the production image.
The docker-compose.yml file contains the name of the image that is created when the project is run.
We now have everything we need to run/launch our service in the Docker container. Before we go further, please refer to Chapter 2, Implementing Microservices, and add the complete code (that is, controller, repositories, and so on) so the project structure looks like the following screenshot:

Now all you have to do is press F5 and launch your service in the container. This is the simplest and easiest way to put your service in the container. Once your microservice is containerized, you can use Visual Studio team services and Azure container services to deploy your container to the Azure cloud (https://docs.microsoft.com/en-us/azure/container-service/dcos-swarm/container-service-deployment).