DEMONSTRATION underpainting with gouache
Many things make gouache (opaque watercolor) an excellent under-painting medium for pastel. It dries to a matte finish, making it particularly compatible with pastel, which also has a matte finish. It produces an opaque cover with a thin coat, so you don’t have to use so much gouache that you fill the tooth of the paper—it leaves plenty of room for layers of pastel. Also, gouache remains water-soluble even after it dries, allowing for easy changes in the early development of a painting.
materials list
White Professional Grade Wallis Sanded Pastel Paper
Nos. 12 and 16 round synthetic watercolor brushes
1 ½-inch flat synthetic watercolor washbrush
gouache opaque watercolors
Ivory black, Burnt Umber, Ultramarine Blue, Green, Red, Yellow, Permanent White
pastel pencils
middle-value gray/cool gray, black, middle-value and dark carmine red, middle-value purple, light gold-ochre, middle-value orange-yellow, middle-value viridian, middle-value orange, dark violet deep, dark caput mortuum, raw umber, burnt sienna
pastels
middle-value bright red, dark carmine red, middle-value scarlet red, middle-value warm pink, dark and light warm gray, middle-value cool gray, light cool gray, light dull pink, light dull orange, dark orange, middle-value chrome yellow, middle-value cadmium yellow deep, light pale yellow, black, dark burnt umber, middle-value Van Dyke brown, middle-value cocoa brown, burnt sienna, middle-value Titian brown, raw sienna, light yellow ochre, very light warm yellow, middle-value warm blue, light warm blue, white

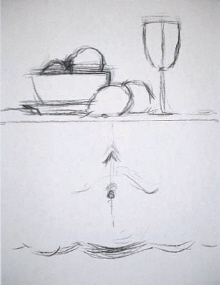
1 Make the Initial Sketch
Use an extra-soft willow vine charcoal stick to draw in the biggest shapes of your subject. Use only as much detail as you need to position the biggest elements of the subject; remember that the sketch will be covered with the underpainting.

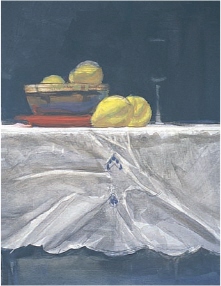
2 Apply the Gouache
Block in the large shapes of the painting with gouache, then the background using a no. 10 flat with Burnt Umber, Ultramarine Blue and a little black. Paint everything else, except for the lightest area (in this case, the tablecloth), with a no. 16 and no. 12 round watercolor synthetic sable brushes. Block in the large shadow area on the tablecloth with the no. 10 wash brush using a diluted mixture of Burnt Umber and Ultramarine Blue. Diluting the gouache with a little water allows you to use it like transparent watercolor. Indicate the wine glass by removing some of the pigment from the background with a small, stiff bristle brush.

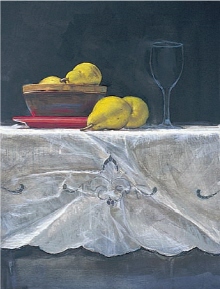
3 Re-draw with a Pastel Pencil
Because the initial drawing has been lost by the application of gouache, it’s helpful to re-draw the subject with a pastel pencil at this stage. If any errors have been made in the gouache application they can be corrected now, and the edges can be refined and the subject clarified with the pastel pencil.
(In this case, the artist drew a line dividing the center of the wine glass in order to make it easier to draw it symmetrically. Then he decided the composition would be better if the wine glass was moved over to the right a little bit.)

4 Add the Pastel
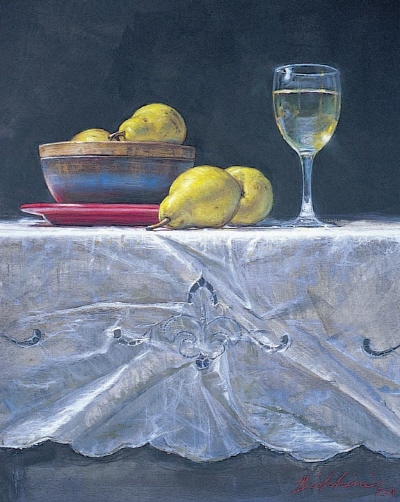
To make the glass and the wine it contains look realistic, build up the values gradually from dark, to middle dark, to middle, to middle light, to light, and then to very light, always paying careful attention to the edges. It is the middle values that make the magic happen—highlights are important, but apply them only after you have put in all of the middle values.

Pears with Pinot Grigio
22" × 18" (56cm × 46cm) by Greg Biolchini
5 Place the Final Touches
As the painting neared completion, the artist felt some of the values in the shadow in front of the tablecloth were a little too bright. He dulled the values of the tablecloth by spraying it with Tuffilm pastel matte fixative spray. He did not spray the whole painting—if he had sprayed the pears or wine glass with fixative, it would have dulled and darkened them too much.
Step back and take a serious look at your painting, and see if there is anything you can put in or take out to improve it. Most adjustments in the final stages will be softening edges, putting in highlights and fine-tuning. At the end of a painting, more thought needs to go into each stroke; these final touches can make or break a design.