DEMONSTRATION painting children from photographs
Because children are not good at holding still, most artists who paint portraits of children use photographic references. The key to success in painting from photos is good reference photos. The better the photography, the better the portrait. It’s best to take the photographs yourself. Your observation of the children as you photograph them will assist you in the subsequent paintings. In some cases it may be possible to make quick sketches from life.
materials list
pastel pencils
French Red Ochre, Payne’s Gray, Caput Mortuum Violet, Burnt Sienna
pastels
brown, cocoa brown, dark burnt umber, middle value burnt umber, light burnt umber, cool middle-value gray-pink, warm light yellow, light pink, middle-value burnt orange, dark cadmium yellow, cordovan, dark cool blue, dark blue-violet, dark warm gray, middle-value warm gray, light warm gray, indigo-blue, dark warm green, middle-value olive green, black, dark gray-red, dark raw sienna, middle-value raw sienna, light raw sienna, dark gold-ochre, middle-value gold-ochre, light gold-ochre, dark yellow ochre, middle-value yellow ochre, light yellow ochre, dark Mars violet, middle-value Mars violet, light Mars violet, dark burnt sienna, middle-value burnt sienna, light burnt sienna, dark red oxide, middle-value red-oxide, light red-oxide, dark cool rose, middle-value cool rose, light cool rose, dark orange-red, middle-value orange-red, light orange-red, dark caput mortuum, middle-range caput mortuum, light caput mortuum, dark gray-green, middle-value gray-green, light gray-green

preparing to sketch
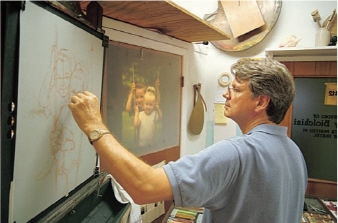
Greg Biolchini sketches his subjects from a slide viewed through the screen in his projection booth. This preliminary drawing stage was done with a light sepia-colored pastel pencil. Note the easel is tilted slightly forward at the top so the pastel falls away from the painting surface rather than streaking it.

1 Draw the Subjects
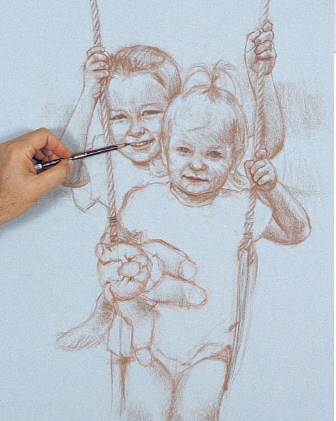
Draw the subjects slightly less than life-size to give them the appearance of being set back into the painting and strengthen the illusion of depth. Measure the children’s heads with calipers to ensure accuracy. Keep in mind that children’s proportions are much different from those of adults. Lightly sketch the initial drawing, but once the placement and shapes are correct, redraw and establish the darks using a slightly darker hard pastel (such as Cocoa Brown), removing any erroneous marks with a kneaded eraser. The girl’s stuffed toy cat was added for balance.
2 Block in the Darkest Values
As you work, it can be helpful to check your drawing with a mirror—it may reveal drawing errors you wouldn’t see otherwise.
Block in the darkest values using the sides of the pastels. Because this paper has very limited tooth, it’s best to stick to harder Nupastels in this first stage.
3 Add Color
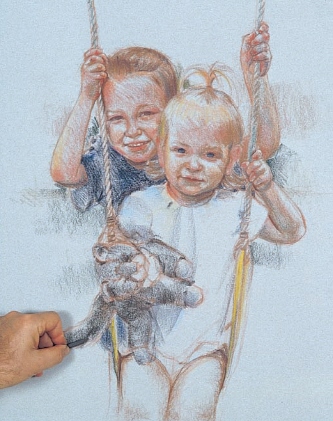
Make color selections by matching them to the colors in the reference slides. Good color selection comes from observation, not from systems, formulas or rules. Work in dark to middle values at this stage.

4 Darken the Color Values
Begin to darken the dark values with slightly softer pastels, including Burnt Umber, Burnt Sienna and Raw Sienna.

5 Develop the Background Color
The impression of background foliage should be built up carefully, using greens and olive green held on their sides for a light touch. Painting the background as the portrait develops keeps the painting a whole, rather than creating a feeling of distinct separation between the background and foreground.
6 Build Up the Lighter Values
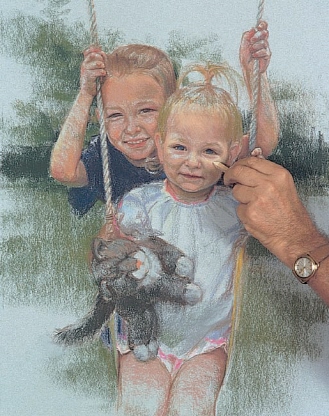
Use very light pressure to preserve the tooth of the paper and build up the lighter values gradually. Look at the reference slide to see where each color appears, placing it throughout the painting as needed. Using each color in more than one area creates harmony.
Use a light pink for the trim on the girl’s blouse. Be careful when selecting cool pinks—some pinks fade in less than six months. Add light to the girl’s face. Lightfastness ratings of each color are available from pastel manufacturers.

7 Add More Color
Use the sides of pastel sticks to make the broader strokes in the little girl’s shirt, the stuffed toy cat and the background.
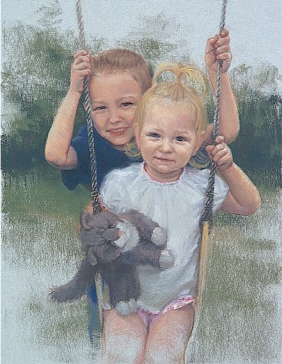
8 Refine the Details
Lay in lighter flesh tones in the girl’s face and hand using peach and other light-colored pastels. Use very light pressure and blend them into the previous middle value layers to continue to produce lighter colors and edges.
The stuffed cat is adjusted with a darker gray pastel. You can use black under another color for a darker shade, but use black with caution. For example, using black in the boy’s blue shirt produces a darker blue when blue is painted over it.
Build up gradually into slightly lighter colors throughout the rest of the portrait, adding a middle-value Yellow Ochre and Raw Sienna in the girl’s blonde hair. The middle-value Yellow Ochre in the light parts of the girl’s hair appears lighter than it really is because of the darker colors around it. Brown is used on the boy’s hair. Fine-tune faces, arms and hands, focusing on middle values.

9 Lighten the Background
Soften the background greens using a gray-green pastel, very nearly the same color as the paper.
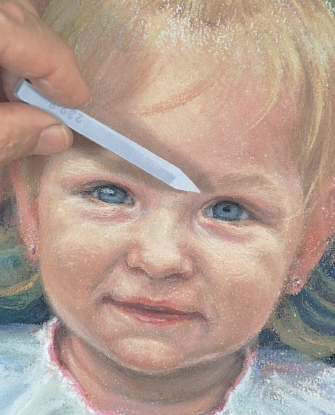
10 Concentrate on the Faces
At this stage you can use sharpened pastels. You can achieve a very fine point on a pastel stick by rubbing the tip of the stick across a medium-grid drywall-sanding screen. The sharpened pastels make it easier to achieve delicate details, which is especially important in rendering children’s facial features.
It is rarely necessary to rub pastel portraits with fingers or stumps, but use the occasional touch of a finger here and there when absolutely necessary, as in the case of this girl’s delicate and subtle features. Refine the faces with peach and other light-colored pastels, using them to layer and blend.
With a sharpened warm, light gray pastel, place highlights in the eyes. Be careful not to make the highlights too large or too light.
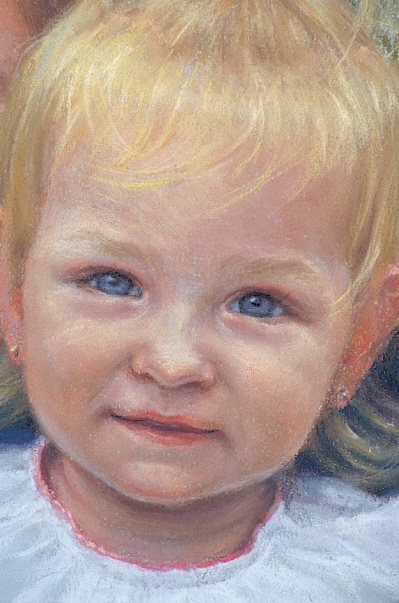
11 Finish the Little Girl’s Face
Soften some of the shadows in the little girl’s face, particularly around her eyes and mouth, by blending the pastel together and softening the edges with a fingertip. Be careful: Too much rubbing and her features could lose definition and become blurred.
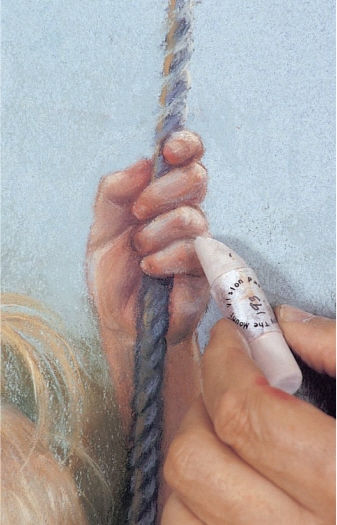
12 Add Details to the Boy’s Hand
For the lightest tones in the little boy’s hands and fingers, use a slightly softer pastel. Using a softer pastel makes it possible to continue layering on more pastel after the paper’s tooth is filled from prior layers. Once the tooth is lost, it’s impossible to continue layering with slightly harder pastels.
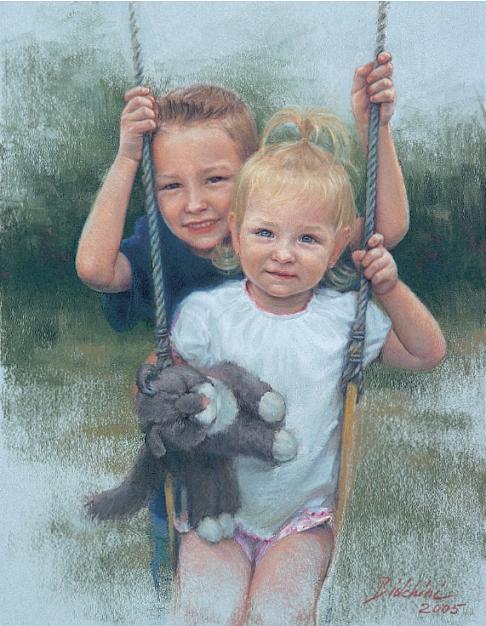
Portrait of Anna and Sean
25 ½" × 19  " (65cm × 50cm) by Greg Biolchini
13 Finish the Portrait
Instead of spraying the finished portrait with fixative, give it a couple of good flicks on the back with a finger to dislodge any loose pastel particles. Fixative dulls and darkens pastel colors, which would detract from such a lively portrait.
With all the finishing touches in place, the artist signed and dated this portrait in the lower right-hand corner. On portraits, the artist includes the date for posterity’s sake.