Cell Service
FINISHED QUILT: 70˝ × 75˝
Designer: Alissa Haight Carlton


This large lap quilt is perfect for cuddling under while on the couch. The bright colors have a strong impact and complement a room with simple, contemporary design. The big panels of fabric that make up this quilt cause it to sew up quickly and easily. Make sure you cut carefully so that the design lines up correctly.
Materials
Based on 42˝ fabric width.
Fabric A (red): 2¾ yards
Fabric B (aqua): 1⅜ yards
Fabric C (ivory): 1⅜ yards for background
Backing: 4¾ yards
Binding: ⅞ yard
Please be sure to read Notes on Yardage and Piecing Large-Scale Quilts. Label the pieces as you cut.
Cutting
Fabric A (red)

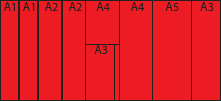
1. Cut 2 strips 7½˝ × WOF and sew them together end to end; trim A1.
2. Cut 2 strips 9½˝ × WOF and sew them together end to end; trim A2.
3. Cut 2 strips 13½˝ × WOF and sew them together end to end; trim A4.
4. Cut 1 strip 15½˝ × WOF; trim A5.
5. Trim the leftover strip from Step 3 to 11½˝ wide.
6. Cut 1 strip 11½˝ × WOF; sew it end to end with the strip from Step 5; trim A3.
A1: 7½˝ × 75½˝
A2: 9½˝ × 68½˝
A3: 11½˝ × 62½˝
A4: 13½˝ × 49½˝
A5: 15½˝ × 39½˝
Fabric B (aqua)

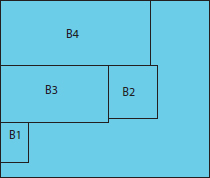
1. Cut 15½˝ from the yardage parallel to the selvage; trim B4.
2. Cut 13½˝ from the yardage parallel to the selvage; trim B3.
3. Cut B2.
4. Cut B1.
B1: 9½˝ × 6½˝
B2: 11½˝ × 12½˝
B3: 13½˝ × 25½˝
B4: 15½˝ × 35½˝
Fabric C (ivory)

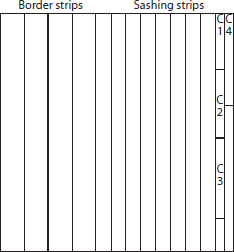
1. Cut 4 strips 4˝ × WOF and sew end to end; trim to 4˝ × 75½˝ for the 2 border strips.
2. Cut 8 strips 2½˝ × WOF and sew in pairs end to end to make 4 sashing strips. Trim to 75½˝ after piecing (see Tip, below).
3. Cut 2 strips 1½˝ × WOF; trim to:
C1: 1½˝ × 9½˝
C2: 1½˝ × 11½˝
C3: 1½˝ × 13½˝
C4: 1½˝ × 15½˝
TIP In general, when piecing long strips, it’s often easier for a too-long piece of fabric to be trimmed down once it has been sewn on. When cutting, think ahead and try to leave strips longer than they need to be if the pattern allows for it. Only trim them down to their perfect length after they are sewn to the pieces of fabric that surround them. This way, you are guaranteed long enough strips, rather than ones that are ¼˝ too short because of small discrepancies in your piecing or cutting. We are humans and not machines—these discrepancies happen but won’t cause problems if you just think ahead in this fashion. There is nothing worse than having to tear out a very long seam because you cut your piece of fabric a bit too short, when you could have just kept it extra long.
The more you piece quilt tops, ideas such as this one will become second nature to you. These ideas are also what make quilting a more relaxing and fun process that doesn’t have to be about being a fussy perfectionist.
Assembling the Quilt Top
Press after each step.
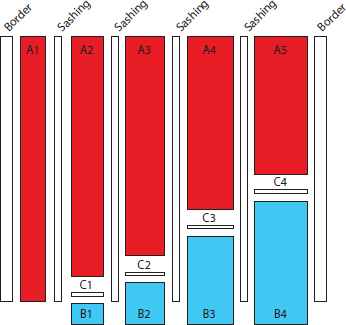
1. Sew A2, C1, and B1 into a long strip.
2. Repeat Step 1 to assemble A3, C2, B2; A4, C3, B3; and A5, C4, B4.
3. Working from left to right, assemble the quilt top.
4. Trim as necessary to square up the quilt top.

Quilt assembly
Notes on Yardage and Piecing Large-Scale Quilts
• When the measurements in a quilt pattern are longer than 42˝ (the standard measurement used as the width of fabric, or WOF), you can sew together pieces of the same fabric to create one larger piece for the quilt top. This creates more seams in your quilt top, but it saves a lot of fabric and money and creates less waste. I also like the rustic and warm touch it gives these otherwise graphic designs.
• Another thing that saves yardage is not being concerned with always keeping the straight grain of the fabric going the same direction. While some quilters might disagree with this idea, it works for me. In all the quilts I have made, I have usually switched the direction of the grain of my fabric, and doing so has never caused a problem for me. The usual argument against this technique is that it changes the drape of the fabric, which is absolutely true for garment sewing. But when quilts are finished they are densely quilted, and quilting affects the drape far more than the direction in which you cut the fabric. Therefore, when it saves fabric, I switch between cutting across the grain or with the grain.
• Lastly, when quilting with solid fabrics, there is no right side or wrong side to the fabric. As a result, when putting together your quilt top, it’s sometimes easy to mistakenly sew to the wrong side of the piecing. Before sewing a seam, be sure to check the already completed seams to be certain that your seam allowances are all on the same side.


Making the Quilt Back
To make an 80˝ × 84˝ quilt back, cut 2 pieces 80˝ × WOF and remove the selvages. Sew the 2 pieces together along the 80˝ edges.
Finishing
Layer, quilt, and bind the quilt.
If you’d like to bind this quilt as I did—with 2 colors switching and matching up with the piecing—make 93½˝ of blue binding and 211½˝ of red binding. Piece the 2 colors together with a straight seam. Usually I sew binding strips together with diagonal seams, but this time I wanted the look of the straight seams suddenly switching the colors.
When attaching the binding, first pin it in place. Work your way around the entire edge of the quilt, lining up the color-change seam with the quilt design. Piece together the ends, again butting them up end to end and making sure you’ve lined up the colors correctly.