
ABBREVIATIONS
beg = beginning
BO = bind off
CC = contrasting color
ch = crochet chain
CO = cast on
dec = decrease
DK = double knitting weight yarn
DPN(s) = double-pointed needle(s)
EOR = end of row
g st = garter stitch
inc = increase
k = knit
k2tog = knit 2 stitches together
k3tog = knit 3 stitches together
kf&b = knit 1 stitch in front, then in back
k-wise = knit-wise, as if being knit
M1 = make 1 stitch
MC = main color
p = purl
p2tog = purl 2 stitches together
pm = place marker
psso = pass next stitch over
p-wise = purl-wise, as if being purled
rnd = round
RS = right side
sc = single crochet
sl = slip a stitch
sm = slip marker
ssk = slip, slip, knit decrease
st(s) = stitch(es)
St st = Stockinette stitch
tog = together
w&t = wrap and turn
WS = wrong side
yb = yarn in back
yf = yarn in front
yo = yarn over (wrap yarn around right needle)
BAR INCREASE OR MAKE ONE (M1)
Note: The bar increase is sometimes listed in a pattern as M1, for make 1.

1. Insert the tip of the right needle under the horizontal bar that runs between the two stitches on your needles.

2. Slip the bar onto the left needle and knit through the back loop. This creates a brand-new stitch from between the previous two stitches.
BIND OFF (BO)
Here are a couple different ways: Basic Bind Off and Three-Needle Bind Off.
Basic Bind Off
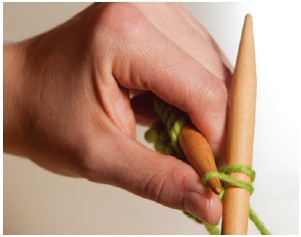
1. Knit one stitch.
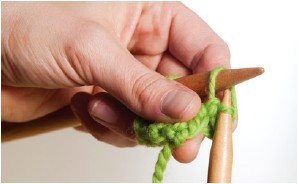
2. Knit another stitch.
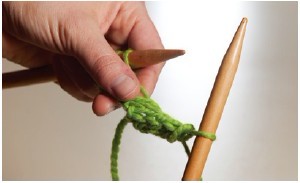
3. Pass the first knit stitch over the second. (My grandmother used to tell me to visualize playing leap frog!)
4. Repeat Steps 2 and 3 until all stitches are off the needle.
This is a great bind off that seams and binds off your finished work at the same time.
1. With both RS facing, insert the tip of a third needle into the first stitch of the right-hand needle, then into the first stitch of the left-hand needle.
2. Knit these two stitches together.
3. Knit the first stitch from each needle together. Pass the previous stitch over this stitch.
Repeat Step 3 until all stitches are off the needles.
Blocking is the final step in your knitting. After felting, it helps determine the size and shape of your finished item. For other knit items, it smoothes out irregularities, can soften a stiff or coarse yarn, and can even allow you to reshape your item. Every yarn is different, so refer to the handling instructions on your yarn for blocking care and instructions.
STEAM BLOCKING
1. Lay out your knitting on a surface suitable for pressing, such as a blocking mat. Place WS up and pin into shape.
2. Steam the fabric by hovering a steam iron above the surface, but do not let the iron touch the knitting. Work in sections, saturating each section with steam before moving on to the next section. (Note: Don’t steam block any yarn that might not be colorfast. If in doubt, steam block your fabric swatch first.)
3. Let dry.
WET BLOCKING
1. Soak your knitting in a sink full of lukewarm water until fully saturated.
2. Gently squeeze and press out as much water as possible, being careful not to wring or twist the fabric. Wrap the knitting in a bath towel and let it sit to absorb more water.
3. Lay the knitting out on a dry towel. Pin and shape as needed, then leave it out to dry completely. If the finished item is heavy, such as a sweater, it’s best to flip the item over halfway through the drying process.
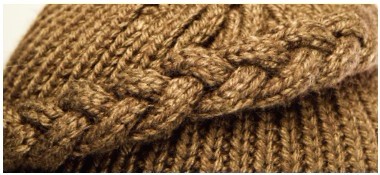
CABLE STITCH
The cable stitch is a fun, easy way to incorporate cool twists, textures, and patterns into your work. When you cable stitch, you are essentially crossing one stitch over the other. Each pattern will determine how many stitches your cable needs. For example: C6F translates to your finished cable being 6 stitches wide, and twisting by holding your cable needle in the front.

1. Slip 3 stitches to your cable needle, and hold in the front.

2. Knit the next 3 stitches from your left hand needle.
3. Knit the stitches from your cable needle. Combined with the rest of your pattern, this will give you a cable running through your work.
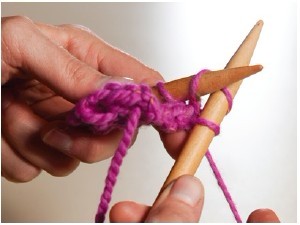
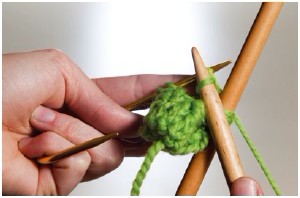
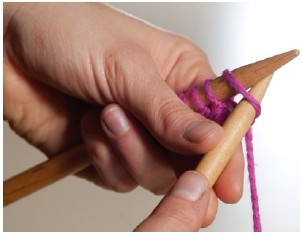
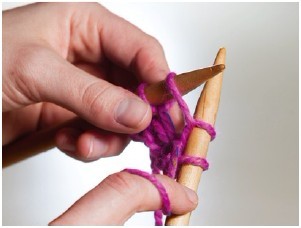
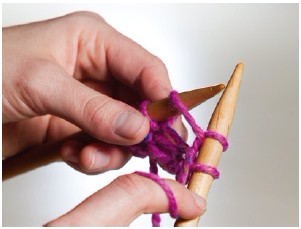
CAST ON (CO)
There are many ways to cast on! Here are the four that I use the most:
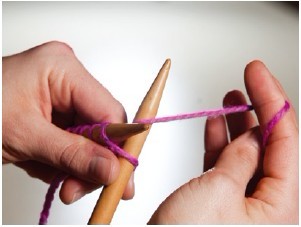
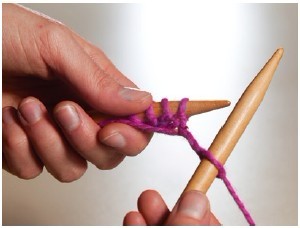
Long Tail Cast On

1. Make a slip knot in your yarn, leaving an appropriate length tail. (Hint: If you need to cast on 70 stitches, wrap your yarn 70 times around your needle, then make your slip knot. This gives you the correct tail length.). Insert the thumb and forefinger of your left hand between the strands of yarn with the working end around your forefinger and the tail end around your thumb. Lay your hand flat, so the yarn is flush with the palm of your hand.


2. Insert the tip of the right needle into the loop on your thumb, point the tip up, and pull down through the loop on your forefinger, then draw up a loop with the needle. Remove your thumb and pull the working yarn to tighten the stitch slightly on the needle.

3. Repeat until you have the desired number of stitches on your right-hand needle.
Cable Cast On
1. Make a slip knot. Knit into your slip knot, leaving the stitch on the left-hand needle. Place the new stitch onto the left needle by slipping it knit-wise.
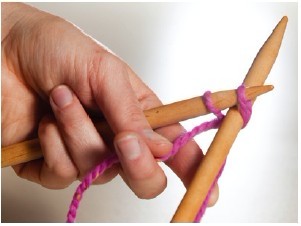
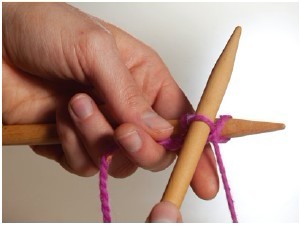


2. Knit into the gap between the last two stitches on the left needle. Slip the knit stitch onto the left-hand needle by slipping it knit-wise.
Provisional Cast On
This cast on leaves live stitches on your edge. It’s perfect if you want to go back, pick up stitches on an edge, and continue knitting (such as in the Light of Eärendil Shrug on page 17). You will need your working yarn, as well as some waste yarn.
1. Make a slip knot with both the working yarn and the waste yarn, and place them on your needle.
2. With both working yarn and waste yarn, prepare for the long tail cast on. When setting up for your loops, put the working yarn around your index finger, and the waste yarn around your thumb.
3. Work your cast on as you normally would with the long tail cast on method. The waste yarn will form what looks like a crochet chain underneath your working yarn. If you end up with a waste yarn loop on your needle, pull it off! You’ve made a mistake and need to work that stitch again.
4. Begin working your stitches as called for in the pattern.
5. When it’s time to work with these stitches again, very carefully unravel your waste yarn, and place them on your needle.
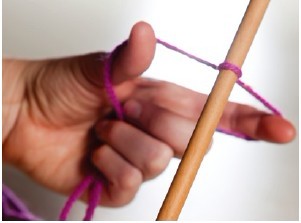
Backward Loop Cast On
Note: This is the perfect cast on for when you need to add stitches in the middle of a project, such as making a buttonhole.

1. Wrap the working yarn counterclockwise around your left thumb.
2. Insert the right hand needle into the loop on your thumb. Remove your thumb and pull the yarn to tighten it onto the needle (but not too tightly!). Repeat the last two steps until you have the required number of stitches cast onto your needle.
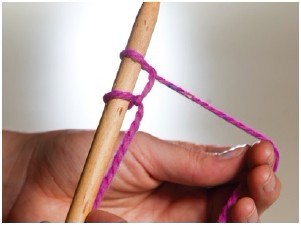
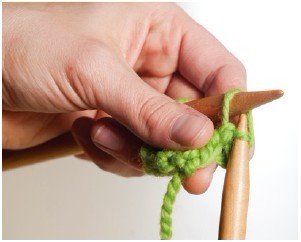
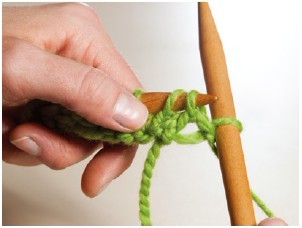
CROCHET CHAIN (ch)
1. Make a slip knot and place it on your crochet hook.
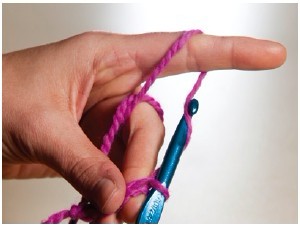
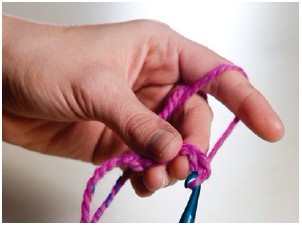
2. Bring your yarn over the hook, drawing the yarn over through the loop on the hook. Repeat until you achieve your desired number of stitches.
Felting is fun and easy. You can felt with any animal fiber, but not cotton or acrylic. There are a couple of ways to do this.
Washing Machine Method:
Put your knit item into a fabric bag or zippered pillowcase. Set your washing machine on hot, and throw it in the machine with another item to help with the agitation. (I have a pair of old jeans I keep around specifically to felt with.) Check your item periodically to make sure it’s not shrinking too much. If it comes out a little too small, don’t worry! It can usually be stretched and blocked back to size.
Hand Felting:
Don’t have a washing machine handy? You can still felt! In your bathtub or kitchen sink, soak the item in hot water with a little bit of dish soap. You’ll want to agitate the item, but it’s best to use a tool for that, since you don’t want to burn your hands! I find that a small sink plunger works great. Once your knit item is the correct size, run it under cold water to rinse and block.
Fringe is fun and easy to make! You need a crochet hook, a piece of cardboard, and a pair of scissors.
Making Fringe
1. Cut your cardboard into a square in the size determined by your pattern. For example, if your pattern calls for 6-inch (15 cm) fringe, you want your cardboard to be a 6-inch (15 cm) square.
2. Wrap yarn around the cardboard to your desired fringe thickness.
3. Cut the all the strands of yarn on one side only of the cardboard.
Attaching Fringe
1. Use a crochet hook to pull the fringe through the edge of your fabric, in between stitches.
2. Line up the fringe so that the ends are even on both sides.
3. Tie a knot in the fringe at the fabric edge.
GARTER STITCH (g st)
The garter stitch is created simply by knitting every single row. Both the front and the back of the finished work will look the same.

I-CORD
Also called the “idiot cord” thanks to its creator Elizabeth Zimmerman, this knitting technique is the perfect example of a knitting mistake gone awesome! The I-cord is great for decorative edging or purse straps.
1. Cast on the number of stitches called for in the pattern onto one double pointed needle.
2. Knit those stitches; then instead of turning your work, slide the stitches to the end of the needle.
3. Place the needle in your left hand, and knit. It will feel a little awkward at first, since the yarn you are knitting is coming from the far side of the needle, instead of the side closest to you.
Repeat until the I-cord is the desired length.
KITCHENER STITCH
The Kitchener stitch is a great way to close an opening, such as the toe of a sock. Working in live stitches on your needles, you need an even number of stitches for this one to work!
1. Bring the yarn through the first front stitch purl-wise and leave the stitch on the tapestry needle.
2. Bring the yarn through the first back stitch knit-wise and leave the stitch on the needle.
3. Bring the yarn through the first front stitch knit-wise and slip the stitch off the needle.
4. Bring the yarn through the next front stitch purl-wise and leave the stitch on the needle.
5. Bring the yarn through the first back stitch purl-wise and slip the stitch off the needle.
6. Bring the yarn through the next back stitch knit-wise and leave the stitch on the needle.
Repeat Steps 3 through 6.
KNIT STITCH (K)
1. Place the needle with your cast on stitches in your left hand and your empty needle in your right hand.
2. Hold the working yarn to the back of your work. Slip the tip of your right-hand needle front to back, into the first loop on the left-hand needle.
3. With the needle in position, carry the working yarn over the right-hand needle, counterclockwise around the needle and in between both needles.

4. Slide the right-hand needle down, with the loop close to the tip of the needle (but don’t let the loop fall off!). With the tip of the needle close to the edge of the left needle, push the right-hand needle in front of the left-hand needle.

5. Slide the right-hand needle up. Let the first loop on the left-hand needle slide off.
KNIT 2 TOGETHER DECREASE / PURL 2 TOGETHER (k2tog/p2tog)
Knit 2 Together
This is a really simple decrease that will slope to the right (as opposed to ssk, which will slope to the left). Simply knit two stitches together as one and you will have your k2tog decrease!
Purl 2 Together
As with k2tog, purl two stitches together as one for a right-sloping decrease.
KNIT FRONT AND BACK INCREASE (Kf&b)
1. Knit into the front of the stitch in the normal manner, then before removing the stitch from the needle, knit again into the back loop of the stitch.
2. Slip the stitch off the needle.
PASS SLIPPED STITCH OVER (psso)
1. Pass the slipped stitch onto the right-hand needle over the next stitch, as if to bind off.
PICKING UP STITCHES
On a horizontal edge, such as the top of a shoulder seam:
1. With RS facing, insert the right needle from front to back into the center of the first full stitch below the edge of the work.
2. Wrap the yarn around the needle and pull the loop through to create the new stitch.
3. Work Steps 1 and 2 for each stitch.
For a vertical edge:
1. With RS facing, insert the needle from front to back into the space between the first two stitches of your row.
2. Wrap the yarn around the needle and pull the loop through to create the new stitch.
3. Repeat Steps 1 and 2 for each stitch.
Hint: If you’re having trouble with the stitches falling off the needle, try using a small crochet hook to pick up your stitches. Slide them onto your needle as you create each loop.
1. To make a pom-pom, cut a 2-inch (5 cm) circle from a piece of cardboard. Cut a smaller circle in the center, about 1/2-inch (1 cm) in diameter. Your circle should look like a donut.
2. Thread your yarn through the hole in the circle, then wrap it around the outer circle over and over until you can’t see cardboard at all. The yarn should be nice and thick! The thicker your yarn, the more your pom-pom will pop.
When finished, cut around the outer edge of the yarn, then tie the middle of the pom-pom with a 6-inch (15 cm) piece of yarn. Use the longer thread of yarn to tie the pom-pom to your fabric.
PURL STITCH (P)

1. Hold the working yarn to the front of your work and insert the needle from back to front though the first loop on the left-hand needle.

2. Bring the working yarn top to bottom over the right-hand needle.
3. Pull the loop on the right-hand needle out through the stitch on the left needle.
4. Slip the stitch off the left-hand needle.
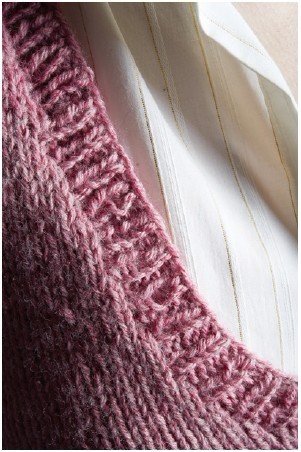
RIB STITCH
The rib stitch alternates knitting and purling stitches. The rib stitch can work in many different combinations, such as a 1 x 1 rib, 2 x 2 rib, 3 x 3 rib, etc., as long as you always end on the purl stitches in your sequence. For example, in a 2 x 2 rib, you knit two stitches, then purl two stitches, and so on, ending on a purl 2. For each subsequent row, you use the same alternating pattern. The rib stitch creates a nice stretchy fabric that is ribbed on both sides. It’s perfect for hats, hems on sweaters, or anywhere you want a little stretch.
Seed Stitch:
Seed Stitch creates another stretchy fabric. It’s easy to do, and it’s created by alternating ribs and purls. For example:
Row 1: (Knit 1, p1) to end.
Row 2: (Purl 1, k1) to end.
Repeating those two rows will create the seed stitch!
SEAMING
There are lots of ways to seam, and depending on your finished item, some will look better than others.
Mattress Stitch:
The mattress stitch is best used for creating invisible seams in side-to-side Stockinette stitch. (Example: Seaming the front and back of a sweater together.)

1. With a threaded tapestry needle and RS of the pieces to be joined facing up and laid parallel to each other, insert the needle into the first stitch on the right-hand side. Scoop the bar in between the “v” of your stitch. Repeat this on the left hand side of your work.

2. Continue in this manner on every seam, working loosely. Pull taut every inch (3 cm) or so.
Backstitch:
The backstitch seam is very strong and durable, but will form a ridge. It’s a good seam for bags, or if you want to hide two less-than-perfect edges.
1. With a threaded tapestry needle and RS of the pieces to be joined facing each other, pin the corners together, matching the pieces up as closely as possible.
2. Secure the seam by taking the needle, front to back, twice around the edges of fabric.
3. Take the yarn around the outside edge once more, this time inserting the needle through the work from back to front, a little ahead of where the yarn last came out.
4. Insert the needle from front to back where the last stitch began, then bring the needle back through the front, maintaining the same distance between stitches.
5. Repeat steps 3 and 4 along the entire seam. Secure the end with two overlapping stitches.
Whipstitch:
This isn’t exactly a pretty stitch, but it’s fine to use on sections that won’t be visible. It’s also fun to incorporate into a finished design, such as using a contrasting yarn color to seam a pillow.

1. Place the pieces to be seamed together with edges lined up. Insert a threaded tapestry needle into the edge of the work from back to front and pull through.
Repeat at ¼-inch (½-cm) intervals along the entire seam.
SINGLE CROCHET (sc)
This stitch can be worked either off the crochet chain or off of a knit edge.
For working off the crochet chain:
1. Insert hook into the second loop of the crochet chain. Bring yarn over the hook front through back, and pull hook back through loop (you now have two loops on your hook).
2. Bring the yarn over your hook, again back to front, and pull through both loops on the hook.
3. Repeat steps 1 and 2 for the entire row.
To work the single crochet on a knit edge, work steps 1 and 2, but there is no need to skip the first stitch in the row.
SLIP, SLIP, KNIT DECREASE (ssk)
This decrease creates a left slant in your finished item.

1. Slip 2 stitches knit-wise, one at a time, from the left-hand needle to the right-hand needle.

2. Insert the left needle into the front of both slipped stitches and knit them together.
SLIP, SLIP, PURL DECREASE (ssp)
1. Slip 2 stitches knit-wise, one at a time, from the left-hand needle to the right-hand needle.
2. Slip both stitches back to the left needle.
3. Purl both stitches together through the back loop.
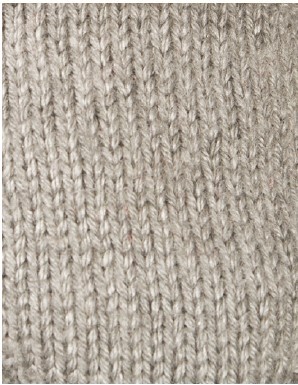
STOCKINETTE (OR STOCKING) STITCH (St st)
Unlike the garter stitch or rib stitch, the Stockinette stitch always has a front side and a back side. It’s created by knitting one row, then purling the next row. The front will almost always be your knit side, and the back your purl side.
WEAVING IN ENDS
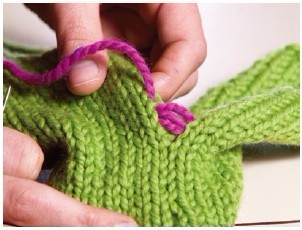
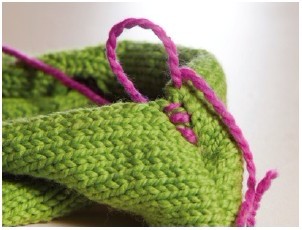
There is really no right way or wrong way to weave, as long as your finished work is secure and the woven threads do not show.It’s best to experiment to find out what works for you. Note: If you don’t have a tapestry needle, a crochet hook can work just as well.

1. Thread tail to be woven through tapestry needle.
2. Weave on wrong side of work, horizontally, making sure to stretch fabric occasionally so it does not gather. Take care to alternate the direction you insert your needle.