Sirsasana Headstand has been called the king of asana, and its benefits are indeed innumerable: calming to the nervous system, nourishing to the brain cells, stimulating to the heart and circulation, balancing to the hormonal and digestive systems, and strengthening to the spirit.
1 In this classic yoga posture, the weight of the body rests on the head and arms. Since your head weighs about 9 pounds (4 kilograms) and your body considerably more, proper alignment and preparation are essential. Place a folded blanket or yoga mat in front of you. Kneel in front of your blanket. Place your forearms on the blanket, with your elbows no wider than your shoulders and form a triangle by interlacing your fingers. If you are using a wall as a safeguard from falling in the beginning, the knuckles should be 2–3 inches (6–8 centimeters) away from it.

2 When performing Headstand, it is important to lift well up from elbows to shoulders. Practice your lift by pressing down through the elbows and moving the shoulders up toward the hips. Close the gap between the floor and the edge of your wrists. These movements should increase the distance between the shoulders and the ears and lift the head away from the floor. If you can’t lift your head, you are not ready for Headstand and need to do some preparatory work to build flexibility and strength first.

3 Place the crown of the head between the wrists, with the back of the head resting against the hands. For the correct alignment in the neck, the very top of the head (not in front of or behind this area) must be in contact with the floor.

4 Tuck your toes under and straighten your knees so you are in an inverted “V” shape. Walk your feet toward the head, gradually bringing the weight of the body onto the head.
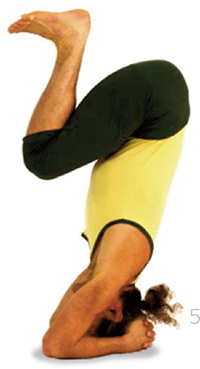
5 When the feet are as close to the head as possible, lift them off the floor (one by one, or with control, together) and slowly bring the heels to the buttocks. Ground down well through the elbows and sides of the wrists. From this steady foundation, reestablish your lift upward to reduce the weight on the head and neck.
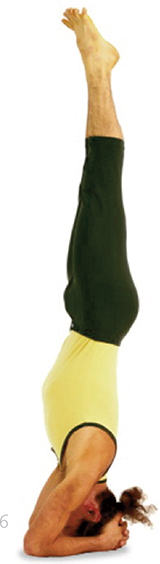
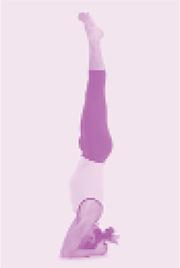
6 Once the feet are lifted, straighten the legs and stretch the heels upward. Again, press the elbows down and lift up the shoulders. If you are near a wall, it should only be used as a safeguard and not to hold you up. Your floating ribs must not jut out. If they do, lengthen the back of the waist and tighten the abdomen to draw them in. Later you can learn to lift up with both legs straight. In any case, keep the feet together and, most importantly, do not kick up but lift up slowly, with control.
7 In the beginning stay for five breaths. Slowly build up your holding time over many months to ten minutes or more. Come down by reversing the steps you took to go up, and rest in Child Pose (page 100) for a few breaths afterward.
GAZE Tip of nose.
BUILD-UP POSES Hare Pose, Downward Facing Dog Pose, Elbow Balance.
COUNTER POSES Practice Child Pose for a few moments after coming down, Shoulderstand, Neck Releases.
LIGHTEN Get help from an experienced teacher.
EFFECT Balancing.