Example 6. Oracle procedure return_hiredate
CREATE OR REPLACE PROCEDURE return_hiredate (pfirstname IN VARCHAR2, plastname IN VARCHAR2, pHiredate OUT DATE) IS lv_hiredate DATE;
BEGIN SELECT hiredate INTO lv_hiredate FROM instructors WHERE lastname = plastname AND firstname = pfirstname;
pHiredate:= lv_hiredate;
RETURN; END return_hiredate;
Call return_hiredate procedure with PHP
<?php
$query6=“BEGIN return_hiredate (:firstname,:lastname,:hiredate);
end;”;
$firstname=‘john’;
$lastname=‘smith’;
$hiredate=“”;
$stmt6=oci_parse ($myconn, $query6);
oci_bind_by_name ($stmt6,”: hiredate”, $hiredate,20);
oci_bind_by_name ($stmt6, ":lastname”, $lastname);
oci_bind_by_name ($stmt6,”: firstname”, $firstname);
$er6=oci_execute ($stmt6);
if (!$er6)
{
$e = oci_error ($stmt6); echo $e [‘message’];
}
$ret6=oci_commit ($myconn);
echo “Hire date=”. $hiredate.”<br>”;
}
?>
Example 7. Oracle procedure delete_instructor
CREATE OR REPLACE PROCEDURE delete_instructor (plastname IN OUT VARCHAR2, pfirstname IN VARCHAR2) IS lv_lastname VARCHAR2 (20);
BEGIN DELETE FROM instructors WHERE lastname=plastname AND firstname=pfirstname returning lastname INTO lv_lastname; plastname:=lv_lastname; RETURN; END delete_instructor;
Call delete_instructor procedure with PHP
<?php
$sql7=“BEGIN delete_instructor (:last_name,:first_name);
end;”;
$istmt7 = oci_parse ($myconn, $sql7); $last_name=“Barry’;
$first_name=“John’;
oci_bind_by_name ($istmt7, ":last_name”, $last_name);
oci_bind_by_name ($istmt7, ":first_name”, $first_name);
$er7=oci_execute ($istmt7);
if (!$er7) {
$e = oci_error ($stmt7);
echo $e [‘message’];
}
$ret7=oci_commit ($myconn);
echo “last name=”. $last_name.”<br>”;
?>
Example 8. Oracle procedure get_instructors
This procedure returns a cursor that can hold multiple records and fields.
CREATE OR REPLACE PROCEDURE get_instructors (plastname IN VARCHAR2, mycurs OUT SYS_REFCURSOR) IS
BEGIN OPEN mycurs FOR SELECT lastname, firstname, email, phone, hiredate, rate, street, city, STATE, zip FROM instructors WHERE lastname=plastname; END get_instructors;
Call get_instructors procedure with PHP
<?php ………
$curs = oci_new_cursor ($myconn); $lastname=“Willams”;
$query8=“BEGIN get_instructors (:lastname,:curs);
end;”;
$stmt8 = oci_parse ($myconn, $query8);
oci_bind_by_name ($stmt8, ":lastname”, $lastname); oci_bind_by_name ($stmt8, ":curs”, $curs, -1,
OCI_B_CURSOR);
oci_execute ($stmt8);
oci_execute ($curs);
echo “Instructors Records: <br>”;
while ($row = oci_fetch_array ($curs, OCI_NUM)) {$last_name=$row [0];
$first_name=$row [1];
$email=$row [2];
$phone=$row [3];
$hiredate=$row [4];
$rate=$row [5];
$street=$row [6];
$city=$row [7];
$state=$row [8];
$zip=$row [9];
echo $last_name.””. $first_name.””. $email.””. $phone.””. $hiredate.””. $rate.””. $street.””. $city.””. $state.””. $zip.”<br>';} oci_free_statement ($stmt8);
oci_free_statement ($curs);
oci_close ($myconn);
?>
Example 9. Oracle procedure delete_instructor2
CREATE OR REPLACE FUNCTION delete_instructor2 (plastname IN VARCHAR) RETURN SYS_REFCURSOR AS my_cursor SYS_REFCURSOR;
BEGIN OPEN my_cursor FOR SELECT * FROM instructors WHERE lastname=plastname; DELETE FROM instructors WHERE lastname=plastname; RETURN my_cursor;
END delete_instructor2;
Call delete_instructor2 function with PHP
<?php
$p_curs = oci_new_cursor ($myconn); $lastname=“Tom”;
$query9=“BEGIN: curs:= delete_instructor2 (:lastname); end;”;
$stmt9 = oci_parse ($myconn, $query9);
oci_bind_by_name ($stmt9, ":lastname”, $lastname); oci_bind_by_name ($stmt9, ':curs’, $p_curs, -1, OCI_B_CURSOR);
// Execute Statement
oci_execute ($stmt9);
oci_execute ($p_curs, OCI_DEFAULT);
echo “Deleted Records: <br>”;
while ($row = oci_fetch_array ($p_curs, OCI_NUM)) {$last_name=$row [0];
$first_name=$row [1];
$email=$row [2];
$phone=$row [3];
$hiredate=$row [4];
$rate=$row [5];
$street=$row [6];
$city=$row [7];
$state=$row [8];
$zip=$row [9];
echo $last_name.””. $first_name.””. $email.””. $phone.””. $hiredate.””. $rate.””. $street.””. $city.””. $state.””. $zip.”<br>”;
}
oci_commit ($myconn);
oci_free_statement ($stmt9);
oci_free_statement ($p_curs);
oci_close ($myconn);
Appendix 1: Installation of Apache and PHP
Download Apache 2.2.22 web server for Windows from http://httpd.apache.org
Be certain to select binaries for Windows and not a source code. There are two kinds of files to choose from, one with openssl and one with no-ssl. Select the one having no-ssl, download and save it to your desktop, and click to start it running. The Open File-security Warning dialog is opened. Click the Run button.
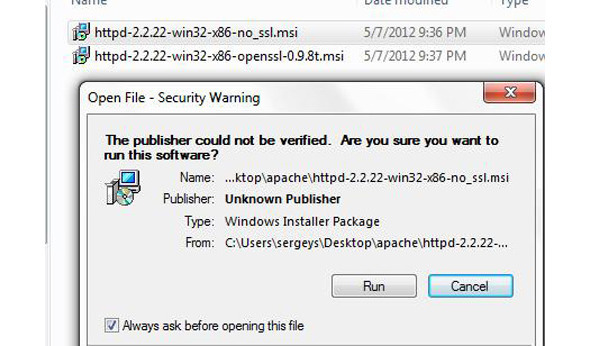
Figure 28. Apache installation.
On the next window enter your server information.
Click the Next button.
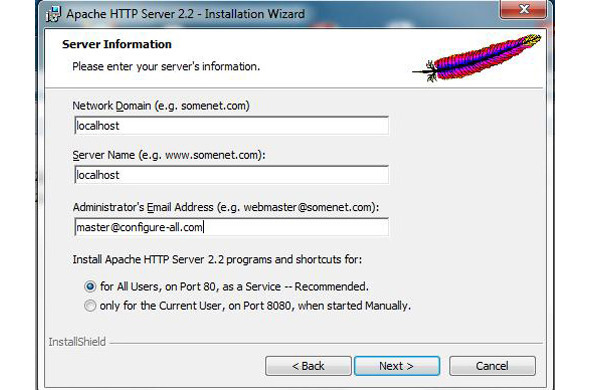
Figure 29. the server information input.
The Typical option in the Select Type window is selected by default. This is OK. Click the Next button.

Figure 30. Selecting the installation type.
It is very important that you change the destination folder to C:\Apache2.2.

Figure 30. Changing the location.
Click the Next button and the Finish installation window is displayed. Click the Finish button and you’re done. If it asks permission to restart your computer, please allow.
Open any browser and type the address http://localhost and hit enter. The It Works text is displayed in the browser. I recommend that you use the last version of Firefox as your default browser for learning PHP programming.

Figure 31. Running a default webpage on the localhost.
Installation of the PHP on Windows
Download PHP from http://windows.php.net/download
At the time of editing this book, the last PHP version is 7.2.4.
Read “Which version do I choose?” on the download page.
Select the Thread Safe and choose a zip file option.
Save it on your desktop and extract files to the C:\php folder.

Figure 32. The PHP directory after installation
Go to My Computer or Windows Explorer and open the Apache2.2 folder.
Open the conf folder and open the httpd.conf file in notepad, textpad, or in notepad ++.
In the httpd.conf file, find the line beginning with “LoadModulo” and add the following lines of text as follows:
LoadModule php5_module c:/php/php5apache2_2.dll
ScriptAlias /php/ “c:/php/”
AddType application/x-httpd-php. html. phtml
AddType application/x-httpd-php. php4
AddType application/x-httpd-php. php
DirectoryIndex index.html index.html.var index.php
Save the above httpd.conf file.
Open the C:\php folder and php.ini. recommended file in the notepad. Find the following line, and set it to your extension directory:
;Directory in which the loadable extensions (modules) reside.
extension_dir =”. /”
It appears in the following manner on my PC:
extension_dir = “C:\php\ext”
Find the line:
;upload_tmp_dir =
Type the directory to which your user will be permitted to upload files.
On my PC it is the following:
upload_tmp_dir = “c:\Apache2\htdocs\upload”
Uncomment
# php.MySQL. dll
If you want to use a short open php tag like "<?” instead of "<?php” Set “short_open_tag” to On.
short_open_tag = On
By default, it is set to Off in the PHP.INI file. In the event the hosting server does not support the short open tag, it is recommended you use the "<?php” tag.
Make sure that the following extensions are uncommented in the PHP.INI file. By default, they are commented, preceded by a semicolon as in the following:
;extension=php_curl. dll
To uncomment the line, delete leading semicolon.
extension=php_curl. dll
extension=php_gd2.dll
extension=php_gettext. dll
extension=php_imap. dll
extension=php_mbstring. dll
extension=php_mcrypt. dll
extension=php_mysql. dll
extension=php_mysqli. dll
extension=php_pdo. dll
extension=php_pdo_mysql. dll
extension=php_pdo_sqlite. dll
extension=php_xmlrpc. dll
extension=php_zip. dll
Rename the php.ini. dist file to php.ini and copy it to the Windows\system32 directory.
Copy php5ts. dll from “C:\php” to “C:\Apache2.2/bin”.
Create a test directory in C:\Apache2\htdocs directory.
Open notepad and type a php script:
<?php
phpinfo ();
?>
Save file as phpInfo.php in the test directory.
Start the Apache web server from the Windows start up menu.
Open your Internet Explorer and type in the following URL address:
http:/localhost/
If Apache installed and configured correctly, the Apache home page displays.
To test php installation and configuration, type the following URL address in the browser: http:/localhost/test/phpinfo.php and hit enter.
The following page is displayed:
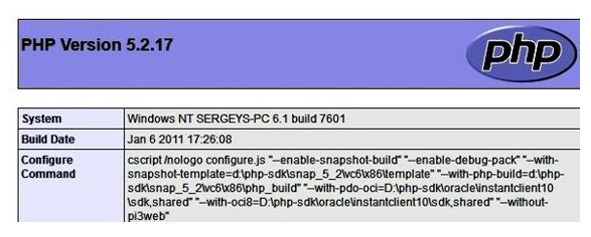
Figure 33. PHP info page.
If the PHP code is displayed in the browser, restart your computer. If the code still appears, reread the instructions to check for what you may have missed.
Each time you modify the PHP.INI file, you must restart Apache so that changes take effect.