Virtual Server Setup
Here wéll learn to configure Apache for virtual server setup.
If yoúve developed several websites on your local PC, it is convenient to create a separate virtual server for each website.
On my PC, Apache is installed in the c:/Apache2.2 directory. Yours may be installed in a different location. Nevertheless, find the conf directory inside the Apache directory and open the httpd.conf file in Notepad. Scroll down to the end of the file and type a directive for a virtual server. Below are two virtual server examples with IP addresś 127.0.0.2 and 127.0.0.3. You can create as many virtual servers as you wish using the following template example:
NameVirtualHost 127.0.0.2
<VirtualHost 127.0.0.2>
<directory /sitea/htdocs>
allow from all
</directory>
ServerAdmin admin@sitea
ServerName 127.0.0.2
DocumentRoot "/sitea/htdocs”
ScriptAlias /cgi-bin/ “sitea/cgi-bin/”
ErrorLog /sitea/error. log
CustomLog /sitea/access. log common
</VirtualHost>
NameVirtualHost 127.0.0.3
<VirtualHost 127.0.0.3>
<directory /siteb/htdocs>
allow from all
</directory>
ServerAdmin admin@siteb
ServerName 127.0.0.3
DocumentRoot "/siteb/htdocs”
ScriptAlias /cgi-bin/ “siteb/cgi-bin/”
ErrorLog /siteb/error. log
CustomLog /siteb/access. log common
</VirtualHost>
I created the sitea/htdocs and siteb/htdocs directories on the C drive and placed an index.html file in each htdocs directory.
For Site A, I typed the following line of html code in the index.html: <h1> Site A </h1>.
In index.html for Site B, I typed in the following line of html code: <h1> Site B </h1> Restart Apache, open browser and type in the URL http://127.0.0.2 and press enter.
The browser displays the text: Site A.
Type http://127.0.0.3 and press enter. The browser displays the text: Site B
You can place a PHP file in each root (htdocs) directory and run it. Now you have the ability to develop two separate websites.
Installation of The XAMPP Server On Windows
XAMPP is an easy to install Apache distribution containing MySQL, PHP, and Perl. Download it from https://sourceforge.net/projects/xampp
Create an xampp folder in the root directory and save executable xampp-win32—7.1.8-0-VC14-installer. exe in the folder.
Select the executable file, right click your mouse and select “Run as Administrator”.

Figure 34. Run as Administrator.
If you have an anti-virus software, you may need to pause protection or disable it temporarily.

Figure 35. Disable anti-virus.
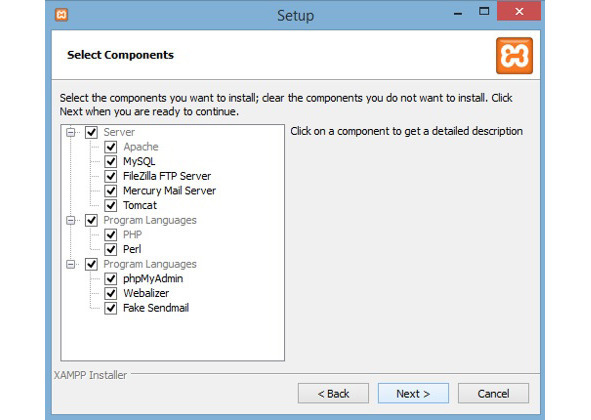
Figure 36. Default selections.
Do not change default selections. Change the destination directory from C:\Program Files (x86) to C:\xampp7

Figure 37. The installation directory. Just click Next
Figure 38. Just click Next.

Figure 39. Just click Next

Figure 40. Just click Finish.
Find the icon XAMPP in your start menu and open it. The XAMPP control panel is displayed.

Figure 41. XAMPP control Panel
The XAMPP control panel is displayed. Click start Apache then after Apache has started running, click Start MySQL. MySQL should start running.

Figure 42. The welcome page.
Open your favorite browser and type in the URL "http://localhost/" The welcome page is displayed.
Click the phpMyAdmin link in the right upper corner. phpMyAdmin is started.
If your phpMyAdmin displays an error, it may be related to port conflict with another software running on your PC. You may change the default 3306 port used by MySQL in the xampp\mysql\bin\my.ini file to the 3307 port.
Restart Apache, MySQL and XAMPP each time after changing a port.
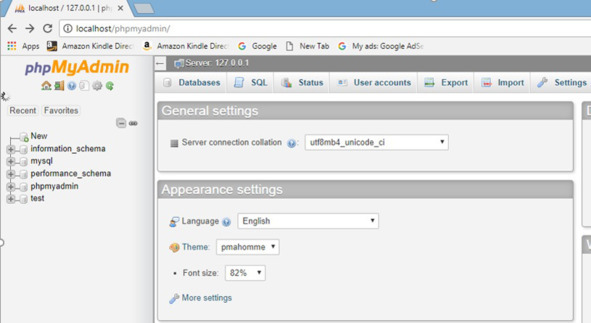
Figure 43. phpMyAdmin
To change the port for phpMyAdmin, open the config.default.php file located in the “phpMyAdmin\libraries” directory.
Find a line: $cfg [“Servers’] [$i] [‘port’] = “” and enter between single quotation marks a mysql port that is displayed on the XAMPP Control Panel.
phpMyAdmin home page. You can click the SQL button on the main menu. In the text area, type a query “create database mydb” and click the Go button. The mydb database will be created.
To create a visitor table, select a database on the left and click SQL. In the text area, type or paste a create table statement and click the Go button. The visitors table will be created.

Figure 44. Create visitors table.
Click the Structure button on the main menu and you will see the table structure: the table fields, data type and the size.
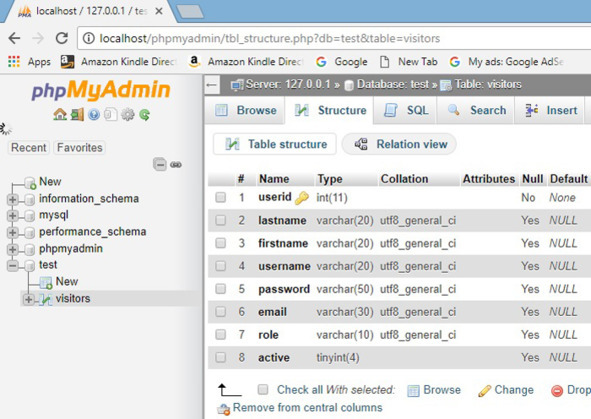
Figure 45. The table structure.
To insert a record to the visitors table, select a table on the left and click the Insert button on the main menu. In the list of fields, enter a visitoŕs data and click the Go button. The record will be inserted.
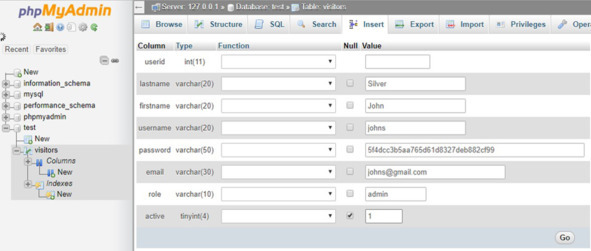
Figure 46. Insert a record
Click the Browse button and the records inserted in the table will be displayed.

Figure 47. The records are displayed.
To export table structure and table data, click the Export button on the main menu. Enter table name in the new template text box, select it in the existing template list and click the Go button.
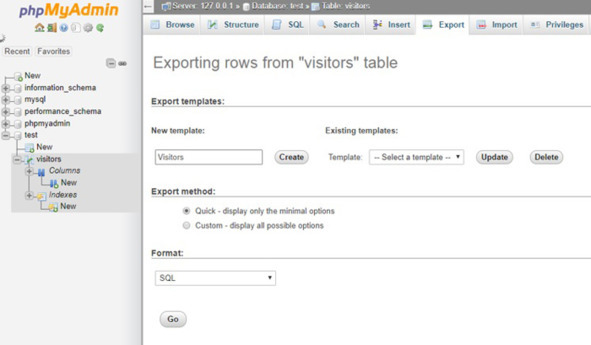
Figure 48. Export a table.
The Save dialog is displayed. Save the file.
Open the sql file and it will include the create table statement for the visitors table.
CREATE TABLE visitors (
userid int (11) NOT NULL AUTO_INCREMENT,
lastname varchar (20) DEFAULT NULL,
firstname varchar (20) DEFAULT NULL,
username varchar (20) DEFAULT NULL,
password varchar (50) DEFAULT NULL,
email varchar (30) DEFAULT NULL,
role varchar (10) DEFAULT NULL,
active tinyint (4) default NULL,
primary key (userid)
) ENGINE=MyISAM AUTO_INCREMENT=1 DEFAULT CHARSET=utf8;
Using the XAMPP shell
Click the Shell button on the XAMPP control panel.
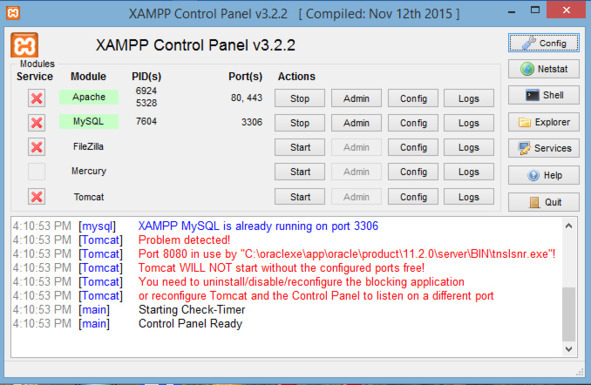
Figure 50. Control Panel.
Login to MySQL with the root user. View exiting databases with the “SHOW DATABASES” command.

Figure 51. Show databases

Figure 52. Create a user “johns” with password “Password7@”.

Figure 53. Grant user with all privileges.
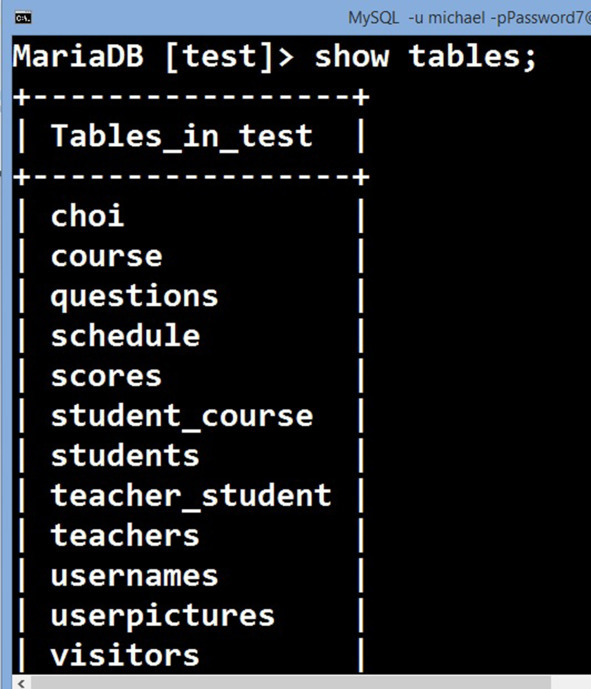
Figure 54. Show tables.
Select a database with the command “use test”.
To see existing tables, type “SHOW TABLES”;

Figure 55. Display columns of the visitors table
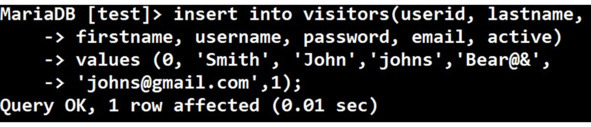
Figure 56. Insert a visitoŕs record
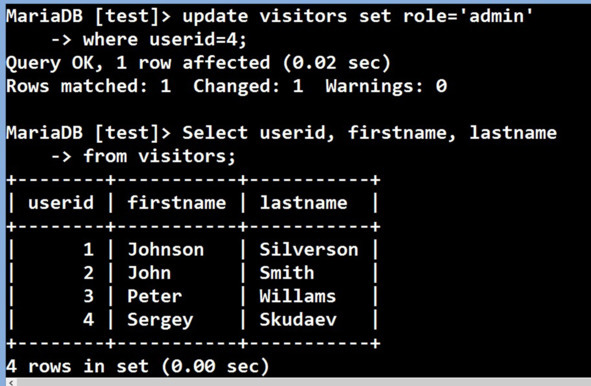
Figure 57. Update the visitor’s record

Figure 58. Display records from the visitors table.
Delete a visitor.

Figure 59. Delete a visitor.
The records are selected and then one of the records is deleted.
Now you know how to use the shell.
Download all the PHP code examples used in this book:
http://www.configure-all.com/phpbook/phpbook.zip