Level 4
You Can Design a Game, but Can You Do the Paperwork?

A JAPANESE GAME director once visited the studio where I worked to impart his wisdom to our team about his philosophy of game design, which mainly had to do with how much money his latest game had made. As he was leaving, he asked our team a cryptic question: “I believe making games is like fishing,” he said. “When I return, you will tell me why this is so.” If he had been wearing a cape, I’m sure he would have swooshed it mysteriously as he left.
I spent a lot of time thinking about just exactly how making games was like fishing. In the end, I decided that making games is nothing like fishing. Fishing is quiet and slow and involves waiting for something to happen that may never happen.1 I also decided that this game director was full of crap. So I developed my own analogy.
Making games is like making chili (bear with me—it’ll make sense soon). Like making chili, making games means you first need a recipe, and that recipe is the game’s design. Having the right recipe is important. You are not making soup or stew. You want to make sure your documentation covers not only what is in your game, but how it can be made—just like a recipe. Be sure to follow the recipe, but be mindful that it will have to change, especially if something doesn’t go right. And, just as when you’re making chili, you must remember that you can season to taste. Some parts of the game will be “meatier” than others, so you will need to adjust your game to make those parts more pronounced.

The next step is to assemble the ingredients. Just as a chili needs ingredients, a game’s design needs gameplay elements. The developers are the chefs. They make sure everything is prepared and cooking like it should. You need the right tools—code that runs the game and scripting tools to create the gameplay—just like you need spoons and pots and pans and a stove to make your chili. However, you might not have exactly what you need at hand. Sometimes you might have the team and resources you want, and sometimes you have to improvise with what is available. That’s OK; I hear cowboys made some pretty good chili using nothing more than a campfire and a tin can. Prepare and add the ingredients in the right order. Simmer the beans and the vegetables first. Brown the meat before you add it to the pot. (I learned that one the hard way.)
In chili, everything is brought to a boil and then left to simmer. The game’s production reminds me of boiling—a burst of energy and effort to get everything in and running. However, if you leave the pot boiling too hot for too long, you can ruin the chili, burn the pot, and catch the stove (and the chefs) on fire. Games and studios have been destroyed by too much crunch time, so be responsible. Game polishing and bug squashing remind me of chili simmering. Chili isn’t ready the moment you finish assembling it. You need to take the time to make it just right, to fine-tune the seasonings and let the ingredients meld to create a richer taste. Games, just like chili, need time to be iterated on, improved, and seasoned. Bugs, code, art, and design problems with the game need to be found and fixed. That takes time. Allow for that time, just like you need to allow for cooking time with chili. Sometimes it’s good to let the team play with a part of the game to find out what works and what doesn’t. I find that chili always tastes better the day after you have made it.
You may need to add something to your chili at the last minute to make it work. Unless you’ve royally screwed it up, chili can usually be salvaged. However, I don’t recommend making games this way. It can lead to stomach upset. Chili can also deceive. It may look horrible but still taste delicious. Some games may not be perfect, or even pretty, but if they have good gameplay, they can still entertain. Good games and good chili satisfy the soul as well as the stomach. (Or the head, if you think with your stomach.)
You see? Making games is exactly like making chili. Take that, Japanese game director!2

So you’ve learned how to make chili, but what about making games? To make a game, you need to create a game design document, or GDD for short. A game design document defines everything in your game. Sound like a tall order? It is! But don’t be scared, there are actually four documents that will guide you through preproduction as you build towards making your GDD:
- The one-sheet
- The ten-pager
- The beat chart
- The game design document
While each of these documents has a specific use during the preproduction/production, the first three each build upon the content from the previous document and eventually end up composing the content found in the GDD.
The length of your GDD is going to be dictated by the complexity of your game. A GDD for a mobile game might only need a 30 page document. A console game might require a document over 300 pages. Game designers have struggled with just how long a game design document should be. There is a movement within the game development community to keep the game design document as short as possible, for a variety of reasons. In the end, I believe a GDD should be just long enough to accurately describe what is going on in the game. However, don’t let that intimidate you. The other documents—the one-sheet, the ten-pager, and the beat chart—are all steps to help you reach your goal of a completed GDD.
Speaking of the basics, you should make sure your document is readable. I’m not just talking about using proper grammar or using correct spelling and punctuation—all of which are very important in making your documents look professional. I’m referring to using the right body font. Font refers to a particular style of typeface. Fonts can be used to convey feeling when you only have words to play with, and I explain how to do that later in this chapter. What I’m referring to is the main body of text of your document—much like the words in a book. You should avoid fancy fonts; otherwise, your readers won’t be able read your document. Keep things simple and legible.3
Speaking of fonts, I recommend never using more than two font styles in one document unless you absolutely have to. You can use a fancy (but legible) font for the title page and things like headings, but try to keep your font size around 22 points or larger. For the body text of your document, keep your font size around 12 points. Anything smaller can be hard for some people to read. If you are creating a PowerPoint presentation for your game, I suggest using body text no smaller than 24 points.
By the way, there is no official format for any of these game design documents. What I’m showing you here is just one way to present the information. For example, video game consultant Mark Cerny presents his GDD material in a single page per topic, bullet point format. He claims this simple presentation is easier for his teammates to read and digest. Use what works best for you. Just remember, the goal of great game design documentation is communication—communication to the player, to your team members, and to your publishing partners. The clearer the communication, the easier it is going to be to get your coworkers excited about your ideas. Got it? Good. Let’s start writing!
Writing the GDD, Step 1: The One-Sheet
The one-sheet is a simple overview of your game. A variety of people will read it, including your teammates and publisher, so you need to keep it interesting, informative, and most importantly, short. It should be no longer than … you guessed it … a single page. You will find two examples of one-sheets in Bonus Level 1. You can create them anyway you’d like, just as long as you include the following information:
- Game title
- Intended game systems
- Target age of players
- Intended Entertainment Software Rating Board (ESRB) rating
- A summary of the game’s story, focusing on gameplay
- Distinct modes of gameplay
- Unique selling points
- Competitive products
Most of these terms are self-explanatory, but the following sections describe a few you may not know.
ESRB Ratings
The ESRB is a self-regulatory organization that enforces a rating system as well as advertising and online privacy principles for software in the United States and Canada.4 The ESRB’s creation is similar to the comic book industry’s Comics Code Authority, which was created to enforce content and morality guidelines in conjunction with concerned parent groups. However, the ESRB’s rating system more closely resembles that of the MPAA’s movie rating system (G, PG, PG-13, R, X). Games are reviewed and assigned a letter rating according to content.
Currently, the ESRB can assign six ratings:
- eC (Early Childhood)—Contains no material parents would find inappropriate.
- E (Everyone) —May contain fantasy, cartoon or mild violence, and infrequent use of mild language.
- E10 (Everyone 10+)—May contain more fantasy, cartoon or mild violence, and mild language and suggestive themes.
- T (Teen) —May contain violence, suggestive themes, crude humor, minimal blood, and infrequent use of strong language.
- M (Mature 17+)—May contain intense violence, blood and gore, sexual content, and strong language.
- AO (Adults Only 18+)—Not suitable for people under 18; may contain prolonged scenes of intense violence, graphic sexual content, and nudity.
Although the ESRB’s guidelines are effective in informing parents what titles are appropriate for their children, stigma is attached to some of the ratings within the development community and fanbase.
Many gamers consider eC to be for “baby games” because this rating most frequently appears on edutainment and licensed titles for young audiences. At the other end of the scale, no brick-and-mortar retailer in America will carry a game with the AO rating. It’s the industry’s equivalent of an X rating in film. Therefore, most publishers and developers won’t even consider making games for this rating and will take great pains to prevent their titles from having this rating.5
An advantage to publishing iOS and Android games is that developers don’t need to submit their games to the ESRB to sell them. However, Apple, Google, and Microsoft have best practices and guidelines on certain content such as pornography, so you can forget about selling your X-rated platformer on the iPhone.
Unique Selling Points
Unique selling points (or USPs) are the “bullet points” found on the back of the box. As a rule of thumb, you should have around five USPs. (A number I developed when I realized I could really fit only five bullet points on the back of a game box.) Remember that “amazing graphics” and “awesome story” or “sequel to the award-winning game” don’t count. All games should have or be these things (though only if your game actually is a sequel in the case of the last one). Besides, gamers can spot that marketing lingo a mile away. USPs should be the unique features that make your game stand out from the crowd. Here are some examples. Let the spin begin!
- “Multiple gameplay modes, including the mind-blistering 256-player death match!”
- “Over 1,000 tunes from the universe’s greatest bands!”
- “Explore gaming’s biggest open-world, where players can go anywhere!”
- “Mow through your enemies using the blastinator, the skull-defiler, and the awesome fire-ant extinguisher!”
- “Experience better-than-reality physics and eyeball-numbing special effects with the new Realitech engine!”
As you can see, USPs should get readers excited about the features of a game without going into lengthy detail about them. Exposing more of that detail is what the ten-pager is all about.
Competitive Products
Competitive products (or “comps”) are games that are similar to your game design idea that have already been released. Listing comps in your one-sheet helps your readers understand what your game is going to be about. However, make sure that when you choose your comps, you pick games that (a) people are very familiar with or (b) are successful. Publishers and marketers are very aware of how well or poorly a game sold. If you choose a comp of a game that did badly, a potential publisher may get scared off. Like I say, “Always pick a winning horse.”
Writing the GDD, Step 2: The Ten-Pager
Now that you have completed your game outline, it is time to expand that information and flesh out the details.
The ten-pager is a “broad stroke” design document that lays out the spine of your game. The intent is for readers to quickly understand the basics of the final product without going into excruciating detail. Keeping your ten-pager interesting may be the most important part of your document. Remember, the people who are going to finance your game are going to read this document. Be sure to provide plenty of visuals but keep them relevant. Don’t go overboard with fancy fonts and ornate layouts. Readability is the key. Creating your ten-pager in PowerPoint or a similar program will assist you with formatting, and will enable you can present it electronically during a pitch meeting or print it out as a “leave behind” handout.
No matter which document you are creating, the goal is to make it interesting enough so your readers want to continue reading it. As you write your ten-pager, ask yourself, “Who is my audience?” There is a big difference between a ten-pager that is being circulated around your team versus one that will be presented to a marketing department. Here are some examples of how you should skew the information in your ten-pager for each audience type:
|
Production Team |
Marketing/Executives |
|
Provide clear diagrams of gameplay. |
Show exciting conceptual images. |
|
Use short, punchy sentences. |
Organize text in bullet-point form. |
|
Use specific terminology to get your intention across clearly. |
Use vivid, descriptive examples. |
|
Compare gameplay to appropriate games, even vintage titles. |
Use successful, modern games as comparative titles. |
Although the preceding examples show two different audiences for a ten-pager, that doesn’t mean you have to write two different documents. Just remember that both audiences will be reading it.6
Keep in mind that the ten pages of a ten-pager are more what you might call “guidelines” than actual rules. Feel free to go over or under7 the ten-page count as long as you succinctly communicate the basics of your game design. By the way, you will find an example of a ten-pager in Bonus Level 2.
The Rule of Threes
Before you start writing, here is a very important rule of thumb that I use when creating a ten-pager:
THREE IS A MAGIC NUMBER
History has observed that all good things come in threes. Don’t believe me? Observe:
- The Hindu Trimurti
- The Back to the Future trilogy
- The Three Musketeers
- Three’s Company
- Arthur C. Clarke’s three laws
- The Three Stooges
- “Third time’s a charm”
This rule will come up again later in this book, but for now, my point is that people like things in threes, especially when you are providing examples.8 The logic behind the rule of threes is this:
- The first example gives readers an idea of what you are talking about but can still mislead them.
- The second example gives readers something to compare or contrast the first example with.
- The third example can complement or contrast the other two, keeping your examples from feeling binary or contrived.
- Anything past three just gets too long and boring: never be too long or boring.
Now that you know the rule of threes, use this power for good! When you are listing your examples in your ten-pager, group them in threes. History will thank you.
Ready for the details? Onward to …
The Ten-Pager Outline
As you read through this part, you might want to check out the example ten-pager in Bonus Level 2.
Page 1: Title Page
Your title page should include the following items:
- Game title
- Intended game systems
- Target age of players
- Intended ESRB rating
- Projected ship date
Game logos—When you are creating the game title for your ten-pager, I suggest creating a placeholder logo. Choosing the proper font for your title allows you to convey the genre of your game quickly without the need for pictures. See if you can guess the game genres suggested by the following fonts:

Page 2: Game Outline
Your game outline page should include two elements:
- Game story summary—Using your one-sheet’s story outline as a starting point, flesh out your game’s story. Keep in mind that your story outline still shouldn’t be more than a few paragraphs long, but that limitation shouldn’t stop you from telling the beginning, middle, and end. Your readers will want to know whether your hero ever rescues the princess! (He does.)
- Game flow—Briefly describe the flow of the game’s action in the context of the locations the players will find themselves in. For example: “Tomb Raider (2013) is a third-person action-adventure that finds young archeologist Lara Croft searching for the lost city of Yamatai, an island off the coast of Japan. The island is rumored to be the home of the Sun Queen, a mythical ruler who possessed magical powers to control the weather.” This brief game flow outline tells players who they are playing (Lara Croft), the camera angle (third person), and the genre of gameplay (action-adventure); plus, it paints a picture of game locations (Yamatai and the coast of Japan) and the players’ goals (solve the mystery of the Sun Queen).
Go ahead and list the environments that the players will find themselves in. Make sure you point out any special gameplay that may occur in these locations.
Here are some other questions that should be answered by the game flow:
- What are the challenges players encounter and the methods by which they can overcome them?
- How does the progression/reward system work? How do players grow as the challenges increase?
- How does the gameplay tie into the story? Do players encounter puzzles that grant access to new areas when solved? Do players have to fight bosses that bar their progression?
- What is the victory condition for players? Save the universe? Kill all the enemies? Collect 100 stars? All of the above?
If your game doesn’t feature a character, concentrate on the environments that the levels of play represent. For example, while the puzzle game Peggle has no main character, each level represents the challenges of a “Peggle Master” who lives in a particular location.
If you are working on a sports game, are there any special events like bowl games or stadiums that players will compete in? If you are making a driving game, concentrate on tracks or races. The key is always to take readers through the gameplay experience while creating vivid images of the game’s locales and activities.
Page 3: Character
Up to this point in your ten-pager, you have gone into some detail about the character the player is controlling (or the vehicle they are driving) in regards to the story. On page 3, you want to highlight a few specifics about your character. Age, sex, and other dossier-style background material can go here … as long as you feel this information does your character justice. Don’t bother listing your character’s blood type if this detail doesn’t add anything to your game. But if it does, mention it.
Concept art is a must when dealing with characters. What does your character look like?
What is the character’s backstory? How did she end up in this predicament? What is her personality type? How does she respond to the challenges in the game? For example, when I worked on God of War, we were constantly referring to Kratos as “brutal,” and everything he did in the game, from killing enemies to opening treasure chests, had to reflect that personality.
How does all this information about the character relate back to gameplay? Does the character have any signature moves, abilities, weapons, or attacks? For example, Mario has his jump-and-stomp attack, whereas Simon Belmont from Castlevania has his whip. What other gameplay does the character do? Driving, flying, or swimming? Make sure you allude to every major style of play in your game.
Show a basic map of the character controls. Find an image of the controller (you can easily find such images online) that will be used to play your game, whether it’s a mouse and a keyboard or a Wii Remote, and show where the controls are going to go. For example, here is a control map for a PS3 action game:

Page 4: Gameplay
Remember that big list of game genres from Level 1? On page 4, you apply those game genres to your game. Start with the gameplay and detail how the sequence of play is presented. Are there multiple story chapters? Or is your game divided into levels or rounds? Does it have any cool scenarios such as driving while shooting or running away from a giant boulder? Call attention to them. Include your big set pieces because they will get your readers interested in your game. Use your USPs from your concept overview here. Don’t forget to outline any minigames, and include a short description and illustration. Diagrams are a great way to illustrate otherwise hard-to-imagine gameplay concepts. If your game utilizes touch or motion controls, use descriptive words like “move,” “tap,” “swipe,” or “pinch” to give readers a good idea of how they will be playing the game.
After you write about your gameplay, go into detail about any platform-specific features. What game features capitalize on the platform’s hardware? Does your game utilize a memory card or a hard drive, or is it downloadable? Does it use a camera or a motion controller? Is your multiplayer mode played split screen? Cover these details because they will be important for readers to understand what technology requirements will be needed to produce your game.
Page 5: Game World
On page 5, present some images and descriptions of the game world. List all the environments mentioned in the story. Provide short descriptions that outline what the players will find there. How do these locations tie into your story? What mood is being invoked in each world? What music will be used? How are all the locations connected within the game world as well as for the players? Include a simple map or flowchart diagram to show how players would navigate the world.

Page 6: Game Experience
The fancy German word “gestalt” translates as “the whole” of something. “Gestalt” is often used by stuffy film and art critics to describe the overall feeling of a work of art or the ambiance of a restaurant. But don’t let the term’s fancy-pantsy-ness fool you; the concept of gestalt is fantastically useful when applied to video games. To make a game feel like a complete experience, on page 6 you need to account for the feel of the starting screens, your cinematics, your music, your sound design, the camera … in other words, the whole, or the gestalt of your game.
So now that you know what “gestalt” means, what is the overall gestalt of your game? Humorous? Horrific? Thrilling? Hardcore? Foreboding? Sexy? How is this feeling going to be presented to the players from the beginning of your product? Look to DVD movie menus and packaging (especially deluxe editions) as inspiration because they usually do a great job of capturing the feel of the movie with just a little music, some fonts, and a few visuals.
Does your gameplay use any unique interfaces? These can be modes that enhance existing gameplay like “detective vision” in Batman: Arkham Origins, for example.
Here are a few other important questions about the game’s experience you should answer for those reading your ten-pager:
- What do players first see when they start the game?
- What emotions/moods are meant to be invoked by your game?
- How are music and sound used to convey your game’s feel?
- How do players navigate the shell of the game? Include a simple flowchart diagram showing how players would navigate this interface. (You’d be surprised how many games have lousy interfaces because the team never thought about this issue!)
Does your game have any minigames? Make sure you provide a brief description explaining how to play them. Does your game have an additional play mode such as driving, flying, or swimming? Describe that mode. Does your game have a variant play style like Plant vs. Zombie’s bowling minigame? Describe it. Does your game have unique gameplay such as the “strike force mission” gameplay in Call of Duty: Black Ops II? Describe it. Describe it. Describe it. If your game has anything that will get readers excited about your gameplay, make sure to describe it.
How about movies or cutscenes? Do you have them in your game? How will they be used to tell your story? How will they be presented to players? Describe the method by which they will be created including (but not limited to) CG, in-game animation, and puppet show.9 Describe when players will be seeing these—during the game, at the headers and footers of levels, and so on. Make sure to mention any attract mode movies too.
Page 7: Gameplay Mechanics
Terminology time! Learn these two valuable terms to sound like a real game designer!
First, mechanics and hazards—what’s the difference?
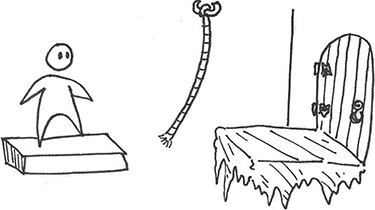
A mechanic is an item or element that players interact with to create or aid with gameplay. Here are a few examples of mechanics to get you started: moving platforms, opening doors, rope swings, slippery ice.
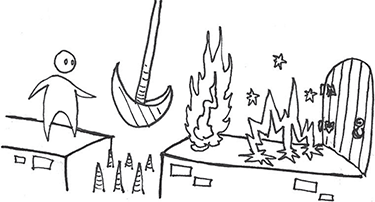
A hazard is a mechanic that can harm or kill players but doesn’t possess intelligence. Here are a few examples of hazards: electrified platforms, spike pits, swinging guillotine blades, jets of flame.
On page 7, describe a few of the mechanics and hazards in your game (you don’t need all of them; I find that three are sufficient at this stage of your outline). What kinds of unique mechanics are in the game? How do they relate to the players’ actions? How will they be used in the environment?
A power-up is an item that players collect to help them with gameplay. Examples include ammo, extra lives, and invulnerability. Although not all games use power-ups, you can still find them in many different genres of games from platformers to racing games. Provide some examples of your power-ups and describe what they do.

Collectibles are items that are collected (well, duh) by the player that don’t have an immediate impact on gameplay. They can be coins, puzzle pieces, or trophy items. What do players collect? What is the benefit of collecting them? Can they be used to buy items, access new abilities, unlock material later in the game? Will they earn players trophies or achievements?

If your game has an economy system, briefly touch on that as well. Describe how players will be able to collect money and buy things in the game. Briefly describe the shopping environment (is it via a store or a peddler, and so on?).
Page 8: Enemies
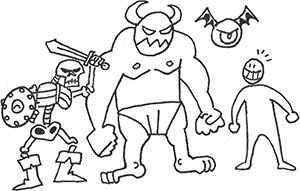
If a hazard uses artificial intelligence (or AI), it qualifies as an enemy character. Be sure to include this info on page 8. What enemies do we find in the game world? What makes them unique? How do players overcome them?
Boss characters are larger, more fearsome enemies usually found at the ends of levels or chapters. Bosses are different because many of them have unique personalities. They are the villains of the story. Who are these boss characters? What environments do they appear in? How does the player defeat them? What does the player earn for defeating them? Your readers will want to know! Boss characters are fun and make for great visuals in your document. Show ’em off!
Page 9: Multiplayer and Bonus Materials
On page 9, you should mention any bonus materials, unlockables, and achievements that will encourage players to replay the game. Provide examples of this content. What is the players’ incentive to play your game again? How will achievements be awarded? Will it use an in-game system, or will it be supported by an external system like Xbox Live or Game Center?
Does your game offer multiplayer capability? For how many players? Will the multiplayer capability offer gameplay that the standard game doesn’t support? How many maps will it support? Can players create and share their own content?
Page 10: Monetization
Monetization has become increasingly important to game developers and publishers. Many mobile game publishers and developers utilize a “free-to-play” system where the players can freely download the core game but have the option to pay to extend their play experience. Other games charge a nominal fee but allow players to buy extra content to improve their experience or ensure victory.
What are players buying for their money? Time? Power? Customization? For example, Kingdom Rush Frontiers players can buy power-ups to give their character more health, upgradable hero characters, and the ability to freeze and explode enemies. Dr. Jolt lets players buy batteries that extend gameplay time. Plants vs. Zombies 2 players can purchase new plant types and gameplay bonuses to improve scores. Team Fortress 2 players can buy new weapons, gear, and amusing hats. LittleBigPlanet’s customers can buy costumes to turn their Sackboy avatar into characters as diverse as The Muppet’s Kermit the Frog, Metal Gear Solid’s Solid Snake, Marvel Comics’ Spider-Man, or 2000 AD’s Judge Dredd. Some developers use downloadable content (DLC) as an opportunity to expand the core mechanics to their game. LittleBigPlanet added an entire fluid dynamics mechanic to the game with its Pirates of the Caribbean-themed DLC.
On page 10, make sure to describe how your game will use monetization. These kinds of games utilize an in-game store where players can pay to download virtual content. How does the in-game store link into the game experience? What can players buy, and how can they buy it? Because games do not allow players to directly pay cash, they have to buy a proxy currency to pay for this content. What is it, and how does it tie into the game? Jet Pack Joyride allows players to buy coins to pay for additional content, whereas Card Hunter’s currency is pizza slices. In an attempt to sweeten the deal, publishers have been offering bundles and “season passes” that bundle together DLC that is not immediately available upon the game’s release. Other kinds of season passes provide an opportunity to buy episodes or content as a bundle at a reduced price. Make sure you mention these monetization methods because they will impact your game’s content creation time and your game’s release plan.
Monetization doesn’t stop with virtual goods. Skylanders’ and Disney Infinity’s publishers sell physical toys and “power discs” that add characters, environments, and gameplay mechanics when used with an electronic interface. If these physical goods are important to your game, make sure you describe how they work!
If you want to see an example of what a ten-pager looks like in action, just jump over to Bonus Level 2 at the back of the book. Don’t worry; I’ll wait for you.
Welcome back! You also need to be specific when thinking about how the gameplay will unfold to the players over the course of the game. How this happens is called progression.
Writing the GDD, Step 3: Gameplay Progression
Introducing gameplay to players can be a tricky thing. Here are several suggestions on how you can start your game:
- Players start from ground zero (or level 1) with no skills, gear, or abilities.
- Players have several skills that are presented to them at the beginning of the game but have to be unlocked over time. The gating mechanism can be experience, money, or some other factor.
- Players have several skills but have no knowledge of how to use them … yet.10
- Players have significant power that they can use immediately … only to lose it after a boss fight or initial confrontation.
- Players have significant power that they can use immediately … only to have to “start back at zero” as the game story is structured as a flashback.
No matter which method you choose, make sure it is fair and satisfying to the players. Players are willing to put up with some shenanigans at the beginning of a game (for example, the “start back at zero”), but they like it best when they feel as though they are advancing quickly and earn lots of new things such as weapons, gear, and abilities.
Just as you need to know how your game begins, you also need to know how it ends. This is why the beat chart is extremely helpful.
Writing the GDD, Step 4: The Beat Chart
The beat chart is a handy-dandy tool that not only can help you develop the content of your GDD but also provides a “map” of the structure of your game; this is extremely important when examining the gameplay progression. Every beat chart requires the following elements:
- Level/environment name
- File name (level/environment designation)
- Time of day (in context of the game)
- Story elements for level
- Progression: gameplay focus of the level
- Estimated play time of level
- Color scheme of level/environment
- Enemies/bosses introduced and used
- Mechanics introduced and used
- Hazards introduced and used
- Power-ups found in level/environment
- New abilities, weapons, or gear introduced/unlocked
- Treasure amount and type the players can find
- Bonus material found in level/environment
- Music track(s) to be used in this level/environment
Here is an example of a beat chart for a couple of levels from Maximo: Ghosts to Glory.
|
Level: World 1-1 |
Level: World 1-2 |
|
Name: Grave Danger (Boneyard) |
Name: Dead Heat (Boneyard) |
|
TOD: Night |
TOD: Night |
|
Story: Maximo enters the graveyard, fighting his way through undead creatures that bar his way. |
Story: Achille’s drill has cracked open the earth, causing lava pits to open up throughout the graveyard. |
|
Progression: Player taught basic movement, combat and defensive moves. Player learns how to collect and map abilities. |
Progression: Player masters hazardous jumps and more intense combat. |
|
Est. play time: 15 min |
Est. play time: 15 min |
|
Color map: Green (trees), brown (trees/rock), purples (tombstones) |
Color map: Red (lava), brown (trees/rock), purples (tombstones) |
|
Enemies: Skeleton (basic), sword skeleton (red), skeleton (axe), ghost, zombie (basic), wooden coffin, chest mimic |
Enemies: Skeleton (basic), skeleton (axe), sword skeleton (red), sword skeleton (blue), skeleton (guardian), zombie (basic), raven, ghost |
|
Mechanics: Holy ground, breakable tombstone, breakable torch, breakable crypt lid, breakable rocks, Achille key statue, key lock, opening gate (door), opening gate (cave), prize wheel, treasure chest, locked chest, hidden chest, end plinth |
Mechanics: Holy ground, breakable tombstone, breakable torch, breakable crypt lid, key statue, key lock, opening gate (door), enemy coffin, floating platform, prize wheel, treasure chest, locked chest, hidden chest, end plinth |
|
Hazards: Unholy ground, Achille statue, fall-away ground, skull tower, breakaway bridge, deep water, lava pit |
Hazards: Unholy ground, swinging gate, skull tower, flame jet, lava pit |
|
Power-ups: Koin, koin bag, diamond, death koin, spirit, life up, flametongue, shield recharge, sword recharge, half health, full health, iron key, gold key, armor up |
Power-ups: Koin, koin bag, diamond, death koin, spirit, life up, flametongue, shield recharge, sword recharge, half health, full health, gold key, armor up |
|
Abilities: Second strike, mighty blow, magic bolt, doomstrike, foot cheese |
Abilities: Second strike, mighty blow, magic bolt, doomstrike, throw shield |
|
Economy: 200 koins, 2 death koins |
Economy: 200 koins, 1 death koin |
|
Bonus materials: N/A |
Bonus materials: N/A |
|
Music track: Graveyard 1 |
Music track: Graveyard 2 |
When you compare two or more columns of a beat chart, certain patterns start to emerge regarding the introduction of new enemies, mechanics, items, and abilities. You can then identify deficiencies in the design and start to move elements around. Filling in holes here, shifting bloated areas there.
Here are a few things to look out for:
- Beware of “clumping”—too many new enemies or mechanics being introduced at once. Spread these out over the course of the game. Remember, the first level of the game always has several elements, so technically it doesn’t count.
- Also beware of “samey-ness”—too many identical combinations of enemies and mechanics. You want to mix things up to keep interaction fresh.
- Alternate your time of day and color schemes. If you have too many of the same lighting or color schemes in a row, things are going to feel and look repetitive. It’s easier for players to notice change and feel progression in the world if things are colored differently.
- Alternate your music tracks. Players will get bored listening to the same music over and over again.
- Watch out for problems in game economy. Make sure players have enough money to buy items to use in the world. Also, make sure players don’t have so much money that it becomes worthless or buy so much stuff that game becomes too easy.
- Introduce mechanics and enemies in conjunction with the items and abilities required to defeat them.
- Determine when players will have “everything” in the game—all weapons, all skills, all vehicles, all armor upgrades. Make sure players have time to play with them. I try to make sure players have everything by three-fourths of the way through the game so the last quarter lets players use all their cool stuff.
- Introduce elements in a reasonable way. As a rule of thumb, I try to introduce two or three new mechanics, enemies, and rewards per level.
- Look out for too much story. How long are players going without playing? A game is a game because you play it. Otherwise, it’s a movie.
Writing the GDD, Step 5: The Game Design Document (and the Awful Truth about Writing It)
Now that you have some meat on your game design’s bones, it’s time to flesh it out with a GDD. A GDD outlines everything that will be in the game. It defines the entire scope of the game. Programmers read the GDD to define a TDD—the Technical Design Document—that is used to build the game. If the GDD doesn’t detail a feature from the start, the team might not be able to add it to the game later without a lot of pain. Needless to say, it’s a very important document that the entire team will refer to during the production of your game.
Some people confuse a game bible with a GDD. Don’t make this mistake. “Show bible” is a term taken from television production. A game bible, like a show bible, emphasizes the rules of the world and the backgrounds and relationships of the characters. This is an important document to create, especially if information about your world and characters is going to be shared with other individuals (like those working on marketing materials such as websites, comic book adaptations, and merchandising), but remember that the game bible has nothing to do with gameplay. That’s what the GDD is for.
The horrible irony is, even though writing a GDD takes lots of time and effort, no one on your team wants to read it. Why? Because most GDDs are very long and intimidating documents filled with information ranging from the useful to the arcane. When I was writing GDDs, I found that everyone was interested in them, but no one wanted to take the time to read them. So, if no one wants to read my design, why am I spending all my time writing it?
Well, eventually, YOU will need to read your own GDD. Creating documentation will help you as much as your teammates. If you keep the game “in your head,” I guarantee there is going to be a moment when you have too much to keep track of and you will get overwhelmed or, even worse, you will forget about your great idea like the gun that shoots fire ants.
Unlike scripts for movies, a GDD has no “official” or mandatory form. Each game designer usually finds what works best for him. For example, because I like to draw, I illustrated my design documents. I found that my teammates understood concepts quickly when I drew pictures for them. The image on the next page shows a single page from my GDD:

Remember, this is the way I created my GDD because I found it easy (and fun!) to create, and this document effectively communicated my ideas to the other team members. Not all designers will want to work this way, and finding your own way is always best. As a starting point, there is a GDD outline in Bonus Level 3.
However, it doesn’t matter how you communicate your ideas, just as long as you are clear. There are plenty of techniques that you can use to get this information across:
- Storyboards—Just like movies, gameplay can be storyboarded. It doesn’t matter whether you can draw detailed images or stick figures; there is truth to the old saying “a picture is worth a thousand words.” If you are having trouble coming up with ideas, you can use published movie storyboards, comic books, or even the gameplay diagrams in this book for inspiration.
- Diagrams—If you are worried about your art skills (you shouldn’t be; even a stick figure conveys information), you can always diagram your gameplay examples. Use consistent shapes and colors to represent elements of your game. Make sure you include a legend so readers know what your icons and shapes mean.
- Animatics—Using your storyboards or diagrams as a starting point, you (or an artist friend) can animate them with programs like PowerPoint or Flash. Although this approach takes more time, seeing your gameplay examples in motion leaves very little room for misinterpretation.
- The beat chart—A beat chart is a document that covers the entire span of the game. The advantage is that it allows readers to grok11 a lot of information on one page, and to compare and contrast the flow of information within the game. Hold on to your horses, cowboy; I talk more about beat charts in a moment.
- The team wiki—Rather than killing trees, why not publish your GDD electronically on a wiki or in a Google doc? It’s a great way for your team members to be kept up to date on the latest and greatest game material, especially because they can contribute to its creation. But be careful; as preproduction moves into production, the design team can very easily neglect a wiki so that it becomes out of date.
A GDD is first and foremost about gameplay—how the character interacts with the world rather than relates to it. It’s a subtle difference, but an important one nonetheless. I find bibles important, especially when communicating your game’s universe to other interested parties, but it really should be done after you have started to flesh out your GDD.
While writing the game design document, always keep this very important thing in mind:
EVERYTHING IS LIQUID
This means that game designs are living things. Game designs change: they flow, they mutate, they evolve. If you don’t let your game idea simmer (like chili!), you may not think of a great idea, or you may miss an opportunity to create some truly great gameplay. Eventually, many of the things you write in your document will become obsolete. At a certain point, writing things down becomes counterproductive, and it all becomes about finishing the game. But you need a starting point, and a GDD gives you that launching pad from which to soar.
Just as you did with your ten-pager, you need to know who your audience is for your GDD. This is a bit easier because your primary audience includes four types of people: the producer, the designer, the artist, and the programmer. Knowing how these different disciplines think and work and prioritize information is very important to getting your point across. Remember this very important thing:
THE MOST IMPORTANT PART OF A GAME DESIGNER’S JOB IS COMMUNICATION
Take the time to talk to your teammates to find out what they are most interested in about the design. If you have to adjust some information in your GDD’s format, then do so. In the long run, your teammates will appreciate your effort.
Speaking of communication, remember that words are very powerful. Make sure you provide very specific examples and terms for the elements in your game design document, especially when referring to characters and game mechanics. If an accurate term doesn’t exist, go ahead and make one up!
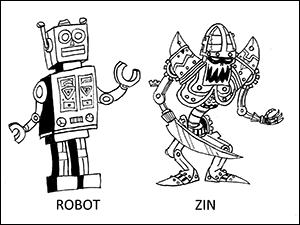
For example, when I was working on Maximo vs. Army of Zin, I first referred to the game’s enemies, the Zin, as robots. I quickly learned that everyone on my team had a different mental image of what a robot was, ranging from C-3PO to the Iron Giant. I realized that my team would be on the wrong page unless I provided a clearer description for them. The image I had in my head of the Zin was of a metal skeleton made out of riveted brass with turning gears for guts. I started using the term “clockwork undead” to describe the Zin. I found that when I focused my language to something very specific, my teammates were able to better visualize the image I had in my head.
There is some debate as to which is better: a shorter, “bite-size” play experience or a longer, more involved one. To be honest, I think the choice totally depends on your game genre, but now that mobile games have exploded onto the market, players are getting used to shorter gameplay experiences (averaging around 15 minutes a session). Even longer games like RPGs and action-adventure games are carving up their game experiences into encapsulated sessions. Whichever way you go, what matters the most is that you give your players their money’s worth.
I usually advise teams making a big action game to aim for a minimum of eight to ten hours of gameplay. I advise teams making smaller mobile games to aim for no more than two to five minutes per level. This doesn’t include replay time or time spent watching cutscenes or reading dialogue. Remember, it never hurts to have more content. However, if you have to cut out a level, remember that you still need to integrate that content (mechanic, item, enemy, etc.) someplace else. If it’s just hanging out at the start of the next level for no apparent reason other than it was needed, the player will be left with a feeling that the game is shoddy. You will learn about some tricks to help determine playing time and avoid cutting features in Level 9.
Writing the GDD, Step 6: Above All, Don’t Be a Jerk
Creating all these design documents is important, but your designs mean nothing if you aren’t a responsible game designer. Some of the following advice may seem like common sense, but I’ve also learned that common sense isn’t always that common:
- A good idea can come from anywhere. I have seen many teams suffer from what I call the “not invented here syndrome,” a belief that any idea from someone who isn’t on the design team isn’t valid. Pardon my French, but only a colossally arrogant idiot would believe that. Good designers always have their ears to the ground for great suggestions from others. Always share your ideas and designs with others. They may disagree with you, but you don’t always have to take their advice either.
- Make a decision and stick with it. Although game designs are always changing, the worst thing you can do is keep redoing and redoing work. It’s no crime to be a perfectionist, but many design issues can be thought out and designed on paper first before a single pixel is rendered or a line of code typed. I have seen many projects drain away time, resources, and team morale when design leads are unable to commit to a direction.
- Update often. Send out e-mails, make comments on documents, use a version control system and in-document comments or text highlighting to make sure your colleagues are kept up to date when changes occur.
- Talk to your teammates. I’m a big believer in “face time”—getting up out of your chair and going to talk to a teammate in person. Some ideas are just better communicated in person. Plus, you never know what great idea might arise during the course of a conversation.
- Tackle the tough ones first. Talk to your art and programming leads ahead of time about how they work and what issues in your design they think are going to be trouble spots. Don’t leave these difficult design issues until the last minute. Sort them out first. If they don’t work out, you will still have time to make course corrections with your design.
- Trust your instincts … There are moments when you are going to have an idea for something in your game that no one else is going to believe will work. Sometimes you just have to dig in and fight for it. Don’t be afraid to fight for a good idea. You may be right in the end.
- … Or don’t. First make sure your idea is a good one and worth fighting for. Shop it around to other team mates. Get opinions. Try someone else’s idea for a change. Better to let Darwinism weed out the bad ideas. You don’t want to end up fighting for a bad idea. It’s a waste of time and energy and makes you look foolish. Don’t make everything a drama. That will just turn off your teammates, and you’ll get branded as a prima donna.
- Respect the abilities of your peers and be mindful of their limitations. Certain team members are better at certain things. Work with your producer to find out who would be the best person for the job. The last thing you want is a teammate working on an aspect of your design that he doesn’t have the talent for or an interest in. Conversely, talk to your teammates about what they’d like to work on. Everything else being equal, you will always get better results if your teammates are into what they are working on.
- Save often and always. Accidents happen, vacations are taken, babies are born during the course of production. Any of these things can cause designers to not be around at a critical moment in production. Make sure your designs are accessible to all the pertinent team members, especially your producer. Use version control programs such as Git, Perforce, Alien Brain, Google Documents, WorkSpace, Dropbox, or Subversion to store documents on a drive that is backed up regularly. Don’t keep the contents of the game in your head. Write those things down. Make sure you have some system of filing so you can find your work too!
- Stay organized. When creating files and documents, use naming conventions that humans can understand. For example, if you have a forest level, make sure the word “forest” or at least the letter “f” is part of the name. Add the YEAR-MONTH-DAY to the end of your documents, especially when multiple documents exist. It’s easier to sort and find your documents using this numbering convention. Naming files by date is helpful, especially when your project spans longer than a single calendar year. Make sure you use consistent naming of everything in your game.
- Be prepared. Eventually, you will need ways for others to get around your game. Have your game include level skips; a flexible cheat camera so others can take screenshots of your gameplay; and cheat codes that enable invulnerability, grant power-ups and money, and so on. Talk to your publishing/marketing partners about their needs early in the development of your game. Sometimes they will want additional content such as extra levels, costumes, or bonus materials to market and sell the game. Be prepared to create this material; don’t leave it until the last minute of production. Be aware that you may have to make a demo of your game. Think about what you would want to have in your game demo to show it off in its best possible light. Earmark potential content such as specific levels or experiences that may be used for a demo later down the line.
Arm yourself with this advice, and I guarantee you, your project will go a lot smoother in the long run.
Now that you have some good habits and documentation examples, you’re ready to dig into one of the pillars of game design, something I call the Three Cs. Level 5 will get you started on the first C, Character.