In the final iteration, we'll write the output of our script to a CSV file rather than the console. This allows examiners to quickly filter and sort data in a manner conducive to analysis.
On line 4, we've imported the csv module that's a part of the standard library. Writing to a CSV file is fairly simple compared with other output formats, and most examiners are very comfortable with manipulating spreadsheets.
As mentioned previously in this chapter, in this final iteration of our script, we've added the necessary logic to detect whether Python 2 or Python 3 is being used to call the script. Depending on the version of Python, the appropriate urllib or urllib2 functions are imported into this script. Note that we directly import the function, urlopen(), and URLError, which we plan to use so that we may call them directly in the script. This allows us to avoid using additional conditional statements later on to identify whether we should call urllib or urllib2:
001 """Final iteration of the Bitcoin JSON transaction parser."""
002 from __future__ import print_function
003 import argparse
004 import csv
005 import json
006 import logging
007 import sys
008 import os
009 if sys.version_info[0] == 2:
010     from urllib2 import urlopen
011     from urllib2 import URLError
012 elif sys.version_info[0] == 3:
013     from urllib.request import urlopen
014     from urllib.error import URLError
015 else:
016     print("Unsupported Python version. Exiting..")
017     sys.exit(1)
018 import unix_converter as unix
...
048 __authors__ = ["Chapin Bryce", "Preston Miller"]
049 __date__ = 20181027
050 __description__ = """This scripts downloads address transactions
051     using blockchain.info public APIs"""
The main focus of this final iteration is the addition of the new function, csv_writer(). This function is responsible for writing the data returned by parse_transactions() to a CSV file. We'll need to modify the current version of print_transactions() to return the parsed data rather than printing it to the console. While this won't be an in-depth tutorial on the csv module, we'll discuss the basics of using this module in the current context. We'll use the csv module extensively and explore additional features throughout this book. Documentation for the csv module can be found at http://docs.python.org/3/library/csv.html.
Let's first open an interactive prompt to practice creating and writing to a CSV file. First, let's import the csv module that will allow us to create our CSV file. Next, we create a list named headers, which will store the column headers of our CSV file:
>>> import csv
>>> headers = ['Date', 'Name', 'Description']
Next, we'll open a file object using the built-in open() method with the appropriate file mode. In Python 2, a CSV file object should be opened in the rb or wb modes for reading and writing, respectively. In this case, we'll be writing to a CSV file so let's open the file in the wb mode. The w stands for write, and the b stands for binary mode.
With our connection to the file object, csvfile, we now need to create a writer or reader (depending on our desired goal) and pass in the file object. There are two options—the csv.writer() or csv.reader() methods; both expect a file object as their input and accept various keyword arguments. The list object meshes well with the csv module, requiring little code to write the data to a CSV file. It isn't difficult to write a dictionary and other objects to a CSV file, but is out of scope here and will be covered in later chapters:
>>> with open('test.csv', 'wb') as csvfile:
...     writer = csv.writer(csvfile)
The writer.writerow() method will write one row using the supplied list. Each element in the list will be placed in sequential columns on the same row. If, for example, the writerow() function is called again with another list input, the data will now be written one row below the previous write operation:
... writer.writerow(headers)
In practical situations, we've found that using nested lists is one of the simplest ways of iterating through and writing each row. In our final iteration, we'll store the transaction details in a list and append them within another list. We can then iterate through each transaction while writing the details to the CSV as we go along.
As with any file object, be sure to flush any data that's in a buffer to the file and then close the file. Forgetting these steps aren't the end of the world as Python will mostly handle this automatically, but they're highly recommended. After executing these last lines of code, a file called test.csv will be created in your working directory with the Date, Name, and Description headers as the first row. This same code will also work with the csv module in Python 3, with the exception of modifying the initial open() function as demonstrated previously:
...     csvfile.flush()
...     csvfile.close()
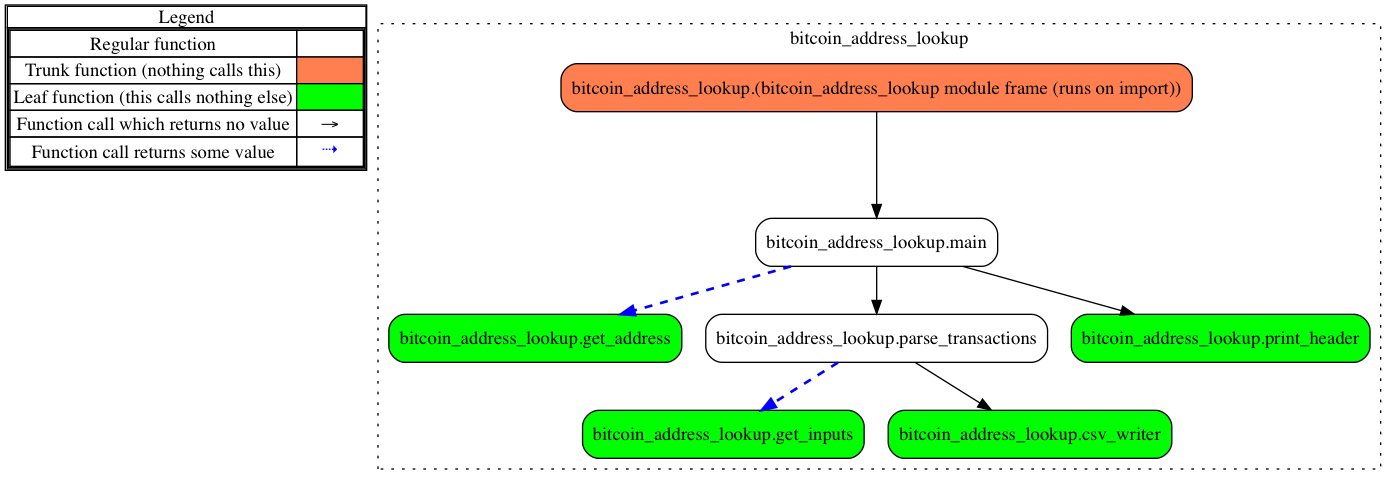
We've renamed the print_transactions() function to parse_transactions() to more accurately reflect its purpose. In addition, on line 159 we've added a csv_writer() function to write our transaction results to a CSV file. All other functions are similar to the previous iteration:
053 def main():
...
070 def get_address():
...
091 def parse_transactions():
...
123 def print_header():
...
142 def get_inputs():
...
159 def csv_writer():
Finally, we've added a new positional argument named OUTPUT. This argument represents the name and/or path for the CSV output. On line 230, we pass this output argument to the main() function:
195 if __name__ == '__main__':
196     # Run this code if the script is run from the command line.
197     parser = argparse.ArgumentParser(
198     description=__description__,
199     epilog='Built by {}. Version {}'.format(
200         ", ".join(__authors__), __date__),
201     formatter_class=argparse.ArgumentDefaultsHelpFormatter
202     )
203
204     parser.add_argument('ADDR', help='Bitcoin Address')
205     parser.add_argument('OUTPUT', help='Output CSV file')
206     parser.add_argument('-l', help="""Specify log directory.
207         Defaults to current working directory.""")
208
209     args = parser.parse_args()
210
211     # Set up Log
212     if args.l:
213         if not os.path.exists(args.l):
214             os.makedirs(args.l) # create log directory path
215         log_path = os.path.join(args.l, 'btc_addr_lookup.log')
216     else:
217         log_path = 'btc_addr_lookup.log'
218     logging.basicConfig(
219         filename=log_path, level=logging.DEBUG,
220         format='%(asctime)s | %(levelname)s | %(message)s',
221         filemode='w')
222
223     logging.info('Starting Bitcoid Lookup v. {}'.format(__date__))
224     logging.debug('System ' + sys.platform)
225     logging.debug('Version ' + sys.version.replace("\n", " "))
226
227     # Print Script Information
228     print('{:=^22}'.format(''))
229     print('{}'.format('Bitcoin Address Lookup'))
230     print('{:=^22} \n'.format(''))
231
232     # Run main program
233     main(args.ADDR, args.OUTPUT)
The following flow diagram exemplifies the differences between the first two iterations and our final version: