|  |
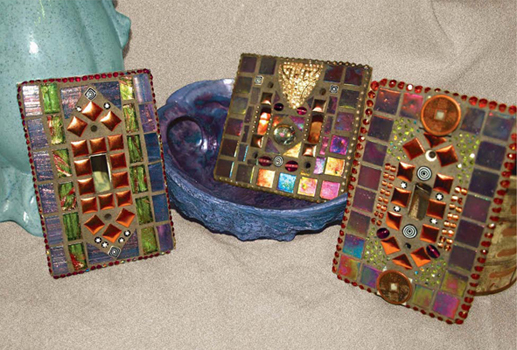
Switch Plate Covers
Whenever I get the itch to redecorate a room I always find myself in search of cool switch plate covers. But standing in electrical departments looking for unique examples of these got really old, really fast. Once in a while—and I mean once in a very long while—I’d get lucky and find a fantastic cover that I just had to have. Unfortunately, those rare finds were not worth the time I spent looking for them—especially when I could be busy making my own.
|
Creating custom switch plate covers is a project that anyone can do, and the creative combinations are endless. Hard to imagine that you can take a 49-cent plastic switch plate cover and turn it into a work of art? Well, I’m about to make a believer out of you.
As you start this project, keep a few things in mind:
- Pieces to be glued must be free of any sharp edges and should lie as flat as possible.
- Keep the middle switch area and screw holes open, so that the switch plate can be attached to the wall and function.
- Make sure that the back of the switch plate is clean and free of grout.
Materials
For each of the projects in this book, I’ve included a materials list to give you a better idea of the amount of materials you will need to complete a project of this size. China patterns and additional elements will vary, based on your findings, with every project.
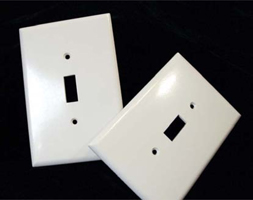
- Hard plastic switch plate covers—singles or doubles. Metal and wood ones can also be used.
- Funky china
- Jewelry, millefiori, beads, tiles, marbles, and mirror
- Sanded grout (charcoal)

Tools
- Wheeled glass nipper
- Tile cutter
- Safety glasses
- Paintbrush or foam brush
- PVA (Weldbond) adhesive was used for this project, but mastic can also be used
- Roll of painter’s tape
- Disposable latex-free gloves
- Large Ziploc bag
- Paper towels
- Q-tips, skewers, toothpicks, or small tools for prodding and cleaning
- Vinegar and water
Directions
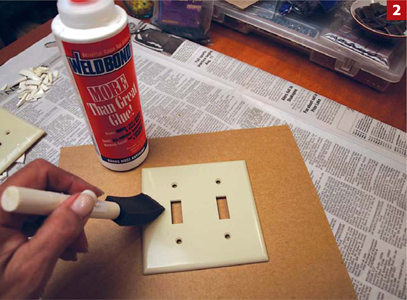
- Cover your workspace with newspaper.
- Coat the switch plate cover with Weldbond. Let it dry completely.
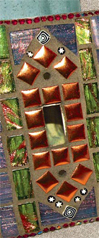
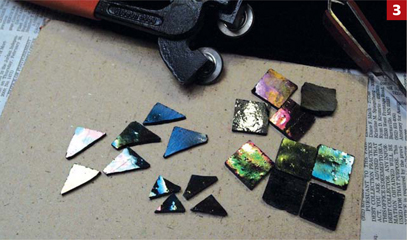
- With the wheeled glass nipper, cut china, tile, and mirror pieces to desired sizes. Again, be sure that all of the pieces lie flat and have no sharp edges.
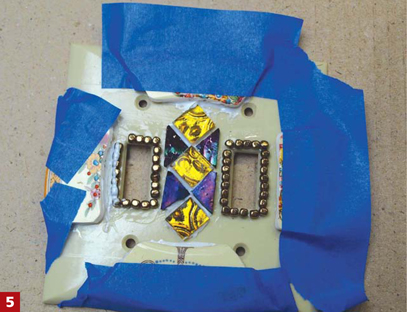
- Glue smaller items, such as beads or tiles, around the switch opening(s) to begin.

- I prefer to start gluing the inner and outer edges of a switch-plate first. It helps me determine how much space I’ll have left for the remaining materials that complete the piece. Use painter’s tape to secure an object that may start to slide.
- When working on the outer edge make sure to glue your pieces on the flat part of the outer edge of the switch plate. If you try to attach pieces to the rounded edge, you’ll have a difficult time getting them to stick. Remember, you’re going to grout this, and after it’s up on the wall you won’t see the rounded edge.
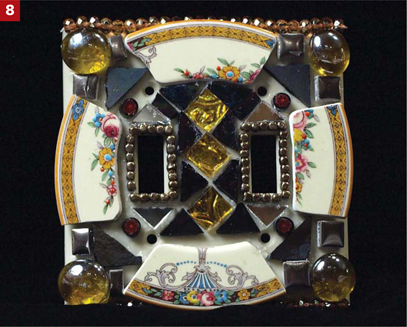
- Fill in the rest of the open areas of your switch plate with tiles, china, glass, and objects of the same thickness, gluing as you go.
- Check that pieces are securely glued and free from excess adhesive. Let everything dry for a minimum of 24 hours before grouting.
- Make sure that the screw holes and switch openings are covered or marked, so you can clean them easily after grouting.
- Remember to protect delicate objects from grout with painter’s tape before you begin the grouting process.
Gluing Beads
I used beads on a few of the examples. Beads can be glued independently, or you can create a string of beads if they aren’t already strung. Knot one end of the string, then string enough beads to fill the area you want beaded. Finish by knotting the loose end to keep the beads tight and securely in place. With your glue bottle, lay down a nice strip of glue on the area to be beaded. No need to get carried away—use just enough glue to set the beads into.
Take the beaded string and carefully lay it into the glue. It’s okay if the string beyond the knot sticks out; you can cut it off after the glue dries, before grouting.
- Grout the switch plate and clean.
- Let dry for 24 hours.
- Polish.
- You may need to purchase longer screws to attach the switch plate to the wall. These can be found at any hardware or home improvement store.