All propagation can be broken down into two categories: sexual and cloned. In sexual propagation, flowers are pollinated and seeds are planted. The result is a plant that is not exactly like its parent, but often similar. This expands the genepool of a species every time it happens. In cloning, a copy of a plant is made. This preserves every genetic trait that the parent plant has. If it has some amazing unique fruit, then it still will as a new plant. Cloning does not expand a genepool, but it does occur frequently in nature. We can find massive clones in a stand of cattails or a grove of aspens. Cloning and growing from seed both create exciting possibilities for any grower.
Cuttings
The experience of rooting cuttings continues to amaze me year after year. It is one of the most satisfying propagation techniques. Cutting propagation can be rapid. A single tree or bush can be turned into many large plants within a single season. It is a technique that builds upon itself readily. I have taken many cuttings from cuttings that just previously rooted. The numbers can multiply pretty fast.
There are two general types of cuttings, hardwood and softwood. Hardwood cuttings are taken when stems are dormant. Softwood cuttings are taken from actively growing wood.
You want to plant cuttings deeply so that they are less likely to dry out. You also do not want to have too much top growth before rooting—in fact, the less the better. Top growth pulls water from the stem. Little tops and big bottoms describes how I try to keep cuttings before they root.
All types of cuttings root best when they callus. It is the same tissue that forms on a tree when you cut a branch off. This tissue is a sign of good healing from a wound. The cuttings you take also need to heal their wounds, especially on the bottom. Callous tissue is very sensitive. It is the most likely place from which roots will emerge. With some easy-to-root species, it won’t matter whether they callus or not. However, callusing is essential for difficult-to-root varieties.
Hardwood Cuttings
Hardwood cuttings can be taken anytime from fall through early spring while plants are dormant. There are nuances to different species, but the general idea is to take cuttings from vigorous one-year-old shoots. Anywhere from 3 inches to 9 feet is a possibility, depending upon species. Most hardwood cuttings I take are around 10 inches long. I plant them to their full depth, leaving only one or two buds aboveground. I plant them whenever the ground is not frozen during the dormant season. I’ve planted lots of them in November, during midwinter thaws, and in early spring. I have not noticed a big difference with the timing. If you have good, strong shoots from a species that roots well, you will likely have success.
Elderberries, currants, goji berries, grapes, cottonwoods, and willows are some of the easiest types to root. I often have close to 100 percent success by just sticking these in the ground anytime they are dormant. Many other species can root well, but often require a bit more help.
Before planting hardwood cuttings, it is a good idea to give them a big drink. I place cuttings in a bucket or jar of water before planting. You just need the bottom end in water. They can stay there for up to a day. If you leave them longer, be sure to change the water so that it doesn’t get anaerobic. This will kill any cuttings if they are left in unchanged water for too long. Some growers will leave cuttings in water for weeks, but they will frequently change the water or aerate with a bubbler.
Hardwood cuttings are easy to handle and store. They don’t dry out very fast the way softwood cuttings do. After you collect them, you can plant them right away or store them for later use. I collect hardwood cuttings over the course of the winter. Often the ground is frozen or buried in snow. I store cuttings several ways.
Storing Hardwood Cuttings
- They can be stored in the fridge. Wrap the stems in barely damp paper towels or newspaper and place them in a plastic bag in the coldest part of the fridge (usually one of the lower drawers). Check for mold every couple of weeks. Don’t let mold get out of hand; you do need to watch for it if you store anything in the fridge. Some growers warn against putting cuttings in plastic bags because of mold. Instead they wrap cuttings in a damp cloth. I have found that they can still mold this way, and they also dry out much faster.
- Storing cuttings outside is easiest if everything is not frozen solid. I have never had any mold problems storing outdoors regardless of the medium they were in. I have buried cuttings in snowbanks, mulch piles, sand, and dirt. Anything except unfinished compost works well. You don’t have to bury the whole cutting, but you can. You just need to make sure the bottom half is buried. That way the stem can still drink.
- Storing cuttings in the basement or an attached garage works very well if it’s unheated. You can pack them in large pots filled with barely damp, well-drained medium. Sand is the best, but also the heaviest. Sawdust works well, but be careful: Using fresh sawdust can have adverse effects. Also, sometimes sawdust is actively decomposing while the cuttings are stored in it. It can heat up and kill entire batches. I have lost many plants because of sawdust getting too hot. If you use aged sawdust, it will work great.
You can also place cuttings on a concrete or dirt floor and cover with burlap sacks. Keep the sacks wet. Be cautious about storing plant material in basements or garages. It can lead to mold problems in a house.

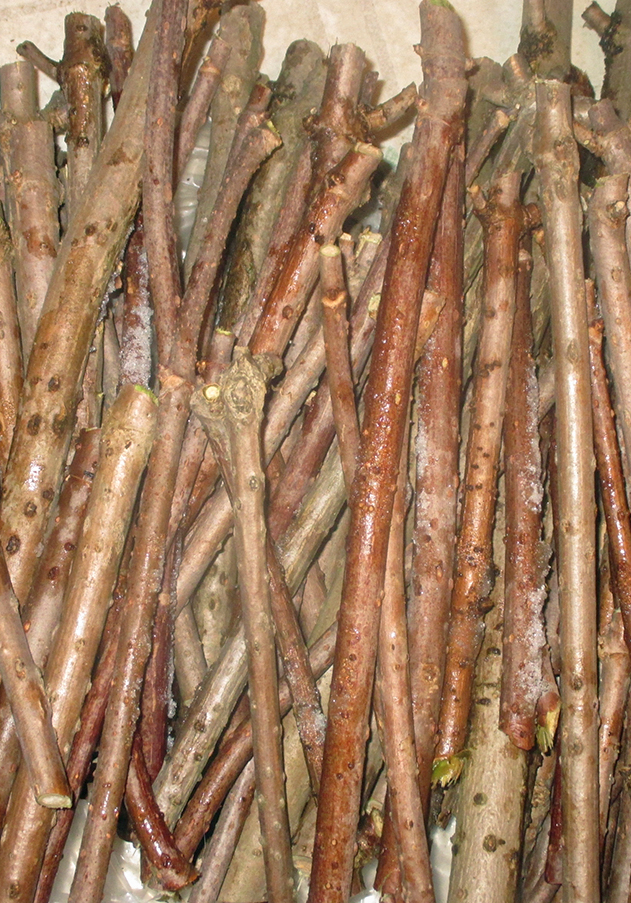
Hardwood cuttings of elderberry collected in winter.
Transplanting Hardwood Cuttings
Don’t rush this step, I have learned. It’s better to wait until roots are well formed before transplanting. It is best to leave cuttings where they are until they go dormant. Sometimes you will want to move them sooner for whatever reason. If you must transplant actively growing cuttings, then pinch their leaves back and soak them before gently moving. With elderberry I pinch all the leaves off; otherwise they often wilt and die.
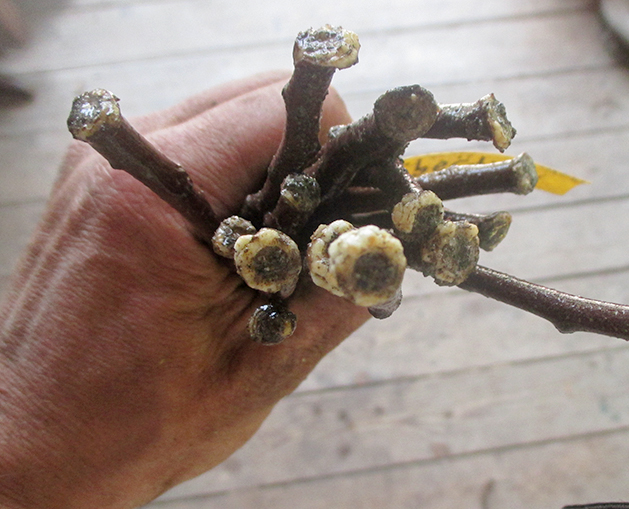
Elder cuttings processed into lengths for planting. They are planted deep enough that just the top bud is showing an inch or two aboveground.
If you are lucky enough to root cuttings before they have leafed out, then they transplant well. I have done this with black cap raspberries that I rooted with bottom heat in February. I planted them out in April before they leafed out. If I could do that with everything I would, but most species will leaf out before many roots have formed.

Elder cuttings growing over the summer in well-fed nursery beds.
Root Cuttings
Root cuttings are when a fragment of root is planted. You can plant the cutting horizontally or vertically. If you plant it vertically, then many growers advise planting the side that was nearest the base of the mother plant up and the part growing away from the mother, down. I haven’t figured out which orientation is best. I have had extremely variable success with root cuttings. Usually one of two things happens. First, the root fragment explodes with growth and turns into a massive plant in one year. I’ve had black locusts reach 9 feet in a year from a 1-inch fragment of root, elderberries that reach 5 feet with multiple stems and even flowers and fruit in one year, and raspberries that turn into a small patch with ripe berries within a few months. Or second, root cuttings can disappoint. What often happens to me is that they callus over, grow more roots, but don’t ever send up a shoot above the ground. I’ve seen elderberries sit like that for two years before disappearing into the soil.

One-year-old rooted elderberry ready for transplanting.
Plant root cuttings close to the surface. Many species will naturally send up root suckers when their roots are close to light. Some growers dip root cuttings in rooting hormone to induce callusing. I sometimes heat the soil for root cuttings by placing them in trays on bottom heat or in a greenhouse. It’s easy to forget about root cuttings after planting them, but if you pay attention to them, keep them watered, and make sure they’re not lost under the shade of weeds, you are more likely to have success with them.
Softwood Cuttings
Softwood cuttings require more care and nuance than hardwood cuttings, but they are more likely to be successful with hard-to-root varieties. You can also produce huge amounts of plants in a short time with softwood cuttings. They can root in as little as a week in some cases. Rooted plants can then produce more material for additional cuttings within the same growing season. Softwood cuttings have allowed me to root varieties with which I never thought I’d succeed.
The timing for softwood cuttings is while they are actively growing. You want to select vigorous growth. It should be firm enough that it snaps when you bend it. If it just bends and folds, but doesn’t crack, then the growth is too young. Check back with it in a week or two. Most softwood cuttings are ready sometime in June in my area. It varies with species.
Taking softwood cuttings in the morning is preferable to afternoon. Cuttings will be more turgid and full of water in the morning.
With full green leaves attached, softwood cuttings can wilt very fast. If they are wilting, they are severely weakened and will probably not bounce back. I place softwood cuttings in a bucket of water as I’m collecting. I then find a place in the shade to trim their leaves back. I either cut leaves in half or cut the whole leaf off.
You can make softwood cuttings as small as from one leaf node to the next, or they can be a foot long. They are stronger when they’re larger, but you get less plant material out of them. With many species, a very small cutting works fine. I’ve rooted haskaps and goji berries that were around an inch long.
The key to softwood cuttings is that you don’t let them dry out or become waterlogged. The stems are more prone to rot than hardwood cuttings. I plant softwood cuttings in pure sand. I also keep them in the shade or under shade cloth to prevent them from drying out. They need to be watered a lot so that they don’t become stressed trying to support leaves. A mist system is the ideal setup for softwood cuttings. I have only used a mist system for the last two growing seasons, so my knowledge is somewhat limited. Here is what I have learned so far.
Mist System
With this system, a mist is sprayed on the cuttings on a timed schedule to keep them from drying out. You can purchase specific mist timers through nursery/greenhouse suppliers. They come in many forms and styles. The easiest ones to set up run on a battery instead of being plugged in. You can adjust the settings so that cuttings are sprayed with a fine mist every 10 minutes for 10 seconds, and the system shuts off at night. You will need to adjust the settings depending on weather. During rainy, cloudy days they will need less mist. On hot, dry days, they’ll need more. The key is to watch the cuttings. You don’t want them to stay soaked. What you do want is for them to have a light film of water on their leaves that dries up shortly before the next spray of mist starts.
Mist nozzles come in many different options. The more expensive brass nozzles spray a very fine mist. Some of the cheaper plastic ones provide more of a leaky-hose-type spray. All of the nozzles clog sooner or later, but the finer sprays tend to clog more often. This is tough because the fine spray is the most beneficial and gentlest form of watering.

Setting up a mist system with bottom heat. Blue foam insulation lies under a snaking heat cable. Strung along the hoops is a black water line with mist nozzles plugged into it every foot. The hoops will be covered with burlap and the bed will be filled with sand.
The mist nozzles are attached to a water line, either PVC or some type of irrigation line. Attach a drain valve to the end of either type of line; otherwise the whole system will drip after each mist cycle. Dripping will cause that spot to be totally waterlogged.
You can house the entire mist system under a plastic tent or under a burlap / shade cloth tent. A friend of mine keeps his system just under the open sky on the north side of a barn. You don’t want the setup in full sun without shade cloth.
I place bottom heat under my mist bed. Even though it’s summer when I use it, the nights can be very cool in my area. The bottom heat provides an even warm temperature to encourage faster callusing.
There are endless variations on mist systems as creative as the growers who use them. Just keep in mind the goal: cuttings that don’t dry out and aren’t saturated.
Transplanting cuttings out of a mist system can be tricky. The plants are small and delicate. If you pull them out of mist and just place them in a bed, they will often die. They need a slight hardening-off period. It is a good idea to move them just to the edge of the mist for a day or two before moving them further. Place them under deep shade at first. When I plant rooted cuttings from the mist house, they go under a tent of burlap. I water them a couple of times a day until I am confident they have transplanted well. Wait at least a few weeks before removing the shade cloth. If it is later in the season when the cuttings have rooted, you may want to not plant them in a bed, but bring them inside to a protected space for the winter. For small sensitive plants, I do not allow them to freeze. They spend the winter in my basement and get planted out in the spring.
Mist systems can take a lot of tweaking to get just right, but once you have a good setup, they are amazing. I believe a good mist system and some nice stock plants could provide anyone with a very decent income and thousands of plants. It might sound like a lot of work and setup, but if you are serious about propagation, a mist system is a game changer.
Rooting Hormone
Rooting hormones are naturally found in plants. In the old days growers used willow water. They would sometimes also insert a grain seed in the bottom of a cutting. The seed releases hormones when it sprouts that help the cutting along.
Today rooting hormone is found as a synthetically derived chemical that causes plants to form callous tissue. It is the callous tissue from which roots are most likely to form. Rooting hormone comes in powder and liquid forms and in varying strengths. Use the strength that is indicated on the box. For hardwood cuttings you usually want the strongest form. Read the instructions and be careful when handling. Synthetic rooting hormones are toxic chemicals.
I used to use rooting hormone all the time until I learned of its toxicity and links to disrupting people’s endocrine systems. It was very hard for me to stop using synthetic rooting hormones. Propagating plants provides my family’s income. I was worried that if I stopped using them, I would have fewer plants to sell. Before I stopped, I carried out dozens of trials, planting half a batch of cuttings with the hormone and half without. I have been gratefully surprised to learn that it almost always made no difference.
I have read about natural rooting hormones like honey and willow water. I have tried these on occasion, but have not noticed a significant benefit personally to justify the time involved. It’s a lot faster to plant cuttings if you don’t have to dip them first. The time adds up when you are planting thousands of cuttings. So, for what it’s worth, I maintain a profitable nursery business that roots thousands of cuttings every year without any rooting hormone.
Bottom Heat
Bottom heat can make a big difference in my experience. I use it for some seeds as well as cuttings. Warm bottoms and cool tops is the ultimate combination when trying to root difficult cuttings in early spring. Cool tops will keep the plants dormant, while warm bottoms will encourage callusing. If the air temperature is around freezing, cuttings won’t make any top growth. But if the soil temperature is around 75°F (24°C), then they can begin to form callous tissue. Bottom heat does a great job of encouraging root activity.
In the old days nurseries would create bottom heat by planting cuttings upside down in the fall. The bottom of the cutting would be near the soil line. In the spring, when the soil warmed up, it would heat the bottoms before the tops.
Some growers create bottom heat with piles of hot manure. This is pretty neat, but it’s not easy to regulate the temperature. I like to keep cuttings at 75 to 80°F (24–27°C) for months at a time.
Today it is easy to create bottom heat with a small amount of electricity. You can go to most garden centers and buy small heat mats. You can buy bigger ones online. The cheapest option is to use heat cables. Instead of a mat, the cables snake back and forth warming a bed of sand. You can also use Christmas rope lighting instead of the heat cables; just be sure it’s not LED lights, as those emit no heat.
Insulate very well under the bottom of the heat mat or cable. You can cover the top of the bed or trays with a sheet of plastic and you’ll create a super-humid jungle. But remember, you want to keep the tops cool and dormant.
The main reason for providing bottom heat or rooting hormones is to stimulate the growth of callous tissue at the base of cuttings.
Make sure to use bottom heat along with a thermostat. You can easily over- or underheat a bed. Anyplace that sells heat mats will also sell the automatic thermostats that go with them. These will keep soil temperature to within a single degree for months on end without you having to keep track of anything. They are easily worth the $20 they cost.
Medium/Soil
I think of cuttings as a race between rooting and rotting. Either roots are going to form or the bark will start to allow fungus in. They can last a lot longer in a very well-drained medium. Sand is the best. Pure 100 percent sand is my favorite medium for starting cuttings that I will be transplanting soon after they root. If they are cuttings that I’m sure will root and are started in just beds outside, then I will plant them in rich soil amended with sand.
You can also use perlite, but it’s not as nice as sand in my experience. Play sand or construction sand both work fine.

Don’t be shy at all when you propagate, or follow any rules. You’re working with living organisms. They will constantly surprise you and break all the rules that anyone will ever tell you. There are no people with green thumbs, just people who plant lots of seeds and cuttings. The more you plant, the more you will learn and the more you’ll grow. Once you understand the basic principles, you can really begin to experiment.