People have been grafting trees for thousands of years. Grafting is a valuable propagation skill to have. You can clone trees that are difficult to root, and you can change mature trees over to a better variety. There is a lot of mystique around grafting, and many folks are intimidated to start. The truth is that grafting takes practice, but it’s not that hard.
Grafting means a stem or bud is joined to another plant with roots. The two fuse together. The way it works is through callusing. When we make a cut on a tree, it will form callous tissue if it’s healing properly. Callous tissue is very sensitive. When you have two branches pressed against each other forming callous tissue at the place where they meet, they will form a graft union. You can increase the surface area where the callous tissues will meet up by making specific cuts.
There are a huge number of grafting cuts and techniques. They all follow the same principle: Line up the cambium layer so that callous tissues line up. The cambium is a thin layer of cells between the inner bark and the wood. Use very sharp tools to create the cleanest possible cuts. This will not only allow for better healing of the stem, but also increase the contact between the two cuts.
A grafting knife is exactly what it sounds like, and if you’re serious about grafting more than a handful of trees you should get one. Keep it extremely sharp. I touch up the blade on mine every time I sit down to graft. Some people use box cutters. And some growers use grafting tools; these tools make an omega cut that eliminates the skill required of a knife wielder. I’ve never used a grafting tool or a box cutter, but I have used grafting knives a lot. They are small, simple tools that work very well and can last a lifetime. A normal grafting knife is beveled on one side. Unfortunately for me and all other left-handed people, they are beveled for right-handed people to use. If you’re a lefty, then you can get a budding knife, which is beveled on both sides, or you can grind a grafting knife to be beveled on the opposite side.
Grafting knives work very well, but take practice. There are endless YouTube videos of people grafting, including my own. Many garden clubs and cooperative extensions offer grafting classes. It’s a good idea to find someone who knows how to graft and watch them. Before you slice open any trees, practice on green stems of the same species. I sliced through hundreds of practice sticks until I felt comfortable cutting any of my own trees.
Be careful. There are few grafters out there who have not cut themselves at some point. The last time I cut myself I had to go to the hospital for stitches. Even though it’s not cool, I wear a safety glove now. You can get knifeproof gloves that are used by chefs for a few dollars. It is worth not missing a few weeks of work or damaging your hands. I always wear a glove on my non-knife hand. I wrap my knife hand thumb with thick tape. All of the other grafters I know do not wear a glove. I’m a dork, but it’s worth it. Some people do wrap their fingers with tape, which looks cool and will stop minor cuts. I had tape on my finger when I sliced it open. The only cut that is really dangerous is the tongue cut on a whip-and-tongue graft. You can sometimes cut all the way through the scion unexpectedly. Grafting knives are wicked sharp.
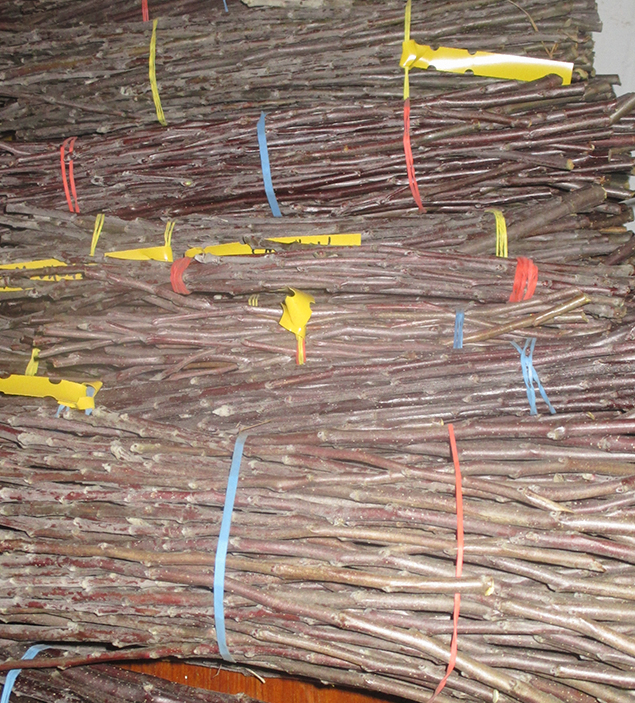
Scionwood bundled up and ready to be stored for winter bench grafting.
Scionwood
The scion is the top of the grafted tree. It is what you are splicing onto the rootstock. The best scions are taken from vigorous, straight shoots. You will find the best scionwood near the tops of trees, from water sprouts growing off the trunk, and from trees that are heavily pruned. Most commercial nurseries maintain scion trees that have the entire top cut off every year. The resulting growth makes perfect straight shoots.
Scions are collected while they are dormant. I collect mine in mid- to late winter on mild days when the sap is rising. I store them the same way that I store cuttings: either in bags in the fridge with moist paper towels around their stems, or in the basement packed in sand.
Rootstocks
The rootstock will influence the growth habits of the grafted tree. There are full-sized (standard) rootstocks and dwarfing rootstocks. They are either clonally propagated or grown from seed, or they are established trees. Rootstocks have to be compatible with the scion. Most species match up with themselves only. There are a few exceptions, but not many. You can graft pears onto hawthorn, or quince onto pear, but for the most part you’ve got to keep it within the same genus. Apples go on apples. You can’t just graft a branch of apple onto an oak tree and expect it to survive.
It’s nice if the rootstocks are the same diameter as the scionwood, but this is difficult to achieve and is not essential. What you don’t want is scionwood that’s thicker than the rootstock. This will form an ugly graft union that is not very strong.
Bench Grafting Versus Field Grafting
Bench grafting is done indoors or at a table outside in the shade, and involves grafting small trees that are bareroot. The trees are picked up, sliced, spliced, and placed in a bucket of water until they are heeled in or planted. Field-grafted trees are grafted to rootstocks that are in the ground outside.
Bench grafting allows the grower to work inside during cold weather. Field grafting has to be timed for specific weather depending on species and technique.
Lining Things Up: Grafting Techniques
In all the following techniques, it’s important that your cuts be decisive. One slice makes one cut. You are not whittling. One slice pressed against one slice allows for the cambium layers to line up without any bumps or dips disrupting the connection. If your scion is smaller in diameter than the rootstocks, then just line them up on one side.
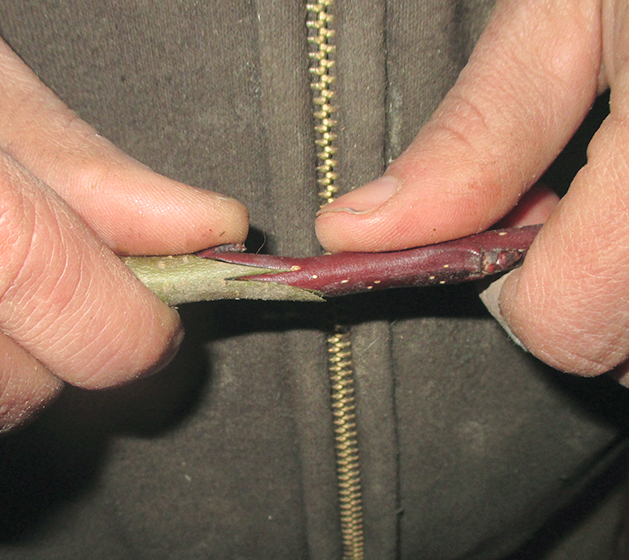
Whip-and-tongue graft. Notice how the two stems lock together.
Whip and Tongue
To make a whip-and-tongue graft, start by making a slanted cut with a steep angle. About a third of the way down from the tip of this cut, slice down until you cut about halfway down the slanted cut. Repeat this on the scion. Slide them into each other. You may need to push somewhat firmly.
Whip and tongue is the most difficult cut to make, but it’s the best and strongest in my opinion. The stock and scion are joined with maximized contact. The unions formed are very sturdy right away; some other unions will take years to strengthen.
Whip and tongue makes sense for bench grafting. It’s not easy to make the cut when rootstocks are in the ground, though it is possible. With practice whip and tongue is easy. After a while, you won’t even think about it and will be able to graft hundreds of trees per day with this technique.
Cleft Grafting
This is pretty easy to learn and does not take nearly as much practice as whip and tongue. The union is pretty ugly for at least a few years and is not nearly as strong initially. Over time, though, it will grow stronger and stronger.
In cleft grafting, split the rootstock down the center with a sharp knife. Don’t push on the end of a knife with a bare hand; use a wooden mallet to tap the knife down if you need to. Cut your scion with two steeply slanted cuts, forming an even bevel. The end of the scion will be the same shape as a flathead screwdriver. Stick it into the split rootstock, pushing it down as far as you can. Be sure to line it up on one side, so there is contact between the cambiums.
Bark Grafting
I know I’ll annoy someone here, but I think bark grafting sucks and is a waste of time. I only mention it in case you are reading about it somewhere else and want to use it. In bark grafting, beveled scions are inserted into a cut branch or trunk between the bark and wood. These grafts are really weak and break off easily if a bird lands on them or the wind is too strong. They also are made on such a big wound on the rootstock that they usually don’t heal well. That’s my two cents. I’m sure others have had better experiences.

Bark graft healed over.
Budding
Budding is the insertion of a single bud into a rootstock. Generally trees are budded in late summer. The bud is left in place and remains dormant until the following spring. The top of the rootstock is cut off just above the bud in the spring, and all the new growth comes out of that single bud. Budding works nicely when you want to graft trees actively growing in a nursery row. It is usually not used for dormant, bareroot stock.
Chip Budding
Chip budding is pretty easy to learn. Cut at an angle on the rootstock about a third or a quarter of the way into the trunk. Make a same-angled cut about half an inch above. The second cut will meet the first one and a chip of wood will fall out. Do the same thing to the scion, except do it around a bud and keep the chip of wood that falls out. Insert the chip with the bud into the rootstock. Make sure at least one side is well lined up. You can tape right over the bud with grafting tape.

T-bud being inserted into rootstock. Illustration by John Walsh.
T-Budding
This technique is easy enough, but must be done when the sap is running in the trees. Usually July and August are best. It helps to heavily water trees during the week prior to T-budding; the bark will peel more easily. Slice a T-shape into the rootstock. You can open up the T-cut with the tip of the knife. Slice a bud off a scion. Cut the leaf off, but leave the leaf stem. It makes a nice handle. Try to only cut the bud off without going deeper than the inner bark. It will naturally want to separate from the wood if you pay close attention.
Peel back the bark on the rootstock with the tip of a knife, insert the bud into the T-cut, and wrap it up. It will insert more easily if the bottom of the bud piece is slightly pointed.
Taping and Wax
Taping up grafting cuts is necessary. Left on their own, the unions will be prone to drying out. The tape will also help hold things together. To seal up grafting unions in the old days, growers used string and compounds made with pitch, wax, and manure. Grafting tape is a lot easier. It is the same thing as surgical tape. It stretches and sticks to itself.
Wrap unions tightly, stretching the tape as you go. Be careful not to knock your scion out of alignment when you wrap it. After the union is wrapped, cut the scionwood so only one or two buds are left. If you leave the scion too long, it will be top-heavy and not as strong. It will also draw a lot of water when it leafs out. One nice bud is really enough. It’s okay if you tape over a bud. They can grow right through tape or wax.
Cover the end of the scion with beeswax or grafting tar. Wax needs to be melted, which is cumbersome in the field but no bother during bench grafting inside on a winter day. The tar can be carried into the field easily, but it’s pretty gross stuff.
Storing
After being wrapped and waxed, the bench-grafted tree is ready for storage. Most of my grafting is done in February and March when the ground is covered in snow. I store my bench grafts by packing them into either sand or very old sawdust. They can be packed in bins or pots. I store mine in the unheated basement.
Weather
Different trees callus at different temperatures. Very few are able to callus at subfreezing temps. Apples and pears can handle being stored in the 30 to 40°F (0–5°C) range and callus well. Most other trees need warmer temperatures. Walnuts will have trouble callusing below 70°F (21°C). This will influence timing and grafting methods. For example, peaches are budded in summertime. I bench-graft mulberries in May and keep them safe from frost.
I plant out all of my bench grafts after danger of hard frost. I’ve had the temperature plunge into the low 20s (–7 to –2°C) after planting out apple grafts. They showed no sign of damage, but I might have just been lucky. It might be worth experimenting to see what you can get away with. In general, though, keep fresh grafts safe from cold weather.
Aftercare of Grafts
After the grafted tree is planted and growing, it needs some attention. Every few weeks during the growing season, check for sprouts coming off the rootstock. Wipe these off with your fingers while they are young and tender. This will force the tree’s energy into the scion. In most cases the scion will take over after a while, and the tree will fully accept it as the top. You still want to remove any root suckers over the years.
Top-Working Older Trees
It’s pretty amazing to look at an old apple tree with terrible fruit and convert it into a tree with 30 varieties of your choice. Each branch can be a separate variety, or you can have them all be the same. It’s tough to keep track of multiple grafts in the same tree over time. It takes quite a bit of pruning and attention, but the reward can also be high.

An older apple tree top-worked by grafting onto its younger branches. The union is quite strong. These stems were cleft-grafted two years prior to this photo. Notice the healed scar on the right branch.
A graft on a mature tree usually starts bearing about three years after it was made (at least in the case of apples).
Generally, cleft grafting is the preferred method for splicing into branches thicker than a pencil and smaller than 6 inches in diameter. It’s very difficult to split and hold open larger branches. People use bark grafting on larger limbs. (Personally, though, I think bark grafts on big limbs make poor unions.)
In my experience, the best way to top-work bigger trees is to pick some sucker shoots that are one to three years old and either cleft-graft them or use the whip-and-tongue technique. You can then cut back the rest of the trunk. Some people leave a nurse limb or part of the original top in place for a year or two until the graft is strong.
The growth powered by an old root system concentrated on a small branch can sometimes be phenomenal.
Some trees are too old and worn out to rejuvenate and top-work. These ancient ones often will not heal well from big wounds. You’ll know a tree is past time for pruning and grafting when it has big holes or large dead sections in the trunk. I have learned to leave these ones alone and just enjoy their character.