Chapter 17
Your Mac Pro is a solid computer, and it should give you many years of dependable performance. However, all computers eventually run into problems, and your Mac Pro will likely be no exception. To help you get through these inevitable rough patches, this chapter offers a few tried-and-true troubleshooting techniques.
Review General Troubleshooting Techniques
Restart Mac Pro in Target Disk Mode
Delete a Program's Preferences
Force a Stuck Application to Close
Force a Stuck Process to Close
Restore an Earlier Version of a File
Restore Files Using Time Machine
Restore the System from a Time Machine Backup
Review General Troubleshooting Techniques
One of the mysteries that you have no doubt experienced is the computer glitch that plagues you for a while and then simply vanishes without any intervention on your part. Unfortunately, most computer ills do not just disappear. There is no easy or set way to solve these more intractable problems, but it can be done if you take a systematic approach. This involves first trying a few generic troubleshooting techniques and, if these do not work, asking a series of questions designed to gather the required information or to narrow down the cause.
Troubleshoot Hardware
Check Connections
Some of the most common causes of hardware problems are the simple physical things, such as devices being unplugged or disconnected. So your first troubleshooting steps should concentrate on the obvious: making sure that a device is turned on, checking that cable connections are secure, and ensuring that external devices (such as those using a Thunderbolt or USB cable) are properly connected.
Replace the Batteries
Wireless devices, such as keyboards and mice, use up batteries very quickly. If a wireless device is working intermittently or not at all, always try replacing the batteries to see if that solves the problem.
You power cycle a device by turning it off, waiting a few seconds, and then turning it back on. This simple procedure is often enough to get a device back up and running. Many wireless mice have a reset button, and some keyboards have an on/off switch. Thunderbolt and USB devices often get their power directly from the corresponding port. Power cycle these devices by unplugging them and then plugging them back in.
Troubleshoot Software
Basic Troubleshooting Steps
First, you can often fix a problem by shutting down all your open programs and starting again. This is a particularly useful fix for problems caused by low memory or low system resources. Next, log out of your user account, which clears the memory and gives you a slightly cleaner slate than merely closing all your programs. Finally, restart Mac Pro to reload the entire system, which is often enough to solve many problems.
Did You Get an Error Message?
Unfortunately, most computer error messages are obscure and do little to help you resolve a problem directly. However, error codes and error text can help you down the road, either by giving you something to search for in an online database or by providing information to a tech support person. Therefore, you should always write down the full text of any error message that appears, or press  +
+ +
+ to place an image of the screen on the desktop.
Did You Recently Change Any Settings?
If the problem started after you changed an application preference or an OS X preference via System Preferences, try reversing the change to see if that solves the problem. Even something as seemingly innocent as activating a screen saver can cause problems, so do not rule anything out. If you determine that changing a program's setting causes the problem, check with the software developer to see if an update to the program is available.
Did You Recently Install a New Program?
If you suspect a new program is causing system instability, restart Mac Pro and try operating the system for a while without using the new program. If the program has any login items that load at startup, be sure to deactivate them (see the section “Bypass Login Items”). If the problem does not reoccur, the new program is likely the culprit. Try using the program without any other programs running. Also check that the program is compatible with OS X Mavericks.
Check Console Messages
The section “Review General Troubleshooting Techniques” recommended that you write down any error messages that appear on-screen. However, if an error occurs behind the scenes, you do not see anything on-screen to tell you that a problem exists. However, Mac Pro likely made a note of the error as a Console message. This message is probably very technical, but it will likely make sense to someone in tech support. You can also Google the message text to see if a solution appears online.
Check Console Messages

 Click Spotlight (
 ).
).
 Type console.
 Click Console.
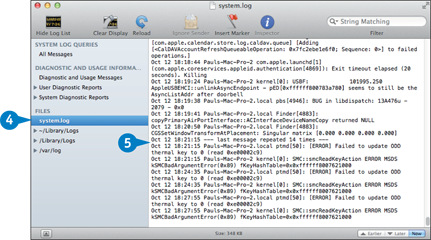
 Click system.log.
 Examine the system log for errors.
Get System Information
When you are trying to solve a problem, it helps to know what components your Mac Pro is using. You might also require system data, such as how much memory is installed. Mac Pro comes with a System Information utility that can provide you with this data and much more. System Information breaks down this data into three categories: Hardware, such as memory, graphics, and storage; Network, such as the firewall and Wi-Fi; and Software, such as applications, startup items, and logs for various components.
Get System Information
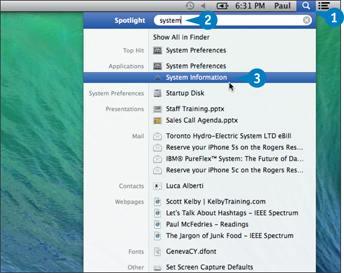
Click Spotlight ().
Type system.
Click System Information.
The System Information window appears.
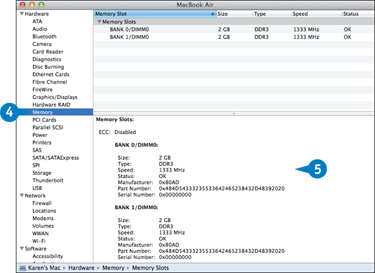
Click a category.
Examine the category information.
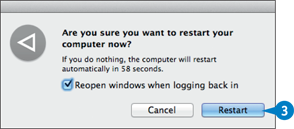
Restart Mac Pro
If a hardware device is having a problem with some system files, it often helps to restart Mac Pro. By rebooting the computer, you reload the entire system, which is often enough to solve many computer problems.
For a problem device that does not have its own power switch, restarting Mac Pro might not resolve the problem because the device remains powered up the whole time. You can power cycle — shut down and then restart — such devices as a group by power cycling Mac Pro.
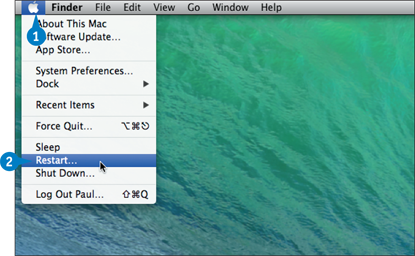
Restart Mac Pro
Restart Mac Pro
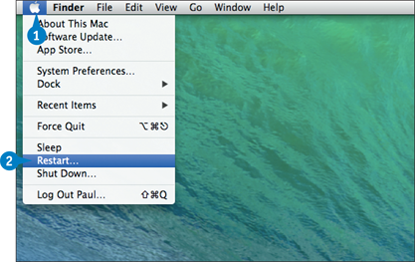
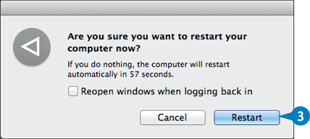
Click the Apple icon ( ).
).
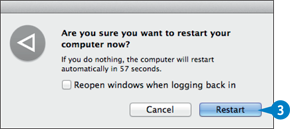
Click Restart.
Click Restart.
Note: To bypass the confirmation dialog, press and hold  when you click the Restart command.
Power Cycle Mac Pro
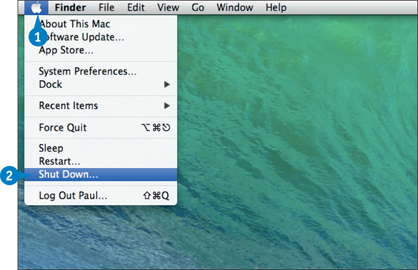
Click the Apple icon ().
Click Shut Down.
Note: To bypass the confirmation dialog, press and hold when you click Shut Down.
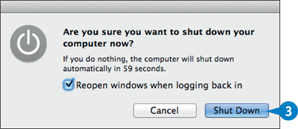
Click Shut Down.
Wait for 30 seconds to give all devices time to spin down.
Turn Mac Pro back on.
TIP
What do I do if Mac Pro is locked up and I cannot select the Shut Down command?
Your have to force Mac Pro to restart or shut down. To force Mac Pro to restart, press and hold  and then press the power button. To force Mac Pro to shut down, press and hold the power button until Mac Pro shuts off.
This does not give you any way to close your running applications, so you might lose unsaved document changes. Therefore, wait for a few minutes to make sure Mac Pro really is locked up and not just in a temporary state of suspended animation while it is waiting for some lengthy process to finish.
Restart Mac Pro in Safe Mode
Behind-the-scenes processes that Mac Pro and your applications use can run amok and cause trouble. You learn how to temporarily disable some of these processes in the section “Bypass Login Items.” If that does not solve your problem, you can see if some other process is at the root of your problem by performing a Safe Boot. That is, you can start Mac Pro in Safe Mode, which means that it does not load most of those behind-the-scenes components.
Restart Mac Pro in Safe Mode
Click the Apple icon ().
Click Restart.
Mac Pro asks you to confirm.
Mac Pro logs you out and then restarts.
Press and hold until you see the Apple logo.
Mac Pro loads with only a minimal set of components.
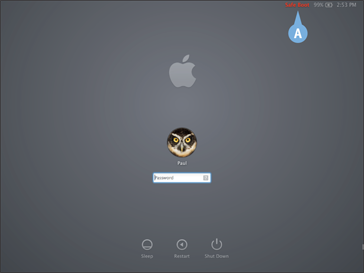
A When you get to the login screen, you see the words “Safe Boot.”
If you have multiple user accounts, click your user account icon.
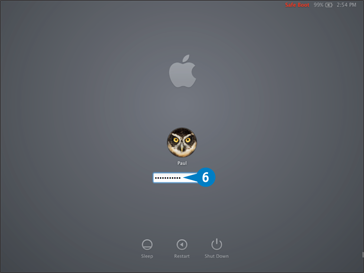
 Type your password and then press
  .
.
 Check to see if the problem is still present.
Restart Mac Pro in Target Disk Mode
You can use target disk mode to help troubleshoot Mac Pro. If you are having trouble starting Mac Pro, a problem with the main hard drive might be the culprit. You normally troubleshot such a problem by booting either to the Recovery HD or to a Recovery drive, as described in the section “Boot to the Recovery HD.” If you cannot access the Recovery HD and you do not have a Recovery drive, then you can still troubleshoot the problem by connecting Mac Pro to another Mac using a Thunderbolt cable and booting Mac Pro in target disk mode.
Restart Mac Pro in Target Disk Mode
Connect Mac Pro and the other Mac using a Thunderbolt cable.
During the restart, press and hold  until you see the Thunderbolt icon.
Mac Pro is now in target disk mode.
Restart the other Mac.
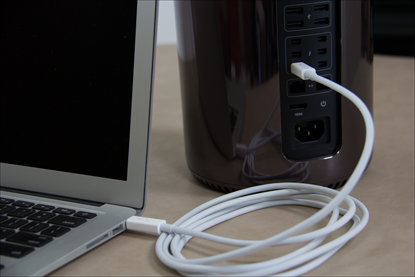

A When the other Mac's desktop appears, the Mac Pro's hard drive appears as a drive on the other Mac.
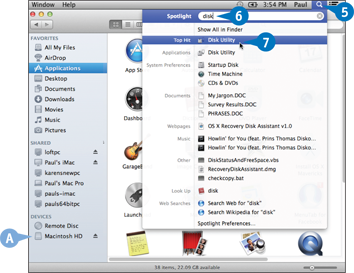
Click Spotlight ().
Type disk.
Click Disk Utility.
The Disk Utility window appears.
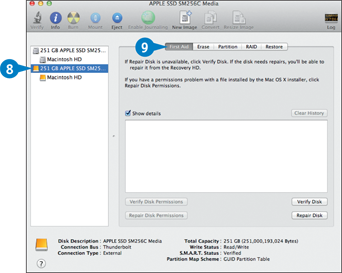
 Click the Mac Pro hard drive.
 Click the First Aid tab.
 Verify or repair the Mac Pro hard drive, as described in Chapter 15.
TIP
Mac Pro will not start in target disk mode. Why?
This can happen if you use a wireless keyboard because Mac Pro does not recognize that you are holding down . The best way to work around this problem is to connect a wired keyboard and try again.
If that is not an option, the only other possibility is to configure target disk mode as the startup disk, although this requires access to the OS X desktop. If you have such access, open System Preferences, click Startup Disk, click Target Disk Mode, and then click Restart.
Bypass Login Items
Flaky system behavior could be caused by one of your login items. To find out, it is possible to log in without loading any of your login items (this is called a safe login). If the problem goes away, you are a step closer to locating the culprit because you can be fairly certain that a login item is the cause. You can then remove the login items one at a time until you find the one that is the source of the problem. Note that you will likely need to reinstate the previously removed login items by reinstalling the software.
Bypass Login Items
Bypass All Login Items
Press ++.
You can also click the Apple icon () and then click Log Out.
Mac Pro asks you to confirm that you want to log out.
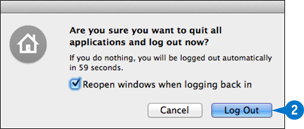
Click Log Out.
If you have multiple user accounts, click your user account icon.
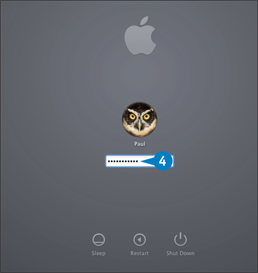
Type your password, press and hold , and then press .
Mac Pro logs you in without loading any of your login items.
When you see the desktop, release .
Remove a Login Item

In the Dock, click System Preferences ( ).
).
The System Preferences appear.
Click Users & Groups.
The Users & Groups preferences appear.
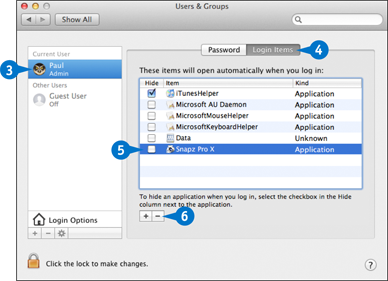
Click your user account.
Click the Login Items tab.
Deselect the check box beside the item you want to remove ( changes to
  ).
).
Click Remove ( ).
).
Mac Pro removes the login item.
Delete a Program's Preferences
One of the most common causes of application flakiness is a preferences file that somehow becomes damaged or corrupted (for example, its data is written with the wrong syntax). In that case, you can solve the problem by deleting (or moving) the preferences file so that the application has to rebuild it. On the downside, this may mean that you have to reenter some preferences, but that is usually a fairly small price to pay for a stable application.
Delete a Program's Preferences
Quit the application if it is currently running.
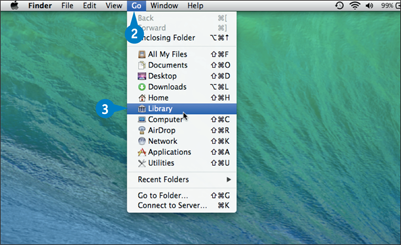
In Finder, click Go.
Press and hold and then click Library.
Mac Pro opens the Library folder.
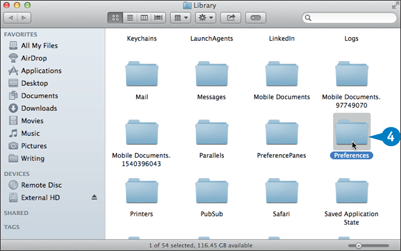
Double-click Preferences.
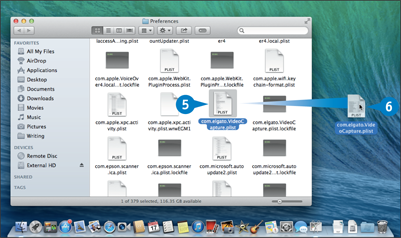
Locate the application's preferences file.
Note: If you cannot find the preferences file, click Go, click Computer, double-click Macintosh HD, double-click Library, and then double-click Preferences to see if it appears in that folder.
Click and drag the preferences file to the desktop.
Note: If the application has multiple preferences files, move all of them to the desktop.
Run the application and see if the problem persists:
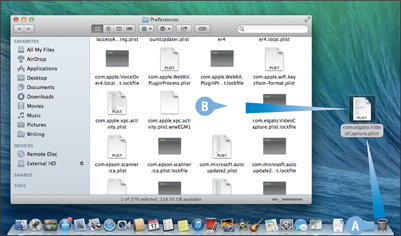
A If the problem is resolved, then the preferences file was the source after all, so move it to the Trash.
B If the problem remains, then the preferences file was not the source. Quit the application and move the preferences file back to the Preferences folder.
Force a Stuck Application to Close
When you are working with an application, you may find that it becomes unresponsive and you cannot interact with the application or even quit the application normally. In that case, you can use an OS X feature called Force Quit to force a stuck or unresponsive application to close, which enables you to restart the application or restart Mac Pro.
Unfortunately, when you force an application to quit, you lose any unsaved changes in your open documents. Therefore, you should make sure the application really is stuck before forcing it to quit. See the second tip for more information.
Force a Stuck Application to Close
Click the Apple icon ().

The Force Quit Applications window appears.
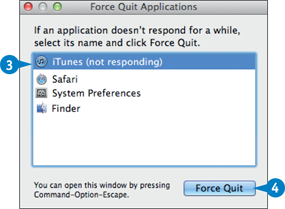
Click the application you want to shut down.
Click Force Quit.
Mac Pro asks you to confirm that you want to force the application to quit.
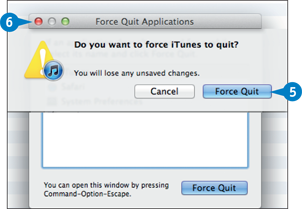
Click Force Quit.
Mac Pro shuts down the application.
Click Close ( ) to close the Force Quit Applications window.
TIPS
Are there easier ways to run the Force Quit command?
Yes. From the keyboard, you can run the Force Quit command by pressing ++ . If the application has a Dock icon, press and hold + and then click the application's Dock icon. In the menu that appears, click Force Quit.
If an application is not responding, does that always mean the application is stuck?
Not necessarily. Some operations — such as recalculating a large spreadsheet or rendering a 3-D image — can take a few minutes, and during that time the application can appear stuck. If Mac Pro is low on memory, it can also cause an application to seem stuck. In this case, try shutting down some other applications to free up some memory.
Force a Stuck Process to Close
A process is a running instance of an executable program or an execution thread within a program. All the applications you have running are processes, but so are all the behind-the-scenes programs that Mac Pro and your applications require to function properly. If Mac Pro is running very slowly or is using all of its CPU resources (see Chapter 16) but the Force Quit command does not show a stuck application, then a stuck process may be at fault. You can use Activity Monitor to check this and to force a stuck process to close.
Force a Stuck Process to Close

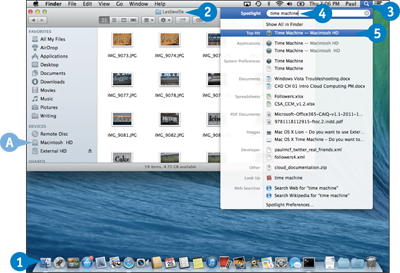
Click Spotlight ().
Type activity.
Click Activity Monitor.
The Activity Monitor window appears.
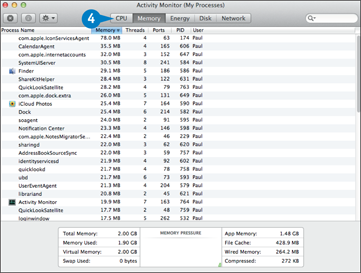
Click the CPU tab.
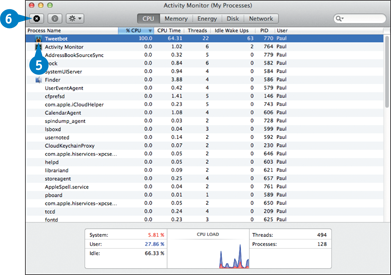
Click the process you want to close.
Click Force a process to quit ( ).
).
Activity Monitor asks you to confirm.
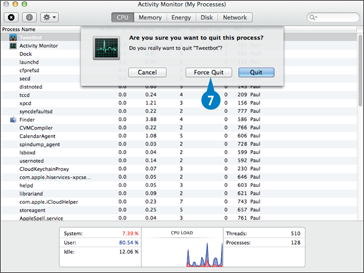
Click Force Quit.
Activity Monitor closes the process.
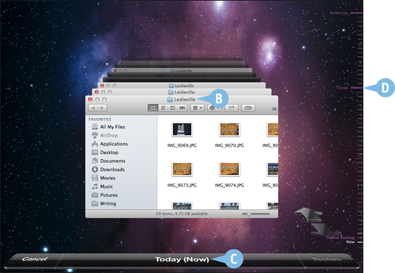
Restore an Earlier Version of a File
If you improperly edit or accidentally overwrite a file, some apps enable you to revert to an earlier version of the file. Why would you want to revert to an earlier version of a file? One reason is that you might improperly edit the file by deleting or changing important data. In some cases you may be able to restore that data by going back to a previous version of the file. Similarly, if you overwrite the file with a different file, you can fix the problem by restoring an earlier version of the file.
Restore an Earlier Version of a File

Open the file you want to restore.
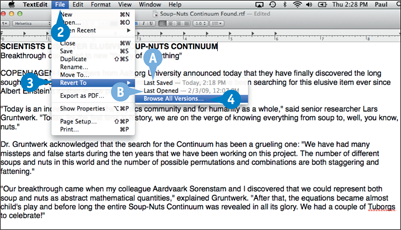
Click Revert To.
Note: If you do not see the Revert To command, it means the application does not support this feature.
A To restore the most recently saved version, you can click Last Saved.
B To restore the most recently opened version, you can click Last Opened.
Click Browse All Versions.
The restore interface appears.
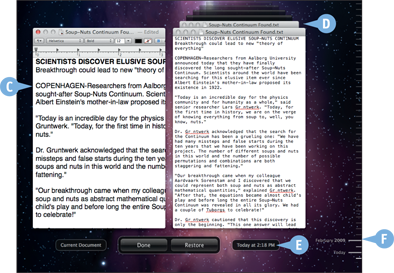
C This window represents the current version of the file.
D Each of these windows represents an earlier version of the file.
E This area tells you when the displayed version of the file was saved.
F You can use this timeline to navigate the earlier versions.
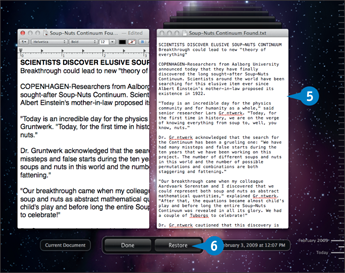
Navigate to the date that contains the version of the file you want to restore.
Note: See the tip to learn how to navigate the previous versions.
Click Restore.
Mac Pro reverts the file to the earlier version.
TIP
How do I navigate the previous versions?
There are two methods you can use:
• Use the timeline on the right side of the window to click a specific version.
• Click the title bars of the version windows.
Can I restore a previous version without overwriting the current version of the file?
Yes, you can restore a copy of the file. This is useful if the current version has data you want to preserve, or if you want to compare the current version with the earlier version. Follow steps 1 to 5 to navigate to the version of the file that you want to restore. Press and hold and then click Restore a Copy.
Restore Files Using Time Machine
If you have configured Mac Pro to make regular Time Machine backups, you can use those backups to restore a lost file. If you accidentally delete a file, you can quickly restore it by opening the Trash folder. However, that does not help you if you have emptied the Trash folder. Similarly, if the program or OS X crashes, a file may become corrupted.
Because Time Machine makes hourly, daily, and weekly backups, it stores older copies of your data. You can use these backups to restore any file that you accidentally delete or that has become corrupted.
Restore Files Using Time Machine
 ).
). Open the folder you want to restore, or the folder that contains the file you want to restore.
A To restore your entire hard drive, choose Macintosh HD in the sidebar.
Note: Restore your entire hard drive only if your original hard drive crashed and you have had it repaired or replaced.
Click Spotlight ().
Type time machine.
Click Time Machine.
The Time Machine interface appears.
B Each window represents a backed-up version of the folder.
C This area tells you when the displayed version of the folder was backed up.
D You can use this timeline to navigate the backed-up versions.
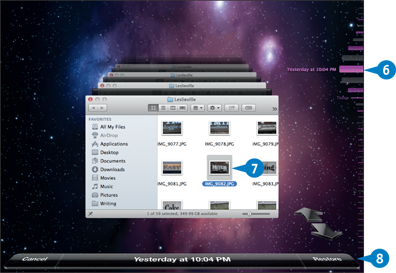
Navigate to the date that contains the backed-up version of the folder or file.
Note: See the tip to learn how to navigate the Time Machine backups.
If you are restoring a file, click the file.
Click Restore.
If another version of the folder or file already exists, Time Machine asks if you want to keep it or replace it.
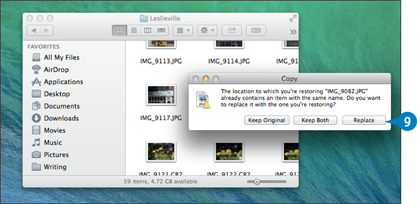
Click Replace.
Time Machine restores the folder or file.
TIP
How do I navigate the backups in the Time Machine interface?
Here are the most useful techniques:
• Click the top arrow to jump to the earliest version; click the bottom arrow to return to the most recent version.
• Press and hold and click the arrows to navigate through the backups one version at a time.
• Use the timeline to click a specific version.
• Click the version windows.
Boot to the Recovery HD
You can recover from some problems by accessing the recovery tools that come with Mac Pro. OS X creates a hidden area of the hard drive called Recovery HD, which contains a program called OS X Utilities. This program offers various tools that you can use to troubleshoot and recover from problems. For example, if you suspect that your Mac Pro's main hard drive is causing a problem, you can access Recovery HD and use Disk Utility to verify or repair the drive. Similarly, you can also use Recovery HD to restore Mac Pro from a Time Machine backup and to reinstall OS X.
Boot to the Recovery HD
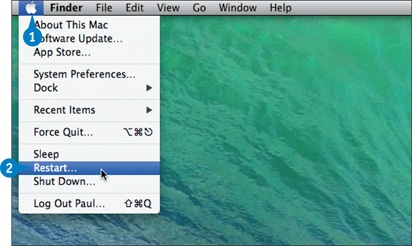
Click the Apple icon ().
Click Restart.
Click Restart.
Press and hold while Mac Pro is restarting.
A list of Mac Pro's hard drives appears.
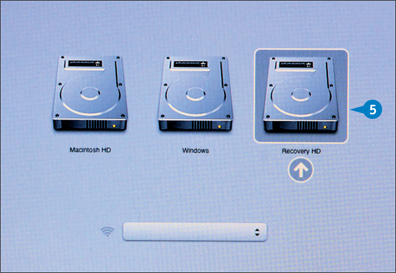
Click Recovery HD.
The OS X Utilities window appears.
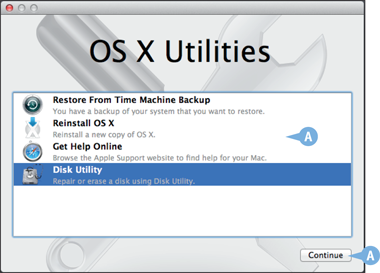
A To use a utility, click it and then click Continue.
Note: See the sections that follow to learn how to restore a backup and reinstall OS X.
TIPS
Can I use the Recovery HD to get online?
Yes. If you cannot start Mac Pro and have no other device for Internet access, access troubleshooting information on the web by booting to the Recovery HD. Click the Wi-Fi Status icon ( ), click your Wi-Fi network, and then type your Wi-Fi password. In the OS X Utilities window, click Get Help Online and then Continue. OS X Utilities loads Safari and displays troubleshooting steps. You can also use Safari to surf to any site that has the information you seek.
How do I boot to the main Mac Pro hard drive?
To restart Mac Pro and boot to the main drive, click OS X Utilities, click Quit OS X Utilities, and then click Restart.
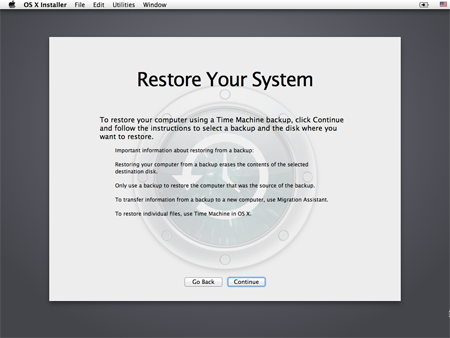
Restore the System from a Time Machine Backup
If you cannot start Mac Pro and you have tried other troubleshooting techniques to no avail, you may be able to get Mac Pro running again by restoring the entire system from a Time Machine backup. If you have tried repairing the hard drive permissions and the hard drive itself, as described in Chapter 15, but Mac Pro still will not start, one or more corrupt system files might be to blame. By restoring the system from a backup, you are essentially reverting Mac Pro to an earlier, working state.
Restore the System from a Time Machine Backup
Boot to the Recovery HD.
Note: See the previous section, “Boot to the Recovery HD.”
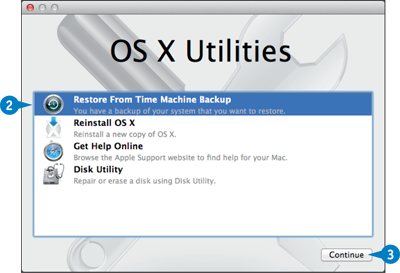
Click Restore From Time Machine Backup.
Click Continue.
Mac Pro displays an overview of the restoration process.
Click Continue (not shown).
The Select a Backup Source window appears.
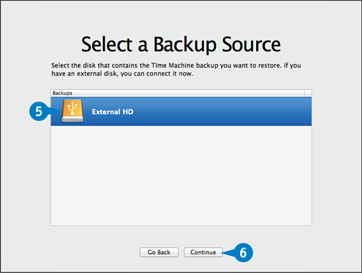
Click the hard drive that contains your Time Machine backups.
Click Continue.
The Select a Backup window appears.
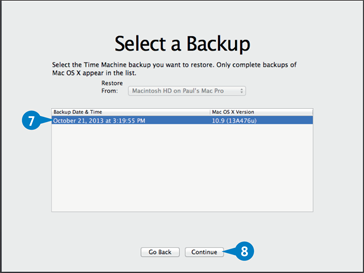
Click the backup you want to use for the restore.
Click Continue.
The Select a Destination window appears.
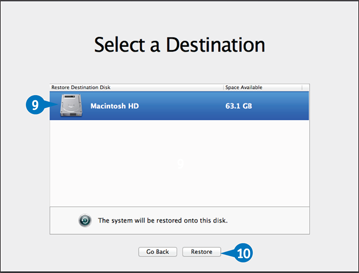
Click Macintosh HD.
Click Restore.
Mac Pro restores your system.
Reinstall OS X
If worse comes to worst and Mac Pro will not start or if your system is completely unstable, then you need to reinstall the operating system. The most common scenario for reinstalling OS X is when Mac Pro does not start, and repairing the hard drive as described in Chapter 15 has no effect. Another common scenario is when Mac Pro suffers from frequent lockups, application crashes, and other unstable behavior, and deleting preference files, as described in the section “Delete a Program's Preferences,” and repairing disk permissions, as described in Chapter 15, have no effect.
Reinstall OS X
Boot to the Recovery HD.
Note: See the section “Boot to the Recovery HD,” earlier in this chapter.
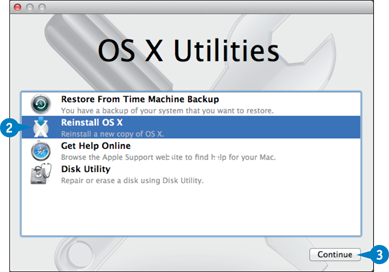
Click Reinstall OS X.
Click Continue.
The Install OS X window appears.
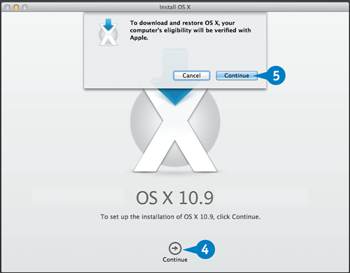
Click Continue.
Install OS X tells you that your computer's eligibility will be verified with Apple.
Click Continue.
The OS X license terms appear.
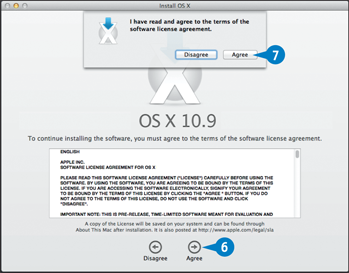
Click Agree.
Install OS X asks you to confirm.
Click Agree.
Install OS X asks you to select where you want OS X installed.

Click Macintosh HD.
Click Install.
OS X Install reinstalls OS X on Mac Pro.