Chapter 3
We now head into the vertical, beginning with leader protection as an element in what we call the “fall-protection system.” Rather than conceptualize the leader’s protection as separate from the bottom anchor and the next belay (and even the eventual rappel or descent), we propose seeing these as components in an overall system. This system protects the leader and follower(s) during their time in the mountains.
Building the Fall-Protection System
Plenty has been written about how to place cams, nuts, pitons, and bolts. Add to that the titles on anchoring, and you’ve got quite a library going. Although individual gear placement and how to combine that equipment into anchors are both basic and critical skills, little has been written about how those parts work together to form an overall fall-protection system. We’ll leave other titles to handle gear placements and basic anchoring, and introduce the more holistic concept of an overall system here.
Gear Fundamentals
When we place gear, we rate or judge its quality with three main criteria:
- The strength of the piece (primary pull)
- The security of the piece (secondary pull)
- Ease of removal for the second
Most of us rank strength as our top priority in a gear placement, but if the cam or nut easily dislodges with a secondary pull (sideways, outward, or upward), its strength is negated. As far as ease of removal goes, it might not seem too important at first, but on longer routes if you or your partner lose a piece or two to getting them stuck or “fixed,” you may compromise your ability to protect subsequent pitches. Clients struggling with sticky gear waste a tremendous amount of energy. Placing easy-to-remove gear becomes even more critical when guiding.
Consider also the time it takes to remove a piece. If it takes an average of 30 seconds extra per piece, that adds up to significant losses on a long route. Take two parties on identical routes, for example, one with tricky gear and the other with simple-to-clean pieces. If we estimate ten pieces per pitch, at 30 seconds extra per piece, then that’s 5 minutes extra per pitch. On a ten-pitch route, you are starting to look at nearly an hour of time lost.
The interface between anchors, protection, and the rope that runs through the system is complex and variable. As the leader climbs upward, the rope snakes its way through the protection system and remains slack until the leader falls. At this moment it tightens, and anywhere the rope bends through protection, an angle forms—introducing a secondary pull to the system.
The Secondary Pull
Secondary-pull angles generally face sideways, or occasionally and more seriously, upward. Since removable (“clean”) protection can be removed by hand, it is sometimes susceptible to dislodging when pulled outward or upward. And not just the top piece in the system—intermediate pieces can pull out with sideways or upward forces. We call these secondary pulls, as most of the time we focus on the expected primary, or downward, pull. Secondary pulls can dramatically reduce the security and effectiveness of your fall-protection system, so let’s dive into some detail about them and how to account for them.
A rope running plumb line from leader down to belayer results in no secondary pull whatsoever. Any deviation in the rope’s path, however, can result in a secondary pull. This could be a belayer standing far back from the cliff (the rope runs down from the leader, through his first piece and outward, toward the belayer), or any time the rope wanders left or right to find a gear placement or a ’draw on a bolt.
As most of you know, a runner, sling, or quickdraw on a piece can dramatically reduce the potential for a secondary pull by straightening out the path of the rope, or just reducing the chances the natural upward snaking of the rope through gear (as the leader climbs) pulls a piece up and out.
Strength vs. Security
Most books focus more on placing pieces for strength and less on the security of a placement. We feel this is an appropriate way to learn the basics. Once the climber understands how to place strong, reasonably secure pieces, he must begin to better understand how, where, and why to make pieces more secure. Too often we see leaders make mistakes in this part of the system, resulting in compromised fall protection.
The other, more advanced skill of ease-of-removal may appear to contradict security. At times this is certainly the case, but there are other instances when security actually helps in ease of removal (more on this in a bit).
In summary—and this is very important—ease of removal cannot compromise necessary security, and security cannot compromise necessary strength.
Anticipating Forces in Secondary Pulls
Depending upon the nature of the climb and protection opportunities, secondary pulls can be difficult to predict. Pulls can change during a pitch, or change temporarily depending upon the leader’s position. For example, if a leader were to put a piece of protection in and then climb to the right, the piece would get a slight pull to the right. Once higher, if the leader traversed back to a stance above the piece, it would get no secondary pull. If the leader continued her traverse to the left, the piece would then get a leftward pull. As soon as the leader placed another piece, the secondary pull would come from that direction. This in reality is a rare case, but not unprecedented.
As a rule of thumb, the secondary pull generally comes from the direction of the next piece in the system. Knowing this gives us a clue in predicting where the secondary pull will come from and how strong it will be.
If we can predict the location of the next piece of protection, we can predict the direction of the secondary pull. Once we know the direction, we then need to visualize the angle the rope will go through the carabiner on the piece. This involves seeing where the climb goes after the piece. Most of the time this angle will be between 90 (an abrupt turn one direction or another) and 180 degrees (a straight line, no turn at all). The closer the change of direction is to 90 degrees, the stronger the secondary pull.
The leader experiences the secondary pull as rope drag during her lead. Rope drag on its own can certainly dislodge pieces. It’s typically a fall, though, that results in a violent “zippering” of numerous pieces on a pitch.
We then ask ourselves, where does the rope come from? If the rope is coming from below, the secondary pull will be sideways and down. If the rope is coming horizontally across the cliff, the pull will be sideways and upward. The secondary pull typically bisects the angle at the carabiner where the rope connects to the sling, piece, or quickdraw.

Because the rope line changes direction at the bottom piece, it creates a secondary pull upward and leftward. The leader must anticipate this and place the piece so it can withstand the secondary pull. Philbrick Photography
Outward secondary pulls are often unanticipated by climbers. Remember any angle in the rope creates a secondary pull—the rope going left or right after a piece is pretty obvious to most people, but the rope changing angle inward (toward the cliff) or outward (away from the cliff) often goes unnoticed. It’s an easy thing to miss, as we’re beneath an overhang or steepening pitch and focused on the hard climbing ahead, not the secondary pulls in our system.
Imagine a climb that starts on low-angle terrain, but then gets steep. The last piece on the low-angled section and/or the first piece on the steep section will get a substantial outward/upward pull. Which piece gets that force is usually the one closest to the transition in angle. If they are roughly the same distance from the transition, both the last piece in the low-angled section and the first piece in the steep section will get an upward/outward pull.
This can happen when we belay on the ground or on a sizable ledge. Visualize a belayer standing 8 feet away from the base of a pitch—the rope leaves his belay device, travels to the wall, through the carabiner on the first piece, then upward into the rest of the system. The rope changes angle at the first piece, so the secondary pull (outward and upward) will be toward the midpoint of the angle. This scenario risks failure of the entire fall-protection system, otherwise known as . . . zippering the pitch.
We’ve seen this scenario zipper a number of pieces, luckily usually just a few, before a cam or well-placed nut arrests the failure. If the first piece in these systems had been placed securely enough to resist that upward/outward pull, the rest of the protection would have been protected and remained in the rock.
Having the belayer set up closer to the wall would also reduce or eliminate the upward/outward secondary pull. Ideally the belayer would stand directly below the climber’s first piece, so no angle whatsoever existed.
Off the ground and on the cliff, this scenario can be less obvious, but if you keep your eye out for steepening sections and keep the rope line in mind, you’ll catch these critical direction changes and angles.
Mitigating Secondary Pulls
To deal with the secondary pull, we have three strategies:
- Add a sling to minimize the rope angle to, or as close to, 180 degrees as possible.
- Make the piece resistant to the secondary pull through its placement.
- Use an opposition system to make the piece omnidirectional.
We recommend adding a sling (usually a shoulder-length, but occasionally even a double-length), even if it doesn’t completely eliminate the secondary pull. It will partially mitigate the pull, while correspondingly reducing friction (rope drag) through the carabiner. The leader will appreciate this as he gets higher on the pitch, but less rope drag/friction in the system means more rope is “in service” should a fall occur—meaning more rope to absorb energy, which lowers the fall factor. A lower fall factor usually results in lower chances of pulling a piece.
Choosing the Right Length of Sling or Quickdraw
Climbers often fail to choose the right length sling or ’draw. For this section we’ll use the term sling to include all lengths of sewn slings and quickdraws. Choosing a sling that is too short, or not using one where you should, can cause three types of problems:
- The friction or drag between the rope and the carabiner effectively adds rope weight to the leader that in the worst case can cause the leader to fall.
- Rope drag can also increase the force subsequent pieces will have to hold in a fall. This is due to the friction caused by the rope drag reducing the amount of force the rope receives below the offending protection point or points, thereby reducing the ability of the rope to stretch and absorb the shock. Looked at another way, it is as if the friction at the piece where the rope drag originates is acting like a belay device. This effectively reduces the amount of rope holding the fall and increases the fall factor.
- The sideways or upward pull of the rope pulls out or displaces the piece.
Because traditional routes seldom take straight lines up cliffs, protection can make the rope “zigzag” up a cliff. It is this zigzagging that causes the problem of rope friction on the carabiners. We use slings to straighten the path of the rope, which in turn reduces or eliminate the friction.
To understand how much force secondary pulls put on our protection, let’s look at how the angle formed at the carabiner-rope point generates force. This is the same process that increases force on our anchors, but instead of loading the junction of the two tangents and determining the force on the outer points of the tangent, we will be loading the outer points and seeing how it affects the junction. This means that acute angles formed by the rope as it goes through protection will put more force on the piece.
A 90-degree angle creates forces 1.33 times greater on the protection than the force applied on the individual leg. This could be 1.33 times the force of a fall or 1.33 times the rope weight being pulled by the leader. This force will be pulling the protection sideways and/or upward. The direction it pulls the piece will be the direction that bisects the angle formed by the rope. If the angle becomes acute and is between 0 and 70 degrees, the force sideways on the protection is approximately double.

These numbers vary due to friction and other factors, but serve as a guide as to how rope drag is created. Don’t worry about particular numbers—just know that a sharp, acute angle will dramatically increase rope drag and secondary pulls! The point is: Create as obtuse an angle as possible, preferably 180 degrees (or to put it another way, a straight line in the rope). In this configuration, there will be no secondary pull on the piece.
One solution would be to put a long sling (a 2-foot sling is our standard “long” sling) on every piece of protection. This does make some sense, and there is no doubt that because many people begin leading on sport routes, where bolts are placed mostly in line, the shorter quickdraw is overused in modern traditional climbing. The problem with placing too long a sling is the extended length of a fall. For every foot of sling that is added to a piece of protection, the fall lengthens by 2 feet. For this reason it is nice to put the appropriate-length sling on a piece to mitigate secondary pulls—no longer and no shorter.
So how do we determine what the right-length sling is? Imagine you’re at a stance and you’ve just placed a good cam. Now you need to determine whether or not to extend it and by how much. Look down at your previous piece and then predict where your next piece will be—draw a line between those two placements. You should choose a sling that extends your current placement so that the rope-side carabiner reaches that imaginary line.
If the imaginary line runs through rock, we need to redraw the line to the point on the rock the rope will run over. In other words, this point on the rock acts in effect as the next piece of protection. Overhangs present this problem, as does protection placed at the back of a ledge. Ideally any sling placed on gear will allow the rope to run over the lip of the overhang with as little bend as possible. For ledges, the sling should be at least as long as the ledge is wide—if the leader is climbing directly above the placement. If he climbs diagonally off the ledge, the sling will need to be even longer.
This is particularly important because the rock, being rougher than a carabiner, will give you more rope drag than a carabiner. Also, if the rock is sharp at the lip of the overhang or edge of the ledge, it could cut or at least damage the rope in the event of a leader fall.
Not all the angles in every pitch can be eliminated with a sling. Sometimes large changes of direction in a pitch require that the rope will angle through a piece of protection—we can’t avoid it. Traverses or large changes of angle from a low-angled section to steeper climbing will create situations that cannot be managed by just sling length. In those cases you’ll need to employ another strategy to mitigate the secondary pull.
Mitigating the Secondary Pull: The Placement Itself
Correctly identifying the direction and potential forces of the secondary pull allows you to place your piece in a way that minimizes the chances of it pulling out. Once the secondary pull is identified, placing your piece such that it can resist it allows you to have the peace of mind that the protection will be viable as you climb above it.
Cracks and Flakes
Terrain helps us find a natural placement that resists a secondary pull. Cracks and flakes can be exploited advantageously with a little recognition and ingenuity.
A crack splitting a face trends upward, and its sides are the face of the rock itself—we often call these “splitter” cracks. If they’re deeper, or the lip of the crack is featured, it offers points at which nuts, Tricams, and cams can be effectively “buried,” meaning they’re protected from being pulled upward, outward, or to the left or right.
Contrast that with a crack formed by a flake. Because a flake is usually a part of the face jutting out into space, the crack it forms is perpendicular to the face itself. For a right-facing flake, this means climbing to the left above it will naturally protect the placement from a secondary pull in that direction. If the climber moves to the right, the gear is naturally oriented to pull directly out and toward the secondary pull—not ideal!

A placement in this flake will naturally resist a leftward pull, while a placement in the crack is more likely to dislodge with the same pull. Philbrick Photography
A splitter or flake can be used to your advantage by accurately predicting the direction of the secondary pull, then placing gear such that the rock itself negates the pull. There are times, however, when we can’t use the terrain to our advantage, so care must be given—most notably when our direction of climbing makes our pieces more vulnerable to the secondary pull. More on these situations below, when we discuss omnidirectional placements.
Horizontals
Horizontal cracks offer natural protection from upward, downward, and often outward pulls. Left- or rightward pulls may still be a concern, though if the crack bottoms out, a cam placed against the back won’t walk. Tricams and Stoppers offer the advantage of bending over the lip of the crack without dire consequences, though left-right secondary pulls can be a challenge to manage. Flexible-stem cams tend to be very secure in a horizontal, but can bend under hard falls.
Omnidirectional Pieces
We can use terrain, but also additional gear, to create an omnidirectional piece. Bolts and ice screws are omnidirectional, meaning secondary pulls don’t affect them—they’re almost always as strong in any direction as they are downward. This relaxes us when we lead above them because we never fear a bolt is going to pull out as we move left, right, or up above it. But what about gear placements?
Spring-loaded cams in a vertical crack can sometimes be omnidirectional, adding security. Cams will often rotate upward or “walk” in a vertical crack, which can make them difficult to remove. Climb anywhere with popular beginner routes, and you’ll see these relic cams, stuck long ago and now weathered from the elements and other climbers trying to “booty” them. As long as the crack doesn’t open up or widen above the cam, these placements can resist upward secondary pulls, offering some (imperfect) protection against zippering.
While cams may resist upward secondary pulls, rotating them into a non-ideal orientation (the stem sticking directly outward or even upward) makes them suboptimal when holding a fall. If we can keep a cam from walking, we have a much better placement in terms of security and strength. To achieve this, we need to look at the walls of the crack to see if we can spot a feature within the crack that prevents the cam from rotating upward. These are more common than you would think, especially in more featured cracks. If we can get the outermost lobe under this feature, this will prevent it from rotating and walking.
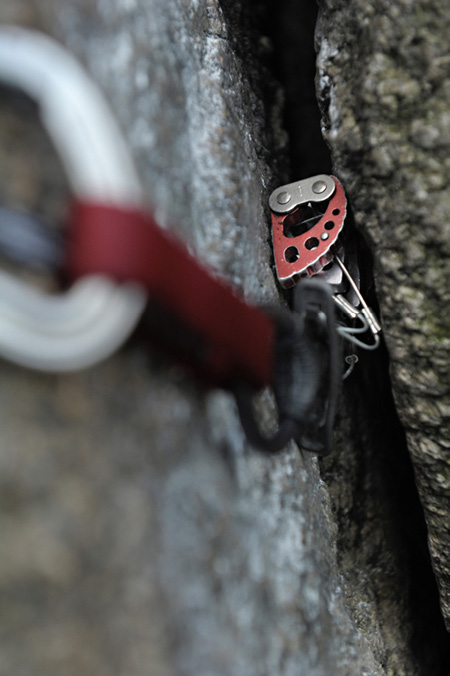
The slight bump on the right, beside and above the outer red lobe, prevents the cam from walking into a less secure position. Philbrick Photography
Stoppers and Tricams
Stoppers and Tricams can also resist secondary pulls, but as a general rule not nearly as well as a cam. Stoppers find purchase in the rock when grains and crystals gouge and scratch the surface. Some climbers even give their placements a solid tug to “set” it—we’ve all done it, especially when a particular nut is our “money piece” and having it dislodge would be dangerous.
In general, though, you should be able to visualize how strong the piece is, then set it relative to the secondary pull. Yarding on a piece that doesn’t need it just makes it harder to remove. Setting stoppers requires a thoughtful loading, from a simple pull with no momentum to a hard jerk with a quick draw. Make it secure but remember only as much as is needed, or you’ll end up just having a hard-to-remove piece.
Often a tiny tweak or refinement to a Stopper or Tricam placement can make them fairly resistant to a secondary pull. Again, finding a tiny lip or constriction in a crack can help. Another strategy is to tilt the unit’s top a little deeper into the crack, relative to its base. This orients the wire (or webbing in the case of a Tricam) at a slight angle, which allows it to flex a bit rather than just pulling up on the piece.
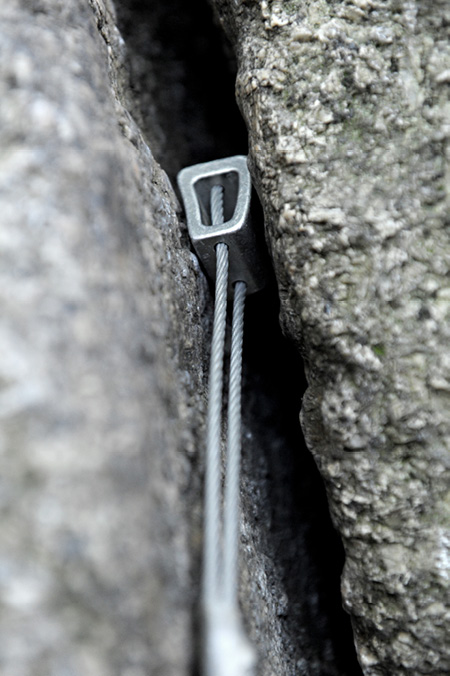
This nut will resist an outward secondary pull. Philbrick Photography
Tricams offer two placement types: active and passive. In the active mode we typically give them a good tug to set them, which helps keep them seated and secure. This is, of course, conditional upon choosing the right size for the crack.
Placed in a more opened position, this Tricam will be easier to remove and is less likely to become fixed. Philbrick Photography
In active mode the cam should be about halfway through its range, if not even more. Many climbers place too big a Tricam in the crack, so it’s barely cammed. Put another way, it’s “stuffed” into the placement. If you find yourself in this situation, be careful setting it. These stuffed Tricams end up fixed because rather than popping out of their cammed position when being cleaned, they tend to set too tightly on both sides. Tug hard on them, or even fall on them, and they become fixed gear. We probably see fixed pink Tricams more than any other piece.
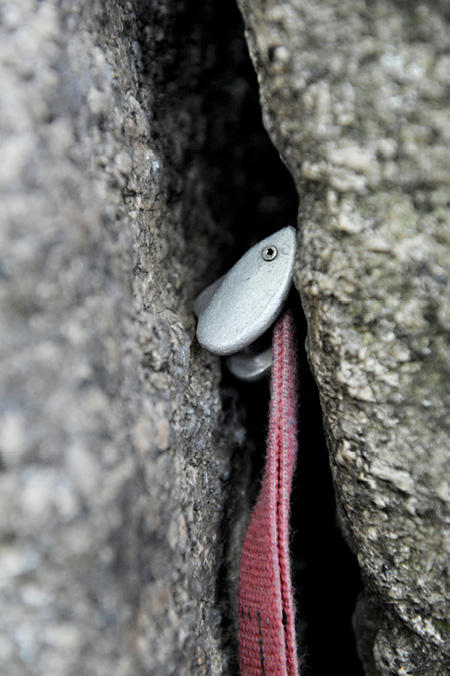
Passively placed Tricams require a bit of care, as do nuts like the DMM Wallnut. Tricams have slightly less surface area than a traditional Stopper, and DMM Wallnuts have a groove vertically on the concave side of the nut. These pieces, if tugged too aggressively when setting, can get locked into their placements, making them very difficult if not impossible to clean. We’ve found that a steady, gradual pull downward sets them adequately, while a sharp tug tends to make them hard to remove—especially for clients and less-experienced climbers.
Oppositional Pieces
Another technique to combat zippering is placing a piece specifically for an upward or outward pull. Imagine you have a good nut placement for a downward tug—it’ll easily hold a fall, but only if the force pulls directly down. To secure this placement, you might rig a nut or a cam below it, but oriented in such a way that it resists an upward and outward pull. You could then connect these pieces with a sling, preferably clove-hitched to the upper piece to tension it and allow it to keep the upper piece slotted and secured.

Use gear placements in opposition to resist secondary pulls. We put the clove hitch on the piece that will hold the fall and the sling connects the pieces, creating an omnidirectional placement. Philbrick Photography
Anticipation
To manage and mitigate secondary pulls, we must become expert at anticipating where the route goes and how our ropes will travel across and up the rock, and don’t forget—we need to predict where our next placement will be, too. Terrain assessment is a skill that takes time to master and it’s difficult to teach, let alone learn, within a book. Add to that reading a route, its sequences and gear placements, and you can see it’s a subtle, demanding art.
Ultimately, managing secondary pulls requires you to know where you’re going, where you’re going to place gear, and how to calculate the angles created by the rope. With some practice you’ll soon be connecting the dots in as straight a line as possible, and when it’s not straight, you’ll be dealing with the secondary pulls via gear placements and slings.
Ease of Removal
Security and strength come first when placing gear, but we should keep removal in mind, too. Especially for climbers looking to do long routes and guides maximizing their clients’ enjoyment, wasting time and energy on stuck gear is a nonstarter. Cleaning gear from awkward stances or struggling to clean while hanging on with one arm can be nearly impossible for newer climbers and clients.
Protect yourself first and foremost, but if you can help it, make your followers’ lives easier by placing from restful stances. Especially with inexperienced clients, placing at a stance with solid feet makes gear removal far easier. If they can use both hands, all the better. Coaching them to relax and reset the feet before they clean gear will help them save energy.
With cams, making sure they don’t walk, even the tiniest bit, dramatically improves ease of removal, not to mention security. Those same lips and features on a crack that add security also help with cleaning by not allowing the cam to rotate or walk into a tricky spot. Adding a longer sling to a cam can make all the difference, too.
For Tricams, making sure that in active mode they are not too tightly placed will help when it comes time to clean them. Remember they should be placed from about halfway through their expansion range to larger. Also, placing Tricams when you have a nice stance and saving the SLCDs for the one-handed placements and removals will make it simpler.
For nuts and Tricams that are passively placed, exercise caution when setting them. Consider slightly longer slings on the piece rather than tugging on it to set it. At first, this will take time and you won’t feel like you are gaining anything, but with practice the finesse will come naturally.
Strategy: Priorities and “Rules”
Leading more complicated routes, longer routes, and routes at our limit requires balancing options and making choices. Do we place an extra piece on the pitch and have less gear for the anchor? Do we clean a piece from a three-point anchor before leading the next pitch? Does a “perfect” anchor compromise our ability to protect the next lead?
Your rack and equipment are finite; this means you’ll need to make some hard choices up there. One option is to bring so much gear you’ll never have to compromise. Your first 10-mile approach, though, and you’ll quickly discover the downside of this strategy. Many climbers apply “rules-based” decision making, hoping this will help them navigate the many variables in climbing and protecting themselves.
Expertise: Beyond the Rules
Expertise grows from a rigid sense of the rules into a more nuanced collection of guidelines. In this manner the more experienced, masterful climber can handle far more complex situations. Anchor building is where we see these rigid rules applied most fervently. Keep in mind, though, that a unique or complex situation may fall outside the parameters of the rules. If we follow, for example, the simple rules of anchor building, our basic understanding becomes incompetence when faced with an unusual anchor situation.
Sticking with the anchor example, this incompetence isn’t necessarily the inability to build an adequate anchor. Rather, it’s too little knowledge to manage a complex situation. Basic rules in a complex situation only provide a simple solution, which might not get the job done.
The competing priorities of reducing weight, increasing speed, climbing well, and taking care of oneself all demand attention. Expertise reveals itself in the solutions we devise to resolve the dilemmas and contradictions presented by these competing variables. Creating solutions with a rigid set of rules disregards the possibility of solving unique and complex problems with an advanced level of technique and application.
For example, after a long and demanding pitch, you may arrive at the belay with less gear than you’d like. You (and your partner!) will want a bomber anchor, but without a full range of protection you’ll be forced to make compromises. Your anchor may be suboptimal. Is this acceptable? When the second arrives, do you rebuild it? If not, how can you justify and mitigate the risks of a suboptimal anchor? What if even with all the gear, you don’t have the option to rebuild, due to a lack of gear choices, an old bolt anchor, or just a poor crack at the stance? Can you purposefully make a compromise at the anchor so you can better protect the next pitch? These questions require us to understand the interplay between the anchor and protection. By understanding that interplay we can manipulate the system such that we still have effective fall protection.
Expertise: A Holistic Solution
Let’s look at a realistic situation that might occur through no fault of the climber. A leader finishes a lead, and finds that the anchor isn’t “confidence inspiring.” This anchor may be suboptimal because of poor bolts or it may be due to a crumbly crack at the only good stance. It may not even be a suboptimal anchor, but suppose there’s a crux just above and the anchor position will make it awkward to catch a factor 2 fall.
In these cases, the best plan of action is for the leader to climb past the poor anchor, fire the crux moves to the next good piece of protection, then lower back to the anchor. Because there is so much rope out, any fall at the crux will be much softer and easier to catch when compared to the potential factor 2.
Once back at the marginal anchor, the leader can augment it by tying a big bight knot with the two strands coming from the piece of protection above and clipping that knot to the masterpoint. The double-stranded bight knot anchors the leader, and when he clips it to the masterpoint, he’s secured by the good piece above and the marginal pieces in the lower anchor.
If the second will be leading the next pitch, the leader also clove-hitches in to the anchor, because when the lower climber becomes the new leader, the team can untie the bight knot and pull all the rope through the top piece, putting the new leader on a toprope for the initial moves.

1. The first leader has clipped a top piece and lowered back to the belay, tied a double-stranded bight knot with the rope, and incorporated it into the anchor. Where you clip it into your anchor system depends upon the quality of the pieces, the material involved, and who will lead the next pitch. Philbrick Photography
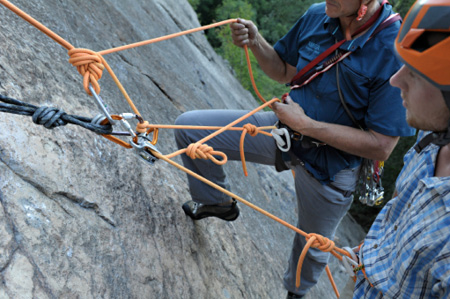
2. This party will be swinging leads, with the new leader being in the plaid shirt. Note the previous leader has clove-hitched in because he will stay on the anchor. Philbrick Photography
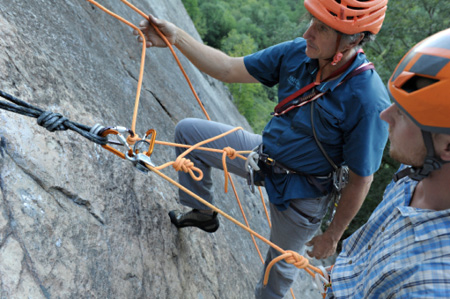
3. The previous leader has removed the double-stranded bight knot and will now pull all the team’s rope through the upper piece, starting at the backside of his clove hitch. This will pull the rope tight against the new leader. Philbrick Photography
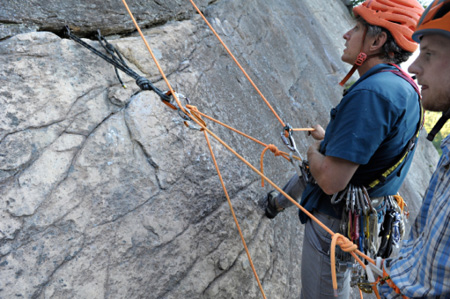
4. The new leader takes a belay. Note that the previous leader takes the new leader’s device off his harness and uses it. In this way, the new leader stays on the plaquette throughout this transition. Philbrick Photography
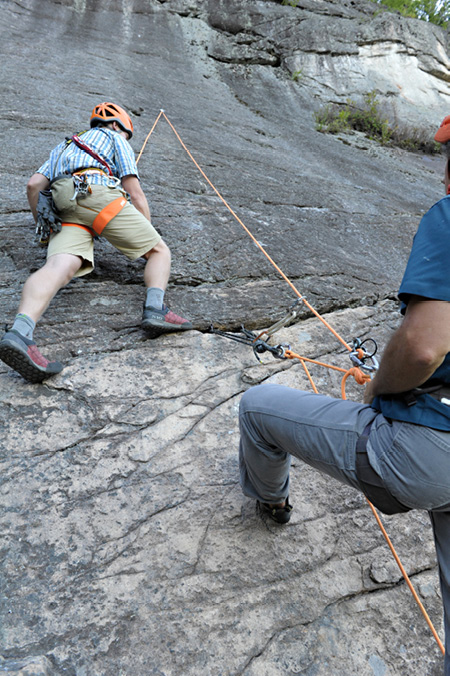
5. The new leader cleans the plaquette and brings it with him. He starts up the pitch, effectively on a toprope through the high piece. Philbrick Photography
In both systems the upper piece of protection is incorporated into the anchor. Once the second arrives, if he is going to lead the next pitch, the bight knot can be untied and the rope pulled through the upper piece till it comes tight to him. Now the new leader has a toprope for the section of concern. If the climber who led the last pitch will continue leading, the follower (or client) puts him on belay on the backside of the bight knot and now he has a toprope for his second trip through the crux section. We’ve used this approach on routes like Bird on a Wire in Joshua Tree and Tits and Beer on Looking Glass, in North Carolina—great routes with challenging climbing above a problematic stance, and this approach resolves the dilemma perfectly.
This example illustrates how understanding fall factors, the dynamic properties of the rope, and building an overall system of fall protection—rather than simply focusing on one piece at a crux—can help formulate creative solutions to the problems we continually face in climbing.
Difficult Problems
Let’s look at more difficult problems for which there might not be any “good solutions,” but nonetheless can be instructive to better understand the interplay of anchors, ropes, and gear in fall protection.
A party decides to link two pitches together, and the resulting mega-pitch ends up being longer than a rope length. (Moderate pitches without rope drag often present this option to climbers, whether on slabby or steeper, open terrain.) The leader finds himself 20 feet shy of the anchor after linking pitches and has three options:
- The leader ties into his top/last piece(s), belays his partner to him, and then the stronger climber leads the 20 feet to the anchor.
- The leader anchors into the top piece(s) and then belays his partner up to a piece of protection 20 or so feet above the old anchor. The follower then ties into that piece and puts the leader back on belay so he can finish the lead.
- The climbers simul-climb a rope length apart until the leader reaches the anchor, builds an anchor, and puts his partner on belay.
In option 1, the team sets itself up for a potential factor 2 fall onto a single- or two-piece placement. This seems an unacceptable risk. The chances of ripping the anchor—and killing the whole team—shouldn’t be accepted when other alternatives are available.
In options 2 and 3, the climbers keep as much protection between them as possible, as well as the full length of the rope in the pitch, greatly reducing potential forces should someone fall. The difference between these two options is that in 3, if the second falls the leader falls, too. This doubles the leader’s chances of falling, especially if the second is tired or less skilled. If the terrain is well within the second’s ability and he’s aware of the risks, option 3 is less tedious and probably reasonable.
If the beginning of the pitch is difficult, or the leader does not wish to accept the risk of being pulled off by his partner, option 2 offers a better solution. In this scenario an entire rope separates the team, with a full pitch of gear placements between the climbers. Fall forces will be very small should the second fall, and the option takes a potential factor 2 off the table. Almost never would we consider belaying a second off a single piece of gear, but in this case it might be a viable, reasonable option.
Imagine another scenario, a rather common one, in which the leader finds herself having difficulty leading her pitch. She’s the stronger climber within her team, but nevertheless she’s thrutching up one of the crux pitches, more than 100 feet above the belay. She comes to a small ledge with a good crack, then some easy terrain, and finally a 6-foot crux just below the belay. She climbs a few feet up, gets a suboptimal piece, eyeballs the crux. She’s considering it . . . but meanwhile the wind has begun to blow, clouds have grown on the horizon, and she realizes if her marginal piece blows, she’ll hit the ledge below. Uh oh!
She wavers a bit and then decides she’d rather have her belayer nearby, take a rest, get some moral support for the hard climbing above. The belayer is the weaker climber, so having him lead the section isn’t an option. She unclips from the marginal piece, downclimbs to the ledge, builds a bomber anchor, and brings up her second.
What her solution fails to take into account is the shock-absorbing capacity of the rope. If she blows the crux section with her belayer far below, she’ll take a 12-foot fall on 100 feet of rope (perhaps a bit more with rope stretch—a consideration), for a fall factor of .12. If she takes the same fall with her belayer on the higher ledge, she’ll take a 12-foot fall on 16 feet of rope, creating a fall factor of .75.
If the worry is the failure of the suboptimal placement and hitting the ledge, then she’s set the system up to put more force onto that piece. Also, if the piece were to fail with her belayer on the higher ledge, not only will she hit the ledge, but she could fall past it. That could result in a very-hard-to-catch factor 2 fall. Her belayer could easily drop her, not to mention she risks pulling pieces in the anchor.
Fall-Line Management
As a leader places protection for a potential fall, he may also be developing a new fall line for his second. Creating a bad swing for the second can be a serious risk-management consideration. For any leader, there should be some concern how protection affects the second’s fall; for the guide, it is a critical consideration.
If a leader were to climb a long, easy diagonal crack, then at the end of it place a piece, the second falling anywhere along that diagonal will swing until she’s directly under that piece. That is their fall line, directly under the piece. If the same leader places gear along the diagonal crack, then the fall line for the second is directly under the next piece, making the swing less. We’ll call this protecting the traverse. This is a classic system and requires that the leader place more gear.
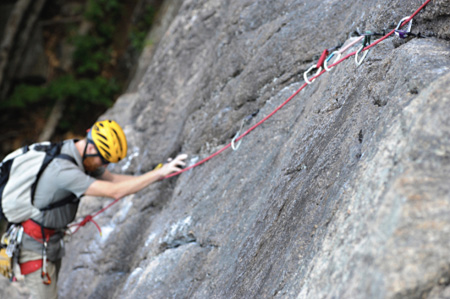
On a traversing pitch, the leader must protect before and after a crux, in addition to intermittent placements along the way. The pieces before a crux protect the leader; pieces after the crux protect the second. Philbrick Photography
In the simple case above, placing more gear lessens the swing, but sometimes placing less might straighten out a fall line for the second. Let’s take the same situation, but after the diagonal the route wanders the opposite way. So our leader does a 15-foot diagonal traverse to the right and then as he moves up, the route wanders back to the left. By not placing gear on the final feet of the traverse (or placing it but then back cleaning) and the terrain going up and left, the rope will take a nice straight line and the swing will not be as dramatic. This style of fall-line management is called the “high pivot point.” The higher the pivot point above the second, the softer the swing will be.

1. Traverses don’t always mean placing lots of gear. In this scenario, the leader placed pieces low in a crack, which means if his second falls while traversing, he’ll take a nasty pendulum. Philbrick Photography

2. If the leader decides he can forego a couple placements, or he back cleans, then he can establish a high pivot point, which gives his follower a much more effective belay as the follower traverses. Philbrick Photography
All fall-line management combines some elements of both situations. Seeing the line and considering how the fall line will be for the second is an advanced leading technique. Guides need to be careful to not focus on a high pivot point so much that they end up putting themselves in jeopardy. A guide must always balance the risk of a runout with fall-line management for the second(s). On big routes a guide becoming incapacitated not only puts him at risk, but also puts his inexperienced clients at risk. Guide security is client security on big routes. It is easy for an experienced guide to take on too much risk, thinking himself impervious to falling on easy terrain.
We first need to recognize when the second might be at risk. One obvious clue is traversing, especially from difficult terrain onto easier terrain. Whenever you finish a section like this, evaluate the terrain for a possible swing.
The beauty of the high pivot point solution is that it reduces rope drag for the leader in most cases, and that can have a positive risk-management impact on him. This is especially true when using the parallel rope system. If the runout is too risky, or the guide doesn’t notice the pivot point solution until after a section, perhaps a decisive and efficient back-cleaning decision is the best solution.
In a party of three, the team could climb caterpillar style and have the middle climber take a back-belay and strategically clean a couple pieces to give the last climber a high pivot.
The key to fall-line management is to think of the two methods as equivalent. Lots of leaders have been taught to “protect traverses.” That phrase creates a bias toward the option of placing more protection over the high pivot point. If you can conceptualize the high pivot point in the same way you do managing rope drag or a secondary pull (see the “Choosing the Right Length of Sling or Quickdraw” section on page 28), it might be easier to recognize the two techniques as viable tools rather than one over the other.
In summary, the high pivot point becomes a risk-management problem for the leader if he elects to run it out to create it. If he back cleans to create the system, it becomes a time-management problem for the team. Weighing those two problems becomes a judgment call.