Chapter 4
Whole books have been devoted to the anchor. Friendly arguments over beers and passionate debates on web forums have generated a tremendous focus on this component of the fall-protection system. So much anchor information exists, it has displaced other important subjects and in many cases has led to confusion. We hope to add clarity to the topic, but to us this chapter is less important than others—not because anchors are unimportant, but because so much information on them already exists.
Common Myths about Belay Anchors
First let’s look at some common myths about anchoring, and then we’ll discuss each.
Myth 1: Three-point anchors are the most common.
Myth 2: The anchor is the most important part of the fall-protection system.
Myth 3: Redundancy at the anchor means it is twice as strong as a non-redundant anchor.
Myth 4: All anchors need to do the same thing, so they should be built to the same standard.
Myth 1: Three-point anchors are the most common.
We would agree that three-point anchors are the most common anchors when placing our own gear. However, if you take all multi-pitch climbing, even multi-pitch trad climbing, and look at how many bolted anchors exist and how frequently we use trees or other natural anchors, you might find that the three-point anchor is much less common than people think. This myth does climbers a disservice in that it potentially overstates their competencies, when in fact anchor building may be a far less practiced skill. Many climbers have far less experience with anchors than they assume.
Question that assumption: Are you truly skilled at efficient, reliable anchor building? Maybe not! For most this may seem too basic a skill, but it is our experience teaching new guide candidates that some attention here is warranted. One problem we see is that masterpoints are often too low, which makes the anchor awkward to work with. It’s also much more difficult to hold a leader fall in the event of a factor 2 fall.
Connecting three or even four pieces also challenges most climbers. Placements that are far apart or too numerous often leave the leader with the impression that her cordelette is too short. Cordelettes seem to get longer every year. We recommend carrying long slings that can ameliorate the above problems, while also being available for sundry other tasks during a climb. We strive to carry gear and material that fulfills as many uses as possible—why not apply this tactic to our bulky, heavy cordelettes?
Myth 2: The anchor is the most important part of the fall-protection system.
We don’t suggest the anchor is unimportant, but it is a part of an entire fall-protection system made up of other equally important components. Leader protection failure is a common cause of accidents, as are rappelling or lowering off the end of a rope and poor belaying. Rappelling, lowering, belaying—these are all “fall-protection systems.”
If you look at how often anchor failure causes accidents, it becomes clear it’s not the hazard we assume it to be. This certainly does not mean we should be focused on leader protection or closing the system for rappels and belays at the expense of the anchor, but neither should we be so focused on the anchor at the expense of those other components.
Build anchors as we’ve learned to do—securely, efficiently, with some redundancy, but without overbuilding them. This saves gear for the next pitch and potentially improves your overall system rather than just the anchor on its own. Too often experienced climbers use too much gear, or too much gear of a certain size, in the anchor, which puts the leader at a disadvantage for the next pitch. We often see climbers carry an excessively large rack to compensate for an overbuilt anchor, too—not a huge penalty on a short route or a route with a short crux, but for longer efforts, the extra weight can be an enormous disadvantage.
Myth 3: Redundancy at the anchor means it is twice as strong as a non-redundant anchor.
In fact, a non-redundant anchor can be stronger than a redundant one. Take, for instance, a cordelette placed around a tree. As an anchor we would then tie a knot to make the cord redundant, but we also have the option of just basketing it around the tree. With a knot in the system, you see that should any strand break or cut, the entire anchor does not fail. In the basketed one, you can see that if one strand were to break, cut, or fail, the entire anchor would fail. So it is clear the knotted one is redundant, while the basketed one is not.
Now, we know that any knot tied into cord will weaken it. So how could the knotted/redundant one be stronger? The simple answer is that it is not stronger in tensile strength.
From here things start to get really confusing. We know from testing that if we pull the knotted cord to failure, it will be weaker than a basketed cord. But if we do a drop test, we might see some differences. Why? Because when the knot tightens, it adds dynamics/shock absorption to the system. We know from testing at DMM in Wales that nylon behaves this way, while Spectra does not—knotted Spectra does not seem to add any dynamic component to the system. We are guessing here, but it seems that Spectra’s inherent “slipperiness,” or lack of friction when running over itself, means that the knot tightens quickly and doesn’t generate much in the way of heat. That means the knotted Spectra isn’t as dynamic. (For simplicity’s sake, we use Spectra and Dyneema interchangeably throughout the book.)
In short, we might be making compromises in strength in the pursuit of redundancy. This might not be a huge problem, but if you do the same comparative analysis with the classic pre-equalized cordelette system and the magic X/crossed sling system, you’ll see the prejudice we have for redundancy over strength.
Bottom line, we need to evaluate the demands placed on each anchor we build. Modern testing has shown that most of our methods for equalizing anchors (pre-equalized cordelettes in particular) do not equalize effectively, so putting knots into our cordelettes and webbing may only be weakening our materials, without achieving significant overall strength in our anchors. Speed and simplicity (you’re at risk of being benighted or beneath seracs on an alpine route, for example) can also deemphasize the need for redundancy. In instances like these, a non-redundant anchor might not be the end of the world—in fact, it might be the smart choice.
Too many times we see climbers and new guide candidates overly concerned with redundancy and to get redundancy they expose themselves to other hazards or carry too much equipment or burn time to solve the problem. In serious, complicated terrain, choices like these are critical to managing diverse hazards and keeping moving.
Myth 4: All anchors need to do the same thing, so they should be built to the same standard.
To discuss this myth we need to first delve into what anchors do. In the most general sense, they keep us from falling off the mountain. But who is the “us” in our definition?
Most of the time, climbing is a team sport, and like all team sports, there are positions. Our teams have three positions: belayer, second, and leader. Next we have to ask, how much energy can each position put onto the anchor? If a belayer is leaning back on the anchor, the amount of weight on that anchor is minimal. It’s less than body weight, in fact, because of the amount of weight on the belayer’s feet. Even at a hanging stance, it will be less than body weight because much of the climber’s weight still rests on the feet, and the friction of the body against the wall reduces the weight even further.
For the following climber, or second, forces can be higher because some slack will be in the system and the initial rope stretch adds some momentum to any fall. Generally a second’s fall can be as high as double body weight. Neither of these forces are really high, but the second putting 400-plus pounds on the anchor is not insignificant.
What about the leader? In most leader falls the anchor feels nothing at all and all the force is concentrated on the top piece of protection. But if a leader comes off at the beginning of a pitch, without any protection in, the anchor must hold a factor 2 fall. Even if the leader used the anchor as his or her first piece of protection, forces decrease on the belayer and climber but that first clip creates mechanical advantage that takes the force and theoretically doubles it (it’s acting as a 2:1 pulley). In reality, the friction of the pulley/carabiner means you multiply by 1.6/1.7. Either way, clipped or not, the forces in a leader fall far exceed the other two.
How does this factor into the myth? In some situations, as when the belay is on a ledge large enough that the leader can’t take a factor 2 fall or there’s good gear immediately available above the anchor, it might be smarter to build a minimalist anchor. If other factors like weather or time trump the “security” of an overbuilt anchor, the “less secure” anchor may actually be the better call.
Advanced Anchor Situations
Let’s cover some anchor systems that might be helpful in advanced or complex situations.
It helps to have a process to analyze the strengths and weaknesses of an anchor in a particular situation. No anchor can be perfect; therefore, we need to know what aspect or function of the anchor is compromised, then make decisions to mitigate those compromises. We can also modify other parts of our fall-protection system to address these compromises.
The list below offers an acronym to help you remember a set of criteria with which to analyze anchors. We call this the NERDSS analysis:
No Extension: If one of the pieces were to fail, the anchor does not extend, thereby keeping the belayer stationary. Movement of the belayer, particularly if he’s pulled off the belay ledge, can severely compromise his ability to hold a factor 2 fall. Shock loading and peak forces are less of a concern here, as the belayer should be attached to the anchor with the dynamic rope. Should the belayer choose to attach himself with a static/semi-static leash, a high-force shock load becomes a serious concern.
Redundancy: More than one anchor element (gear, material, etc.) must fail before the whole anchor fails. As we said above, there isn’t a direct correlation between strength and redundancy. It is still something worth considering, though, and any anchor analysis should. Bottom line, if your anchor isn’t redundant, you should know it and have a reason to justify it.
Distributed: If there is to be more than one piece in our anchor, we want the force generated by a fall to be distributed among the pieces. We use the combined strength of those pieces rather than having one backing up the other. When joining pieces and distributing forces, we do not want to unwittingly amplify those forces by having large angles in the “legs” of our connection system (more on this below).
Simplicity: How quickly can we build and break down the anchor? How simple is it, and does it allow climbers to easily check key elements?
Strength: The system, placements, and materials we use must be appropriately strong.
We must start by realizing that without a perfect anchor, our job becomes making the best compromises given our situation. The techniques we cover below are best described as a “system of anchoring.” This system will solve most problems on multi-pitch climbs, but it is not exclusive. In other words, many valid anchoring techniques exist, and just because we don’t cover them doesn’t mean they’re less worthy or applicable. The reason we do not cover them is to simplify the anchoring process and reduce duplication. These are the systems we use daily in our work and recreation. We find these systems to be versatile, and we seldom need to stray from them.
Single-Point Belay Anchors
The single-point belay anchor may seem like too large a compromise, but in many areas they’re the most commonly used ones. On crags in forested terrain, single trees often provide solid anchors both on and at the top of the cliff.
Single-point anchors can be used if we feel the need to belay a short section of third/fourth-class terrain to check a slip. We could use a single nut or cam, along with a stance, to belay a climber off our belay loop. In this section we’ll focus on the more robust single-point anchors needed for fifth-class rock.
By definition, a single-point anchor cannot be redundant, therefore we must be very comfortable with it if we are to employ one in fifth-class terrain. As mentioned above, the most common single-point anchor is a very stout tree. Other examples can be large boulders, a thread, and large horns. All must be inspected carefully, but horns and boulders seem to be the most common single-point anchors misjudged in the field. Pound on them, tap them with an ice axe, push them with your feet to test—but be aware they sometimes fail. Don’t rain a rock down on your buddy if something gives way!
Although the anchor itself may be a single point, we can rig the sling or cord we use in a redundant manner. This is especially important with horns and boulders, as they may have sharp sides that could cut the material we place around them.
Rigging Material on a Single-Point Anchor
There are three common ways climbers place sling or cord around these type of objects:
- Girth hitch
- Placing a loop around the object and clipping the ends of that loop together with a carabiner (often called basketing)
- Placing a sewn sling or tied cord around the object and tying the end loops together with a figure eight or overhand knot (the classic cordelette style)
Let’s run through our NERDSS analysis for the girth-hitched single-point anchor. The “no extension” analysis becomes moot, because with only one point on which to anchor, there’s nothing to fail and extend. When we analyze the girth hitch for redundancy, we ask, if the sling were to break or cut at any one spot, would the whole system fail? We can quickly see that the girth hitch lacks redundancy. When analyzing distribution, again we have a moot point because we are talking about a single point. When we do a strength analysis of the girth hitch, we see that only two strands of the cord or sling hold the force. This means that each strand of cord or sling needs to hold half the force that is placed on the anchor.

A girth-hitched cord puts the load on two strands of the material and offers no redundancy. Philbrick Photography
When we place a loop around the rock or tree and clip the ends of that loop together with a carabiner (basketing), four strands hold the force, which puts only one-quarter of the force on each strand This is a stronger arrangement than the girth hitch, but this system too lacks redundancy, because should any strand break or cut, the whole system fails.

Basketing a cordelette puts one-quarter of the load onto each strand. Philbrick Photography
Looping a cord or sling around an object, then tying it off with a figure eight or overhand, yields the strength of four strands, but we’ve also weakened the material because of the knot. However, if any strand were to break or cut, the system remains intact. While slightly weaker, this system provides redundancy.

Tying off the cordelette reduces the chances of triaxially loading the carabiner. Philbrick Photography
Because of their simplicity, analyzing that very simplicity in single-point anchors becomes an academic exercise. One could argue tying off the figure eight or overhand takes slightly longer, but generally this is seconds and the real difference is marginal. The only exception to this might be at a hanging belay with wet slings—with cold, tired hands, removing the knot from a weighted Spectra sling can be a drag, especially for clients at the end of a long day. Consider this when guiding.
Given that the girth hitch has no real advantage over the other two systems and is weaker than the other alternatives, its use as an anchoring system is limited and in most cases should not be employed. It is included here for comparison purposes only.
When applying the NERDSS analysis as we evaluate our anchors, we need to avoid falling into the trap of assuming a redundant anchor is always better than a non-redundant anchor. As important, given our slings and materials are typically far stronger than we need, overemphasizing an anchor’s strength can also lead us to a flawed analysis.
What we may perceive as a positive or a negative might not be so on second glance. For example, knots weaken material, but in nylon can actually add dynamic capacity to an anchor (improving strength). Redundancy guards against cutting, but forcing a knot into a sling might shorten it to the point where it multiplies forces on two horizontally spaced bolts, dramatically weakening the anchor.
Redundancy, of any anchor concept, is the most habitually applied, and at times it’s overemphasized. From the example above, imagine a tree so large we can’t tie off a cordelette when we wrap it. Do you not use the tree as an anchor or basket it? You basket it! When you do, however, your analysis should immediately remind you that the anchor isn’t redundant, so we need to address the problems of non-redundant anchors.
We immediately consider the method used to join the ends of the sling or cord because it’s rigged in a non-redundant configuration. These methods range from factory stitching to any number of knots; the most common ones are the water knot for sling material and the double fisherman’s or the flat overhand for cord. In a non-redundant system, if these knots were tied incorrectly or became untied, the anchor fails.
After the junction knot failing, our concern returns to the sling or cord cutting. This is of importance when the single-point anchor is made of rock, either a large boulder or more likely a horn. Using rock as a single-point anchor generally triggers us to seriously consider using a redundant system.
Typically this means doubling a cord or sling, then knotting it. The bight knot not only delivers redundancy, but other benefits as well. In our basketed system above, the carabiner can easily end up cross-loaded and compromised. Having a bight knot creates a masterpoint, which guards against the carabiner shifting, or being cross- or triaxially loaded. We could add another carabiner or just pay extra attention to it.
Like most situations, you’ll have to balance compromises. If, for example, a tree proved too large to double a cord or sling around, then a basketed system isn’t necessarily inappropriate. You should check the junction knot, use good material, and pay extra attention to keeping the carabiners aligned correctly. In short, you’re identifying the shortcomings of your solution but “making it work” in that particular situation—something we should be doing constantly when building anchors.
This is an advanced approach to anchor building. We challenge our assumptions and analyze our systems as we go. We move beyond rules-based decision making into applying judgment and expertise in the field, depending upon the situation at hand.
Two-Point Anchors
We typically build at a minimum two-point gear (nuts, cams, Tricams, etc.) anchors for our fifth-class climbing. Because we consider two-point anchors a minimum standard, we should therefore consider them somewhat uncommon. Two-point fixed anchors (bolts and pitons, for the most part), on the other hand, are quite common and standard.
Whether gear or fixed, let’s look at four main systems for our two-point anchors.
- Crossed sling (magic X)
- The quad
- The cordelette
- Direct tie-in
The Crossed Sling (Magic X)
To tie the crossed sling, take a sling (usually shoulder-length, but occasionally a double-length) and clip it into two pieces. Pull down on one strand of the sling between the two pieces and twist it, then clip a locking carabiner into the loop formed by the twist and the other strand of the sling. You should check to make sure that the locking carabiner is clipped properly through the twist and the other strand. If it is not, should either of the pieces fail, the carabiner could slide off the sling, causing the anchor to fail entirely.

The crossed sling (magic X). Philbrick Photography
Tied correctly, you’ll notice that either of the pieces could fail and the anchor would remain intact, though it would extend several inches. While somewhat redundant (as far as the pieces are concerned), the crossed sling fails the “no extension” test.
Looking more closely at redundancy, we notice that if the sling were to get cut, the entire anchor fails. So this anchor is not entirely redundant.
Keep in mind, however, that most masterpoint anchor systems are technically non-redundant. We commonly use a single locking carabiner for our connection. We don’t mean to suggest a single locking biner is unsafe, but we find it a notable detail given the (over)emphasis placed on redundancy.
Now check the distribution of the forces with the crossed sling. We can move side to side or up and down while hanging on the anchor. With the crossed sling, the locking carabiner slides and the sling adjusts to keep the forces distributed somewhat evenly, though not perfectly. The sliding action of the crossed sling becomes much less effective with high forces like those generated in a factor 2 fall. The sling appears to bind itself in the locking carabiner, reducing the distribution further.
When we analyze simplicity, the crossed sling is hard to beat, especially with bolts or gear placements close enough that we can use a standard shoulder-length runner.
Next we consider the strength of the crossed-sling system. We can see that each piece receives about one-half of the force, but because we have four strands taking the force in the sling, we are stressing each strand with only one-quarter of the force. So in our analysis of the crossed sling, we find it will extend and lacks redundancy, but it has a good distribution of forces and is a simple and a strong system.
In summary, with a crossed sling we need to make sure the junction knot or stitching is in good shape and the material itself is undamaged. We should also verify the sling doesn’t contact any sharp edges along its length.
The Quad
The quad has grown in popularity over the past few years. We find it most useful in ice climbing, so look for more information on it in that chapter.
It works exceptionally well on rock as well, particularly if most or all of the anchors are bolted. Plaisir routes—that is, “pleasure” routes that are long, bolted, and with two-bolt belays—make the perfect venue for having two quad-style anchors ready to go at the base of the route. No need to tie or untie them throughout the day; have them ready in your pack at the base and leave them built all day. Fast and efficient.

Two-point quad. Philbrick Photography
To tie a quad, start with a quadruple-length sling (most likely in Spectra/Dyneema to save on bulk and weight, but a cordelette works fine, too), fold it in half with a twist, and then fold again. Each time you fold it, you give it a half-twist, so the sling should now be in fourths. It should be about the length of a shoulder sling now. Tie an overhand about 4 to 6 inches from each end. Clip each of those loops into each bolt. At the center of the quad you should have four independent strands between the overhands. Clip your locking carabiner into two of the strands, leaving the other two for your plaquette and/or for your partner to clip into it.
The quad extends a bit if a piece fails. It’s redundant and it distributes forces better than a crossed sling, as there’s no webbing running over itself. In tests it scores the best in distribution/equalization compared with the other anchors. Its strength is as good as a classic cordelette. For simplicity it is a bit mixed. If you need to build it at the stance, it is similar or a bit more work than a classic cordelette setup. If you can keep it tied as you would in ice climbing or on a route that has all bolted anchors, it is very simple.
The Two-Point Traditional Cordelette
To build the two-point cordelette anchor, you clip the cord into the pieces as a giant loop. You then pull down on the sling between the two pieces until you meet the strand hanging below (the bottom of the big loop), grab the two strands, and tie either a figure eight or an overhand knot.
When we check for extension, we find little or no movement of the belayer should a piece fail. With redundancy, we find that at least two strands of the cord need to be cut or break for it to fail. The cordelette distributes forces between the pieces, but only in one direction. In this sense, it is “pre-equalized,” or equalized for only direction of pull. Our cord (or sling) must usually be longer than a shoulder-length runner, and because of this, it is quite a bit more tedious to break down and store.
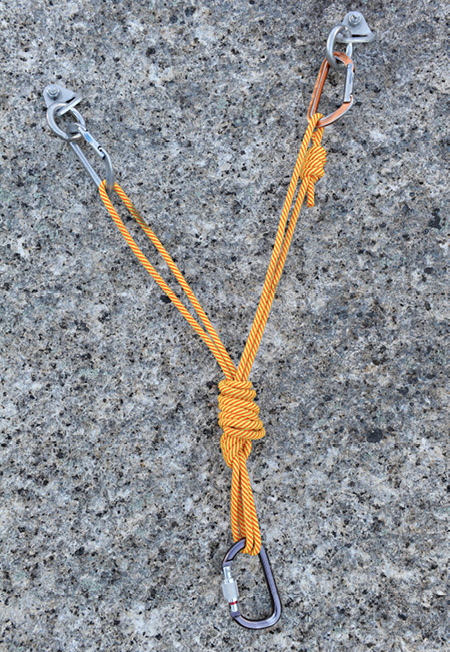
A traditional two-point cordelette. Philbrick Photography
Taken as a whole, the cordelette method proves relatively simple, but not quite as quick and clean as the crossed sling. In terms of strength, we’re working with four strands of material, but we also knot the cord—therefore compromising the strength. As we mentioned in the section on myths, the balance of strength, redundancy, and dynamics becomes a complex calculation.
As long as we’re working with 5.5mm tech cord, 6mm nylon cord, Dyneema sling material, or at least 9/16-inch (15mm) nylon webbing, the cordelette system measures well within our needs for strength. The point here is that many confuse redundancy with strength, and that is not always the case. A redundant system like the cordelette may protect you from a poorly tied junction knot in the sling or cord, or a manufacturer’s defect, but it does not necessarily create a system that has a higher tensile strength.
The Direct Tie-In

1. Two-point direct tie-in. Philbrick Photography
For the direct tie-in, we build our anchor with the rope. First, tie a small overhand on a bight close to your harness. (We do this to conserve enough rope to create a masterpoint once we’ve built the anchor. This knot is really just a placeholder for the moment.) Next, measure from your stance to the lowest piece of your anchor. To do this, clip your rope into the lowest piece and stand at the stance. Pull the rope tight to you using the piece as a pulley. Grab the two strands going to the piece, and walk your hands up this to the piece. Unclip the rope from the piece, making sure not to lose the measurement. Add about 4 inches of rope to the measurement to accommodate the extra length the knot will take up.
Now tie a figure eight knot so that the loop of the knot is as long as the pieces are apart. Clip this knot into the lower piece. Take the backside rope from this knot and clove-hitch it to the second piece. Adjust this so that both pieces are weighted when you lean back against your anchor. Next, undo the overhand on a bight you tied and tie another one as close to the figure eight as you can. This overhand becomes the masterpoint you’ll use to belay your second.
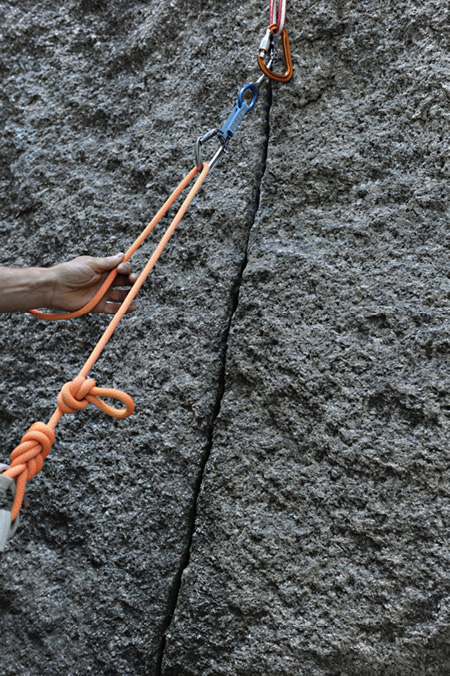
2. Tie a small bight knot into your rope just in front of your tie-in. Measure the rope to the lowest piece. Philbrick Photography

3. Tie a figure eight on a bight, forming a loop long enough to create a small angle when clipping the next piece. Philbrick Photography

4. Take the backside of your figure eight and clove-hitch it to the upper piece. Philbrick Photography

5. Once you’ve connected the rope to the two pieces, untie the bight knot in front of your harness and retie it just below the lowest piece. This is now your masterpoint. Philbrick Photography
Comparisons and Scenarios
Let’s compare the four methods just described using the NERDSS analysis. To analyze an anchor, it is best to imagine yourself tied into and leaning back on the anchor.
When we do a NERDSS analysis on the direct tie-in, we find it similar to the cordelette in that it does not extend should a piece fail. As we check the direct tie-in for redundancy, we first notice that we have done away with the sling or cord of the previous three systems. Of note, we have also done away with our locking carabiner! Because we have taken out the potential weak link (of a cord or sling) and the locking carabiner, we consider the direct tie-in to be a superior system from a redundancy perspective, despite the fact that arguably it isn’t redundant because we are using only one rope.
For us, this is a classic example of the superiority of more advanced analysis. Rigid protocol systems that “require” an anchor to be SRENE or ERNEST are useful when teaching the basics to relatively new climbers. When climbers progress to advanced systems and practice, analyzing systems rather than applying hard-and-fast rules yields more creative, more adaptive solutions.
Checking the direct tie-in for distribution yields similar results to the cordelette system. Both do a reasonable job of distributing forces between pieces, but only in a relatively narrow orientation. In terms of simplicity, the direct tie-in falls behind the other systems, especially for newer climbers. It can be confusing and challenging. As for strength, it’s probably the best of all of them, given we’re using only the dynamic climbing rope.
The following chart compares the analyses of the four two-point anchor systems:
|
No Extension |
Redundancy |
Distribution |
Strength* |
Simplicity |
|
|
Crossed sling |
No |
No |
Good |
Good |
Simplest |
|
Quad |
No |
Yes |
Very good |
Good |
Can be if left tied |
|
Cordelette |
Yes |
Yes |
Limited |
Good |
More complicated |
|
Direct tie-in |
Yes |
Yes |
Limited |
Excellent |
Most complicated |
*All four anchor systems are strong enough for multi-pitch climbing if the proper width or diameter cord or sling is used.
How does understanding these various systems help us in deciding which two-point anchor system to use in a situation? Considering some examples might help you make better decisions on the rock when the time comes.
First let’s note that the quad and cordelette require a long, dedicated anchor sling or cord to build. This leaves the crossed sling or the direct tie-in as alternatives if you drop or lose your dedicated material. Between those two, the crossed sling has a masterpoint, so that can be important for a team block-leading or a guided team. Of course, we’ve already identified the compromises of the crossed sling, but by knowing those compromises we can manage them.
Let’s look at an anchor that has two older bolts that look about the same and aren’t very confidence inspiring. Do we want to make sure both are weighted as equally as possible so the force is distributed, or are we concerned with one failing and causing extension? If we feel they are roughly the same age and quality, one being substantially weaker is possible but not likely. If we have our anchor-building kit, then the quad starts to look good. It has the advantage of good distribution and redundancy, so it is superior to the crossed sling. Since the classic cordelette system doesn’t distribute forces as well, it may create a weaker system by loading only one bolt.
How about a two-bolt anchor at which we have one new bolt and one rusty old bolt? We might be more concerned with extension, since we likely have a much weaker piece in the older bolt. If the belay is on a small ledge, that extension could be serious and make catching a factor 2 fall almost impossible. So now we lean to the cordelette or direct tie-in. Several variables factor into our decision when contemplating those two systems: simplicity, the availability of gear, and whether we are block-leading or not.
We could also look at the comfort of the stance on two good bolts. On a cordelette, two or three climbers hang from the same masterpoint, so if one climber leans in one direction, the others get pulled around. With the quad you can have two independent masterpoints, so climbers can move more freely and with less stressful shifting in the anchor. The quad therefore may be better for the comfort of the climbers.
Decisions and analyses like these may seem unwieldy at first, but over time you’ll be able to make them quickly and almost unconsciously. As with any new system, incorporating it into our daily repertoire takes some time, but then becomes second nature.
Three-Point Anchors
Three-point anchors are the most common gear anchors and are mainly variations and combinations of the two-point anchors you already know. We will cover two types of three-point anchor systems and then look at combination anchors building on these:
- Three-point traditional cordelette
- Three-point quad
- Two-point cordelette/crossed sling combination
- Two-point quad/crossed sling combination
- Two-point direct tie-in/crossed sling combination
Three-Point Traditional Cordelette
To tie this, take your cordelette and clip it into all three pieces. Then much like the two-point cord, pull down the single strand from between each piece, then grab the bottom strand and tie either a figure eight or an overhand. This loop becomes the masterpoint.
When we do the NERDSS analysis on the three-point cordelette, we find the same results as we had with the two-point setup—no extension, redundant, so-so distribution, good simplicity, and adequately strong.

Traditional three-point cordelette. Philbrick Photography
Three-Point Quad
To build a three-point quad, take a cordelette and clip it into the two smallest, or “weakest,” pieces. Then, just like a two-point traditional cordelette, pull down the strands between the pieces and tie an overhand. Tie the knot as close to the pieces as you can to keep the angle between them acute.
Next take the bottom of the sling or cord, what you would tie off as the masterpoint in a two-point system, and clip that to the third piece. Pull down on the section of the cord between the two pieces that are combined and the third piece to get an approximation of the expected direction of forces on the anchor. Now unclip the cord/sling from the third piece and tie another overhand knot, and clip that loop back into the third piece. Ideally the two-point side of the sling is equalized on the two smallest/weakest pieces of gear, while the single side is on the strongest piece.
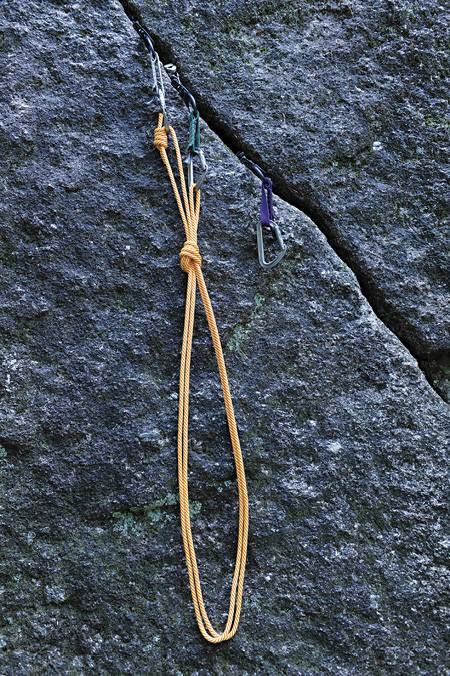
1. Three-point quad. Connect the first two pieces and tie an overhand below, being careful not to tie them off so closely it creates an obtuse angle. Philbrick Photography
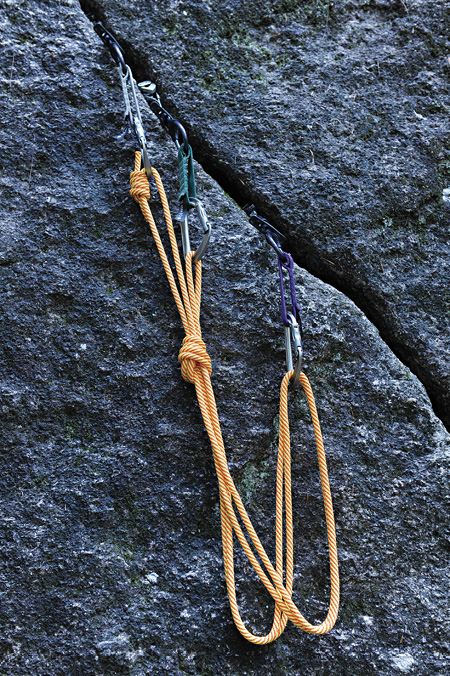
2. Clip the hanging loop of material to the third piece. Philbrick Photography

3. Tie an overhand below the third piece. Philbrick Photography
When we do the NERDSS analysis on the three-point quad, we find similar results to the two-point setup. The three-point quad, however, doesn’t distribute the load quite as well between the two combined pieces, so its distribution is less effective with three pieces.
Combination Anchors
Now let’s check out the combination anchors. To build these anchors we will take two pieces and combine them into one via a crossed sling. We then use the two-point cordelette, the two-point quad, or the direct tie-in to join the crossed sling with the remaining piece to form a three-point anchor.
When we analyze the combination cordelette and direct tie-in anchors, we discover that they distribute forces a bit better than the three-point cordelette, two-point cordelette, or two-point direct tie-in.

Two-point cordelette plus the crossed sling. Philbrick Photography
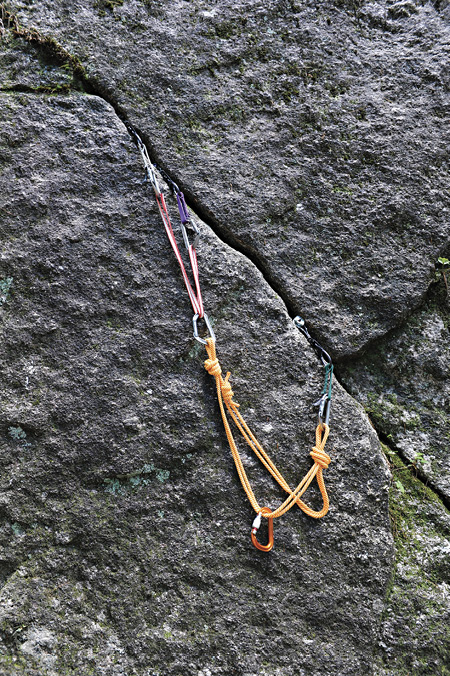
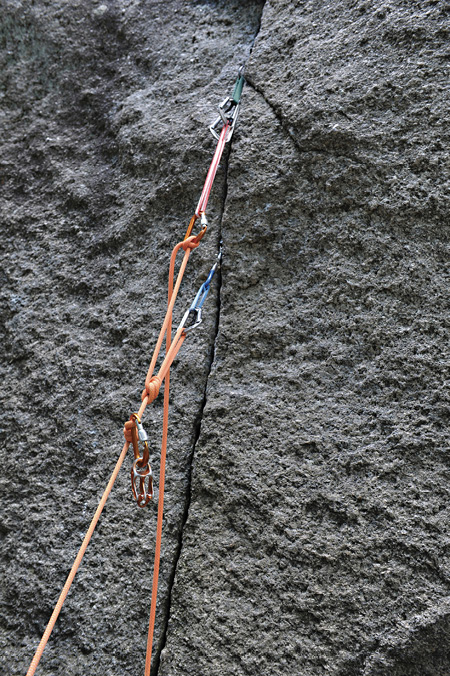
Two-point quad plus the crossed sling. Philbrick Photography
Two-point direct tie-in plus the crossed sling. Philbrick Photography
Look at the previous photos and visualize what would happen if the belayer leans to the opposite side of the crossed sling. The two pieces connected by the crossed sling would take the weight. If the belayer leans to the other side, the single piece takes the weight. This means if you can predict the direction from which a secondary pull will come, you can build the anchor so that at least the two pieces will take that force. The quad/crossed-sling combination appears to do the better job at distributing the load.
We do not cover the three-point crossed sling anchors because due to the friction caused by the multiple twists in the material, this system does not distribute the load effectively. Given that the main reason to use this type of system is its ability to distribute forces, there is no advantage to the three-point crossed sling.
We also do not cover a combination crossed-sling anchor. The idea of having three pieces of gear and two slings come down to a non-redundant system seems wasteful. In the rare circumstance you are without a long sling or cord (making a quad or classic cordelette impossible) and you need a masterpoint, perhaps it would be worth building a combination crossed-sling anchor.
In the following chart we compare three-point anchors:
|
No Extension |
Redundancy |
Distribution |
Strength* |
Simplicity |
|
|
Three-point cordelette |
Yes |
Yes |
Limited |
Good |
Simple |
|
Three-point quad |
No |
Yes |
Good to very good |
Good |
More complicated |
|
Two-point quad/crossed sling combination |
No |
Yes |
Very good |
Good |
More complicated |
|
Two-point cordelette/crossed sling combination |
Yes |
Yes |
Good |
Good |
More complicated |
|
Two-point direct tie-in/crossed sling combination |
Yes |
Yes |
Good |
Excellent |
Very complicated |
*All three-point systems are strong enough for multi-pitch climbing systems if proper-width slings or diameter cords are used.
As we get into anchors with more pieces, it is easier to get closer to a non-extending, redundant, distributed, strong system. Distribution and simplicity become the main variables. For most three-point anchors, what system you use becomes less important because with so many pieces and equipment to connect them, we can satisfy most concerns.
Notice when we use a combined system, the two pieces of the crossed sling act as one. That means at worst we should only be able to put half the force, and at best one-fourth the force, on those pieces. So, besides looking at where a secondary force might come from (and getting those pieces to mitigate it), we could also combine the two smallest or weakest pieces so they end up as a strong single piece within our anchor. In the end, simplicity and adapting the gear you have is where the art of the three-point anchor lies.
Four-or-More Point Anchor Systems
To build anchors with more than three pieces, you follow the same basic concepts as above. First, cross-sling pieces until three points remain. When you’re down to three points, do a three-point cordelette or quad system. You can also cross-sling pieces until two points remain and then choose between the two-point cordelette, the direct tie-in, or the quad.
We can assume anchors needing four or more pieces most likely consist of suboptimal pieces. Were the pieces bomber, three would be adequate. Suboptimal pieces mean distribution will be important. Also, by the time the anchor is fully built, the slings and other connections will drop the masterpoint down quite a bit. To use a given stance, you will need to get the pieces high and/or close together. If not, your masterpoint will be too low to have an effective anchor.
Angles and Their Effect on the Distribution of Force
No matter which anchor system you use, the angles between pieces demand your constant attention. Keep in mind we’re concerned not only about angles between pieces, but also the angle created when we wrap sling or cord around a tree or horn. In short, any angle should be less than 90 degrees and the more acute, the better.
Any angle above 0 degrees increases forces somewhat, but once an angle exceeds 90 degrees, the forces will be multiplied significantly. For example, at 90 degrees a downward force of x becomes .75x at each piece—that’s a 50 percent increase in forces! At 120 degrees the angle double forces on our anchor; at 160 degrees it increases forces on each leg three times, for a 6x increase on the whole anchor.

Force multiplication can occur even if the outermost strands of a three-point cordelette create the obtuse angle. Even though the middle strand of the cordelette may mitigate the problem, the chances that you will be able to get the three pieces working together to effectively distribute the force is slim. Angles are an important consideration in our anchors. Read up on them, as they are well covered in other books focusing on anchors.
Special Circumstances and Methods
To adapt these various anchor systems to the terrain and to the location of our gear placements, a couple skills will help. First we need to be able to effectively lengthen our cordelette and crossed slings if they are too short to join the pieces. Lengthening allows us to reduce an angle that is inappropriately large. Conversely, we’ll need to shorten our cordelette and crossed slings in certain situations. This shortening allows us to have the masterpoint of the anchor at the right height so the belayer can take a proper stance to belay the leader or the second.
These two techniques run counter to one another, and compromises will be made. Refining these skills allows us to create the best anchor possible, even in awkward stances.
Shortening Anchor Systems
We commonly use three methods for shortening the cordelette. With the first, we simply double our cord and use it as we would normally, thereby shortening it by half. This works great and remains simple, though it’s not adjustable—it’s either full length or half.
In the second system, we tie an overhand knot in our cord and use the now-shortened loop to build the anchor. When using this technique, tie the overhand knot along the strands below the junction knot—in this way it keeps the junction knot out of your system and simplifies building it.
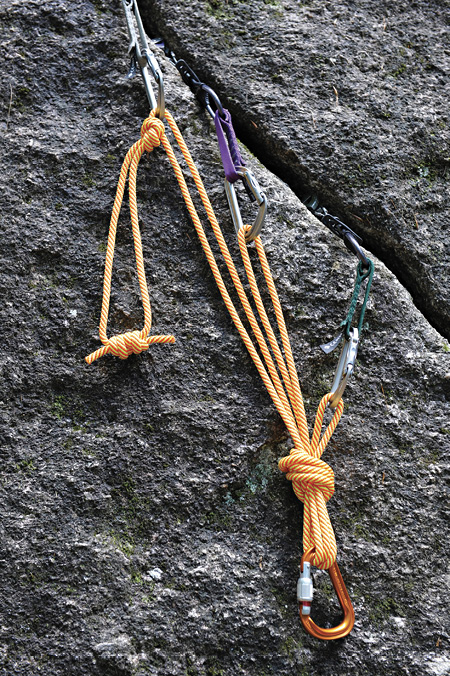
The overhand knot shortens one leg of the cordelette. Philbrick Photography
Another way to shorten the cordelette is instead of tying a figure eight knot at the bottom of the cord when pre-equalizing the rig, keep wrapping the excess before tying the cord off. Some climbers call this a figure nine or a BHK—big honkin’ knot. Whatever you call it, it’s a simple, quick means of taking up excess material and dialing the height of your masterpoint. It also makes the knot a bit easier to untie after weighting it, which makes it a nice option at a hanging belay or while wearing gloves.
You’ll rarely need to shorten a crossed-sling anchor. Given the strengths and weaknesses of the crossed sling, it is primarily used on two bolts and it is done with a shoulder-length sling. This makes it exceptionally simple. When you are using a crossed sling as part of a combination anchor, you might need something longer than a shoulder-length, but shorter than a double-length. In this event, you could shorten a double-length by knotting one end of it (trap the sewn portion of the sling behind your knot to keep it from complicating the system). This is the second technique described above when shortening cordelettes.
There is a case when you might want to complicate the crossed sling, but it would not be just to shorten it (though it happens to do just that). This could happen when joining two suboptimal pieces and those pieces are far enough apart that you need a long sling. In that case you can use a crossed sling that has limiter knots tied into it. The limiter knots are overhands knots tied into each leg of the crossed sling. We call them limiter knots because they limit both the extension and the range that the crossed sling will slide to distribute the load.
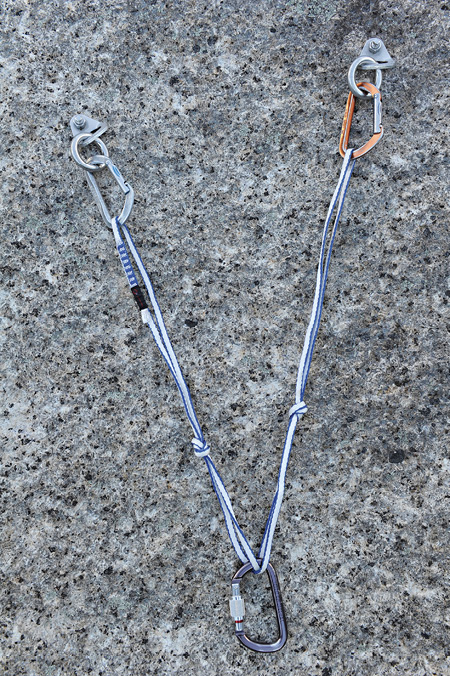
The knots limit the potential extension on the anchor. Philbrick Photography
With limiter knots tied into both legs as shown, a redundant system is created. Some find the analysis of the crossed sling with limiter knots so positive they use it on a regular basis. Most climbers and guides, though, find tying the crossed sling with limiter knots tedious and not as efficient at distributing the force compared to the quad. The quad’s knots can be moved closer to the middle of the material to reduce the extension of that system if need be. The crossed sling with limiter knots is generally reserved for special circumstances, usually when two poor pieces are being combined in a three- or four-point combination anchor. For that reason, it is a good technique to know even if not used very often.
Lengthening Anchor Systems
The combination anchor in and of itself adds length to a system, because combining two pieces into one means you only need to join two pieces with your cord or quad.
We can also add a sling to a piece or a combination of pieces that is farther from the expected masterpoint to lengthen the cord or quad.
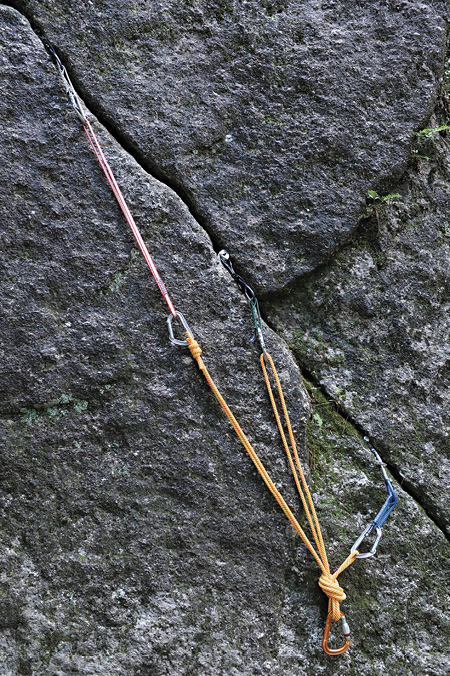
Adding a sling effectively lengthens your cordelette. Philbrick Photography
Anchors are an important component of the fall-protection system. The techniques outlined above give you some tools for constructing appropriate anchors. This overall system, along with the NERDSS analysis, should allow you to have an advanced understanding that adapts to terrain and individual placements on any given climb. At the least, it should give you a baseline from which to evaluate a system we did not cover. By applying this knowledge, you will be able to quickly and efficiently adapt to the variables you will take into consideration when deciding where and how to build a particular anchor in the field.