Chapter 12
So many books have been written on this subject that we considered not including it in this one. We expect that most of you already have a baseline level of self-rescue skills, and hopefully you own any of the books on the subject.
What convinced us to include some thoughts on self-rescue is the fact that many of the techniques can be used to solve problems not considered accidents. We hope to introduce some new tools, but more important, give you an expanded sense of the application of them—in short, how to apply your self-rescue techniques more often and how to incorporate them into your daily practice. Using our self-rescue techniques outside of the context of a rescue can help us, as climbers and mountain guides, deliver good client care, help increase client reward, and plain have a better time climbing.

Silas Rossi. Courtesy Silas Rossi
Three Main Skills
When we think of true self-rescue, we think in terms of three main skills, all of which are simply techniques to move a hurt or incapacitated climber:
- Hauling
- Counterbalance rappelling
- Tandem rappelling
Hauling. Hauling is pretty self-explanatory: We need to be able to build a mechanical advantage system to haul our partner up.
Counterbalance rappel. Counterbalance rappelling is for the most part unique to self-rescue and even unique to rescuing a following climber. To the uninitiated, it resembles a toprope up on the cliff: the hurt climber tied to the rope, his rope running up and through an anchor, then down to a rescuer on a rappel device. For the rescuer and the hurt climber to move together, the rescuer connects himself to the hurt climber’s rope. He does this affixing a Prusik to the patient’s rope, then clipping it to his belay loop with a long sling and a carabiner. This connection has no real purpose when the climbers are together, except it makes both climbers move simultaneously when the rescuer feeds rope through his rappel device.
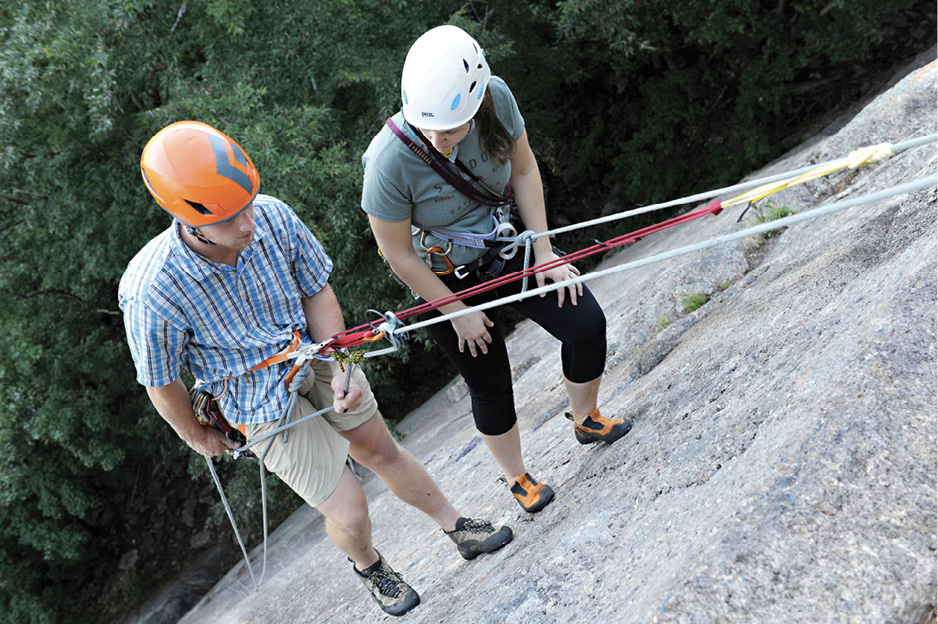
The rescuer transitions to a counterbalance rappel, and once he’s close to the victim, he engages a friction hitch on the victim’s strand and clips it to himself on his belay loop. Philbrick Photography
Tandem rappel. The tandem rappel has both the rescuer and hurt climber hanging on one rappel device so they can descend together. The rescuer ties a two-point cordelette, and what would normally be the masterpoint becomes the attachment to the rap device, with each climber clipped into the two legs.
Why not just use a counterbalance rappel, some might ask? With the counterbalance, for the rescuer and hurt climber to move down 1 foot you need 2 feet of rope to pass through the device. That makes the descent tedious and a bit jerky. Once the climbers can get to an anchor and build a proper rappel system, connecting both to the same device is much more efficient.
The goal of most self-rescue is to go from a typical leader or second belay to a tandem rappel and descend with the victim to the base of the cliff. Many times that requires a “pick-off” of the second from mid-pitch, so the counterbalance allows us to accomplish it. With leader rescue, the counterbalance rappel isn’t as relevant. Similarly, when rescuing a follower who is close to the belay (and not too seriously hurt), hauling him up to you may make more sense.
Ultimately, getting together with the hurt climber at a stance at which you can build, or already have, an anchor is the first step. After that, descending together in a tandem rappel is usually the best option for getting an injured climber down the cliff.
Looking at the big picture, we consider the entire process, from belaying until the point we can tandem rappel, a transition. How complex that transition is depends on whether the belay is above or below the hurt climber, what the distance is from the hurt climber, and the availability of terrain like ledges, cracks, etc. The true expertise of self-rescue is the ability to use every advantage terrain gives you to minimize the technical difficulty of the transition from belaying to tandem rappel. In other words, cheat as much as you can.
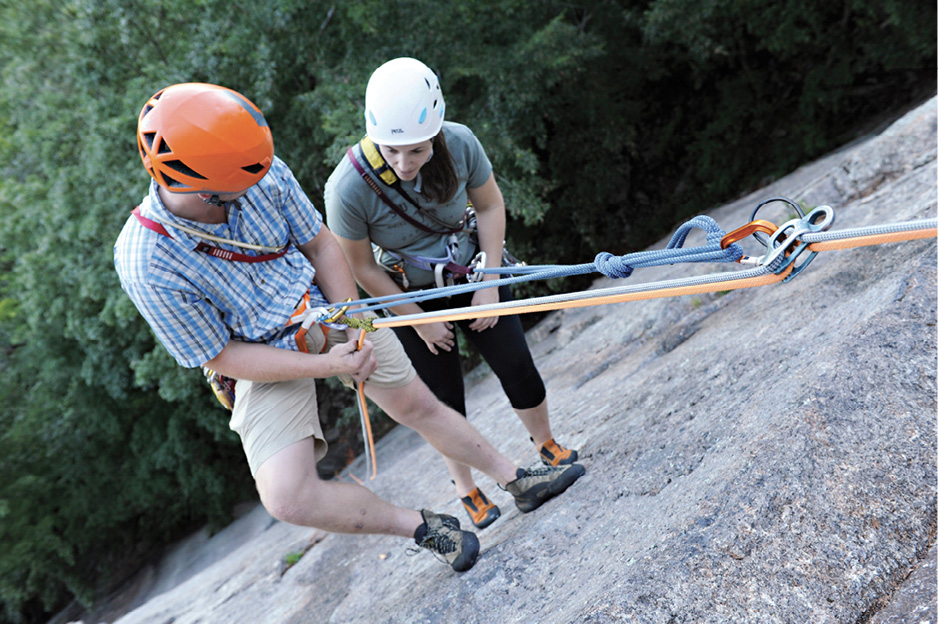
To build a tandem rappel, start by doubling a 15-foot cordelette and tying a small bight knot at one end of the doubled loop. Notice the rescuer trapped the knot joining the cordelette ends inside the bight knot, or masterpoint. This protects the rescuer and victim from a junction knot failure, as the masterpoint is redundant. Try to make the two other loops slightly different lengths by offsetting them when you tie the bight knot/masterpoint—this allows you to place the victim below you during the rappel. You can also add a sling basketed through the victim’s belay loop to extend her tie-in.
Self-Rescue—Your Best Option?
Before we embark on the technical systems of self-rescue, we should discuss the appropriateness of a self-rescue. Self-sufficiency is a highly respected trait in climbing. That self-sufficiency needs to be tempered with reality. Once you get someone out of technical terrain, you will likely need help getting the injured person to a road. If you are going to get help for that, it may be prudent to get a rescue started sooner rather than later.
In some areas you might find a helicopter ready to extract you before you can finish first aid. In others you may wait for hours and find that only a small group is available to help. Executing a self-rescue is hazardous, difficult, and stressful. There are people who have trained extensively and are professionals working in some areas; to think you can do better or to ignore these professionals makes about as much sense as treating someone for their injuries at home once you get down rather than going to the hospital. Of course, if you are in an area with inexperienced rescue personnel, you may very well be the most experienced person for some time. In that case, making your best effort seems the best choice. Remember, if self-rescue is your best option, make sure the scene is safe and do no harm.
Planning for Rescue
Any time you visit a new area, you should inquire as to the availability and quality of rescue. That can have an impact on what you bring and how you strategize your planned climb. It may seem strange having rescue in mind when planning. If, in fact, an efficient, professionalized team exists, you may decide to carry less emergency gear. If rescue resources are scarce, you might carry more or even plan a multiday trip to have more resources nearby.
In areas with ample rescue infrastructure (like many parts of Western Europe), you should use it if an accident occurs. It’s hard to deny that traveling lighter has advantages: It increases your ability to move, lowers fatigue, and enhances your speed. Those things in and of themselves can derail an accident. Knowing you have competent rescuers nearby might allow you to leave a few items at home. To ignore available rescue infrastructure may very well create a rescue situation by virtue of having too much gear along. Climbers must balance how much “in case” equipment they bring against the potential of that very equipment contributing to an accident.
If you do find yourself in a region with professional rescue personnel and helicopter access, consider the weather. The ability to fly needs to be considered. Can the helicopter fly? Professional pilots can often fly in weather worse than we want to climb in, but give some thought to your particular situation.
With this said, let’s get into the nuts and bolts of self-rescue.
Second Rescue Hauling
Hauling is less about rescue than it is about problem solving. Truly hauling an injured climber should be rare. If the injury is minor, or is an upper-body injury like a shoulder the climber can guard, then it might be considered reasonable. A lower-leg injury might be manageable for a short distance. The idea, however, that you can haul a seriously injured or unconscious climber any distance is a fantasy. Without some assistance from the injured climber, it will be next to impossible to overcome the friction of his body on the rock. A serious leg injury would be extremely painful, if not unbearable, if the victim must hop along as you haul her.
Normally we haul and assist climbers with minor injuries, when they’re close to the belay, or just partners who can’t get past a particular move. In these situations, when the climber can assist with our hauling, the process is far easier.
When using a plaquette in guide mode, it makes building a haul system quick and easy:
3:1 Haul from a Plaquette in Guide Mode
- 1.Tie a catastrophe knot into the brake strand.
- Place a friction hitch on the rope going down to the stuck climber.
- Clip the brake strand into the friction hitch and remove the catastrophe knot.
- Pull.

The foundation of our hauling systems, the 3:1 is our most commonly used technique. The plaquette acts as the progress-capture pulley and a simple Prusik as the tractor. Note the rescuer has knotted the tractor Prusik so he doesn’t lose distance in his throws. Philbrick Photography
Assisted Haul (or Drop Loop)
With a climber just below the anchor, within one-third of a rope length, instead of using a friction hitch, drop a loop of rope to the stuck climber and ask him to clip it to his belay loop. This is known as an assisted haul or drop-loop 3:1.
- Tie a catastrophe knot into the brake strand.
- Grab the brake strand where it comes off the stack or pile and pull some slack out of it, creating a loop that hangs from the back of the plaquette and from the stack. Clip a carabiner into this loop.
- Lower the carabiner-on-a-loop down to the stuck climber.
- Have the stuck climber clip the carabiner into his belay loop. Make sure the loop does not have any twists.
- Untie the catastrophe knot and pull. The stuck climber can also pull on the strand coming from the plaquette to assist, should he need to.
Climbers call this technique the assisted haul because the stuck climber can pull on a strand and it assists the raise.
To help the stuck climber identify which strand to pull, the rescuer simply starts pulling. In front of the stuck climber will be three strands—two will be moving upward and one will be moving down. The stuck climber pulls on the one moving down. If the stuck climber assists, he’s actually doing most of the hauling. Keep in mind, too, the rescuer mustn’t pull too quickly, because this will pull and pinch the stuck climber’s hand into the carabiner on the loop.
Both of these systems create a 3:1 theoretical mechanical advantage. With the friction created by the plaquette and the rope going through the carabiner on the friction hitch, you end up with somewhere around 2:1. This will be enough to assist someone as he climbs. For an overhang, you need a lightweight climber and little friction in the system, so no rope drag and properly extended protection pieces!
Mechanical Advantage in Hauling Systems
Understanding the fundamentals of mechanical advantage in our systems helps us execute a better rescue and avoid problems. We’ll cover the basics, as there is far more detailed information available in books and online. We hope to give you enough information to understand the hazards and maintain efficiency when hauling, especially because these systems are improvised. You won’t have the luxury of low-friction-bearing pulleys like professional rescuers or riggers do.
In the 3:1 system we have to pull 3 feet of rope to move the climber 1 foot. When we increase the mechanical advantage to a 5:1 or 6:1, we increase that ratio. So you can see, the goal is to increase the advantage just enough to work—and no more.
We need to avoid increasing the advantage to the point hauling becomes easy. Not only is it inefficient (remember you’re pulling 6 feet of rope through a 6:1 for every foot it raises the climber), it adds force to the anchor, it can hurt the climber, and it can make the haul very inefficient through friction.
Forces on the Anchor
How do we add forces to the anchor? Let’s take a 3:1 system as an example. Most people would say if they’re hauling a 90-pound weight, they would have to pull 30 pounds to move that weight. But that doesn’t take into consideration the friction of the system: The rope running through carabiners and over rock dramatically lower the advantage—from a 3:1 theoretical advantage to somewhere around a real advantage of 2:1, depending on the rock, the path of the rope, etc. So in a very real sense, the rescuer doesn’t know how much weight he’s pulling.
Now, the friction of the rope on rock and through carabiners is always there, so when the load is at rest (we’re not hauling), the anchor takes the weight of the climber minus the friction in the system. To haul, we must overcome the climber’s weight plus friction. So the anchor has to hold two-thirds of the weight plus friction when we are hauling.
Two-thirds—where is the other one-third? That is what you are pulling. In the system we described, you pull the rope up, so you are “one” of the “three” in that system. The anchor gets the other “two.” It is that knowledge that’s important. How much force are you putting in the system? We don’t really know because friction is incalculable for us, but we do know the anchor is getting double the forces we apply when pulling.
What if we increase the mechanical advantage? If we are pulling the rope up when we pull on a system, it is one of the 9x advantage. So if you are pulling a 9:1 system, the anchor gets eight times what you pull. If the weight you’re pulling gets stuck and you pull as hard as you can, how much force can you generate? In a 9:1, multiply however hard you can pull by eight.
Imagine if you summon someone to help you haul—suddenly two people are pulling! Envision the forces generated by two strong climbers. All of a sudden, the weight gets stuck . . . but that weight is a climber. If the anchor holds, we are putting a lot of force on the stuck climber, and if he’s pulled up against a roof, with his neck pinned, that could be disastrous.
If we create a system with which we can just barely move the victim, we are limiting how much force we put into the anchor and the climber. If the climber or rope became stuck, the increase of force in the system is minimal and we’ll notice it right away. Suppose we were using a system of high mechanical advantage, like a 9:1. We might not notice the increase in forces and this could have dire consequences for both the anchor and more importantly the climber.
As far as efficiency is concerned, the higher the mechanical advantage, the more rope we need to pull. In a 3:1, as we mentioned, you must pull 3 feet of rope to move the climber 1 foot. In all systems, we will from time to time have to slide the friction hitch (the “tractor”) to get another “throw.” So if you increase the mechanical advantage to 9:1, you have to pull 9 feet of rope to move the climber 1 foot. This will require more throws, so we’ll be sliding the Prusiks more often. This will make the haul very tedious, so the easier the pull, the more tedious the system.
With this basic understanding, let’s work on increasing the mechanical advantage, because regardless of how much more tedious it may be, we need to be able to move the climber.
5:1 Haul
There are two common 5:1 hauls, and climbers debate which is better. The first one loses a little more to friction; the second one is harder to build. We’ll describe both. We begin with the rescuer belaying with an auto-locking plaquette in guide mode.
Block-and-Tackle 5:1
- Tie a catastrophe knot into the brake strand.
- Place a friction hitch on the rope going down to the stuck climber.
- Clip the brake strand into the friction hitch.
- Now pull the brake strand up and clip it to the anchor.
- Clip another carabiner into the carabiner on the friction hitch.
- Pull the brake strand down from the anchor and clip it into the new carabiner on the friction hitch.
- Untie the catastrophe knot.
- Pull.

Notice the block-and-tackle 5:1 requires just one rope, which makes it simpler than the backside 5:1. The downside is that it bends over one additional carabiner, increasing friction. Philbrick Photography
The above 5:1 just loops the rope one more time from the friction hitch through the anchor then back to the friction hitch. Keeping the ropes untwisted helps with reducing friction. Any or all the carabiners can be non-locking since the self-braking plaquette backs up the system throughout.
Backside 5:1
- Tie a catastrophe knot into the brake strand.
- Place a friction hitch on the rope going down to the stuck climber.
- Clip the backside of your clove hitch into the friction hitch.
- Push the friction hitch almost as far as you can down the rope toward the injured climber.
- Tie a small bight with as small a loop as you can into the rope right where it comes out of the carabiner on the friction hitch. Using a small overhand on a bight helps keep the bight knot short.
- Clip a carabiner into the bight knot and then clip the brake strand into that carabiner.
- Untie the catastrophe knot.
- Pull on the brake strand.
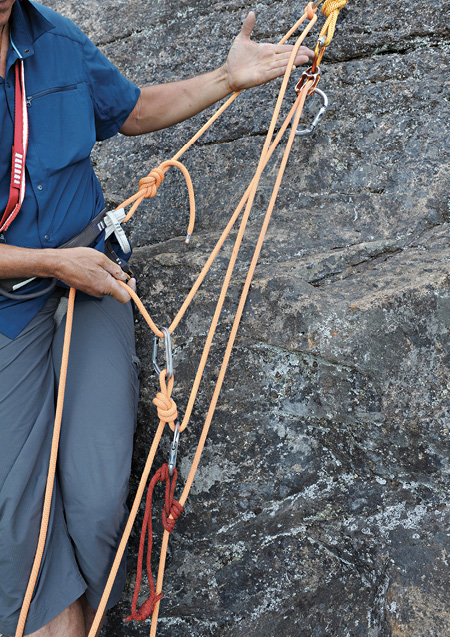
The backside 5:1 runs through one less carabiner compared to the block-and-tackle version. You do, however, incorporate the backside of your clove hitch, making it slightly more complicated to build. The placement of the bight knot on the backside haul strand affects the system’s efficiency. Philbrick Photography
In step 4 you’ll notice that you push the friction hitch down almost as far as you can. When you tie the bight knot, it is hard to get it as close as possible to the carabiner. Now when you push the friction hitch down, you will eat up the little bit of slack that inevitably occurs between the bight knot and the carabiner. This little bit makes a difference in the efficiency of your throws.
Comparing the two 5:1 systems, you’ll notice the rope runs through one more carabiner in the first system, adding some friction. In the second system, getting the bight knot tied small and as close as possible to the carabiner on the friction hitch makes a big difference on the number of throws and the efficiency. It helps to be precise with tying and the placement of the knot.
9:1
The 9:1 is the next easiest to set up and it will be the first to require two friction hitches, so you will need to do double throws. It is essentially a 3:1 on top of another 3:1.
This is a last-resort haul—not very efficient but if you can’t move someone with the 5:1, it might be necessary. The maximum force you can put on the anchor is eight times what you can pull. If for a short time you pull with 100 pounds of force, then it will put 800 on the anchor. Be very careful if at some point someone comes to help you. Two people potentially double that force, which means you could further injure the victim and it puts far more forces into your anchor.
Remember, only enough mechanical advantage to move the load. If it is too easy, the potential for problems increases.
- Tie a catastrophe knot into the brake strand.
- Place a friction hitch on the rope going down to the stuck climber.
- Clip the brake strand into the friction hitch.
- Place another friction hitch on the brake strand and move it close to the carabiner on the first friction hitch.
- Clip the brake strand to the anchor.
- Now clip the brake strand to the second friction hitch.
- Untie the catastrophe knot.
- Pull.
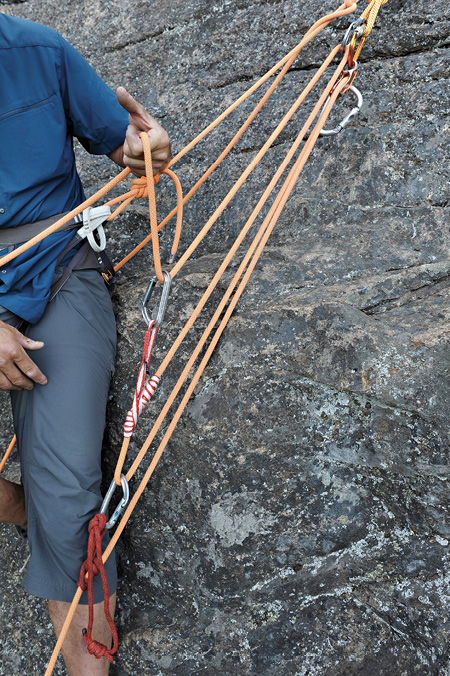
The 9:1 is similar to the block-and-tackle 5:1, but instead of clipping the last bend through another carabiner, you build a friction hitch on the strand and clip the rope to it. This creates a 3:1 on top of a 3:1, yielding enormous mechanical advantage. Philbrick Photography
Rescuing a Second, Counterbalance Transition (Unweighted)
Self-rescue becomes much more difficult with a weighted system. In reality, though, our transition from belaying to rescue is unweighted because we transfer the load to a temporary system. Once on the temporary system, our transitions become easier because we’re dealing with an unweighted system.
The temporary system adds visual and material complexity. If we go through the transition first without weight and then add the temporary system, it is far easier to learn.
So could this transition actually take place unweighted? If you imagine how a second could get injured, one method might be hitting a ledge due to rope stretch or slack. If there is a ledge, the second may be able to sit on it or somehow otherwise take his weight off the system. Unweighted doesn’t mean we can sacrifice security, though: At all times the second climber must remain protected!
- The rescuer ties a bight knot into the brake strand and clips it into his belay loop with a locking biner.
- He clips the rope going to the injured climber to the anchor with a locking carabiner. (Notice you’re essentially building an LSD lower, which means the plaquette will not lock should the second slip. The bight knot on your belay loop is absolutely critical in this situation.)
- The rescuer unclips the belay device from the anchor, slides it down the rope, and clips it to himself in rappel mode with a short extension. A basketed, shoulder-length sling through the belay loop is about the perfect length.
- He places a third-hand backup on the ropes behind the rappel device.
- He snugs everything up by taking up any slack through the rappel device and then tests it.
- The rescuer unclips his clove hitch from the anchor.
- He rappels down. When he reaches the bight knot he clipped to his belay loop, he engages his third-hand backup, tests it, and if it holds, unclips from the bight knot and unties it.
- He finishes the rappel down to the injured climber.
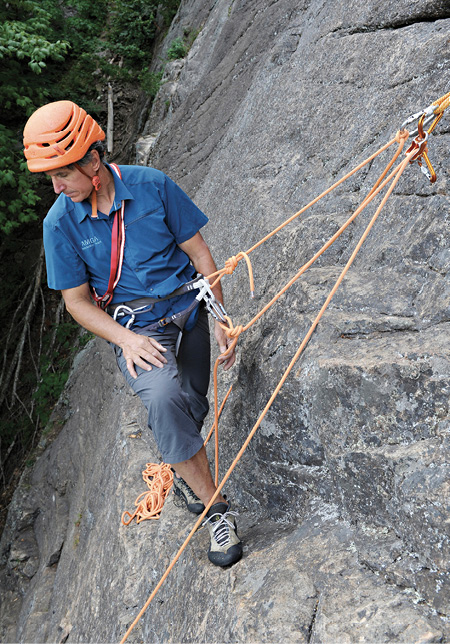
1. Unweighted transition to counter-balance. To begin the transition, tie a bight knot in the brake strand and clip it to your belay loop. In the event you’re short on locking carabiners, you can use two non-lockers (reversed and opposed) on the belay loop. This is a great spot to conserve lockers, and note the rescuer in this photo has done just that. Philbrick Photography
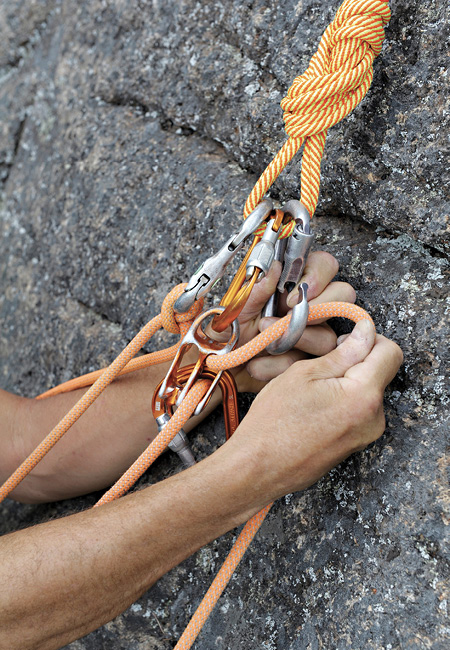
2. Feed or pull some slack through the plaquette to the climber’s side and clip it through a locking carabiner on the masterpoint. Philbrick Photography
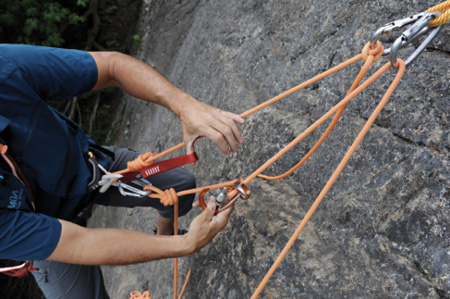
3. Unclip the plaquette from the anchor, slide it down the rope toward you, and clip it in rappel mode to a sling basketed through your belay loop. Clean the extra carabiner off the ear. Philbrick Photography
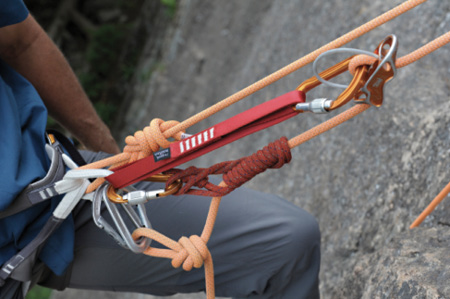
4. Add a friction-hitch backup to the brake strand below the device. Philbrick Photography
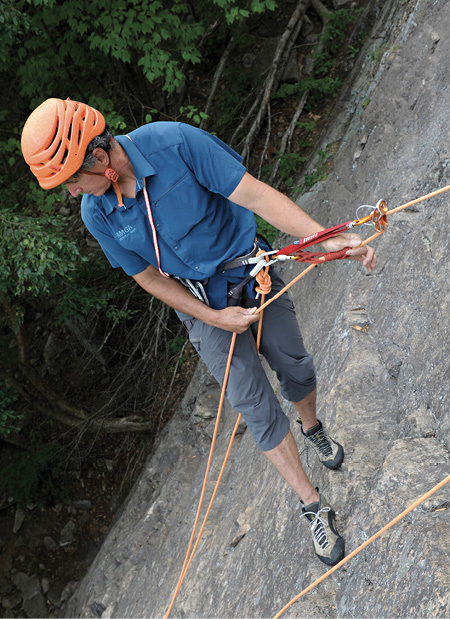
5. Unclip your clove hitch at the anchor, as well as the bight knot from your harness. Rack your carabiners, untie the bight knot, and rappel to the victim. Philbrick Photography
During this transition the rescuer ties the bight knot and clips it to his belay loop, creating a very secure counterbalance anchor. Until the rescuer unclips his clove hitch from the anchor, both the rescuer and the injured climber are secure. This means any mistake made during the transition might create 3 to 5 feet of slack but will not be catastrophic. This simple move of tying a bight knot into the brake strand and clipping it to the rescuer will be common in our rescue/problem-solving transitions.
The Temporary Ledge
The above transition took place while the injured climber sat on a ledge. But what if there is no ledge? We’ll build one—not a real one, but a temporary one.
In reality, our temporary ledge is just the technical solution to creating an unweighted scenario, like our natural one above. The temporary ledge simplifies our rescue. So, in the event your follower is injured and fully weighting the rope, consider building a temporary ledge with the following transition:
- The rescuer ties a bight knot into the brake strand (he leaves 3 to 4 feet of slack this time) and clips it into his belay loop.
- He ties a friction hitch on the rope going to the injured climber and clips a carabiner onto it. He uses a locking carabiner if he has a spare. The rescuer should avoid using his best Prusik cord as he’ll need it for the far more important application of his third-hand backup.
- He grabs the backside of his clove hitch and with this rope ties a Munter mule overhand on a locking carabiner clipped to the friction hitch built in step 2.
Now the rescuer releases the belay device and lowers the injured climber onto the Munter mule overhand. To do that, he first tries to lever the blocking carabiner back and forth on the plaquette. This should slowly feed rope out until it produces enough slack, then he can pull the device from the back and release it. If that doesn’t work, he can clip a carabiner (or a nut tool) to the lower hole on the plaquette and use it as a lever to orient the plaquette to release. The Munter mule overhand setup should be as snug as possible, so little rope is needed to lower the injured client onto it.
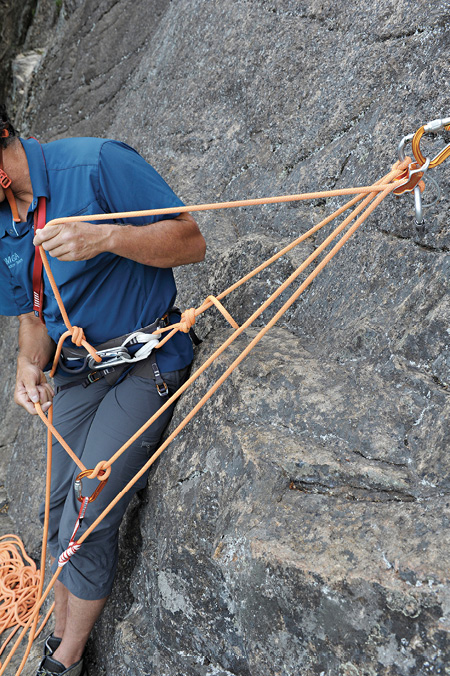
1. Building the temporary ledge. Tie a bight knot on the brake strand and leave approximately 1 meter of slack in the system. Clip the knot to your harness with either a locking carabiner or two non-lockers reversed and opposed if you’re short on lockers. Once you’ve backed up the victim, tie a friction hitch on his strand of the rope. Remember not to use your dedicated Prusik/third-hand, as you’ll need it later during the rappel. We’d rather have our best material available for the rappel, as we’ll be on it longer. With the backside of your clove, tie a Munter mule overhand to the friction hitch. Remember to orient the Munter in the “lower” position before tying it off, so it doesn’t snarl once you weight it. Philbrick Photography
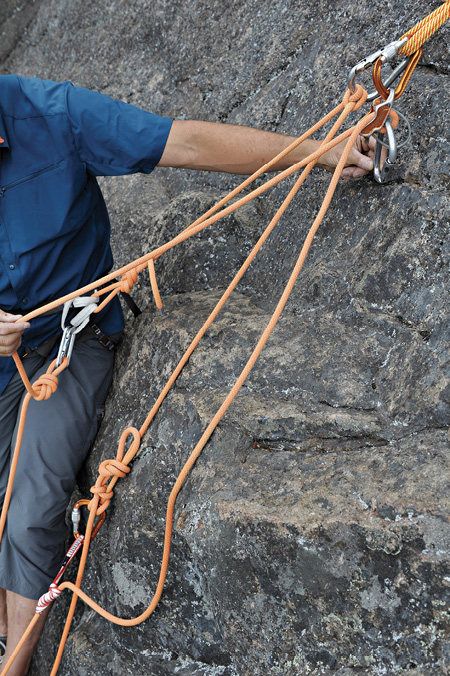
2. Ratchet the blocking carabiner back and forth to lower the victim onto the temporary ledge. Philbrick Photography
Releasing the device takes a little thuggery. Don’t worry about it releasing quickly, because the injured climber can’t drop too far—the Munter mule backs it up, and in the unlikely chance it slips, you have the bight knot on your belay loop securing everything.
Once you’ve unloaded the plaquette, you can begin the transition. There is very little change in the process until step 6. Since the bight knot is already clipped onto the rescuer’s belay loop, the process starts from there:
- The rescuer clips the rope going to the injured climber to the anchor with a locking carabiner.
- She unclips the plaquette from the anchor and clips it to herself in rappel mode with a short extension. A shoulder-length sling basketed through the belay loop is about the perfect length.
- She places a third-hand backup on the rappel strand.
- The rescuer snugs everything by taking up any slack through the rappel device, then tests it.
- She unties the mule and with the Munter lowers the weight onto her rappel. As she does this she needs to be well braced, so she does not get pulled into the anchor. The rescuer takes the Munter off the rope once the second’s full weight is on her rappel rig and she’s in control of the counterbalance rappel.
- The rescuer unclips her clove hitch from the anchor.
- She rappels down the slack behind her device. When the bight knot clipped to her belay loop comes tight, she tests her third-hand backup and unclips the bight knot and unties it. Once the bight knot is untied, the rescuer needs to make sure she will not be pulled into the anchor. If that were to happen, the rappel device would jam into the anchor, and then the friction hitch would pull upward and into the rappel device. The third hand will likely fail. Dropping the victim is a real hazard here. The rescuer needs to be very careful until she is fully off the belay ledge. If she’s still in danger of being pulled upward, she can tie another catastrophe knot farther down the rope, rappel to it, then remove it and continue.
- The rescuer rappels down to the injured climber.
In step 7 we talk about the potential for a catastrophic failure. With the victim’s weight on the rescuer while she’s close to the anchor, she must resist being pulled up and into it. We suggested adding 3 to 4 feet of slack before she ties the bight knot. This is to accommodate the length she’ll need to lower the victim onto the Munter mule and still have rope to move away from the anchor before removing the bight knot. She must try not to waste the slack behind her device by failing to fight to move down (rather than lowering the victim). If she is close to the anchor and the bight knot is tight, she can tie another bight knot below the original and clip it to her belay loop before untying the original one. Being pulled into the anchor and dropping the victim at this point is the most likely mode of failure in this system and it is very serious. If there’s any chance of this, the rescuer should have a bight knot behind her device and below her friction-hitch backup.
Beyond Rescue: Tools for Everyday Climbing
The temporary ledge and even small parts of the system like clipping a bight knot on the brake strand can be used to solve problems unrelated to rescue. By incorporating these techniques into our everyday systems, it allows us to stay practiced and feel less stressed should a rescue ever happen.
The Backup Bight Knot
The first tool that can be very useful is tying a bight knot into the brake strand of a plaquette and clipping it into you. Since you are usually clove-hitched into an anchor, this can be considered another anchor, but it doesn’t cluster your system. Of course, in the worst-case scenario (a belay or haul-system failure), you would get a violent pull, but it will be more than survivable. Having a bight knot clipped to you gives you peace of mind whenever you’re working with a plaquette for any reason.
Lowering the second a significant distance offers a good scenario in which the bight knot becomes useful. Imagine the second can unweight the system but still needs to be protected during the change to a lower.
You first tie a bight knot into the brake strand and clip it to your belay loop. Now you decide to use a Munter hitch for the lower. You tie a Munter hitch on the climber’s rope and begin to disassemble your belay device. At that point you realize you incorrectly built the Munter and it is just a double loop through the locking carabiner. With the bight knot clipped to your belay loop, you still have your partner secured, and because the rope goes through a carabiner at the anchor, there isn’t much slack.
Whenever you need to unlock your plaquette, if you first tie a bight knot into the brake strand and clip it into your belay loop, you have created (in seconds) security with no extra confusion at the anchor.
The temporary ledge solves the problem of unlocking and/or lowering a second who cannot unweight the belay. Once the ledge is built and weighted as described above, you can transition the plaquette to a lower. For us, if we need to do any weighted transition, we look to the temporary ledge, along with the bight knot clipped into the belay loop, as a possible solution.
A Weighted Knot Pass
Using the temporary ledge also facilitates a very easy, secure knot pass, using very little in the way of additional gear beyond a Prusik cord. Notice, too, the original Munter hitch used to lower is not broken down in this sequence. Because you’ve successfully used the Munter to lower the first rope-length, you know it’s been built correctly, so why retie it? Using the temporary ledge, we simply pop the junction knot through the Munter, saving the steps of untying and retying it behind the junction knot, as well as eliminating the risk of retying it incorrectly. Simplify, simplify, simplify!
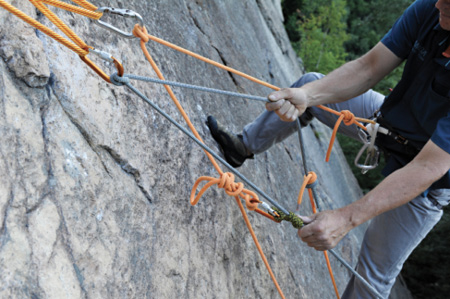
1. Knot pass. Use your temporary ledge rigging as a backup during the first lower. Note the temporary ledge pictured here is built using the backside of the rescuer’s clove hitch. When the joining knot approaches the Munter, the rescuer engages the temporary ledge. Philbrick Photography
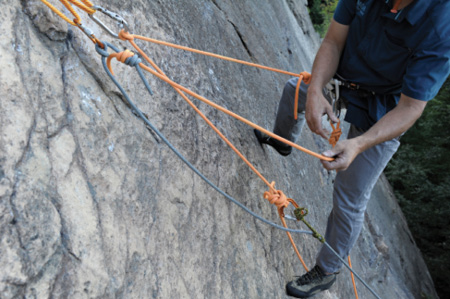
2. The rescuer has engaged the friction hitch attached to his temporary ledge, verified that it’s grabbing, and then tied an figure eight on a bight and clipped it to his belay loop to back up the knot pass. Philbrick Photography
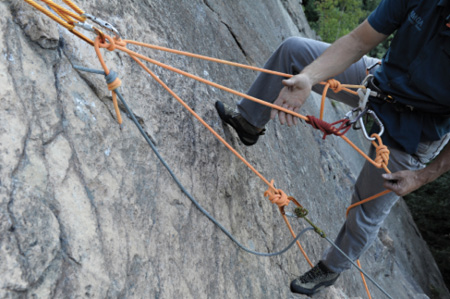
3. The rescuer feeds the junction knot through the Munter hitch on the anchor, then puts a friction-hitch backup on the brake strand. Philbrick Photography
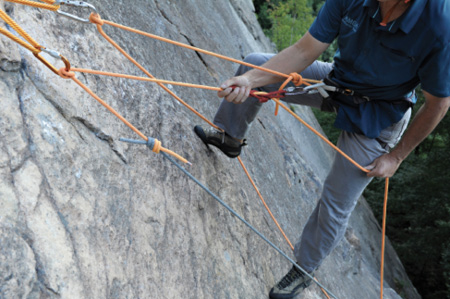
4. The order in which you perform the following steps is important. First, release the Munter mule overhand on the temporary ledge and load the Munter used in the first lower. Second, engage your friction-hitch backup and verify it grabs. Third, while maintaining control of the brake strand, unclip the figure eight on a bight form your belay loop, untie it, and continue to lower. Philbrick Photography
Scenario: Assisting a Climber at the Crux
Let’s see how these techniques can be put together in a new way to aid a guide or instructor wanting to coach a client at the crux on a multi-pitch climb. Using a few simple tools, a guide or instructor can set up a toprope on an upper part of a multi-pitch climb, using a system very similar to the counterbalance self-rescue transition.
In our scenario the guide is belaying 40 to 50 feet above a crux; there is a small ledge just below the crux, maybe 15 feet below the difficulties. The client can almost do the moves but not quite. There is no real time pressure. The client wants to focus on difficulty, not efficiency or moving quickly. To help the client, the guide wants to coach, and being closer allows better communication and helps keep the stoke high. Perfect situation to give the client a fun, challenging day!
Our transition begins with the client hanging on the rope, struggling a bit, and uninjured. He can unweight the rope, but cannot make the moves free.
- The guide ties a bight knot into the brake strand and clips it to his belay loop.
- The guide puts a third-hand backup on the brake strand, just above the bight knot.
- The guide clips a locking carabiner into the masterpoint of the anchor where the belay device is clipped.
- The guide now asks the client to temporarily get on the rock and unweight the rope. As soon as it’s unweighted, the guide clips the climber’s strand into the locking carabiner; this sets up the load strand direct (LSD) lower. Note: Although the LSD lower does not normally require a locking carabiner, in this scenario it does, as that carabiner will also be used for the counterbalance rappel.
- The client re-weights the rope. The guide engages the third hand, checks everything, unclips and unties the bight knot on the brake strand, and lowers the client to the ledge below the crux.
- Once the client is comfortable on the ledge, the guide ties another bight knot on the brake strand below the third-hand backup and clips it to his belay loop with a locking carabiner. This is absolutely critical.
- The guide preps a sling on his harness for an extended rappel. A sling basketed through the belay loop is a very good length for this application.
- The guide now unclips the belay device from the anchor and clips it in rappel mode onto his extension. Note: The guide only needs to unclip the biner hanging the device from its ear, slide the device down the rope, open the blocking carabiner, and clip that to his sling/tether—no need to disassemble it only to reassemble it on the sling/tether.
- The guide checks and weights the rappel system, unclips his clove hitch at the anchor, then unclips and unties the bight knot and rappels to the client. This puts an upward tug on the client, so a little warning is a good idea.
- Once down on the ledge, the guide again ties a bight knot into the brake strand and clips it to his belay loop, securing the team.
- The guide now takes a locking carabiner and clips it to the top of the belay device and clips that back to his belay loop. This puts the device into guide mode on his belay loop.
- The guide can now belay and coach as the client works the hard section.
- Once the client is through the crux and gets to a rest, the guide ties another bight knot into the brake strand and clips that to his belay loop and takes the older one out. The guide now ascends to the anchor, using the belay device in locking mode and a friction hitch with a foot loop. The foot loop should be built above his plaquette; a double-length sling is a good length. Ascending will put a tug on the client, so another warning is in order.
- Once at the anchor, the guide ties another bight knot into the brake strand and clips it into his belay loop. He removes the one he tied at the ledge afterward.
- The guide secures himself with a clove hitch to the anchor on the climbing rope. Note: The guide never untied, only dropped his clove when he rappelled.
- The guide unclips the belay device from his belay loop, clips it into the anchor in self-braking mode (reversing the maneuver from step 8), and finally cleans the foot loop off the rope.
- The guide checks everything, unclips and unties the bight knot on his belay loop, and belays the client up to the stance.
This process isn’t theoretical—it is a technique we have used in our work and allows us to maximize our clients’ enjoyment and progress. For a careful, competent guide, techniques like these not only deliver a more customized day to a paying client, but employing them also acts as training and practice for a rescue situation.
This scenario does not include the temporary ledge because the client can unweight the rope. For a routine instructional system this is typical, but if you were to add that component to a practice you have a pretty complete scenario you can use to gain the skills necessary to deal with a problem.
The Tandem Rappel
Guides use the tandem rappel in a variety of situations—an injured or nervous client, or a child being the most obvious. Working with a family, the tandem allows the adults to be pre-rigged above the guide with a smaller child as a tandem.
We can also use the tandem in the recreational setting. A recreational team can employ the tandem to replace the simul-rappel. Because both climbers are on the same device, the problems and hazards of the simul-rappel don’t exist. If you’re not careful with the lengths of the arms of the cordelette, the tandem can be awkward and uncomfortable. With a little forethought, however, and staggered-length arms on the cordelette, it can be much more comfortable.
On multiple rappels, two climbers can attach to each new anchor with one clip of the masterpoint using a tandem. This makes the transition from one anchor to the next very efficient.
Leader Rescue
While leader rescue is typically much easier than rescuing a follower, it presents more risk. In most leader rescues, the belayer and leader are already set up in a counterbalance. Problem is, that counterbalance is anchored by what is most likely a single piece of protection, which the rescuer can’t inspect, clipped with a non-locking carabiner. The whole team is counterbalanced on that piece, though with additional pieces below it.
Fortunately, in most cases the belayer can simply lower an injured leader down to the anchor. Most wouldn’t even consider this scenario a “rescue.” As we said, this is the situation in a vast majority of cases. Consider: A 200-foot rope is pretty standard, and although we do sometimes stretch the rope out on a climb, we find it far more common for pitches to be somewhere between 120 and 150 feet. Many times—especially in places like Eldorado Canyon—pitches are less than 100 feet.
So, unless the leader is near the end of a long pitch, chances are you’ll be able to lower her back to you. Unless . . . the leader’s highest piece is more than 100 feet from your belay. (We’ll chat about traverses in a moment.) This presents a special, albeit less common, problem.
Rescues without the Option of Lowering
In the event you cannot lower the leader back to your stance, the goal becomes getting both you and the leader to a secure anchor, hopefully at a decent stance or ledge. From there you’ll transition into a descent of some sort, most likely tandem rappelling.
Reuniting with the leader may require some combination of the rescuer ascending and/or lowering the injured leader. Remember, the rescuer is already rigged in a counterbalance rappel. That means the rescuer has three obvious options available:
- The rescuer can stay put and lower the injured leader.
- The injured leader can stay put and the rescuer can ascend.
- The rescuer can climb with his device locked off, so that as he climbs, the leader lowers.
Initially the rescuer has all three methods at his disposal and can transition from one to the other as he sees fit. Eventually either the injured leader or the rescuer will get to the ledge first. At that point, options narrow. Before we go too much further, let’s go over the transition from belaying the leader to a position where we can have these options.
- The rescuer ties off his belay device.
- He ties a bight knot into the brake strand and clips it into his belay loop with a locking carabiner.
- He unclips his clove hitch from the anchor and disassembles the anchor.
- Using the anchor material (cordelette), the rescuer ties a friction hitch on the rope going up to the injured leader and makes a foot loop.
- He stands in the foot loop, which will take the weight off his belay device. He then clips the ear of the belay device to his belay loop and unclips the locking carabiner with the rope in it from his belay loop; this becomes the blocking carabiner. This flips the belay device into guide mode on his belay loop.
- The rescuer unties the belay device (from step 1) and is ready to effect the rescue.
Once this transition is complete, you have all three options available to you: moving the rescuer, moving the injured leader, or both. If at this point the rescuer started to climb, the leader would lower down the cliff. Or, the rescuer could start to ascend the rope, which would keep the leader in place while the rescuer moved up. Finally, the rescuer could flip the device and lower the leader.
Had the rescuer deemed a lower an appropriate first step, he would have lowered the leader prior to doing the above transition. For this reason, we can likely assume the rescuer will be going up. Once he gets a better handle on the situation, he may want to do a lower; for example, if the rescuer gets to a ledge within 100 feet of the highest piece of protection and he then decides to lower the leader to it. From this point on, how the rescue takes place has everything to do with the terrain, nature of injury, and how much risk the rescuer decides is appropriate.
Risks While Rescuing
The risks are real, but not excessive. Ascending may seem extreme because we have removed the anchor. The reality, however, is that for the worst to happen, all the leader’s protection would have to fail. Of course, if the top piece were to fail and the rescuer was ascending the rope or hanging on it, it would result in a fall. The distance the rescuer and the leader would fall is the distance to the next piece. The key for the rescuer is to get in a position where they can improve security “on the fly.”
That security can come in two ways:
- The rescuer gets to a ledge that is within 100 feet of the top piece of protection and clove-hitches into a piece he places or a piece of protection already on the pitch.
- The leader is lowered or can get himself to a piece of protection and secures the rescuer’s strand of rope to it.
The rescuer will have some gear with him, because as he’s already cleaned the anchor and as he ascends, he removes more gear. This may seem to add risk, but leaving the anchor and the gear does not reduce the falling hazard.
By having that gear, he not only expedites the rescue, but also makes it less complicated and in the end less risky. The key is to not go so far as to limit how much protection remains above. At the least there should be three or four pieces of protection left, so the rescuer should not ascend above that point unless he can be secured in some other way.
If the injured leader gets to the ledge first, he can do a very simple procedure to secure the rescuer. If the rescuer and the leader can unweight the rope, the leader can tie a clove hitch into the rope going down to the rescuer and clip it to a piece at the stance. If the rope cannot be unweighted, the injured leader can use his Prusik cord and tie a friction hitch on the rope going to the rescuer and clip that into a piece at the stance.
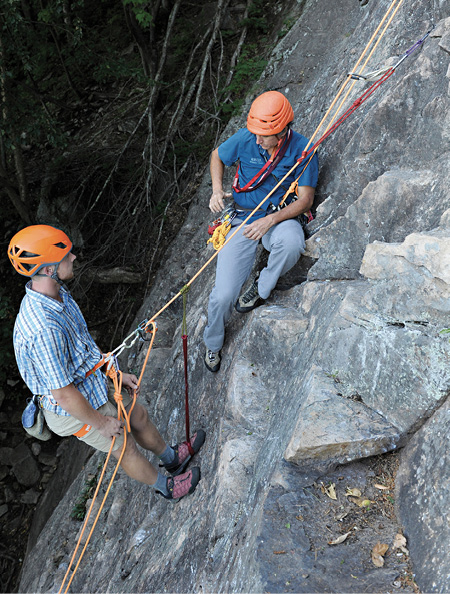
The rescuer ascends the rope with a foot loop installed above his plaquette, which he has flipped into ascension/guide mode. The rescuer is counterbalanced with the leader through the top piece of protection in their system. The leader has increased security for the rescuer by affixing a friction hitch on the rescuer’s strand of rope to a piece of protection, effectively creating a two-point anchor on which to ascend. Philbrick Photography
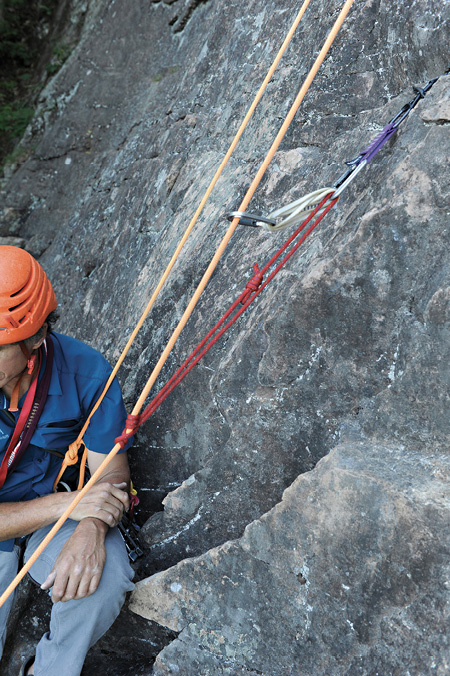
A close-up of the friction-hitch attachment to the rescuer’s strand. The leader added his friction hitch directly into the quickdraw on the nearest piece of good protection. Philbrick Photography

Provided the leader and rescuer can communicate, the leader can connect the rescuer’s rope to a piece with a clove hitch, offering more security than a friction hitch. To do this, the rescuer must leave a bit of slack in the rope, allowing the victim to tie a clove hitch. Philbrick Photography
When the leader does this, in effect he creates a two-piece anchor for the rescuer. There’s the top piece on which the leader probably took his initial fall and now a friction hitch connecting another piece in the system to the strand the rescuer is ascending. The two pieces are not perfectly equalized, but at least now the rescuer is ascending a rope that’s secured by two individual pieces. If the top piece blows, the friction hitch will go tight, and instead of falling the distance between the top piece and the next, the friction hitch will arrest the rescuer’s fall. This increases the security substantially for the rescuer.
The Impossible Scenario
We often get questions about seriously injured leaders and seconds. Much has been discussed about the viability of rescuing an unconscious victim. In a self-rescue you need to be realistic as to what is solvable. A truly unconscious leader who stays unconscious and who is a significant distance from advanced medical care is likely not going to make it. People die and they die climbing; you cannot save everyone.
That said, if you have a critically injured leader, you need to alert authorities and you need a team—preferably with a helicopter—that has the means to extricate your partner. That is his only real hope. For you to take extreme risks to save someone you can’t save may make you feel better . . . but it might just kill you, too. Take a deep breath and work with deliberate and thoughtful patience doing your best, but with an accurate perception as to the risks and benefits. Rescue is serious business—take it seriously.
Special Problems and Terrain as the Solution
We can anticipate and design solutions for many of our problems, but in most cases the individual terrain demands a unique solution. Imagine the scenario of a leader who has traversed far to the side of your belay. You can go through many techniques and systems to devise “the solution,” but if you notice the long ledge 75 feet below the injured leader and lower him to it, then counterbalance rappel to it and traverse, you’ll look far smarter.
In our work it is easy to see terrain as the enemy. It is terrain that creates the falling hazard, the route-finding problems, and the pendulums for our clients on traverses. But if we also notice a ledge or a particular weakness or a horn on which to belay, these become opportunities. When you start to look at terrain for solutions, you start to see terrain as the solution.
When, due to stress or inexperience, we see terrain solely as the problem, the only solution we have is the rope. We see this time and time again, the hope for a technical solution via the rope, instead of the simpler, perhaps less sexy, solution within terrain. So, it’s nearly axiomatic in guiding—terrain before the rope, and the rope before despair. Burn this into your consciousness!
Complex Second Rescue
As we mentioned, rescuing the leader counts as a special circumstance due to the fact that it is rare you won’t be able to lower the leader down to you. The same situation applies to the second.
We described a rescue of your second, assuming he is within half a rope length of your stance. But what if he is farther down? In that situation you’ll need to descend to another stance to anchor and then transition to the new lower anchor. This complicates the rescue because as we’ll see, the top belayer may already be short on gear.
The rescuer has already led a pitch, decreasing the size of his rack, and now he needs to descend, leaving an anchor above. As he descends he’ll remove gear as he rappels past, hopefully replenishing his options. He may not have another cordelette, either, because he left it at the stance above and the second probably has the other below. Perhaps the rescuer could replace the top cord with slings or an improvised system.
So, we will describe the process assuming two things: 1) the rescuer knows the second is more than half a rope length below, and 2) the rescuer did not recoup the cordelette from the stance above.
- The rescuer needs to find a place to anchor within 100 feet of the second, but with about 5 to 6 feet of slack left in the counterbalance rappel.
- The rescuer builds an anchor at this stance and leashes in.
- The rescuer places a friction hitch onto the rope going down to the injured second and attaches it to the anchor using a mariner’s hitch. He allows rope through his device to load the friction hitch/mariner’s hitch.
- Once the friction hitch/mariner’s hitch bites, he feeds out a few inches more, introducing slack into the rope above the friction hitch/mariner’s hitch.
- The rescuer takes the slack and clips the rope going to the injured second through the new anchor with a locking carabiner, then ties a bight knot and clips it to his belay loop.
- The rescuer disassembles his rappel device, unties from the end of the rope, and pulls the rope down from the anchor above. He should then pull the rope back up and either tie back into the end or tie a stopper knot in the end of the rope. This closes the system so he can’t rappel off the end of the rope.
- He now rebuilds his rappel, adds a third-hand backup below it, and releases the mariner’s knot to weight his next counterbalance rappel.
- The rescuer unclips his leash.
- He must again be wary of getting pulled into the anchor, as doing so can unlock his device. He must resist the upward pull when starting his counterbalance rappel. Once he gets established on rappel, he can untie the bight knot on his belay loop and continue.

1. Build a mariner’s hitch by clipping a double-length sling to your anchor, and attach it with a Munter hitch to a locking carabiner on a friction hitch on the load strand of the rope. Philbrick Photography
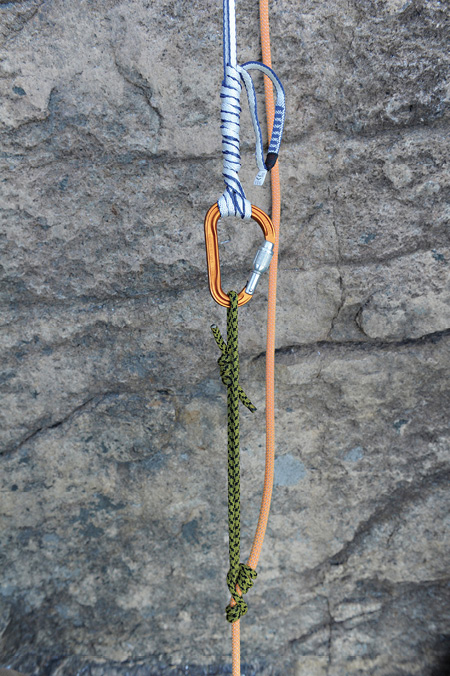
2. Now wrap the sling around itself until you’re left with several inches of material, and thread the end between the two strands of the sling. Notice the rescuer positioning the bartacks such that it’s the portion of the sling threaded through itself at the end. Philbrick Photography
Most would assume that if the rescuer has a cordelette, he will use it for anchoring. Depending on the configuration of the pieces, this may very well be the best use. If he can save it, though, it may come in handy later in the rescue. In that case using the cordelette to tie a friction hitch/Munter mule, instead of the mariner’s knot, may be a better use.
There will likely be a shortage of locking carabiners, so using opposite-and-opposed non-lockers becomes important. We mention in step 9 that the hazard of getting pulled into the anchor, which then allows the third-hand backup to travel upward and hit the rappel device and fail, is a realistic concern. Notice, though, at that point the rescuer still has the bight knot clipped to his belay loop. The rescuer must try to avoid this, but the bight knot prevents dropping the second—though it would be unnerving for the second to be dropped several feet!
In step 9 the rescuer should rappel 6 to 10 feet below the anchor before unclipping and untying the bight knot—this distance protects him from risking a failure of the rap system. Due to a large weight discrepancy or just a low-friction system, if the rescuer still feels in danger of being pulled upward, he can replace the bight knot with one farther down the rope and put even more distance between himself and the anchor.
Multiple Seconds
You’ve already thought to yourself, what about multiple seconds? For the recreational party, a team of three may make things easier, while for the guide it will likely complicate things. How exactly you solve the problem will depend on so many variables that you cannot have a specific system. What we will do is discuss some ideas and the strengths and weaknesses of each.
Caterpillar
In a caterpillar system, if the injured second is the first follower, the rescue system can stay the same (counterbalance to him) because the other second is well anchored below. Once the rescuer gets to the point of a tandem rappel, the second follower (who remained at his belay) can rappel with the team, either prior to the rescuer so she can set up the next stance or as a pre-rigged rappeller in a client/guide situation.
If the team is in caterpillar and the second follower is injured, there are far more options. In a recreational party the first follower can be lowered and do a pick-off. Once down to the injured partner, the rescuer would attach the injured climber to the rescuer’s rope with a friction hitch and back it up with a sling from one belay loop to the other. The leader can then lower the injured climber onto this system. The key to this system is coordination, and therefore communication will be critical.
In a guided situation the uninjured follower’s rope can be set up as a 100-foot rappel. Remember, he’s already at the stance and can be pre-rigged on his rope; then the guide can do the rescue to a new stance and give a fireman’s belay to the client. In this system the guide will have to delay getting to the injured climber so that she can set up the pre-rigged rappel for the uninjured second.
Parallel
In parallel systems the problems are more complex since both seconds’ ropes are probably in the belay device. In a recreational setting a well-coordinated lower of both seconds connected by an extended friction hitch connecting the victim to the rescuer can work, but now the communication is made more difficult because the leader and the healthy second are rarely close enough to develop a plan.
For a guided party the guide may decide to have the healthy second finish the pitch, then free up the rope and set up a pre-rigged rappel—as she did in the caterpillar system. Again, this prolongs the time it takes the guide to get to the injured climber.
In almost all systems a guide could secure the healthy second and leave him in place, get the injured second stabilized, then re-ascend to belay the healthy second to the stance. Regardless of the situation, a thoughtful plan needs to be hatched and then executed. There will be no easy answer or cookie-cutter process because of the sheer number of variables.
Complex Systems and Simple Solutions
No self-rescue is a cookie-cutter process with two followers, in caterpillar or parallel. Each rescue requires considering all the skills at your disposal to solve the problem. We have described some basic tools and systems, but there is no way to develop and learn a step-by-step process to solve every possible permutation. Self-rescue is far more advanced than that and requires a comfort with rope systems and a good vision for terrain.
Climbers must have a complete toolbox of techniques, as well as a high level of comfort in vertical terrain, to execute a complex self-rescue. What we think you’ll find, however, is that many minor injuries or simple accidents can be surprisingly easy to manage. As you practice more-complex systems, don’t allow their complexity to blind you to the simple solutions before your eyes.