
Modern manufacturing holds all parts to amazing tolerances. Well, the good ones do, and they cost more than the cheap import rubbish. They’re worth the extra cash.
The AR works like this. Incoming gas from the gas tube travels into the gas key, which directs it to the interior of the carrier. There the gas expands and cools, the force of expansion driving the system. Basically, what the gas does is treat the carrier like the remnants of a drinking straw. You know, you tear off one end, you put the open end of the straw in your mouth and you blow the remaining sleeve of paper at your annoying sibling.
The gas blows the carrier away from the chamber. In the wall of the carrier is a kidney-shaped slot. That slot holds the cam pin. When the carrier moves, it acts to rotate the bolt, using the cam pin as a lever, and once the bolt has been rotated open, the carrier hauls the bolt back away from the chamber.
To control gas flow and timing, the carrier has vent holes in its side, aimed at the ejection port cover. The bolt has three gas rings in its tail section, which act exactly like the piston rings in your car — controlling pressure and preventing leakage. In an interesting development, the gas in the expansion chamber not only pushes the carrier to the rear, but pushes the bolt forward, taking some load off the lugs, easing rotation and opening.
Now this is in the original, direct-impingement system, also known as DI. In the various piston systems, the piston rod pushes (or strikes, depending on the design) on the carrier, but that adds a bit of complexity. You see, the gas system pressurizes the carrier along its central axis. The piston pushes on the carrier off-center, and this leads to a phenomenon known as “carrier tilt.” The rod pushes on the carrier above its center of mass, so the carrier attempts to rotate, and that means the rear end of it tips down. This can lead to gouging of the buffer tube where it meets the lower receiver. Manufacturers deal with this using several methods. One is to make so-called skid pads on the bottom of the carrier to stop tilt and create a sliding motion before the carrier can tilt too much. Another is to extend the bottom lip of the buffer tube forward, to keep the tube under the tilting carrier rather than the threaded portion of the lower receiver, or the front edge of the buffer tube.
The carrier blows back, hauling the bolt with it. The bolt extracts the fired case, ejector tossing the case overboard. Once the carrier bottoms out in the buffer tube, the spring pushes it forward where the bolt gobbles up another round, chambers it, the carrier cam slot works its leverage on the cam pin, the bolt rotates closed and you’re ready to repeat.
That’s the system in a nutshell. Now, let’s look at the individual parts, starting with the carrier.
The carrier is a nearly indestructible piece of equipment. You can break it, but in so doing you’ve probably just blown up a rifle, and everything else on it is toast, too. I’ll take a bold stand here and say you cannot wear out a carrier. It has no accepted service life because it is not a wear part. And the only wear part on it, the gas key, can be replaced.
Carriers come in a variety of configurations, with said variations all having something to do with one of two areas: the lower rear hoop or the firing pin shoulder. Oh, you can find steel, aluminum and titanium carriers, lightened carriers, heavy carriers, and carriers plated with every other metal or alloy known to man, but we’ll get into those later. For now, we’ll just cover the common ones.
The bottom rear hoop provides the proper (as in originally designed) mass for the carrier, and it is the bearing shoulder that trips the auto-sear in full-auto or burst fire. As-is, there is nothing inherently bad about it. However, back in the early days when the first attempts at “assault weapon” control (and this was so long ago the pejorative term hadn’t even been thought of as a stick with which to beat us) were going on, Colt figured they would solve that problem by clipping the hoop. So, the semi-auto AR-15 carrier has a hoop shorter than those on an M16.
And a brief side note, the originals were all AR-15, even the select-fire ones. It was only when the Army, via the DoD, adopted it did the term M16 come into the parlance. So, if you happen to see a select-fire Stoner-system marked “AR-15,” it may well be an actual real one.
Modern manufacturing holds all parts to amazing tolerances. Well, the good ones do, and they cost more than the cheap import rubbish. They’re worth the extra cash.
This didn’t last long, and Colt added another change — the firing pin ramp. The select-fire carrier’s bottom ramp extends back almost to the rear of the firing pin. If the carrier is not fully closed, the hammer can’t reach the firing pin, instead striking the bottom shoulder of that ramp, preventing an out-of-battery discharge.
Alas, people who were doing a modification known as “follow-fire,” an attempt to illegally convert an AR-15 into a pseudo M16 (and no, I won’t tell you how it is done) found that shoulder useful. Useful in that if the rifle didn’t quite cooperate, it wouldn’t blow up.
So, Colt made three changes, one of which involved the carrier; they opened up the ramp so the retaining shoulder on the firing pin was exposed. They made the flange on the firing pin larger in diameter. And they cut a notch into the top corner of the hammer. Now, if the members of the “hold my beer and watch this” lot tried to make their mods, the hammer would catch its hook on the exposed firing pin flange and stop.
All this had the effect of making the full-auto carrier an object of myth, legend, rumor and gossip.
A quick discussion of legalities and the Bureau of Alcohol, Tobacco, Firearms and Explosives, or ATF. The ATF will not tell you how many M16 parts are OK to have in your AR-15. This is part discretion, and part recognition. The recognition part is that if they put a hard-and-fast number on it, the next day 100,000 experimenters will get to work. If they say, “You can have X number of M16 parts in your AR-15, and it is OK” then the experiments begin. And every iteration of parts will be tried, tried and tried again, until someone finds a way to put the magic number of M16 parts in a rifle, thereby generating legal full-auto fire.
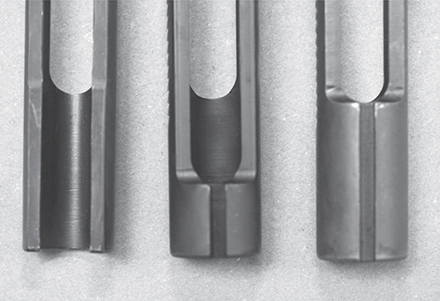
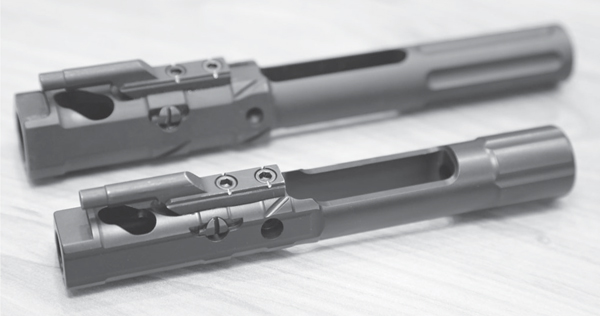
Left, the lopped-off Colt carrier. Center, the Colt AR-15, and right, the M16 full-auto carrier.
The other is that by not setting a limit, if you have one, and you have a rifle that fires full-auto, they have the option of simply spanking or imprisoning you. Prosecutors love discretion, as it means their job is easier. Hey, it’s human nature.
This standard government position lead to the unintended consequence of a blizzard of letters arriving at the ATF tech section every year. You got a question? Write it up and send it in, and the ATF will answer. Unfortunately, being a government agency, they can’t simply have a wall rack of response letters, sort of a hard-copy FAQ. That would be too easy. No, each letter has to be read, handed to the answer committee and then a response typed up. The response always follows this format:
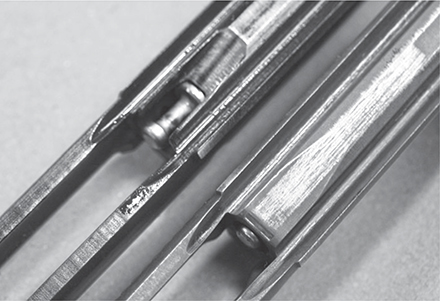
Top, the ramped firing pin shoulder that Colt made for a long time. Bottom, the shrouded firing pin shoulder on the M16 and other semi-auto carriers.
Thanking you for your inquiry.
Re-stating your question.
Responding to your question by quoting the relevant section of regulations or statute.
Reminding you that the important part of this situation is the exact wording of the statute.
Thanking you for your interest in the situation.
The response to a blizzard of questions on a single subject ends up being one of two things: the ATF admits the process is clumsy and annoying to all, or they change the regs.
In the case of the full-auto carrier in a semi-auto rifle, the ATF just told the manufacturers that they, the government, didn’t give a [fill in the blank] and to use whatever worked. That’s how you find full-auto carriers in rifles these days. Do not, I repeat, DO NOT write to the ATF, asking if the full-auto carrier in your AR you just bought is allowed. It is. The company that made it knew this. Such letters only do two things; bog down the letter process for other questions, and annoy the ATF.
And it can lead to other less-fortuitous outcomes.
A few years ago, an inventor came up with an idea. It was a rig to allow the disabled to shoot AR rifles. The arm brace was born. It was such a success that Sig bought it. And it was such a success that everyone had to have one. And far, far too many wrote to the ATF, asking, “Is this really allowed?” So many, in fact, that the agency had to sit down and take another look at the piece of gear they had approved. And they suddenly “discovered” that a lot of people were using it, people who were not disabled. And they changed their interpretation.
Now, I don’t think the re-interpretation would stand up in a court of law. However, no one is going to deliberately challenge it. Why? Because you have to have standing. “Standing” in the legal sense means you have been harmed by the law and can now challenge it. In this case, you can’t take the government to court on the arm brace issue, because you have not been harmed. You do not have standing. How do you get standing? You get arrested and charged under this interpretation.
Best outcome? You spend years, and a metric buttload of money, prove the interpretation wrong and get to live your life. You do not get a refund on your legal expenses, nor can you collect from the government. Worst outcome? The interpretation is proven correct, you still spend years and money, and then you go to jail.
I say thanks for nothing to all those who wrote letters, despite the fact that a copy of the approval letter from the ATF was enclosed with each arm brace.
But we have wandered far afield, and have to get back to the subject — carriers.
Your carrier will come out of the package either bare or with a key on top. And there isn’t a lot you can do to a carrier except inspect one important area, the bolt tunnel. Peer inside the front and you’ll see a hole bored down the center. That’s where the bolt will ride. The interior of the carrier is hard-chrome plated for wear and corrosion resistance. However, not all are the same. Look closely, and even use a light if you need. Do you see any circumferential marks? How about tool marks in the chrome plating? If you do, send it back and request another. Not that there is anything obnoxiously wrong with tool marks. But, what they will do is wear your bolt gas rings at an accelerated rate. The bolt cycles back and forth in the bore hole each time the rifle cycles. That means the rings slide along the shaft walls. If the tool marks are high enough, or sharp enough, they will wear the rings, and quickly.

The bolt has a rotating band that keeps the crud from getting in the way. This bolt isn’t even close to the dirtiest I’ve seen.

Gas rings come in trios. If the rings in your bolt are worn and need replacing, take care of all three. Don’t be cheap. Whatever savings you reaped by only replacing one or two will be quickly eaten up by the test-fire ammo you burn just to make sure.
The carrier will not wear to accommodate the bolt rings because it is hard-chrome plated. The chrome is so much harder than the rings, which will just be filed down by the toolmarks. I’ve seen rifles where the carrier was so rough that gas rings lasted about 500 rounds, and needed to be replaced when tested. Not that this is bad, but replacing rings twice on each case of ammo is a hassle, and you never know if they have worn too much until you either test them or the rifle starts malfunctioning.
The easiest way to solve the problem is exchange the carrier for one with a smooth interior. When you send it back, explain why, what it means, and who told you to do it.
I’ll be glad to take the hit.
The key is the little spigot up on top of the carrier, the part that slips over the end of the gas tube, directing gas down to the carrier interior. Unless you drop it, the key is not a load-bearing element of the rifle design and not subject to impact. However, it must maintain a gas seal or your rifle won’t work well.
The quick check is this: hold the carrier in one hand. Grasp the key with your other hand. Try as hard as you might to move the key by wiggling it. If it moves at all, you must follow the proper process to make it tight. The proper process is to first remove it. Grab an Allen wrench and remove the screws that are there. If at all possible, have new ones to replace them. If you don’t, re-use the existing ones. But screws are cheap, so always have spares.
The tightening process is the same as the initial installation process.
Scrub the carrier and key clean. Use a clean, medium-grit stone, or a flat narrow file and some emery cloth, burnishing the slot in the carrier and the bottom of the key. You want them flat, smooth and clean. You don’t have to remove all the Parkerizing, just knock any high spots down. And clean any gunk out that might be there.
Degrease again. You want to apply some sort of fastening adhesive. The mil-spec calls for Permatex, a self-forming gasketing material. I’ve seen several different Permatex’s listed as correct, so the requirements are not particularly difficult to meet. Also, I have used both red Loctite and the dark green Shaft and Bearing Loctite to successfully seal the key.
Some will say that a sealant isn’t necessary. I won’t say they are wrong, but I will note that I have visited the Colt factory and, while I was there, watched the carrier assembler use Permatex and apply it to the carrier trough before torqueing down the key screws.
Clean, then smooth the parts where they bear on each other. Degrease the parts. Then apply a smear of Loctite/Permatex on the base of the key and on the inside edges of the carrier trough. Do not apply it to the threads of the screws. Press the key into place and tighten the screws. Then torque them to 55 in. lbs.
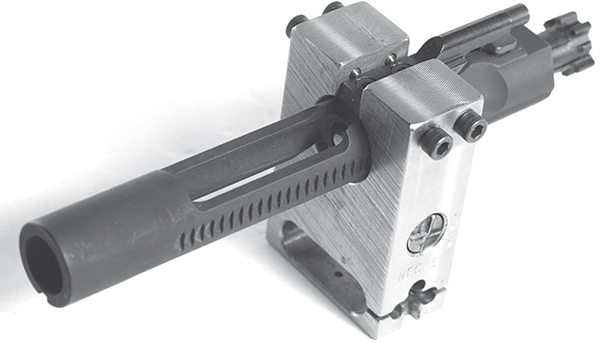
The carrier installed, ready for the key screws to be staked.
Wipe the excess Loctite off the exterior and interior of the bolt tunnel. Stake the screws into place. Use a MOACKS, it is the best. You can get by with a small chisel and a hammer, but neither you nor the carrier will like it.
Let the Loctite cure, and you’re done.
Why all this?
The gas key transfers the gas to the carrier interior. If there are leaks, the gas pressure inside the carrier decreases. That means less force to drive the system, and the result is what is known as a “short-stroke” malfunction. This typically happens only after you’ve been shooting for a while, and the gun gets dirty and dry. Lube is important, as we’ll cover later.
The MOACKS not only stakes gas keys, but it cleans many parts on the bolt, carrier and firing pin.
The typical manifestation is in a class, one starting on Monday morning. By Tuesday afternoon, with a lunch break, and tired students who haven’t lubed their rifles, the gun is dry, the key leaks, and when they start shooting after lunch, violá, short-stroking. In the past, the response was “Lube it, and keep shooting.” Today, we know that there can be more involved. It only takes a moment to check, and if the key is loose, a few minutes to correct forever.
Keys live longer than gas tubes. The key is hard-chrome lined, and the donut on the tube wears faster than does the key. You could probably go through several barrels and gas tubes before your key is a problem. Well, key wear, anyway. What you have to watch out for is dropping it.
An acquaintance of mine is a long-time US Army NCO, who had lots of experience with the system. He told me that one of his friends had made up a special tool. It was a hardened steel post that was the correct diameter of the interior of the gas key, with a bevel on it matching the interior angle of the key opening. You see, when the various Army teams would travel to compete, the rifles traveled in one truck, while the bolts for them were in a different truck, in the same convoy.
The staking bolts crush metal over onto the key screws, keeping them from loosening and backing out.
So common was it that keys got dinged in transport, that this senior Sergeant made a tool to swage them back into shape.
You can make such a tool if you want. If you have the tools to do it, you also have the knowledge of how to measure and make one. If you do not have the tools, your option is to buy a new key, replace the dinged one and learn your lesson.
Assuming you have a high-mileage rifle, and in the rebuild you find that the gas tube is worn, what can you do? The end of the gas tube, where it pokes into the upper receiver, has a donut-like ring on the end. This is the tube seal. The opening of the key is a funnel, and the end of the tube is tapered, so they are self-centering. But if the gas tube is a bit off center, it wears on the high spot. If it wears enough, it can leak. But that is a lot less likely, as the interior of the key is hard-chromed. More likely, you dropped the carrier, it landed on the key, and the key is now bent or dinged, and useless.
Time to change the key. Find an Allen wrench that fits. (Unfortunately, the correct cap screw for the key comes in two different Allen wench sizes. Curse the makers while you try the other one.) Use the wrench and a lever if you have to, and loosen the screw. If it is bound tight, one of three things will happen: the screw will come loose, the head will break off the shaft or the Allen socket will get stripped or rounded out. We’ll cover these in order.

Gas keys are replaceable parts. If they wear too much, and start to leak, yank them off and install new ones. Life is too short to put up with misbehaving, inexpensive parts.
If the screw breaks loose, stop. Now do the same to the other. If you try to unscrew the one screw, it will lift up against the staking, tip the key, bind the second screw, and you will get no further. Loosen the second screw and work them out in turn, removing the key. This is why when you were applying Loctite to the key you did not apply any to the threads.
If the head breaks off, stop. (The two actions feel different, you will be able to tell which is which when it happens.) Now loosen the second screw. If it loosens, or breaks, you are riding high. Remove the heads/screws, and toss the old key away. You have no use for it, nor for the old screws. Grab the stub of threaded shaft in the carrier with a pliers and unscrew it. Need I point out, again, this is why you did not apply Loctite to the threads?
If the Allen sockets round out, take your carrier to the nearest bench grinder, and grind the heads off the carrier key screws. Why not do this first? Because it is more work than simply unscrewing properly secured screws, that’s why.
With the old key off, step back to the installation process, and attach the new one using new screws.
None of the piston system carriers need this. They are either machined integral to the carrier or they are dovetailed and bolted on. There is one, however, that takes a different approach, and that comes from LWRC.
The LWRC DI carrier has the base and shoulder of the key machined as an integral part. To that they attach a wear part spigot onto the shoulder. The spigot can be replaced if it becomes worn or damaged, but the design does not permit gas leakage. The spigot is held in by threads, and then locked in place with a cross-pin.
If you have this, you not only have a key that won’t leak, the carrier is plated and easy to clean.
Let’s talk exotic carriers. The sculpted, the aluminum, the titanium and the unobtainium carriers. What’s up with those? Simple: competitive advantage. By taking a regular steel carrier and carving all the “unessential” steel out of it, or making one from aluminum or titanium, the manufacturer has reduced the reciprocating mass.
With less mass banging back and forth, there is less balance disturbance of the rifle as it cycles. (Honest, some shooters can feel this, or say they can.) What really matters is that there is less mass to bottom out and cause a thump at the rear of the recoil cycle.
This does not come without cost, however. The reduced mass of the reciprocating parts means there is less mass to strip a round out of the magazine and shove it up the feed ramp into the chamber. If your rifle is dirty, dry, dusty, carboned-up or otherwise not feeling its best, the decreased mass might make the difference between closing or not.

JP Enterprises makes lightweight carriers meant for competition. However, these should not be used in a duty or defensive rifle.
There is also the matter of less mass to accept the drive cycle of the gas flow. Less mass means higher cyclic velocity, and the parts come back faster and bottom out harder. They also rebound sooner, and with more velocity than the design was really built to handle. This can mean that the bolt comes back to the magazine early, stripping off a round when the magazine isn’t ready. But ready or not, the bolt is coming, and that can mean malfunctions.
If you put a high-tech competition carrier in your rifle and now it suddenly doesn’t work, throttle back the gas. The lighter parts don’t need as much of a boot in the butt. You need to control gas flow to avoid malfunctions. Which is the main reason competition rifles have an adjustable gas block built into the system, right under the handguards.
Not having built one in, your lightweight carrier can give your rifle problems. If it's meant to be a competition rifle, then go for the lighter parts and control gas. If it's intended as a general use or defensive rifle, use the original carrier, you need the weight.
Being the guy in the know, and with spies in all locations on the planet (or so some readers suppose) I get sent all sorts of interesting information. One of them concerns a recent incident with the US Border Patrol. Apparently, someone from the higher echelons of management, sent armorers around to all the Border Patrol stations with orders to fully inspect all M4A1 carbines in use. In the course of inspecting, they apparently “deadlined” (that is, required removal from service) 65-70 percent of all rifles. This of course came as a surprise, and the powers-that-be had not planned to replace or repair that many rifles. So, the BP agents were reduced to one rifle per agent or less.
Now, in a city department, having one rifle for every other officer is not a problem. Backup is mere minutes away, and taking cover behind something substantial is an accepted practice when outgunned until the cavalry arrives.
However, Border Patrol agents are often miles and miles from anyone who might help. And they are in rifle country, with nothing solid to stay behind until help arrives. Not having rifles is a big problem. And there was a lot of consternation until the shortfall was corrected.
One of the tools the armorers used was a gage I had never heard of called a Gage, Gas Seal Hole, and is meant to be utilized at Depot-level maintenance. It measures the wear in the carrier bore hole, where the bolt tail seals. If the gage goes all the way into the carrier, the carrier is worn out.
That such a tool exists does not surprise me. After all, the government has to have standards, measurements and inspection tools for everything.
Gemtech makes a special suppressor-ready carrier, one that can deal with the increased dwell time. It’s available in both 5.56 and 7.62 sizes. If you shoot suppressed you should get one.
What would surprise me is that any carrier, well, any properly-made carrier, would fail this gage. Look, we have a hardened-steel part with wear surfaces that are hard-chrome plated. Rubbing against it is the tail of the bolt, but it isn’t really rubbing against it. The gas rings and the bolt body keep the bolt pretty well centered in the bore hole. The amount of actual rubbing has to be pretty minimal, and most of what is going on is carbon being created, ground off and pumped out of the gap. If there is gas leakage in that gap, I can see where the problem might be wear on the bolt from over-enthusiastic cleaning. But the carrier? I guess anything is possible.
Considering how grossly over-gassed even a properly gassed AR is, I’d bet that even if you had a carrier that failed this gage, you could assemble it into a rifle and never notice the failure on the part of the carrier. Now, if you want to track down one of these gages and use it, go ahead. But don’t think it is gaining you any advantage over your fellow shooters. And don’t think the gage will be cheap, either.
If this was your original carrier, you’ve certainly gotten your money’s worth out of it if you have worn it out. Let’s just assume, for a ballpark figure, that the carrier in question has survived a decade of constant use. You’ve plugged four replacement barrels into the rifle, each with its own bolt. So, the original barrel and bolt, plus four more, at $75 each for the bolts and $150 each for the barrels. That’s $900 just in parts. Each of those bolt/barrel combos lasted you, what, 10,000 rounds? So that’s 50,000 rounds (don’t forget the original parts) and that, at the current price of ammo of roughly $300 per thousand, ran you $15,000. So, all told you have gotten the price of a new compact car of use out of that carrier. A new carrier to replace it costs you somewhere between $150 and $200.
Go ahead and splurge, buy the replacement one with the super-high-tech plating on it, to make it easier to clean. The extra $25-$50 is nothing in the scheme of things.
Bolts are a wear part, which means no bolt lasts forever. In fact, the bolt is probably the part that has the shortest life in your rifle, as it certainly is subjected to the highest stress. The AR-15 bolt is a small, thin-skinned, hardened part that is subjected to immense pressure and stress.
The mil-spec calls for a steel known as Carpenter 158. You will search in vain in the SAE catalog for it, as it does not have a series number. A series number is something like 4140 or 316. In carbon steel, the 4140 means it is a 41-series alloy, with 0.04 percent carbon.
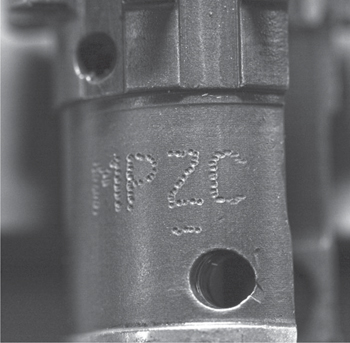
A properly tested bolt will be marked “MP” and some other letter or number.
Carpenter 158 is made by the Carpenter Steel Company, and it is their 158 alloy, specifications known only to Carpenter and the government. Carpenter gives enough of the details, the ingredient list if you will, so that an educated and experienced engineer can figure out if it is what they need. Carpenter makes it in batches, very carefully controlled and precisely handled, so it is consistent as possible, and within specification.
What this means is, if you want Carpenter 158, you buy a batch. They do not make it as an inventory item, it is made in batches, and if you want it, you buy it. If you and someone else can split a batch, that isn’t Carpenter’s concern, but you cannot place an order for, say, 1⁄10th of a batch’s weight and have them ship it.
However, to a certain extent, steel is steel. If someone has a full laboratory, and the knowledge of how to inspect, they can take a mil-spec bolt, see what grain structure it has, what hardness the various parts have, and reverse engineer an alloy. And since the TDP, or technical data package of the M16 is owned by the government, they say who gets to read the actual specs for Carpenter 158. If you don’t have a contract that involves M16 bolts, you can’t have the specs. If you do have the specs, you can’t necessarily use them to make outside parts. It’s all in the contract.
That’s the long way of explaining why not everyone makes bolts out of Carpenter 158. Also, Carpenter 158 was developed back in the 1950’s. While I’m certain Carpenter has improved it since (as long as it performs at or above the required specs, and has the recipe mix they told the government it had back in 1964, they can improve it all they want) I’m also certain there are alloys that work as well or better that have been developed since.
It is entirely possible, and they are not blowing smoke, that a bolt maker or AR builder is using a steel better than Carpenter 158.
But, we need to get back to bolts and how they are made.
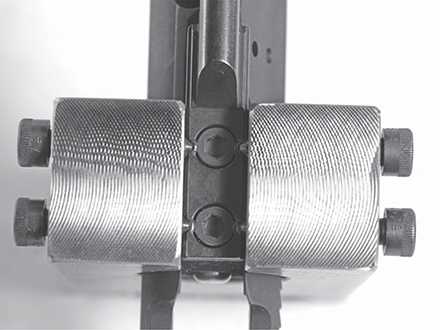
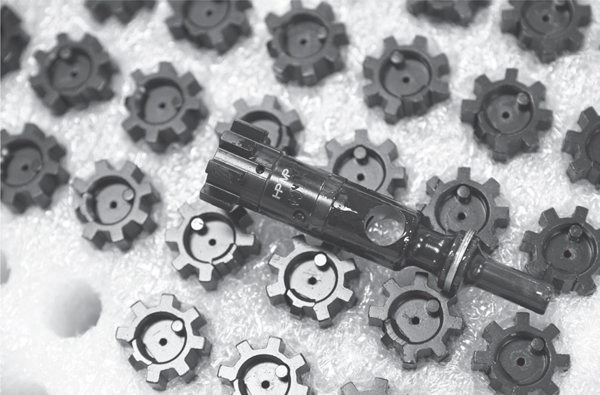
Bolts are turned on a lathe. The bolt is a cylinder with segmented teeth, the locking lugs. It is relatively easy to use a lathe/mill CNC machine that will first turn the parts as cylinders, then orient them to cut the locking lugs, extractor socket and drill and bore the cam pin hole. The difficult part is in hardening it.
The lugs and the webs between the various components of the bolt can be quite thin. The bolt, in order to have sufficient wear characteristics, and strong enough to take the load, has to be surface-hardened. If the hardness is too thin, the load-bearing parts can peen, or upset. If the hard layer is too thick, the bolt can be brittle and shear off when the load becomes too great. And since the rear surface of the lugs have to be axial and an exact distance from the bolt face to control headspace, there isn’t a lot of wiggle room there.
Once made, the mil-spec calls for several extra steps. First, the parts are shot-peened. This involves what amounts to sandblasting, but with mild steel shot instead of sand. The pellets are streamed at the part, and the impact acts to stress relieve and surface harden the bolt. This can greatly increase the service life of parts so treated. However, it requires an exact knowledge of shot size, velocity, impact/flow rate, and time of duration. Also, the useful life of the shot has to be monitored and controlled.
The end result is a very tough, durable, hard and expensive part. But wait, there’s one more test.
In the mil-spec process, each and every one of the bolts is placed in a fixture, and subjected to the impact of a proof-round discharge. Then, it is given a magnetic particle inspection. This involves subjecting the bolt to a magnetic field and applying a powder that is magnetically sensitive. If there is a crack, or a large stress in the bolt, the magnetic field will be disrupted, and the alignment of the powder will show it.
The specifications are known only to those with the contract, but a certain number of bolts are allowed to fail the proof test in each production batch. And a certain number are allowed to fail the inspection. A part that passes is marked in typical Colt fashion with an “MPI,” with other companies using similar markings, such as “MP.” In the mil-spec process, if more than a certain number of bolts fails, the whole production lot must be scrapped. Not just stuffed into a dumpster, but mangled beyond use.
Manufacturers have lots of parts on hand, and can mix-and-match a bolt to a barrel for correct headspace. If you are replacing a barrel, it would be clever to order a new, headspaced bolt with it.
That is why USGI bolts, complete with MPI markings, cost so much. Each and every one of them was tested and passed. But, in a theme you have no doubt noticed, this is not without cost. It is a statistical certainty that the pressure testing of the bolt, when made, and then again when the rifle is assembled, reduces the service life by a significant amount. Let’s say that the government ceiling on service life of a bolt, 7,500 rounds, is several thousand rounds less than if the bolts had not been so hammered by proof round testing during manufacture. But, the government would rather have a 100 percent certainty that they all pass, even if it means a somewhat reduced service life, than one in a thousand quitting in a much shorter time period, say a few hundred or a thousand rounds.
It isn’t just a matter of statistics, but what you want the statistics to tell you.
So, let’s put a bolt together.
You’ll need a small hammer, a set of punches, a bolt fixture such as those from Brownells, the bolt and its parts. Give the bolt a good inspection. Now is the time to find cracks and chips. Make sure if you paid for a bolt that went through the magnetic inspection that it is marked as such.
Check that the cam pin you are going to use fits the bolt. If you are using a new bolt, you should be using a new cam pin. They are an inexpensive, hard-used part and, while they do seem to last forever, why not spend the extra $5 that it costs?
Do a quick check of the ejector you’re about to install. The top edge should have a very slight bevel to it. If it is dead square, it will shear brass and eventually bind. If it has too large a bevel, it will shear brass and eventually bind. Just like Goldilocks, you want just enough.

This is a bolt disassembly tool. If you ever plan to take the ejector out of your bolt, you’ll need this.
Put a drop of oil into the ejector shaft. Slide an ejector spring in. Slide the ejector in and make sure its relief cut is oriented toward the retaining pin hole in the bolt. You can look through the hole and see which way the ejector needs to be. Now place the bolt into the fixture. Align the ejector retaining pin hole with the clearance hole in the fixture. You won’t need the clearance hole on assembly, but it is a good habit to practice.
Turn the handle of the fixture, which compresses the ejector down into the bolt. Once the handle stops, look through the retaining pin hole and make sure the ejector clearance is correctly aligned.
The retaining pin will not move the ejector to create clearance. You must compress the ejector so it will clear the retaining pin. Do this as many times as it takes to get it right. If you don’t, you can bend or break the retaining pin when you try to drive it into place.
Once in, unscrew the handle and remove the bolt.
Next up, the extractor.
The extractor will probably come bare, with no spring on it. If you are buying all new, and the extractor is offered with the spring installed, buy it that way. You need the extractor, the extractor pin, internal buffer, extractor spring and an O-ring or D-Fender.
Put the internal buffer inside the spring. The spring will be a tiny little spring cone; you want the fat end of it in the extractor seat. Place the little flange of the internal buffer (or the nail-head if you will) against the extractor. You cannot simply press the extractor down into the seat. The recess milled in the extractor has an underlip, a recess cut in it for the spring diameter. To press the extractor spring down into the extractor, you need a tapered pin punch or the tip of a loaded round.
Keep the spring centered on the extractor recess and press straight down on the top center of the spring, compressing it into the recess. When you hear or feel a slight snap, the spring has been seated. Alternately, you can use the tip of a knife to press down on the bottom coil of the spring only. Slip the knife point into the spring, depressing the last coil into the recess.

If your ejector does this, then you need to track down the sharp edges and slightly bevel.
Slide the O-ring or D-Fender over the extractor spring. Place the extractor in its slot in the bolt and press the extractor in with your thumb. The easiest way to get the extractor pin across is to pinch the bolt at the extractor, compressing the spring and rubber booster.
Start the pin, pressing for all your hand strength is worth, pushing the pin through when the holes line up. Use a small hammer to tap it flush, and you’re done.
Once assembled, apply some oil. A drop in the gap of the extractor, at the point where the pin goes through, is all you need at this time.
An ejector with shaved-off brass particles, keeping it trapped inside the bolt.
As uninteresting as the cam pin may appear, it serves a vital function. When the carrier cams the pin on closing, the pin tips off of upright. Look at the squarish lump on the left side of your upper receiver. That is the recess into which the cam pin tips when it cams. When the bolt opens, the cam pin turns back upright, sliding back and forth in the area of the upper receiver where the gas key and charging handle cycle.
Frank DeSomma at POF designed a cam pin with less friction. The simple approach was to change the rectangular head of the pin, replacing it with a roller bearing. The POF cam pin is plated, making it easy to swap. Disassemble the bolt, pull out the cam pin, plug the POF pin in, and reassemble. Job done.
Does it do a lot? Probably not, but an incremental improvement is still an improvement. If you can add in ten changes that each improve the system by 1 or 2 percent, you have improved the system by 10-20 percent. That’s not nothing.
If you are building a rifle from scratch, the extra few dollars for the POF roller cam pin is worth it. If you want to make a competition rifle a bit smoother, get one and install it. The mil-spec-or-nothing crowd will mock you, but as I’ve said before, let your scores do the talking.
When it comes to the AR-15, almost nothing exceeds the volume of misinformation as does headspace.
If someone tells you that all you need is a USGI Field gauge, stop talking to that person right now. Stop listening to anything they have to say. Just walk away. Oh, there might be useful information there. After all, you have to paw through a lot of gravel to find a nugget of gold. And telling you that a Field gauge is the only tool you need is definitely gravel.
What is headspace? In simple terms, it is the amount of room in the chamber for the cartridge to rest before it is discharged. The measurement is defined as the distance from the face of the bolt to what is called the “datum line,” which is a particular location on the shoulder of the chamber of a given diameter, and a stated distance from the face of the bolt. The idea is to provide enough room for the loaded round to fit, even when the rifle is dirty, choked with carbon or just not squeaky clean.
Similarly, ammunition is manufactured so the distance from the base of the cartridge to the shoulder will always fit into a chamber. The tolerances of the loaded round and the chamber into which it fits are not allowed to overlap — the largest cartridge made must fit into the smallest chamber made.
Alas, not everything can be made to exact dimensions. So, the chamber is allowed to vary slightly. Generally speaking, the allowable “drift” of the headspace dimension is 0.006, or six-thousandths of an inch. If headspace is within that spread, it is deemed to be correct.

You can see how the bolt locks into the barrel extension. Note that POF makes barrel nuts that act as heat sinks to pull heat away from the chamber.
To measure headspace, there are three kinds of instruments. One is called a “Go/No-Go” gauge. Another is a set of precisely ground and measured gauges, each .001 inch difference in size. And finally, a micrometer that looks like a headspace gauge. Each works differently.
The Go/No-Go gauge is simple. The Go gauge is manufactured to the largest size of a cartridge. If you can close the bolt on a Go gauge, things are good, as the chamber is not below minimum.
The No-Go gauge is made to be a small amount larger than the largest allowable dimension of the chamber. If a bolt closes on a No-Go gauge, the chamber is too big. But, what does that really mean? When you fire a round, the case expands to fill the chamber. If the shoulder of the chamber is forward of the shoulder of the case, the case expands to fill the chamber. The shoulder must then blow forward to fill the gap. The rear goes back to the bolt face. In the middle, brass gets stretched.
Now, in the microsecond in which this happens, it can proceed in several different ways, but the end result is the same: the case gets stretched in the middle, weakening it. This matters only to reloaders.
Re-sizing brass pushes the shoulder back to minimum (this is called the “shoulder bump” and it ensures your loaded ammo will fit your rifles) and the next time you shoot, the brass will be stretched again. The effective service life of your brass depends on how much stretching, and how much bumping you subject it to. If your headspace is within accepted limits, you can get 10 or more loadings out of your brass before you start seeing neck cracks from work-hardening. If the headspace is excessive, you may only get two or three.
An exemple of this is the SMLE in .303 British. The .303 headspaces on the rim, not the case shoulder. The British Army cared not a whit about reloadability, only for reliability. I gave up reloading ammo for my various SMLEs because I could not get cases to last more than three loadings in any of them.
The US Army, Marines, Air Force, and let’s not forget the Coasties, do not care about reloadability of brass. As long as the brass holds together and is ejected in a single piece, they are happy. And that is where the Field gauge comes into play. The Field gauge has been developed with one thing in mind — how large can the chamber be and still have a rifle that can be used in a wartime situation? And that is why military armorers have a Field gauge that they use commonly, rarely reaching for their Go and No-Go gauges. An armorer may have a rack filled with rifles and carbines that would easily gobble up a No-Go gauge.
Use of the Field gauge only applied to used rifles and carbines. If a brand new, fresh out of the box unfired rifle is tested, and the bolt partially closes or locks on a Field gauge, it should be sent back, even in military use.
Why then is a Field gauge not a good choice for you? In short, you aren’t going to war. You will likely be using reloaded ammo. You have an interest in making that brass last as long as possible. If you need headspace gauges, get a Go/No-Go set.
What of the others? The “thousandths” set is used to determine not just that the headspace is within tolerance, but precisely what it measures. The micrometer gauge does the same thing, but instead of having to check the fit of the gauge set, you install/assemble the micrometer set, adjust, and then read the measurement.
The cognoscenti argue over the commercial .223 versus the mil-spec 5.56 headspace gauges. I talked to Dave Manson, a maker of headspace gauges about this. His quick reply was, “Which 5.56 set?” It seems there are a whole raft of gauges and specifications out there. And that is just in the shoulder location, not including the leade, which we’ll get into in a short bit.
How much can these vary? Let’s look at a few dimensions, hunted down and laid out for your curious gaze.
So, if you have a rifle chamber just over the max size, call it 1.470 inches, and your sizing die is set to bump the shoulder back to fit under the minimum chamber size, let’s call that 1.460 inches, you are working your brass .010 inches on each shot. It isn’t going to last long.
To measure headspace you’ll need a chamber brush, cleaning rod, bolt disassembly tool and a set of headspace gauges.
Unload your rifle and separate the upper from the lower. Use the chamber brush to scrub the chamber. Clean the bore with a patch to extricate any crud you scoured out of the chamber.
Remove the extractor from the bolt. Use the bolt fixture to remove the ejector. Scrub the bolt and dry it. At this point, don’t be tempted to just drop the gauge in, close the bolt and see what happens. The closing bolt has enough mass and leverage to close the bolt on even a No-Go gauge if you are forceful enough or let it crash forward under full spring force.
That is the wrong way to be doing it. The right way is as follows.
If you have the barrel out of the receiver, life is easy. Drop the Go gauge into the chamber. Hold the bolt by the tail, and see if you can insert it into the barrel extension, rotating it in front of the locking lugs. You should be able to do this. If not, that particular bolt/barrel combo is out of tolerance, under-minimum headspace and should not be used. Which is at fault? There is no way of telling with the tools at hand. To find out, you need at a bare minimum a surface plate, standing calipers and a bolt face cylinder. The cylinder is simply smaller in diameter than the bolt face opening, and a known thickness.
Put the cylinder on the surface plate. Stand the bolt on the cylinder, and measure the distance from the surface plate (which is flat to a millionth of an inch, if you bought the good one) and then consult the bolt drawing to see what that measurement should be. Without a bolt drawing there’s no real way to know.
If the bolt and chamber accepted the Go gauge, then remove the bolt and gauge, and replace the Go with the No-Go. Try again. The bolt should not, must not, rotate to the closed position. If it does, you have excessive headspace, and as before, you don’t really know which of the two is at fault.
A quick answer, in both instances is, both of them.
What if you have the barrel already installed in an upper receiver? Go to the store and buy yourself a foot of PVC tubing. You want a piece that has a quarter-inch inside diameter, or ID. The outside diameter, or OD doesn’t really matter since you can’t buy it with walls thick enough to not fit into the upper receiver.
Stuff the tail of the bolt into the PVC tube and use the tube as a handle to hold the bolt, as you insert it into the chamber while doing the Go/No-Go test.
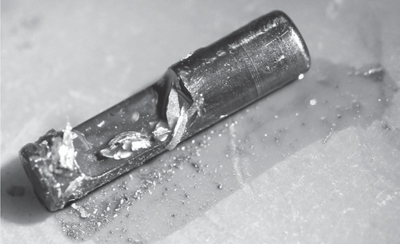
If you have a case separation, you’ll know when the rifle won’t close, and when you do get the bolt back, this comes out.
The first thing to do, if you have the gear and parts, is check the headspace on a rifle that has worked. If you are building a rifle from parts and do not have a working rifle to check, then you need to borrow one. Or go to the gun club with your parts and tools, and ask someone if you can measure theirs.
If the other rifle checks out, then send the parts back. If the other rifle doesn’t pass muster, then check your technique. The odds of two rifles from different sources both having incorrect headspace is exceedingly low.
Back in the early days, we ran into incorrect headspace frequently, as many people who were making parts were either new or not very good at it. I also suspect that a lot of the bad parts we found at sale prices in gun shows back then were production rejects, out of spec and should never have been sold. The bad parts makers got their names bandied about enough that they either improved or quit. Now, everyone who is still in the business knows the proper bolt or barrel extension dimensions. However, you may still find some parts that do not agree.
Brand new parts should fit. If you got the bolt and barrel from the same source, contact them and arrange an exchange. They should be happy to do so. If you got them from two sources, contact each and explain the situation. See which, if either of them, will help you. Accept their help and strike the other company from your list of “doing business with” for the future.
Only in extreme circumstances should you even think about chamber reaming to adjust headspace. And then only if the barrel is stainless or un-plated carbon steel and un-returnable. You can only correct insufficient headspace by reaming. If you have excess headspace, and you cannot return the barrel, then your only other option is a session with spare bolts and your headspace gauges. Maybe you’ll find a bolt that would otherwise be too big, but will solve your excess headspace problem.
I have reamed chambers and adjusted headspace in rifles without removing the barrel from the receiver, so it can be done. Having done it, I have to tell you this: remove the barrel. The hassle of reaming the chamber with the barrel in the receiver is greater than the hassle of removing the barrel and then reaming. Plus, you can do a better job with the barrel out. So, you’ll need the barrel and bolt, the finish reamer for 5.56 (not .223 Remington) with handle, cutting lube, chamber brush and a cleaning rod and patches for the bore once you are done.
Clamp the barrel, padded, upright in your bench vise. Scrub the chamber. Strip the bolt and scrub it clean. Check the headspace, just to remind yourself what under-minimum headspace feels like. (The bolt won’t rotate closed with the Go gauge in the chamber.)
Insert the reamer in your tap handle or reamer holder. Gently lower the reamer into the chamber, and begin rotating before it contacts the shoulder. Only turn in the direction of cutting, never reverse rotation. Give the reamer two full turns once you feel contact, pull it out while still rotating, and inspect the reamer. You should see metal chips on the shoulder of the reamer. If you also see chips on the body, you’re getting a bonus in the headspace adjustment; you’ve got a narrow chamber and the reamer is correcting that. You won’t have to mess around with small-base dies when you go to learn reloading.
Swab out the chamber and recheck headspace. With a few iterations you will get to the point where you can feel the bolt lugs start to cam underneath the lugs of the barrel extension. Repeat the two-turn cutting procedure until the bolt will just rotate closed on the Go gauge. You have minimum headspace at this point.
You now have a decision to make. You can leave it at minimum, reassemble the barrel into a rifle again, and test fire it. You’ll probably find that it is plenty reliable, and unless you insist on shooting it in miserable environmental conditions it will serve you well.
If you want it to be a little more forgiving of neglect, you have to increase headspace past minimum, but not too much. Remember, the .006 inches of gap is all you have to work with. Measure the overall length of your Go gauge. This is not the headspace, just the length of the gauge. Now carefully apply a small piece of tape to the base of the gauge and measure again. You have just added a few thousandths to the Go headspace, by the thickness of the tape. Do the two-turn ream again, install the taped gauge and measure.
You can, if you are careful and diligent, add a controlled number of thousandths (adding .002, .003, or .004) to the minimum headspace, and not exceed the maximum.
Once you are done, scrub the chamber. Push a clean, dry patch down the bore to get lube and metal chips out of the bore, reassemble the rifle, and go to the range to test-fire and re-zero.
Remember, you can adjust headspace only when the chamber is under minimum, and the barrel material is stainless steel or un-plated carbon steel. You cannot adjust the headspace on a chrome-lined barrel, or one that has been treated via the Melonite process.
Why a 5.56 reamer, and not a .223? Because you want the leade to be 5.56. If your chamber is not only under minimum, but has a .223 leade, then the headspace reaming operation will take care of both.
If you have too much headspace, and your brass stretches, then what? Basically, subjecting the same brass to excessive headspace too many times will cause it to break in the middle. You probably won’t know it, because the broken rear half will be extracted and ejected. But the next round will find the front half crammed in the chamber. The fresh round will wedge hard into the remaining piece, locking the rifle up. You’ll have a heck of a time clearing the jam.
If you are using commercially reloaded ammo, it is possible for the brass to have been abused before it got to you. If it had been fired in something with grotesquely excessive headspace, like an M249 SAW, then it would have been stretched at that time.
So, a singular event, in reloaded ammo, may not be your rifle’s fault.
But check anyway.
If you shoot your rifle, you consume parts. With the possible exception of the carrier (the jury is still out on that one, given the new information) everything on your rifle has a service life. Bores and leades wear, bolts eventually wear or crack, and even the buffer spring has a cycle life. It may be a million cycles, but it has a life. So, what do you look for on bolts and parts?
First up, the gas rings. By far the shortest-lived part on the bolt, gas rings can last thousands of rounds or quit in hundreds. It depends on the interior of the carrier bore’s smoothness or lack thereof. The classic test is to take a clean and lubed bolt/carrier assembly out of the rifle. Extend the bolt so it is fully forward of the carrier, and then stand it on its head. That is, stand it on the bolt face.
If the weight of the carrier causes the assembly to collapse, the rings are worn and you can change them if you wish. Will they still work as-is? Sure. A secondary test is to push the bolt back into the carrier and hold it with the bolt facing down. If the weight of the bolt alone causes it to extend forward, then the rings are worn and you must replace them.
A perennial question is, how many rings do you need in your bolt? As my brother has said, on more than one occasion, “There you go, confusing wants with needs again.” You want three. How many your rifle will work reliably with is what you are really asking, and to that I have no ready answer. There is no definitive answer because every rifle is the master of its own fate. I have one rifle that will pout if it doesn’t run three rings. Needless to say, it isn’t my first choice of rifle for bad times or self-defense. I have another that will function reliably with no rings at all, if you accept not locking open when empty as part of “reliable.”
Gas rings are cheap. Do the test. If the bolt fails the test, replace all three.

Small parts are prone to breakage or loss. Have a spare firing pin, cotter pin and other small parts, just in case.
Second, ejectors. The ejector and its spring, unless you damage them or allow the bolt and spring to become rusty, do not wear for the life of the bolt. The government assertion that the service life of a bolt is 7,500 rounds means the ejector spring has been cycled 7,500 times. It is a poor spring that can’t take 7,500 cycles. If you were really cheap, you could probably get an ejector and its spring to last through five or 10 bolts, but why? The replacement bolt probably comes sporting an ejector, extractor and the springs. Use them.
One easy test is to keep a new ejector spring on hand as a sample. When you pull the old one out (for whatever reason) compare it to the new one. If the old one is visibly shorter than the new, install the sample until you can order a replacement. If it isn’t visibly shorter, put the old one back, it still has life left in it.
Third, extractors. We used to worry and fuss over extractors, but they are pretty simple things. On the front end, all you need to be sure of is that the ledge is clean and has not been machined with a rounded lip, and that the corners have a sharp feel to them. My buddy Ned Christiansen describes the feel as “kitten teeth.”
What really matters for extractors is on the back end. You must have, at the very least, an extractor spring with a little black synthetic buffer in it and a SpecOps/Crane O-ring. Better yet would be an extra-power spring, with black insert and a D-Fender extractor buffer.
From its onset, the Stoner system has been under-extractored. From the original spring-and-no-insert, the government has gone through a spectrum of colors, each darker color having a higher elastomer rating (stronger springiness) until they have gotten to the black ones.
It is possible to have too much extractor strength, but it isn’t likely. You can tell if you are close (and do this at the range, please, with the safety on, and the muzzle in a safe direction). Drop a round in the chamber, ease the bolt forward, not letting it crash into battery. Gently rest the bolt against the case before you let go of the charging handle. The buffer spring should have enough force to cam the extractor over the case rim and close the bolt. If it doesn’t, you are getting close to excessive extractor strength. What is truly too much is, if the extractor can’t cam over the rim in normal cycling.
Bolts last longer than gas rings, but they can still wear and break. The most common location is where the two lugs on either side of the extractor crack at the base, sometimes breaking off. Why there? The bolt is designed as an eight-lug bolt, with the lugs evenly spaced. However, to fit the extractor in there, Eugene Stoner had to remove one of the lugs. This left seven spaced as if there were eight. As a result, when you fire, the bolt is unsupported in that area, the stresses acting to tip the bolt. Since the bolt can’t tip, the two lugs outside of the extractor bear a greater amount of the generated stress.

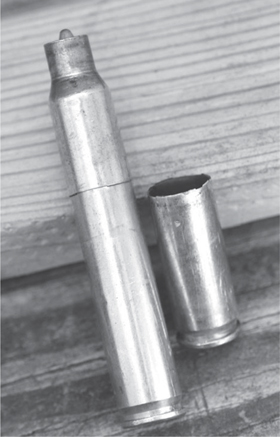
This was one of the weirdest malfunctions we’ve ever seen. The under-powered extractor and the getting-bound-by-brass ejector combined to barely eject this empty. It then got caught by the carrier and clamped in place.
In normal use this doesn’t matter, at least not in a statistically significant way. Low-quality bolts, badly made barrel extensions and excessively powerful ammo can increase the rate, but we’re still talking about something a lot less than 1 percent of the time.
What does cause problems are SBRs. And especially SBRs with suppressors. The greater gas volume, and higher peak that many SBRs generate, cause the bolt to be unlocking while the case has not yet relaxed from expansion. The increased dwell time of suppressors only adds to that stress.
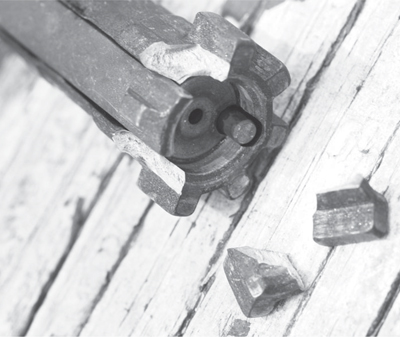
When bolts break lugs they usually shear on either side of the extractor.
Christiansen has had occasion to do armorers work for some very special organizations. One in particular runs a fleet of several hundred suppressed SBRs. Every time he shows up, there is another shoebox of broken bolts for him. He dutifully inspects the rifles and usually finds a few more — rifles that were still functioning even though the bolts were cracked.
You can inspect your own bolt with it still in the carrier, but it is easier if you remove it. Here’s the process. Thoroughly scrub and then degrease the bolt so it is bone dry. (Needless to say, re-lube before assembly, once you are done.) Look closely at the base of the locking lugs on either side of the extractor. The cracks usually proceed on a diagonal line from the root of the lug. No cracks? No problem, especially if you are not SBR’d or suppressed. If you are, make this inspection a regular part of your cleaning and maintenance.
If you find such cracks, replace the bolt, check the headspace with the new one and keep shooting.
A few years ago, we were seeing a mysterious crack at the cam pin hole and failure in bolts. I first noticed this in a law enforcement (LE) class, where the students were merrily hosing the targets out to 300 meters. I was in the range tower. “Lane 3, your shot was 10 feet low, left.” Next iteration, “Lane 3, your miss was 5 feet high and right. Off the line and get the rifle inspected.” When we pulled the carrier assembly out of the upper, the bolt fell out onto the ground.

If your bolt breaks like this, it is probably a high-mileage part you should have swapped out sooner. If not, you may have the rare rifle that is grossly over-gassed.

This is a rare breakage that we saw for a few years. There’s no preventing it, just replacing it.
The sidewall of the bolt is very thin at the cam pin hole. As near as we could tell, some sub-contractor who was making bolts for several AR makers had gotten a batch with some problems. Perhaps the case-hardening was too thick, and the sidewall was brittle. Perhaps the deburring wasn’t done right, and the edge was too sharp, causing a stress riser. We don’t know, except that we saw them for a while and then the problem went away. Maybe we used all the bad bolts up.
When you are inspecting the bone-dry bolt for cracks at the locking lugs, take a look at the cam pin hole. If there is a crack, it will be obvious. If you don’t catch it, eventually the bolt will crack through on both sides and the front half will come loose.
To clean the bolt, scrub the gunk from the front and the carbon from the rear. It does not need the attention a Sergeant will give it in a white glove inspection. But you should knock off the larger chunks of carbon now and then. The best tool for this is one of the special purpose tools from Avid, Sampson, Otis, M4Cat and many others. Do not use a pen-knife; you will end up cutting your thumb. Do not use a cleaning brush, as you risk hooking one of the gas rings, flinging it into the weeds or shag carpeting.
It need not be squeaky clean. Simply make sure there isn’t a big hard ring of carbon hanging on.
Lube the ejector, extractor and rotation bearing ring on the bolt body. A drop of oil rubbed around the rear side of the lugs will suffice, and back into the carrier it goes. You’ll apply more lube later, so don’t get too worried about oiling everything now.
It has become common for inventors, manufacturers and gunsmiths to offer new and improved bolts. Are they really that much better? The quick answer is yes, but it depends. As I’ve said before, and some of you are already mentally forming the words, the AR-15 is the epitome of 1950s technology. The alloys, surface treatments, quality standards and expectations are all from the Eisenhower Administration. It would be a staggering miracle if it wasn’t possible to make a better bolt, barrel, whatever. However, knowing and proving are two different things.
Just because someone says they use a better alloy doesn’t mean they have proved it. And a better alloy may make a better bolt, but by how much? To know that, you have to test to the point of destruction a statistically significant number of any given product.

Manufacturers have to make bolts within very strict tolerances. But they still have small variances in dimension and that’s where headspace tolerances come in.
However, if someone is offering a “better bolt” and the product isn’t at least as good as the original, they won’t be in business for very long. It follows then that if someone has been making and selling an improved bolt for a few years, it probably is better.
There’s also the matter of the AR as a system being a known quantity. You can take a reliable, accurate AR, and swap the bolt (check the headspace, of course) and if it remains reliable in function and accurate, you can be pretty sure that the new bolt is working as it should. Will it outlast an original one? You’ll have to wear out a couple of barrels to find that out.
The Sharps is one of the improved bolts using better steel alloy and modern stress analysis to make it stronger. To make something stronger, you either make it larger or you improve the alloy, or both. In the AR, you are limited in size. The bolt has to fit the carrier and barrel extension, and that is that. But you can change the shape of the locking lugs so as to reduce the stress riser effect.
Stress risers are details of design, or manufacturing, that act to focus stress to a small area. One example would be a sharp, ninety-degree corner on a strength part. The sharp corner acts to focus the stress the part undergoes, and it will break early. If instead the corner is machined with a radius, the smooth curve does not allow the formation of a stress riser.
Similarly, a heinous tool mark can act as a stress riser, which is why bolts are shot-peened. Peening reduces the size of tool marks, which are unavoidable.
The shape of a part can focus stress. By removing metal in a controlled way, from a certain area, you can redirect stresses so they can’t become focused or concentrated.
As an aside, Sharps is not the only company to do this. LMT also has spent a great deal of engineering attention to bolt lug design to reduce the stress focus effect.
The Sharps bolt is made of S7 tool steel, which is a more modern alloy than Carpenter 158, with advantages in some aspects.
Assuming the barrel is headspaced within tolerance, the Sharps drops in as a straightforward replacement for your bolt. Or, if you are building from the ground up, use a Sharps bolt in a barrel made of stainless steel, reaming the headspace to adjust as needed.
Bill Alexander offers two bolts — a standard and hard-use. The hard-use bolt is improved with subtle engineering changes to the lugs and given an ionbond surface treatment. The end result is a bolt that looks like a regular bolt, but has a much longer service life.
Lewis Machine & Tool has taken a new approach to bolts. First of all, they did extensive CAD/CAM and solid modeling stress testing, and found that if they removed metal from the lugs, they could make them stronger. They use a newer alloy, which is stronger than USGI. The extractor is improved both on the claw, which grips more of the cartridge rim, but also the extractor spring has been changed. There, they widened the end of it to a lobster tail shape, and packed two springs side-by-side in the bolt to increase extractor tension.
And they modified the carrier as well. There are five vent holes instead of three, and the cam pin track has been changed, to provide a longer dwell time before rotation.
Finally, the bolt is plated with a proprietary coating that increases lubricity, eases cleaning and resists chipping.
This does not come for free. An LMT bolt runs you on the order of $180, (ca. 2016) where a regular bolt might run you as little as $50.
During the early years of the AR-15, the bolt and carrier of the rifle were chrome-plated to make cleaning easier. The government decided that shiny chrome was not desired in a combat situation, and that the chrome-plating process was too prone to hydrogen embrittlement. They dropped the requirement.
This means that if you are going to build a period-correct AR-15, M16A1 clone, XM-177 or other, you have to find a bright carrier. That means a chrome-plate job, a modern plating that is shiny (although not as correct as a chromed one) or one made of stainless.
That used to be a lot harder, but the progress in AR materials today means finding an acceptable carrier is now as easy as opening a Brownells catalog.
One thing to keep in mind is that some very early models did not have a forward assist, and finding a period-correct carrier without the notches isn’t easy. However, the government never really cared about details like that, so it would not be unusual to find a rifle or carbine lacking a forward assist that had a notched carrier. The Air Force in particular has been in the habit of rebuilding old rifles, and not just scrapping and replacing them.
So look, and build correct, but don’t get too OCD about it, because even a minor difference can be current-issue correct.
Does an expensive, high tech bolt make a difference? On the one hand, the government feels the service life of a USGI bolt is 7,500 rounds. And yet, except in the case of SBRs, and especially suppressed SBRs, I have not seen that short a service life in bolts. I have one that is on its third barrel. I know of others, high-volume trainers and competition shooters, who do not see bolts breaking (if at all) in anywhere near that timeframe.
If you want to build a rifle or carbine with a super unbreakable bolt, go for it.
However, if you are building an SBR or a suppressed SBR, I’d suggest that you get the best bolt you can. A suppressed carbine might benefit from upgraded parts, but the real shorties, and those with cans, are definite candidates for a better bolt.
