
Maple trees grow naturally in the forests of eastern North America, from the coastline of southeastern Canada and the northeastern United States westward through Ontario and Minnesota. To the south they can be found in Georgia, continuing as far west as eastern Kansas and Oklahoma.
There are 13 native maple species in North America, all of which can be tapped: sugar, black, red, silver, box elder, mountain, striped, bigleaf, chalk, canyon, Rocky Mountain, vine, and Florida. Only four of those are commonly tapped: the sugar, black, red, and silver maples; their sap has a higher sugar content than sap from the other species.


Maple forests are located in the northeastern United States and southeastern Canada.

Four types of maple trees are commonly tapped: sugar maple, black maple, red maple, and silver maple.
It is important to tap more mature maple trees and leave the smaller ones to develop and grow into healthy sap producers. A wound in a larger tree will do less damage than a wound in a smaller tree because a larger tree has more surface area, and the damage is somewhat displaced by the size of the tree. Smaller trees also have less sap.
There are no stringent guidelines to follow, but a good rule of thumb is to tap trees that are larger than 10 inches in diameter at chest height. Tapholes should not be plugged after the spout is pulled out at the end of the sap-collecting season. Just as your body heals a cut, the tree will naturally heal, and the taphole will eventually close.
The easiest way to identify a maple tree is by its leaves; it is difficult to identify a maple without its leaves, but it can be done. Mature maples are large dense trees with rounded crowns. The trunks are usually straight and free of branches for two-thirds or more of the height. The bark of a mature maple is usually light to dark gray with vertical smooth strips that may curl. Look for a tree whose branches, buds, and leaves are located opposite one another, and on which the twigs are arranged in pairs on opposite, rather than alternating, sides of a branch. During the growing season the buds and later the leaves are arranged in pairs on either side of the twigs.

When identifying maple trees, look for branches that are in opposite (left) position rather than alternate (right) position.
Because it can be hard to identify maple trees without leaves, it is most efficient to identify and mark your trees in the summer or fall, when you can easily determine what kinds of trees you have by looking at the leaves. For marking you can use either tree-flagging tape or a forestry-approved marking paint. Flagging tape, found at hardware stores, is a nonadhesive tape, usually brightly colored, that can be tied around a tree to mark it. Forestry-approved marking paints are designed to withstand harsh weather but are not harmful to trees (see Resources for suppliers).

A mature maple tree has a rounded crown.
Landowners can utilize forest management strategies to maintain a healthy woods; however, it is most important to allow a woods to maintain its natural diversity. For example, if your woods has a variety of tree species, you don’t want to cut all but the maples. Leave the forest as it developed naturally, though you may want to thin your woods and clear dead trees, as this allows for younger ones to grow.
When thinking about sugar bush management, keep your objective in mind. What do you want your sugar bush to accomplish and what can you do to achieve this goal? It is best to ask your local forester for advice. If you don’t want to contact a forester, at least talk to an experienced syrup producer who has an operation similar to the type you hope to establish.
There are also good forestry maintenance resources available online. Search for “forestry maintenance” in your state to find resources specific to the area in which you live. The resources don’t have to be specific to a sugar bush; they just have to focus on hardwood forests in general.
The time to tap maple trees is in late winter or early spring, when the weather is above freezing during the day and below freezing at night. Sap generally runs from early February to late March in the more southern states and from early March to mid-April in the northern states and provinces. The exact calendar date varies greatly from region to region and year to year.
Begin by watching the forecast, and look for an extended period of desirable weather. One day of perfect weather may cause excitement but may not lead to an extended freeze-thaw cycle that will cause the sap to run. In an average year you will have 10 to 15 days when the sap runs.
Tapholes begin the process of healing as soon as they are drilled, so if you tap your trees too early, you risk missing out on sap flow later in the season. The tapholes may start drying out before the sap is done running.
The same bacteria that cause a taphole to heal will cause you to make darker syrup as the season progresses. At the beginning of the syrup season, when the taphole is fresh and your equipment is clean, you will probably make syrup that is lighter in color, often referred to as Grade A Light Amber. As the season progresses, and bacteria collect in the taphole and on equipment, you will probably make syrup that is darker, often referred to as Grade A Medium or Dark Amber. Really dark syrup, sometimes with an off, or atypical, maple flavor, is considered Commercial grade syrup. This bacteria growth is a natural occurrence and is nothing to be concerned about.
By tapping your trees too late, on the other hand, you may miss the early sap flows. Syrup produced earlier in the season is usually higher quality (with a lighter color and a more delicate maple flavor) than syrup that is produced later in the season. This is due to warmer temperatures, natural bacterial growth, and equipment that may not be as clean as it was at the beginning of the syrup season. Later in the spring, trees also begin to go through a chemical reaction as they start to bud. Sap that is collected after that point can also make lower-quality syrup.
Watch what the experts in your area are doing. People who have been tapping trees for a long time know what to look for in local weather patterns. They watch for a forecast with daytime temperatures reaching into the 40s (above 4°C) and nighttime temperatures plunging below freezing. Don’t rely on national weather outlets. Your forecast must come from local sources because current, local weather greatly impacts the sap run.
Also, temperatures taken in wooded areas are colder than those taken out in the open. The difference can be as much as 8°F (4°C). If you’re considering tapping on a 40°F (4°C) day, the temperature in the woods may still be 32°F (0°C). Tap one tree that is representative of your lot, as a “test tree.” When the sap starts running in that tree, you can tap the rest.
You will need a drill and bit, a spout, and a hammer. A spout (also called a tap, spile, or spigot) is a strawlike fitting that is inserted into the tree. The spout will allow sap to drip out of the tree and into whatever container you use for collection.

The basic tools for tapping a tree include a metal sap bucket, a spout, and a hand-brace drill and bit.
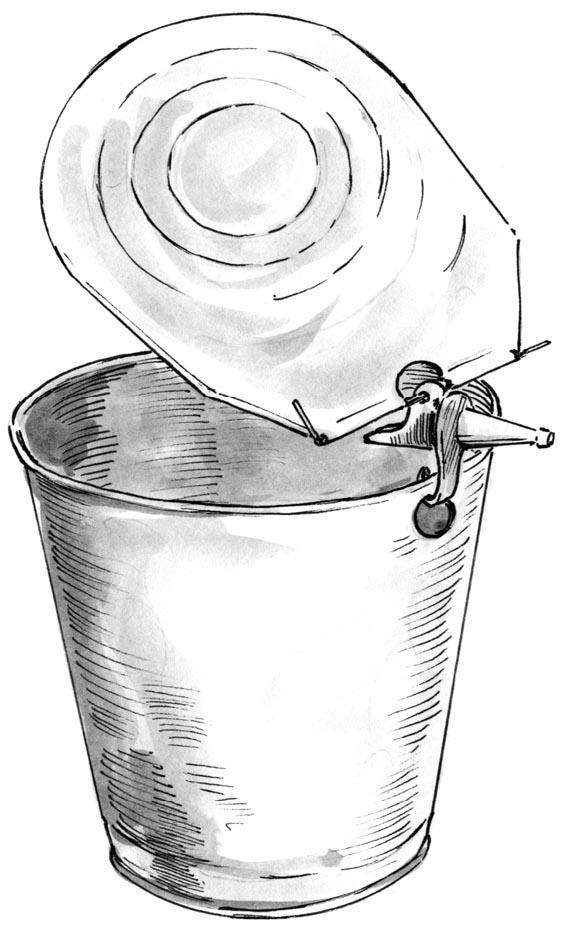
A hooked spout works with a flat sap pail lid. The lid and the spout are fitted together, and the sap bucket hangs from the hook on the bottom of the spout.
Spouts come in a variety of styles and are typically made of aluminum alloy, stainless steel, or a plastic composite. Spouts come with or without hooks. Hooked spouts are generally used with the flat metal lids that cover sap pails. The hooked spout attaches to the lid via a thin metal rod that feeds through a hole on the top of the spout (see illustration on page 15). When the spout is in place on the tree, a pail hangs from the hook on the underside of the spout. If there is not a hole through the top of a hooked spout, you need to use a roof-type metal pail cover that mounts to the rim of the syrup pail.
Hookless spouts are a bit more versatile than hooked spouts, but they do not work with flat pail lids. Hookless spouts have a notch on the top over which you hang your pail or Sap Sak holder. Hookless spouts work very well with metal pails and roof-type metal pail covers, Sap Sak holders, and plastic 5-gallon pails and their plastic covers — as well as with other more makeshift collection vessels.
The maple industry has done a good job of standardizing spout sizes. The two most common sizes are 7⁄16 inch and 5⁄16 inch.
Historically, the 7⁄16-inch spout was most commonly used, but research suggests that a taphole will heal faster if a 5⁄16-inch spout is used. Research has also shown that spouts smaller than 5⁄16 inch restrict sap flow and lower production yield. A 5⁄16-inch spout has almost exactly the same sap output as a 7⁄16-inch spout.
Use the same size drill bit as your spout. For example, if you are using a 7⁄16-inch spout, use a 7⁄16-inch drill bit. For a 7⁄16-inch spout, drill a hole, at a slightly upward angle, that is 2 to 21⁄2 inches deep. For a 5⁄16-inch spout, drill a hole that is 11⁄4 to 2 inches deep. Make sure to use a sharp wooden drill bit, and clear the hole of any debris before putting your spout in place.
Both sizes of taps are commonly sold, and which is best for you is a matter of personal preference. Often a customer will select a particular size based on the size of the drill bit she already owns. If a customer is starting from scratch, he will often choose the 5⁄16 size strictly because he likes the idea that the tree heals faster with the use of the smaller spout. Either size is absolutely acceptable. Neither spout does any lasting damage to the tree.
Whatever you use to collect sap can hang directly from your spout. You don’t need to nail it to the tree. Metal buckets with covers, 5-gallon pails, or Sap Sak holders are most commonly used (all discussed in chapter 3), but other items will work as well. See chapter 7 for information on tubing for larger operations.
As mentioned, your trees should be at least 10 inches in diameter at chest height for you to tap them.
Choose a smooth spot on the tree that doesn’t have any visible scarring and is at least 6 inches away, horizontally, from any old visible tapholes. Tree scarring, caused by punctures to a tree (such as tapholes), impedes the flow of sap and runs mostly vertically through trees. You never want to tap directly above or below an old visible taphole. Don’t worry about tapping too close to old tapholes that have healed completely. Younger, healthy trees will heal faster than older trees. Tap the tree at a comfortable working height.
On a large, old tree, you may need to remove some loose bark to create a smooth spot to tap. You may put more than one tap on large trees, but taps should be kept 18 to 20 inches apart horizontally.
You may tap any side of the tree; it is a myth that you need to tap only the south-facing side. To avoid old tapholes from year to year, you will have to make your way around the tree. Some experts suggest tapping in a systematic spiral pattern around the tree.
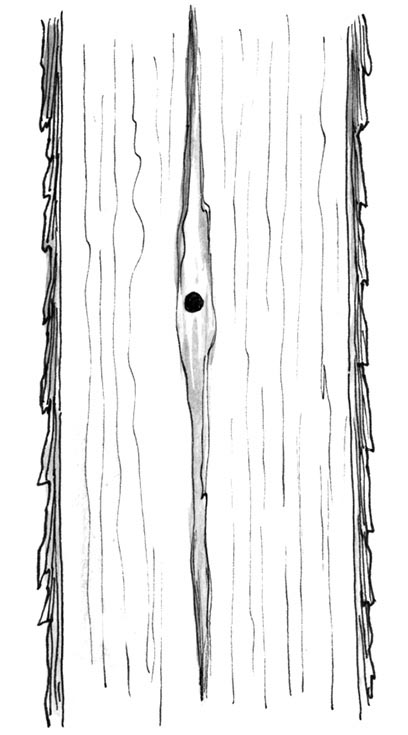
Tree scarring runs mostly vertically within maple trees. Do not tap above or below old tapholes to avoid tree scarring, which can impede sap flow.
Using a power drill or hand bit and brace, drill a hole that is about 2 inches deep at a slightly upward angle. If using a power drill, be careful not to let the bit spin and cauterize (heat and begin to seal) the hole. Cauterizing a hole will limit the sap output.
Place your spout into the hole, and gently tap it in about 1 inch with a hammer until it is snug. There should be about a 1-inch gap between the back of the drilled hole and the end of the spout once the spout is tapped into place. This open space in the taphole is sometimes referred to as the “collection area.” The collection area allows for a small amount of exposed wood grain where the sap can come to the surface. The sap also gathers in the collection area and creates a small amount of pressure, which pushes the sap from the tree.
Be careful not to drive in the spout too far. This could crack the wood, and the crack could leak sap. If you’ve cracked the wood, you may see sap running down the side of the tree, and your spout may be dry. There is nothing you can do to fix this, but if it does happen, learn from the mistake. The tree will heal itself.

Hold your drill steady and drill about 2 inches into the tree. Make sure the hole is clear of debris before pounding in your spout.

Leaving a 1-inch open space inside the taphole, between the back of the drilled hole and the end of the spout, allows for the sap to gather in the hole and create pressure for even sap flow.
After the spout is in place, hang a bucket or Sap Sak holder on it and wait for the sap to start dripping. Be patient. It may not flow right away, but when the weather is just right, you’ll be able to watch the sap drip from the spout.
You will probably average 10 to 15 days of actual sap production in a season. The amount of sap a tree will produce on any given day depends greatly on the freeze-thaw cycle, the barometric pressure, and the amount of thawed ground moisture in your woods. The barometric pressure falls when a storm approaches, and a large change in barometric pressure can lead to a good sap flow. That’s why the sap runs faster when it snows or rains in the spring.
On average one taphole will yield about 1 gallon of sap a day. It takes about 40 gallons of maple sap to make 1 gallon of maple syrup.

Hang your bucket directly from the spout in the tree.