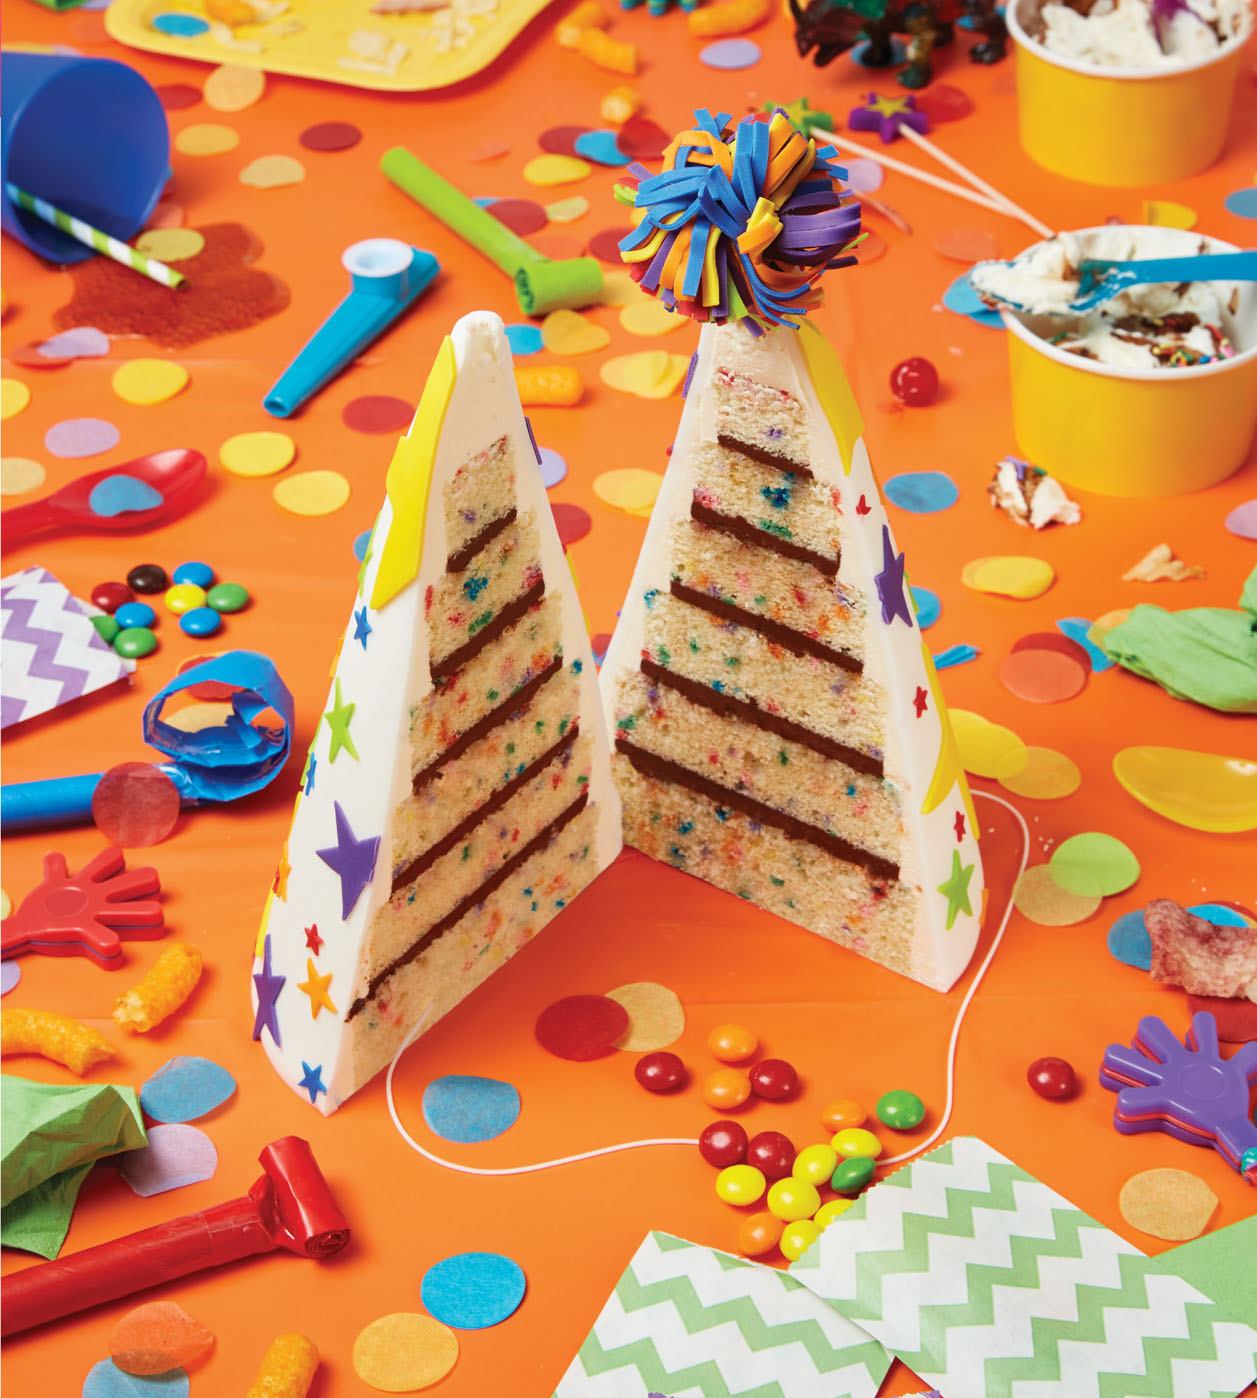
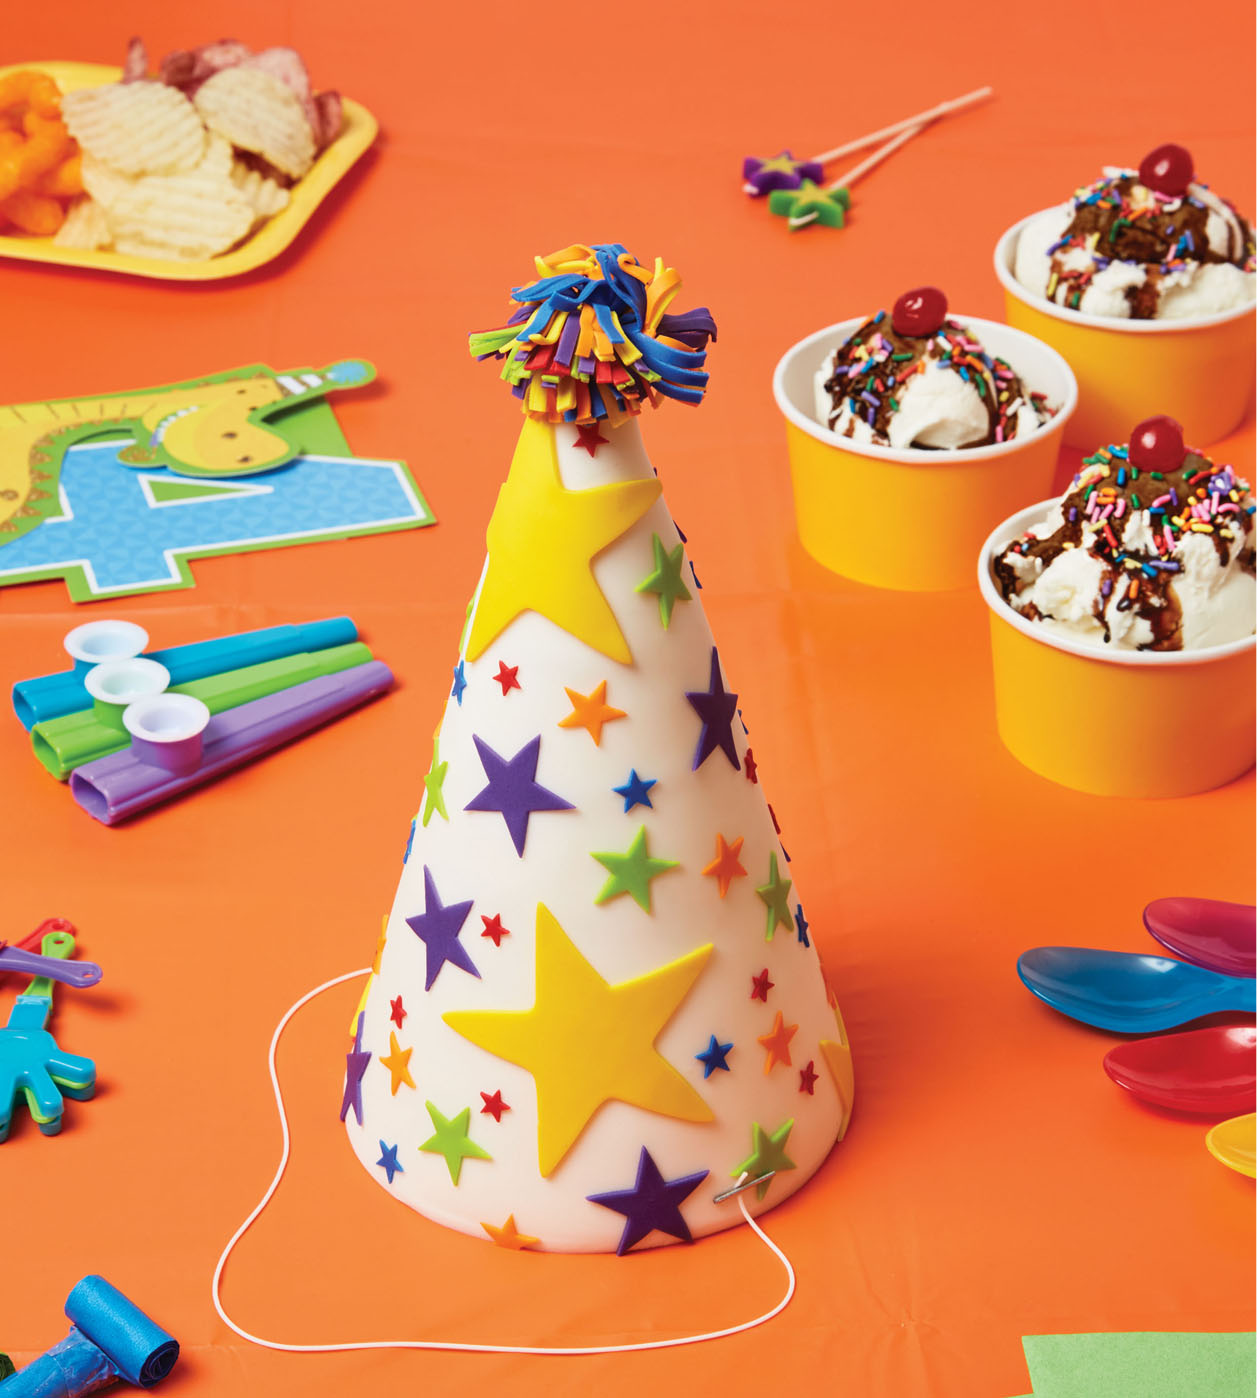
Whether you’re six or sixty-four, there’s nothing quite like wearing a fun party hat on your birthday. That’s why this Party Hat cake is the ultimate birthday cake for anyone, at any age! At How To Cake It we love a good celebration, and have been lucky to have so many things to celebrate! Now I’m throwing a party, and you’re invited!
What’s great about this cake is that the decorating possibilities are endless, and the true fun comes from creating your own unique designs and patterns. Try switching up the colors, adding stripes instead of stars, or covering the whole cake in sprinkles. But don’t be sad when you have to cut into this cake—the colorful funfetti makes it a party on the inside, too!
This cake is a good one for bakers just starting out working with fondant because it teaches you how to cover a whole cake. If you’re hosting a party or feeding a larger crowd, you can also use this cake as a decorative but edible cake topper—just set it on top of store-bought or simple round cake. Talk about caking your celebration to the next level!
SERVES 4 TO 6
Tools
10-inch square cake pan (3 inches deep)
Sir Squeeze-A-Lot bottle (see here)
Serrated knife
Ruler
Circle cutter set
10-inch round cake drum
Small offset spatula
Piping bag
#806 round piping tip
Rolling pins: wooden, French, and small nonstick
Fondant smoother
Nonstick mat or board
Star cutters or other shape (various sizes)
Paintbrushes
Herb scissors (or regular scissors)
Clay extruder with smallest round faceplate
Ingredients
1 recipe Yo’s Ultimate Vanilla Cake batter
½ cup rainbow sprinkles
½ recipe Yo’s Chocolate Swiss Meringue Buttercream
½ recipe Yo’s Italian Meringue Buttercream
½ recipe Yo’s Simple Syrup
1 pound 12 ounces white fondant
Gel food colorings: yellow, red, orange, purple, blue, and green
Confectioners’ sugar for rolling fondant
Vegetable shortening
Clear piping gel
Pieces of raw spaghettini or spaghetti
Silver luster dust
Day 1: Prep It
1 Preheat the oven to 350°F. Line the bottom of a 10-inch square cake pan with parchment paper (see “How to Bake a Cake”).
2 Prepare the cake batter according to the recipe. Gently fold in the sprinkles. (Add the sprinkles just before baking, so they don’t bleed and muddle the color of the cake.) Scrape the batter into the prepared pan and spread so that it is smooth in the pan. Bake for 1 hour, or until a toothpick inserted in the center comes out clean, rotating the pan halfway through. Transfer to a wire rack and let cool completely in the pan. Cover tightly with plastic wrap and refrigerate overnight.
3 Prepare the two buttercreams according to the recipes. Cover each bowl tightly with plastic wrap and refrigerate.
4 Prepare the simple syrup according to the recipe. Let cool to room temperature. Pour into your Sir Squeeze-A-Lot bottle and refrigerate.
5 Color fondant: Divide 12 ounces of the fondant into six 2-ounce portions. Dye each a different color (see here): yellow, red, orange, purple, blue, and green. (Or you can use whatever colors you’d like.) Wrap each portion of fondant tightly in plastic wrap and set aside in a cool, dry place.
Day 2: Cake It
1 Remove the two buttercreams from the fridge and let them come to room temperature. This may take a few hours.
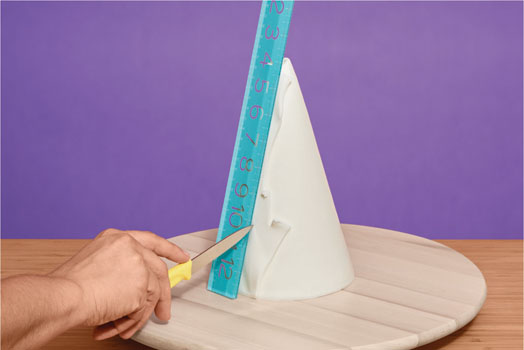
2 Remove the cake from the pan and peel off the parchment. Set the cake right side up, and level it using a serrated knife and ruler (see here). Flip the cake over and remove the caramelization from the bottom using the same technique.
3 Using six circle cutters (starting with the largest at 4½ inches and each subsequent cutter decreasing in diameter by ½ to ¾ inch), cut six circles from the cake. Later, when you stack the circles with the largest on the bottom and the smallest on top, it should form a natural cone shape.
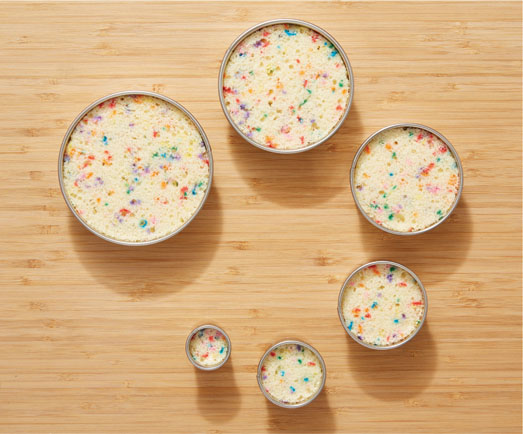
4 Lay out all the cake pieces on a clean work surface and shower them with simple syrup, being careful not to oversaturate the smaller ones. Let the syrup soak in fully before continuing.
5 Place the largest circle on a 10-inch round cake drum. Turn the remaining five circles over so the simple syrup side is facing down, then use a small offset spatula to spread a layer of chocolate buttercream onto the tops of those five circles, maintaining a neat edge—you don’t want any excess buttercream spilling off the sides. Stack the circles, turning each one upside down so that the buttercream side is placed on the layer underneath it. Once you have built up the cone, transfer it to the fridge to chill for 20 to 30 minutes, until the buttercream is firm to the touch.
6 Fill in the cone shape: Fit a piping bag with a #806 round tip and fill it with Italian meringue buttercream. Pipe a ring of buttercream on the cake board around the edge of the bottom cake layer. Working your way from bottom to top, pipe a ring of buttercream onto the top edge of each cake round, hiding the chocolate buttercream.

7 Use the small offset spatula to spread the piped buttercream, crumb coating the entire surface of the cake, following the natural slope of the cone. Pipe a dollop of buttercream on the top of the cone, where the point will be. Don’t worry if the point isn’t perfect now, as you’ll be able to perfect it when you ice the cake. Transfer to the fridge to chill for 20 to 30 minutes, until the crumb coat is firm to the touch.

8 Apply another layer of buttercream over the crumb coat, following the natural cone shape. Pay special attention to the top of the hat, shaping the buttercream to a nice point. Return it to the fridge to chill for 20 to 30 minutes, until the buttercream is firm to the touch. Smooth the icing with a little more buttercream if needed and chill again.
9 Measure the height of the cake and its circumference at the bottom. Dust a work surface with confectioners’ sugar and, using a wooden rolling pin, roll out the white fondant until ⅛ inch thick and slightly larger than those measurements (see here).
10 To pick up the fondant, set the French rolling pin on one end of the fondant and roll the pin with the fondant around it (like wrapping paper onto a roll) until all the fondant is wrapped around the pin. Pick up the pin with the fondant wrapped around it, then quickly and carefully unroll it around the side of the cake, smoothing it out with a fondant smoother.

11 With a sharp paring knife, trim away the excess fondant, trimming at the top first before it peels back, and then trimming at the bottom. Where the ends of the fondant overlap, line up a ruler along the seam and use a sharp paring knife to cut through both layers of fondant; remove the excess from on top and underneath to create a clean seam. Try to get the tip of the cone neat, but don’t worry too much about perfection here—it’ll be partially obscured by the pom-pom, which will be easier to attach if the tip isn’t too pointy. Knead together the fondant scraps, wrap them tightly, and set aside. Transfer the cake to the fridge while you work on the details.
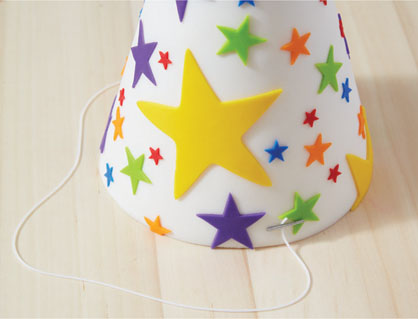
12 Create the star decorations: On a nonstick mat or board, using a small nonstick rolling pin, roll out each of the colored fondants as thinly as possible. Using star cutters, cut out stars of different colors and sizes. I chose to cut the stars of each color the same size. (The party hat would also look great with polka dots or other shapes, so use any cutter shape you love.) Knead the scraps of each color into separate disks, wrap them tightly in plastic wrap, and set aside for the pom-pom.

13 Attach the stars to the cake by lightly brushing water on the backs of the stars. I attached mine in a random pattern.
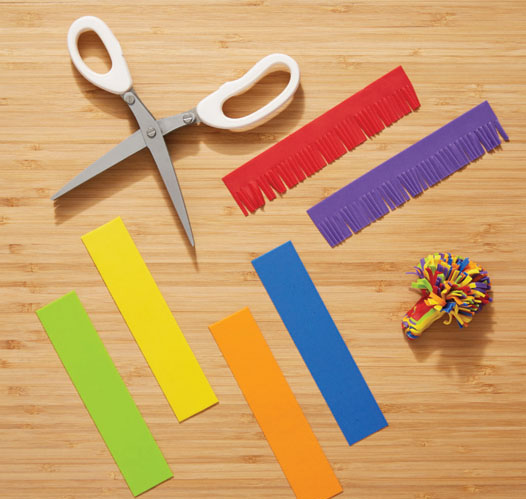
14 Create the pom-pom: Roll out each piece of colored fondant and cut into strips 1¼ inches wide and about 6 inches long. Fray one long edge of each strip using herb scissors, cutting a little more than halfway across the strip. (You can use regular scissors, but it will require more cuts and more patience.)
15 Glue the strips together by brushing water onto the unfrayed side and stacking them on top of one another with all the frayed edges on one side. Roll up the strips and squeeze them together just below the frayed parts. Pinch away the excess unfrayed fondant to make a pom-pom shape.
16 Carefully attach the pom-pom to the top of the cake with royal icing. For added security, you can push a piece of spaghettini through the pom-pom and into the cake to attach it.
17 Make the string: Knead a little vegetable shortening into a tiny bit of the remaining white fondant to soften it, then roll the fondant into a cord. Push the cord through a clay extruder using the smallest round faceplate to make a long string. Use some piping gel to attach the two ends of the strings to either side of the bottom of the party hat, about ½ inch up from the bottom. Let the remaining string drape across the cake drum.
18 Create the staples: Break off two ½-inch pieces of spaghettini. Brush with silver luster dust. (If it doesn’t stick very well, lightly coat the spaghettini with shortening and brush again.) Apply to either side of the cake, just below the ends of the string, with a dot of piping gel. Now you’re ready to party!