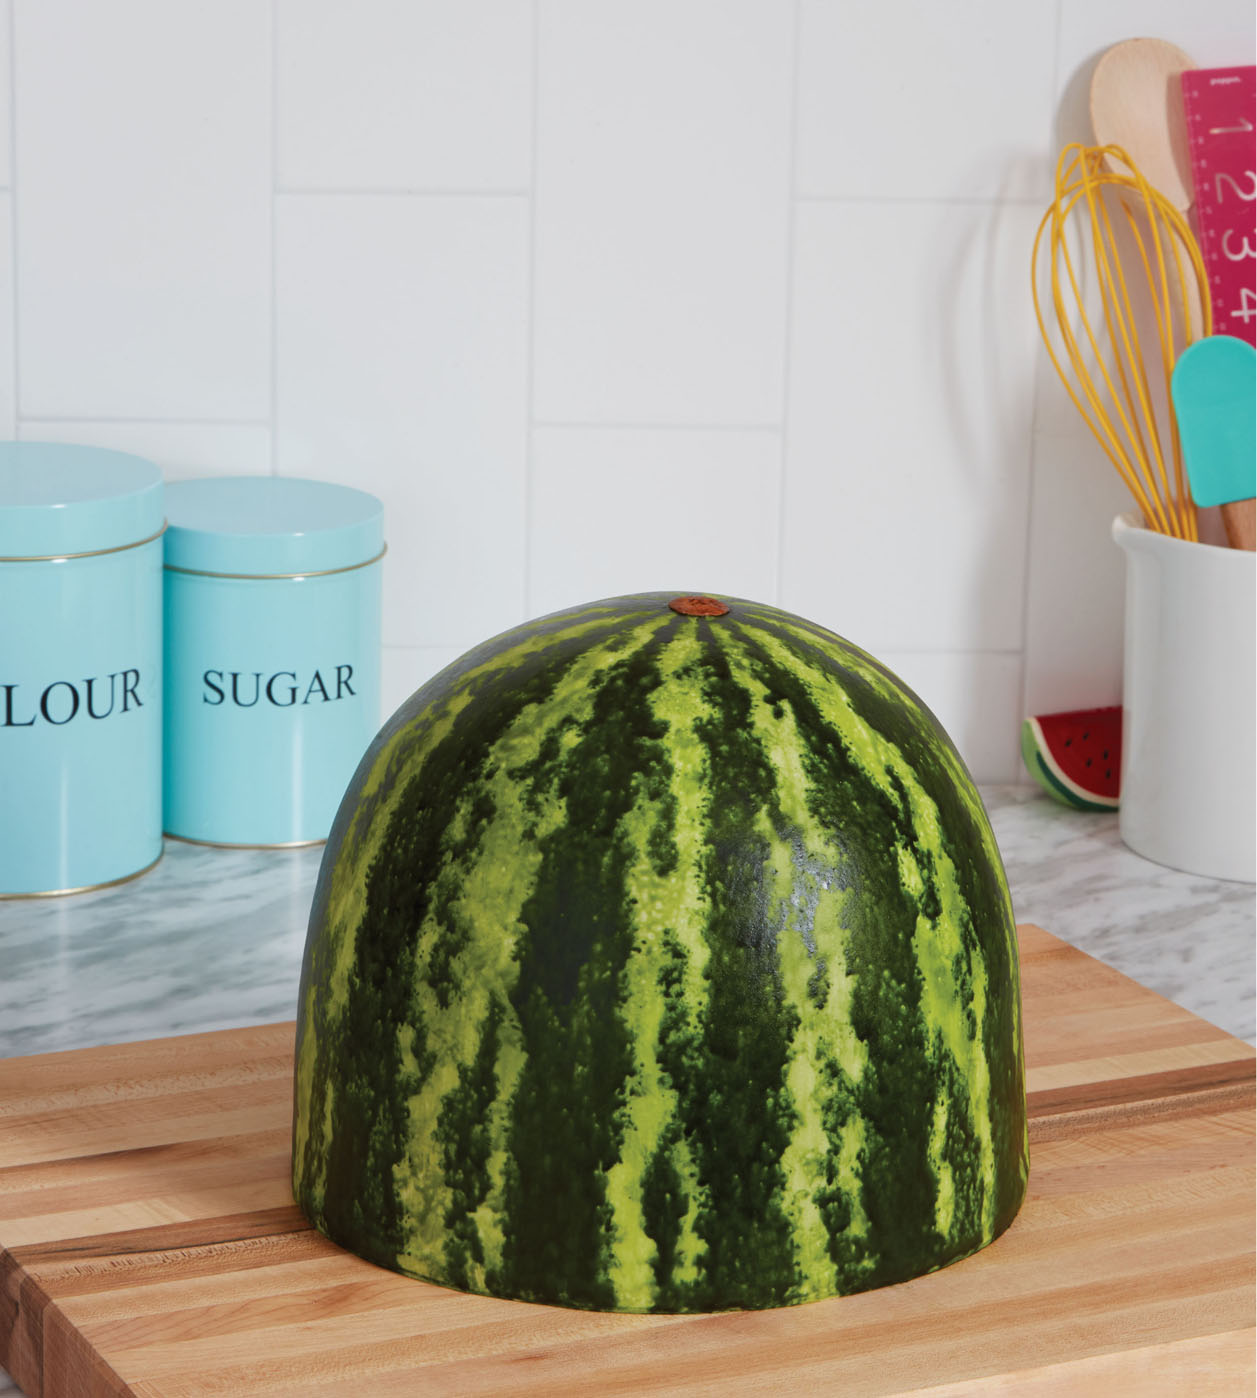
A big reason I wanted to start a YouTube channel was to be able to bake my “bucket list” of cakes—and this one was at the top of that list. What I didn’t expect was that my Watermelon cake, better known as Walter Melon, would end up completely stealing the show. (His video is my most watched ever!) He became a recurring character on How To Cake It and even made the news around the world. Yup, he’s pretty much a celebrity now, not to mention a diva. But that’s not the only reason he made it into this book. He’s actually the perfect project for practicing your cake painting skills, especially freehand patterns.
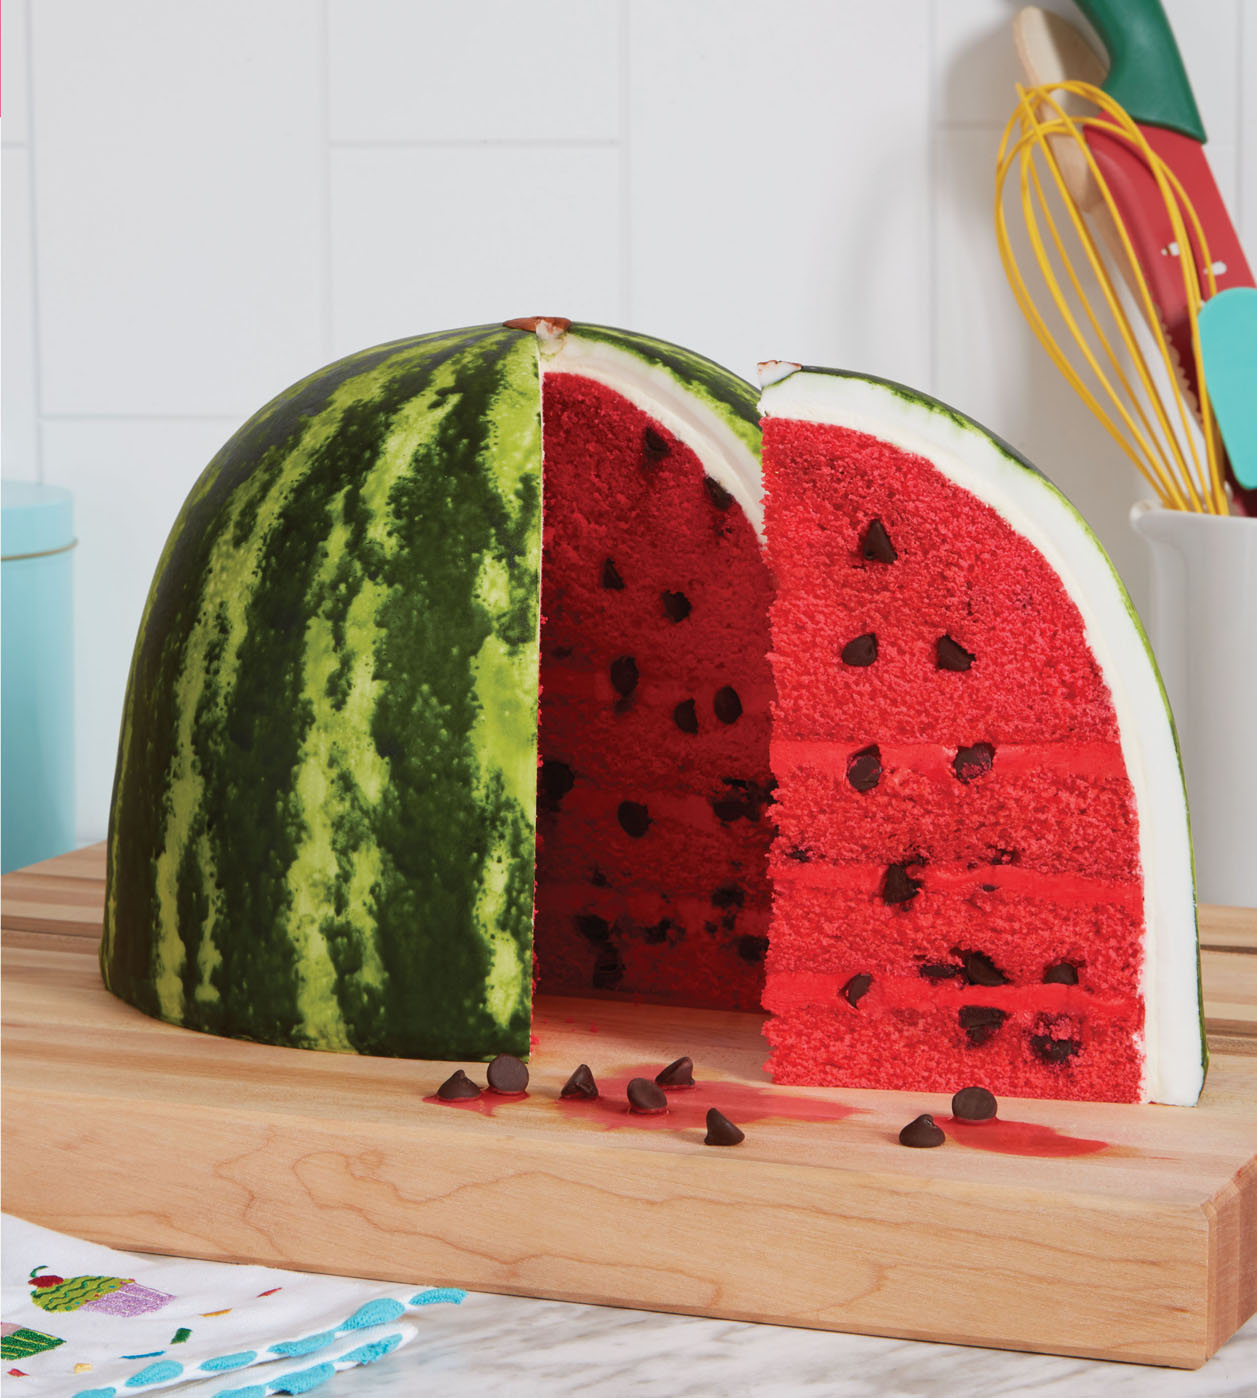
The real fun of this cake, though, is that it looks like a perfect, juicy watermelon both inside and out, with its white fondant rind, chocolate chip seeds, and pink velvet cake yumminess. I usually find it hard to cut into my cakes after I’ve put so much love and effort into them, but slicing this one is really satisfying. (Sorry, Walter!) You can even present it sliced for added fun. But don’t be fooled: While Walter can act like a real melonhead sometimes, he’s really quite sweet inside!
SERVES 12 TO 20
Tools
9-inch half-sphere cake pan (one half of a sphere pan set)
3 (9-inch) round cake pans (3 inches deep)
Kitchen scale
Sir Squeeze-A-Lot bottle (see here)
Serrated knife
Ruler and fabric measuring tape
14-inch round cake drum
Small offset spatula
Fabric measuring tape
Rolling pins: wooden and French
Fondant smoother
Paintbrushes
Ball and veining sculpting tools
Ingredients
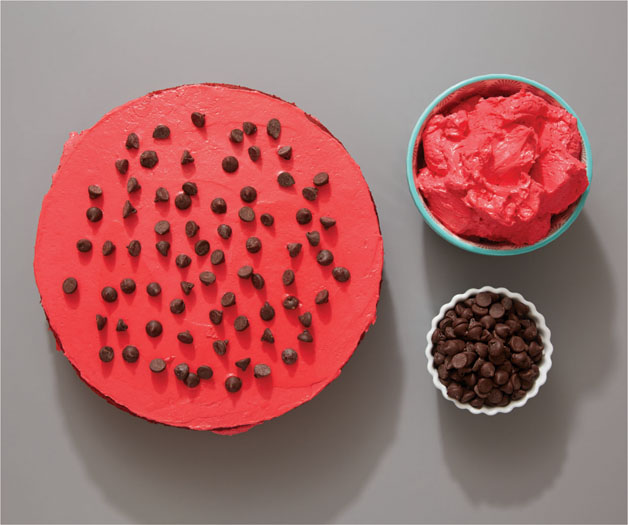
1½ recipes Yo’s Pink Velvet Cake batter
2 cups semisweet chocolate chips
1 recipe Yo’s Italian Meringue Buttercream
1½ recipes Yo’s Simple Syrup
Confectioners’ sugar for rolling fondant
4 pounds white fondant
Gel food colorings: rose, red, moss green, kelly green, buttercup yellow, and ivory
Clear food-grade alcohol
You can bake in a 9-inch stainless-steel bowl instead of a half-sphere cake pan and line it the same way.
Day 1: Prep It
1 Preheat the oven to 350°F. Line a 9-inch half-sphere cake pan and the bottoms of three 9-inch round cake pans with parchment paper (see “How to Bake a Cake”). Set the half-sphere pan on a baking ring or a smaller cake pan set on top of a baking sheet to keep it upright.
2 Prepare the cake batter according to the recipe. You will add the batter to each pan in two parts, adding the chocolate chips in between. You will divide the batter and chocolate chips as follows:
3 (9-inch) round cake pans
¾ pound batter each
¼ cup chocolate chips each
¾ pound batter each
9-inch half-sphere pan
1½ pounds batter
½ cup chocolate chips
1½ pounds batter
Pour the first half of the batter for each into the prepared pans as indicated above. Sprinkle the top of each pan of batter with chocolate chips, leaving a 1-inch border around the edge of the pan—because seeds are usually on the inside of the melon and not at the edge. Pour the second half of the batter into each of the pans as indicated above.
3 Bake the 9-inch round cakes for 40 minutes and the half-sphere cake for 1½ hours, or until a toothpick inserted in the center comes out clean, rotating the pans halfway through. Transfer to wire racks and let cool completely in the pans. Cover tightly with plastic wrap and refrigerate overnight.
4 Prepare the buttercream according to the recipe. Cover the bowl tightly with plastic wrap and refrigerate.
5 Prepare the simple syrup according to the recipe. Let cool to room temperature. Set aside a little syrup for the “watermelon juice” later, if you like. Pour the rest into your Sir Squeeze-A-Lot bottle and refrigerate.
The chocolate chips will mostly sink to the bottom of the batter while baking, and that’s okay—don’t sweat it!
Day 2: Cake It
1 Remove the buttercream from the fridge and let it come to room temperature. This may take a few hours.
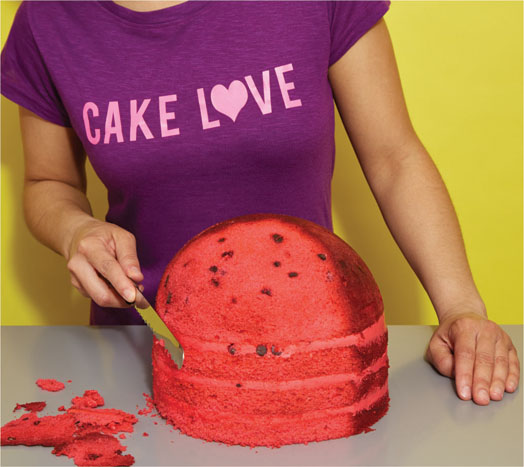
2 Remove the 9-inch round cakes from the pans and peel off the parchment. Set the cakes right side up, and level them using a serrated knife and ruler (see here). It can be difficult to cut through chocolate chips, so take your time. Flip the cakes over and remove the caramelization from the bottoms using the same technique. Remove the sphere cake from the pan and level the flat side, being sure to remove the caramelization.
3 Lay out all the cakes on a clean work surface and shower them with simple syrup, showering both the flat and curved sides of the sphere cake. Let the syrup soak in fully before continuing.
4 Divide the buttercream evenly between two bowls. Color one half of the buttercream the same color as the cakes, using rose and red food coloring. Set the remaining white buttercream aside.
5 Place one 9-inch cake on a 14-inch round cake drum. Using a small offset spatula, spread a thin layer of watermelon-colored buttercream onto the cake. Sprinkle ¼ cup of the remaining chocolate chips over the buttercream, again leaving a 1-inch border at the edge. Add another dollop of buttercream and spread over the chocolate chips. Stack and fill the other two round cakes on top, using the remaining chocolate chips and more buttercream. Place the sphere cake, dome side up, on top of the stacked cakes. Transfer to the fridge to chill for 20 to 30 minutes, until the buttercream is firm to the touch.
6 With the serrated knife, carve away all the caramelization from the cakes, starting at the top and working downward, maintaining the dome shape. Avoid overcarving—this cake already has a natural watermelon shape, so just remove anything that’s too dark.
7 Use the offset and straight spatulas to crumb coat the cake with the white buttercream (see here). Transfer to the fridge to chill for 20 to 30 minutes, until the crumb coat is firm to the touch.
8 Apply another layer of white buttercream over the crumb coat, trying to get it as smooth as possible. Return it to the fridge to chill for 20 to 30 minutes, until the buttercream is firm to the touch.
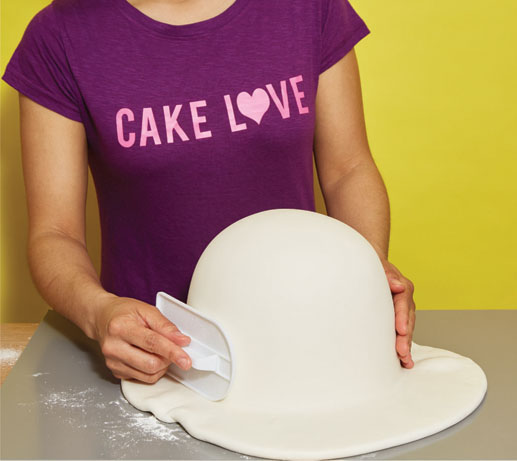
9 Make the watermelon rind: Measure the cake, from the bottom of one side, up and over to the bottom of the other. Dust the work surface with confectioners’ sugar and, using a wooden rolling pin, roll out a circle of fondant that is ½ inch thick and large enough to cover the cake. Set a French rolling pin in the center of the fondant and fold one end up over it. Try not to handle the fondant too much. Pick up the pin, then quickly and carefully drape the fondant over the cake. Use a fondant smoother and your hands to smooth it over the cake. Trim away excess fondant at the base of the cake with a sharp paring knife.
10 To make realistic-looking watermelon skin, you’ll need to paint the fondant in several layers, letting each dry before starting the next. Begin with a light green shade as the base coat: In a small bowl, mix moss green, kelly green, buttercup yellow (to make the green more subtle and natural), and just a touch of red food coloring (to dull the color) and dilute it with a bit of clear food-grade alcohol. Using a paintbrush, paint a base coat to cover the entire cake, using downward brushstrokes. Let dry completely, about 30 minutes.
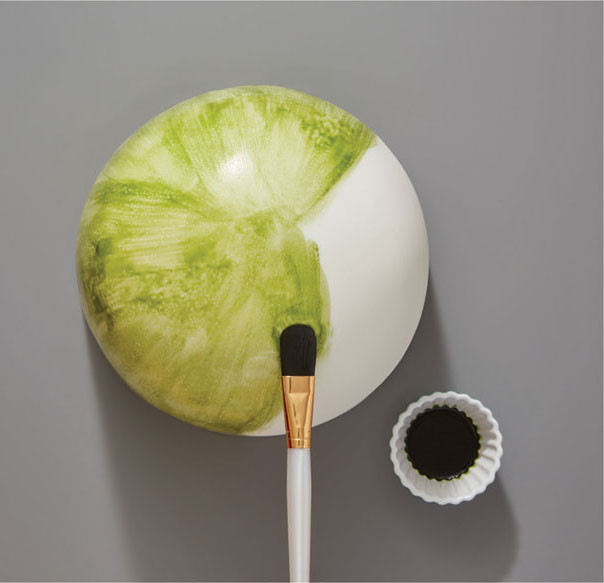
Start by making a small batch of paint to test on a spare piece of fondant. If your green is too dark, remove some of the paint from your bowl and add more alcohol. If it’s too light, add a little more green.
11 For these next steps, it’s helpful to have a real watermelon nearby to get the right shades and patterns. Add more moss green to the paint mixture you just used, deepening the color. Dot the cake all over to create a speckled pattern. Let dry completely, about 30 minutes.

12 Darken the color further with more moss green, and paint darker stripelike patterns on the cake, one at a time, working down from the top center. Then use a drier brush to dab and soften the stripe pattern.
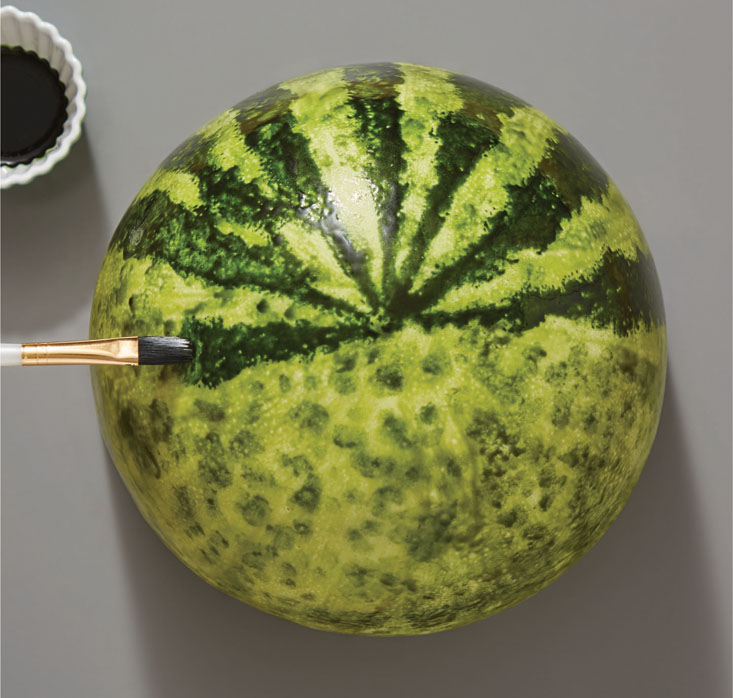
13 With the darkest paint, add darker areas of speckling like a real watermelon would have. Let dry completely, about 30 minutes.
Real watermelons have imperfections—that is, areas where there are more speckles and where the lines aren’t so pronounced.
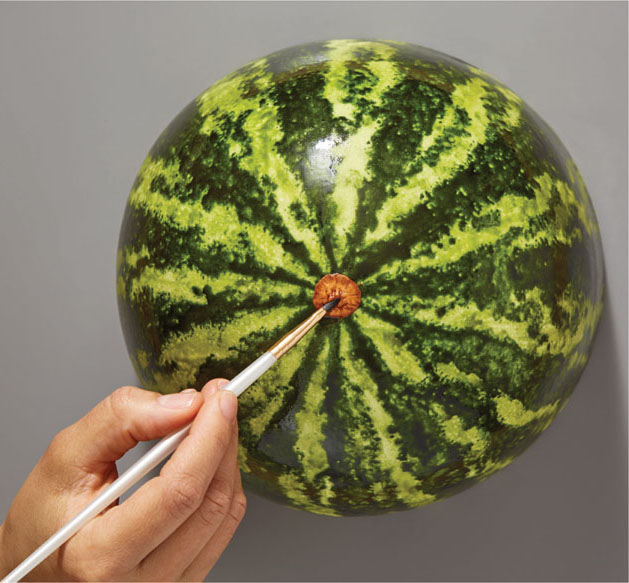
14 Add the flower stalk: Use a ball tool to gently push an indent into the top center of the cake. Roll a small piece of white fondant into a ball and pop it into the indentation. Add some texture by pressing around the fondant with a pointed veining tool. Paint the stalk with a bit of ivory food coloring diluted with alcohol. Let dry completely.
15 I like to serve this cake with a slice removed to reveal the chocolate chip seeds. I also like to gently push additional chocolate chip seeds into the cake to give it a more realistic look.
16 It’s also fun when you’re plating this cake to leave a little drizzle of “watermelon juice” around the bottom. You can create this by mixing just a touch of rose food coloring into some of the reserved simple syrup. Now you, too, can enjoy your very own juicy watermelon!