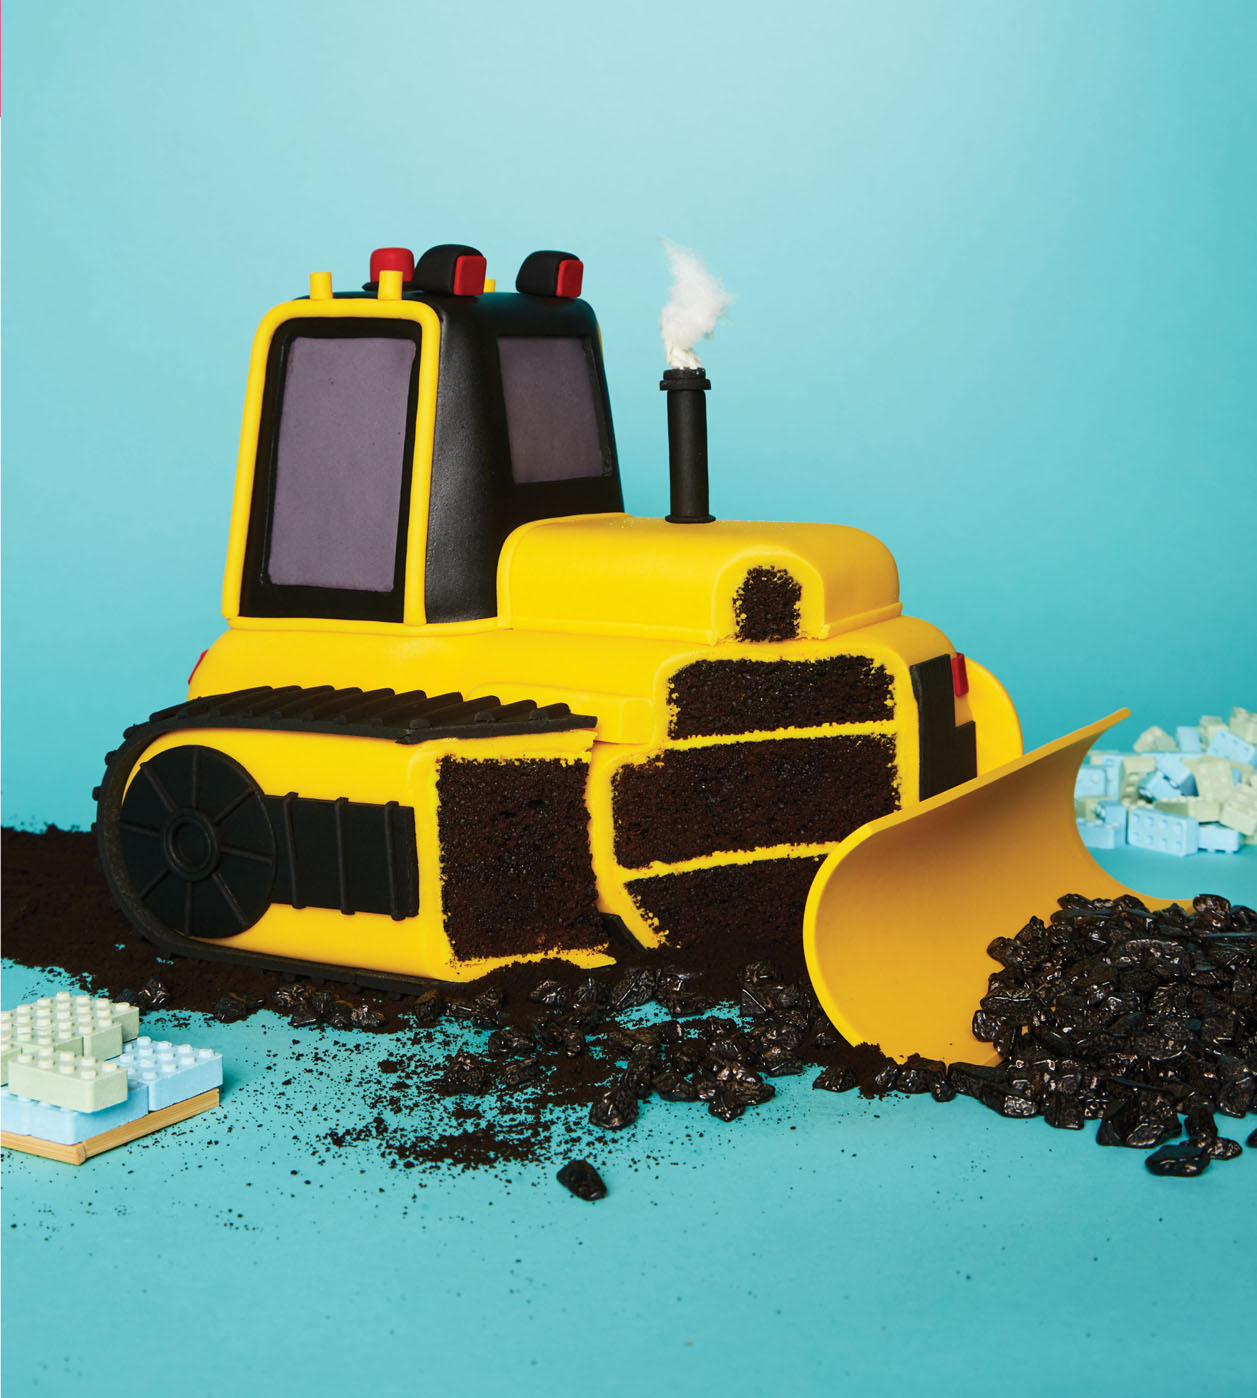
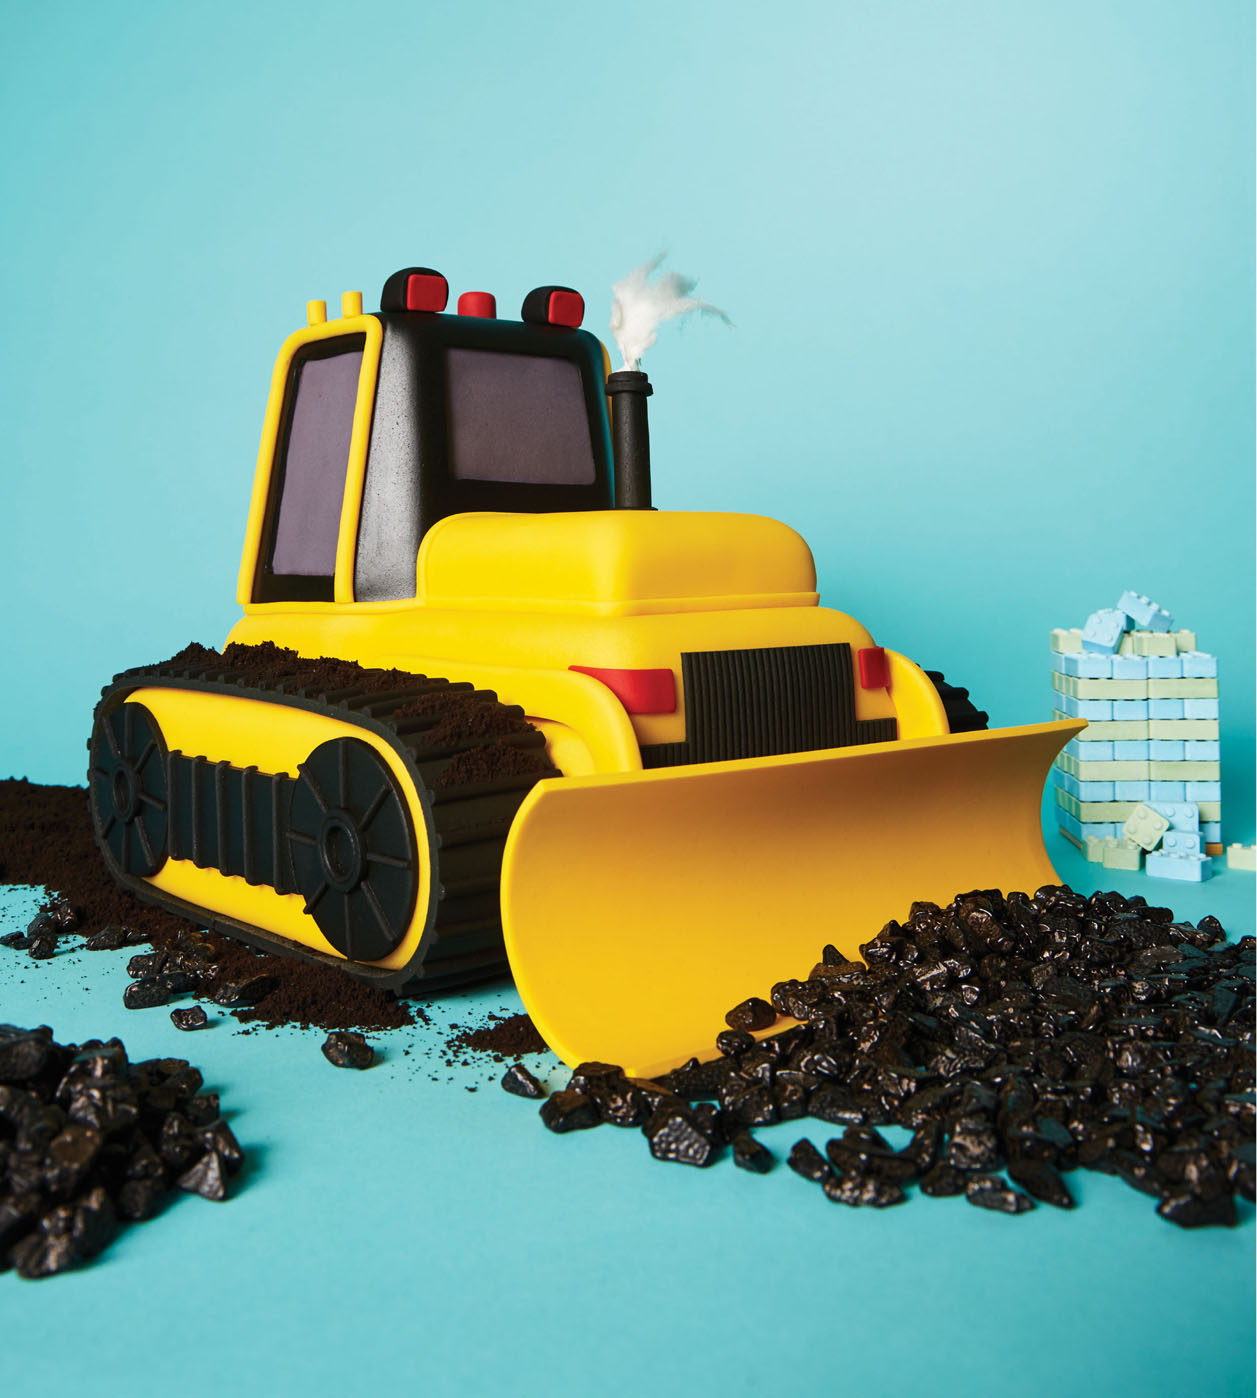
My son just loves construction sites. From real-life digs to toys, if there’s a bulldozer on the scene, he’s all smiles. And having been to quite a few toddler parties over the last couple of years, I can assure you he’s not alone. Turns out most preschoolers tend to share his obsession, making this the perfect cake to serve to pint-sized partygoers. My son is four now, and not surprisingly, this replica of a toy bulldozer is his favorite cake in the whole book (though he still hasn’t forgiven me for cutting into it). Each toy bulldozer tends to have slightly different detailing, so if you’re making this cake for a little one in your life, I suggest making it extra special by customizing it to perfectly match their own toy.
Along the way, you’ll get to practice doweling, carving, and creating fondant and gum paste details. Exercise your creativity by propping it before serving. I used chocolate pebbles and candy bricks to set the scene, with cotton candy smoke as a sweet added touch. I guarantee you, there isn’t a kid around who won’t dig this!
SERVES 14 T0 16
Tools
12 × 18-inch cake pan
Sir Squeeze-A-Lot bottle (see here)
Nonstick mat or board
Rolling pins: small nonstick, wooden, and French
Serrated knife
Ruler
Small offset spatula
Cake boards: 4 × 8 inches for the base, 3¼ × 4½ inches for the cab
16-inch cake drum to hold the finished cake
3 (¼-inch) wooden cake dowels
Garden shears (to cut dowels)
Clay extruder with round and flat faceplates
Paintbrush
Strip cutters: #1 and #2
Circle cutters: 1-inch and 2½-inch
Round piping tips: #807 and #809
Ingredients
2 recipes Yo’s Ultimate Chocolate Cake batter
1 recipe Yo’s Italian Meringue Buttercream
Gel food colorings: lemon yellow and golden yellow
1 recipe Yo’s Simple Syrup
8 ounces gum paste
Confectioners’ sugar for rolling fondant
3½ pounds yellow fondant
1 pound white fondant
2 pounds black fondant
½ recipe Yo’s Royal Icing (page 000)
Vegetable shortening
Clear piping gel
1 ounce red fondant
Props and styling (optional)
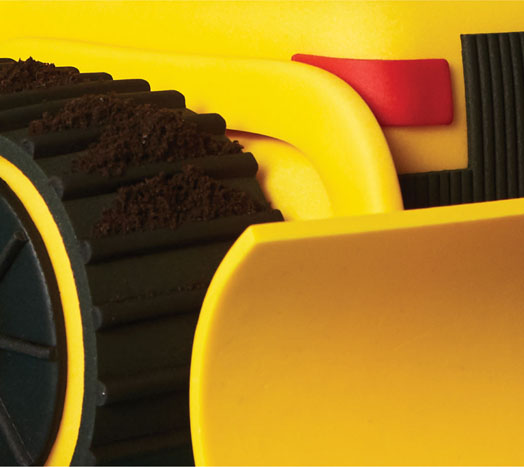
1 cup chocolate cookie crumbs for “dirt”
Chocolate pebbles
Block-shaped candies to look like bricks at a construction site
White cotton candy for the “smoke” coming out of the exhaust pipe
Day 1: Prep It
1 Preheat the oven to 350°F. Line the bottom of a 12 × 18-inch cake pan with parchment paper (see “How to Bake a Cake”).
2 Prepare the cake batter according to the recipe. Pour the batter into the prepared pan. Bake for 50 minutes, or until a toothpick inserted in the center comes out clean, rotating the pan halfway through. Transfer to a wire rack and let cool completely in the pan. Cover tightly with plastic wrap and refrigerate overnight.
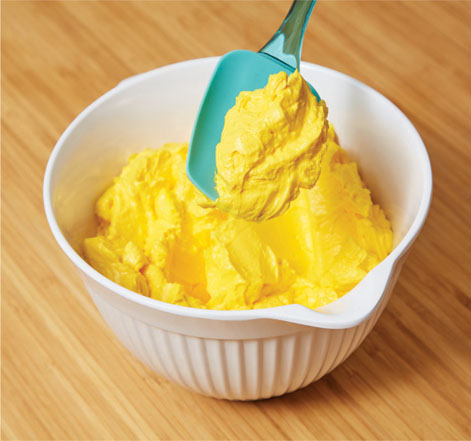
3 Prepare the buttercream according to the recipe. Color 4 cups by stirring in 1 tablespoon lemon yellow and ¼ teaspoon golden yellow food coloring. Cover the bowl tightly with plastic wrap and refrigerate. (Cover and refrigerate or freeze the remaining buttercream for another use.)
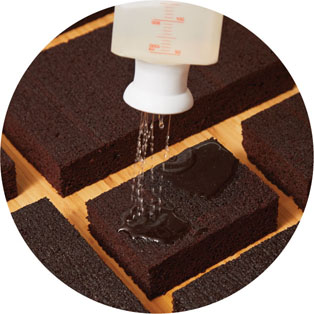
4 Prepare the simple syrup according to the recipe and let cool to room temperature. Pour into your Sir Squeeze-A-Lot bottle and refrigerate.
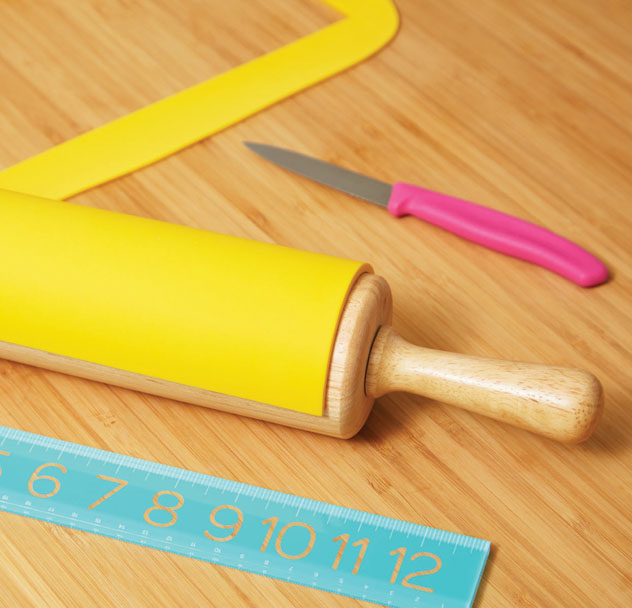
5 To make the bulldozer’s blade, dye the gum paste with ¼ teaspoon lemon yellow and ⅛ teaspoon golden yellow food coloring. On a nonstick mat or board, using a nonstick rolling pin, roll out the gum paste until ⅛ inch thick. Trim the gum paste into a 5 × 9-inch rectangle. (Your bulldozer cake will be approximately 9½ inches wide, and you’ll want the blade to be a similar width.) Fold the gum paste over the length of a greased rolling pin (or other curved surface) and set aside to dry. Tightly wrap the remaining gum paste in plastic wrap and set aside.
The further in advance you can make the blade, the better, as gum paste details get stronger and last longer with more time to set.
Day 2: Cake It
1 Remove the yellow buttercream from the fridge and let it come to room temperature. This may take a few hours.
2 Remove the cake from the pan and peel off the parchment. Set the cake right side up, and level it using a serrated knife and ruler so that it’s 1½ inches in height (see here). Set aside the hump, because you will use it later.
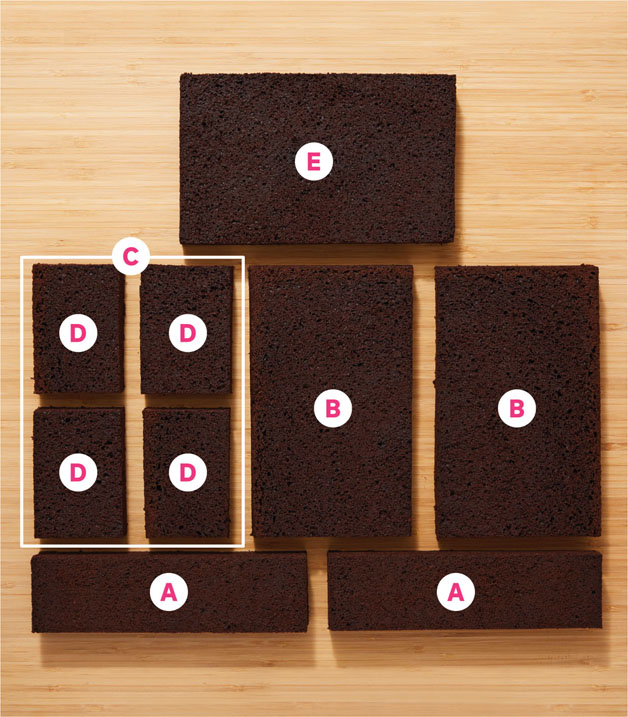
3 Using the ruler and serrated knife, trim the cake into eight pieces:
• First, cut a 2½-inch-wide strip lengthwise from the cake, then cut that in half crosswise, creating two 2½ × 9-inch strips (A); set the two strips aside. These will become the two tracks that will sit on each side of the truck.
• This leaves you with a 9½ × 18-inch slab. Cut it into three rectangles as follows: two 5½ × 9½-inch (B) rectangles and one 7 × 9½-inch (C) rectangle. The two 5½ × 9½-inch rectangles, along with the trimmed hump, will become the body of the bulldozer.
• Cut the 7 × 9½-inch rectangle into four smaller rectangles, each 3½ × 4¾ inches (D). These will be used to create the cab and the hood.
• Cut a 5½ × 9½-inch rectangle from the center of your cake hump (E). Using the serrated knife and ruler, level it to 1 inch in height.
4 Shower all the cake pieces with simple syrup to keep the cake moist and delicious. Let the syrup soak in fully before continuing.
5 Make the bulldozer body: Using a small offset spatula, fill and stack the three 5½ × 9½-inch layers with yellow buttercream, centering the stack on the 4 × 8-inch cake board.
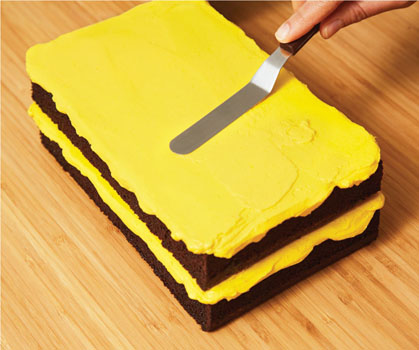
6 Make the cab: Fill and stack three of the four smaller (3½ × 4¾-inch) rectangles with yellow buttercream, centering the stack on the 3¼ × 4½-inch cake board. Transfer the body and the cab to the fridge to chill for 20 to 30 minutes, until buttercream is firm to the touch.
7 Make the hood: Level the remaining small rectangle to 1 inch in height. This will be placed on the top of the body.
8 Take the two 2½ × 9-inch strips (the tracks) and round off all four corners with a serrated knife.
9 Retrieve the largest stack of cake (the body) from the fridge and carve the shape of the bulldozer body with a serrated knife, rounding off the corners and indenting the sides at the top of the cake, for two-thirds of the length of the cake (see photo in step 16 for clarity). Taper the bottom edges to meet the edge of the cake board.

10 Take the smaller stack (the cab) out of the fridge and round off the top, then trim the sides and front so the cab slopes slightly toward the bottom. Then, cutting on the diagonal, trim off the front corners. Make sure to trim off the front corners of the cake board that may still be sticking out.
11 Set the hood piece on top of the body so you can visualize the bulldozer shape; with the serrated knife, round the top edges of the hood. Remove the hood piece and set it aside.
12 Use the small offset spatula and the yellow buttercream to crumb coat (see here) all the cake stacks and pieces separately, including the track pieces (lay them down flat on their wide sides). Transfer all the cake pieces to the fridge to chill for 20 to 30 minutes, until the crumb coat is firm to the touch.
13 Apply another layer of buttercream over the crumb coat, trying to get it as smooth as possible. Return to the fridge to chill for 20 to 30 minutes, until the buttercream is firm to the touch.
14 Apply yellow fondant to the body, tracks, and hood pieces: Measure the bulldozer body. Dust the work surface with confectioners’ sugar and roll out a sheet of yellow fondant that’s ⅛ inch thick and large enough to cover it in one piece. Set a French rolling pin in the center of the fondant and fold one end up over it. Try not to handle the fondant too much. Pick up the pin, then quickly and carefully drape the fondant over the body of the bulldozer and smooth it with your hands. Trim away the excess with a sharp paring knife. Roll out two smaller pieces of yellow fondant and drape them over the tracks; smooth the fondant and trim away the excess. Roll out a piece of yellow fondant and cover the hood; smooth the fondant and trim away excess.
15 Make gray fondant and apply it to the cab: Knead together the white fondant and 1 ounce of the black fondant to make gray. Roll out the gray fondant and cover the cab; smooth the top and all four sides and trim away excess at the corners. Roll out the black fondant and cover the gray fondant, starting with two smaller pieces on the sides and then draping one longer piece over the front, top, and back. Trim the bottom edges.
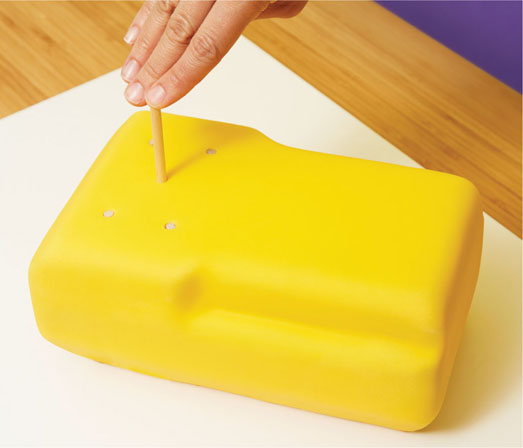
16 Put the bulldozer body piece on the 16-inch cake drum. Insert a dowel into the body of the cake where the cab will sit, and mark a cut line level with where it emerges from the surface of the cake. Remove the dowel and use that mark to cut five dowel pieces from three dowels. Insert the dowels all the way into the body of the cake where the cab will sit, with one in the center of the area and the other four about an inch in from each corner. The dowels should not extend above the fondant.
17 Place the cab on top of the bulldozer body, keeping the cake board underneath the cab; use a little royal icing to adhere it.
18 Place the hood onto the body of the bulldozer: First, measure the space between the cab and the front of the bulldozer to make sure the hood will fit now that it’s covered in fondant and bigger than before. You may need to trim the end of the hood that will be nestled against the cab, using a sharp paring knife. Place the hood on top of the bulldozer body, using a little royal icing to adhere it.
19 Create the windows in the cab: Using a sharp paring knife, cut away rectangles in the black fondant on each side of the cab to reveal the gray fondant underneath. Leave a ½-inch border of black around each window to frame it.
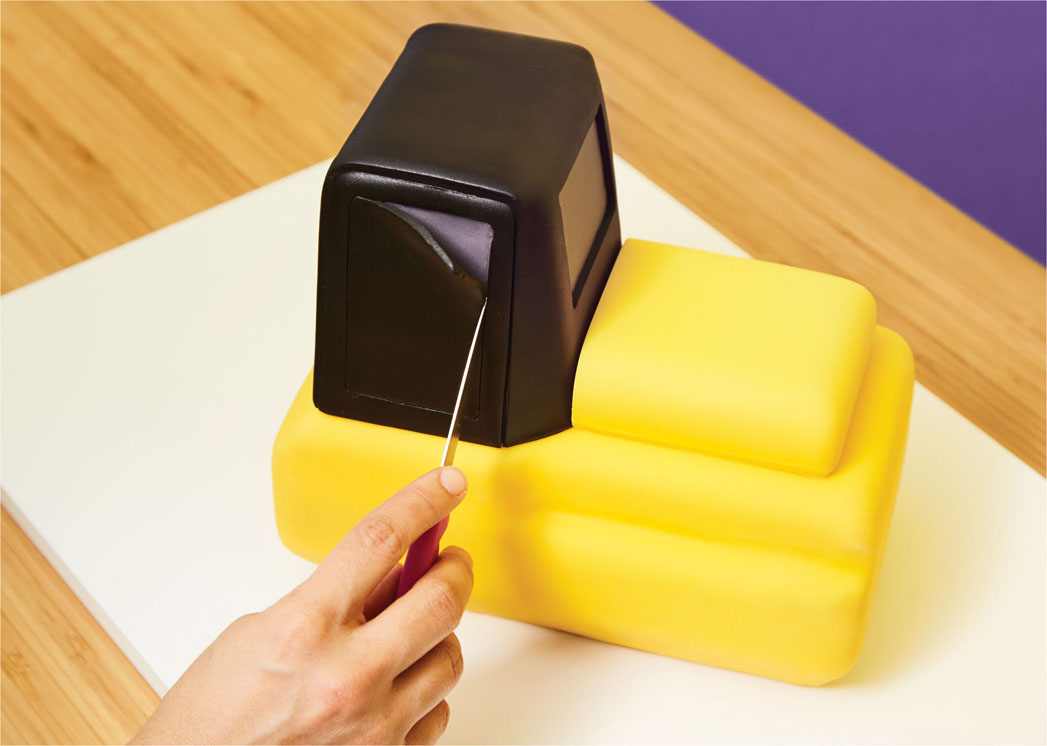
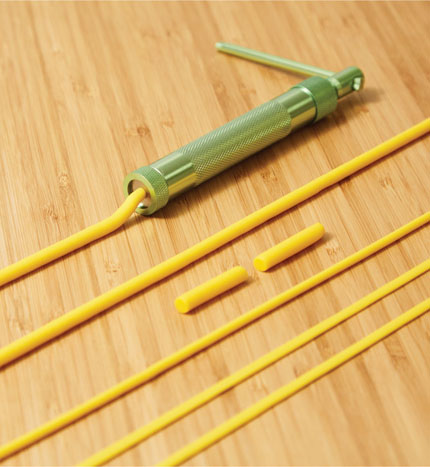
20 Create some basic details using fondant and a clay extruder: Mix some of the leftover yellow fondant with a little shortening to soften it, then roll the fondant into several cords. Push each cord through the clay extruder using the round and flat faceplates to make borders to go around the hood and around the cab. These add nice details and help to cover up seams. Attach the details to the fondant by brushing a little piping gel on them.
21 Cut four black fondant bands 1¼ inches wide and as long as the four sides of the bulldozer’s base. Use a little piping gel to attach the bands to the base of the bulldozer, and trim the seams with a paring knife. This will give the bulldozer the appearance of being raised from the ground.
22 Make the grilles for the back and front of the bulldozer: Roll out some of the black fondant, then use a strip cutter to lightly score the fondant to make grille markings. Cut out two pieces that will fit the front and back of the bulldozer (an upside-down T shape for the front and a rectangle the width of the back). Brush piping gel onto the black fondant pieces and attach them to the bulldozer.
23 Have fun adding other details like lights, lighting mounts, and an exhaust pipe using black and red fondant and simple tools such as a paring knife and a ruler. I made two small lighting mounts (black with red inside) for the top of the cab, one larger red light for the top of the cab, two red front lights, two back lights, and an exhaust pipe (black fondant wrapped around a dowel; trim the fondant off one end of the dowel and stick it into the cake).
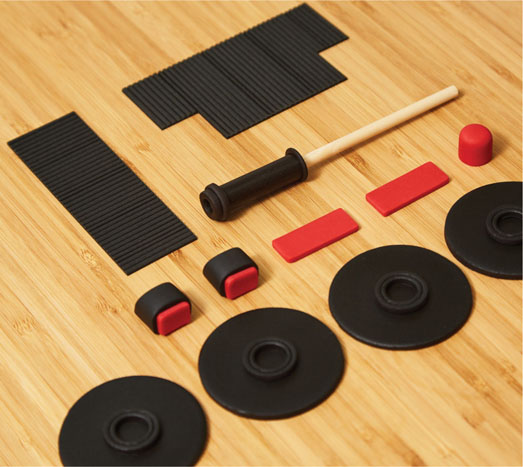
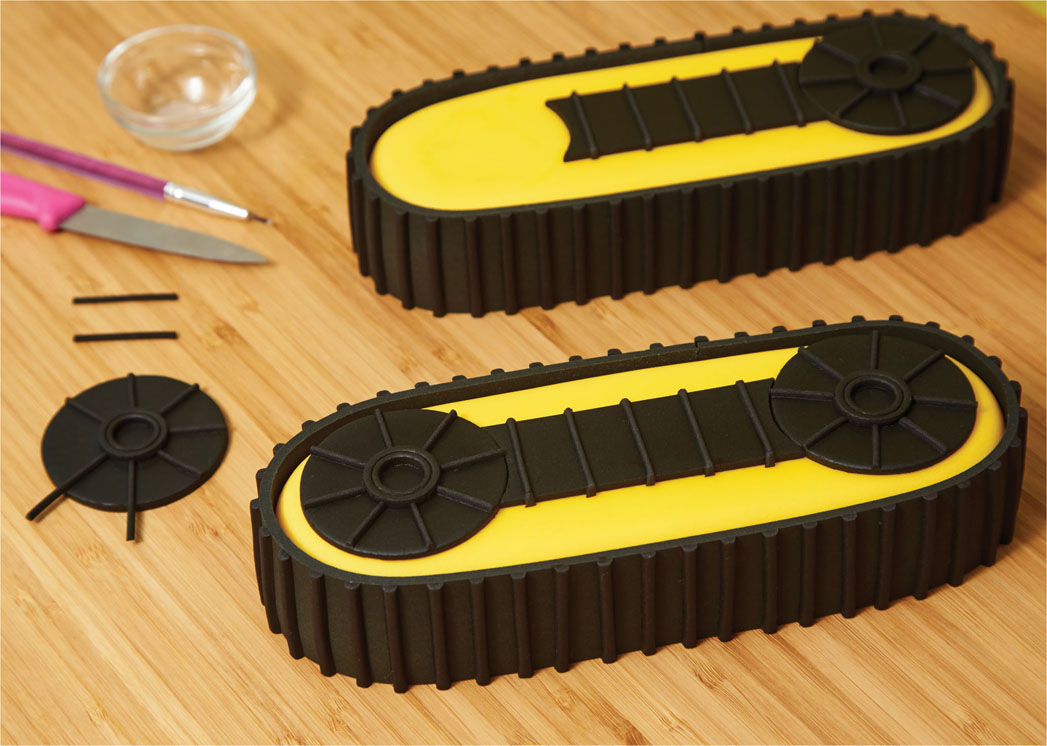
24 Create the tracks: Roll out and cut two bands of black fondant that are each long enough to go around the outside of each track. Roll out and cut a similar band to make the treads for the tracks. Use a strip cutter to cut narrow strips of black fondant, cut them to the width of the band, then attach them with piping gel, leaving ½ inch of space between them to create the treads.
25 Create the four wheels: Roll out black fondant and cut four circles with the 1-inch circle cutter and four with the 2½-inch circle cutter (for eight circles total). On the smaller circles, use the #807 and #809 round piping tips to indent concentric circles. With piping gel, attach the smaller circles to the larger circles. Add fondant spokes to the wheels using a strip cutter and paring knife to make eight spokes per wheel, attaching them with piping gel. Add the bands between the two wheels on each side, cutting out a curve with the 2½-inch circle cutter at each end of the bands to fit them to the wheels.
26 Create the arms of the bulldozer blade: Mix together equal parts yellow gum paste and yellow fondant. (This mixture, called “50/50,” is stronger than fondant and not as quick to dry out as gum paste.) Roll it out until ¼ inch thick, then cut two ¼-inch-wide strips that are long enough to extend from the back of the hood down over the front of the bulldozer to the cake board in front. Attach the strips to each side of the bulldozer body with piping gel. The ends in front will be hidden by the blade.
I took my son’s bulldozer when he wasn’t looking—don’t tell!
27 Add the bulldozer blade: Very carefully lift the dried and set gum paste from the rolling pin. Using royal icing, attach the blade to the front of the bulldozer.
28 Add edible props around the bulldozer—cookie crumb dirt, chocolate pebbles, and candy bricks. At the last minute (because cotton candy dissolves quickly), stick a puff of cotton candy on the end of the exhaust pipe to look like smoke to complete the look. Now get ready to dig in!