DESPERATE MEASURES
If there’s one thing that sorts the sheep from the goats in photographic terms it’s trying to produce successful images when all the odds are stacked against you, and you are facing bad weather, flat light, maybe rain thrown in for good measure, or an uninspiring location. We’ve all found ourselves in these situations. The question is, how do you respond? Do you pack your gear away and head for home feeling defeated, or see imperfect conditions as a challenge to be faced head-on?
I like to think that I fall into the latter category. I’m an impatient photographer and like to get things done. But at the same time, I hate returning home empty-handed, and so over the years I’ve developed a number of coping strategies. Here are five of them.
1. Shoot in black and white
No matter how bad the weather gets, you can always produce a great black and white photograph. Dull, grey, damp days may reduce colours to flat, muddy hues, but if you record them in mono it doesn’t matter. Heavy rain makes life difficult because you’re forever wiping water droplets off your lens to avoid flare. But steady drizzle needn’t stop play. You can always shelter under an umbrella, or use a polythene bag as a rain cover for your camera.
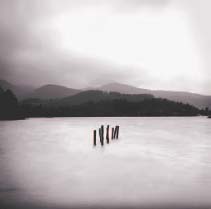
DERWENTWATER, LAKE DISTRICT, ENGLAND
This image started life as a colour transparency which I scanned and converted to black and white in Photoshop. It was taken on one of those wet, windy days photographers dread, but I knew I could get something out of it.
CAMERA: MAMIYA C220/LENS: 80MM/FILM: FUJICHROME VELVIA 50
ISLE OF HARRIS, OUTER HEBRIDES, SCOTLAND
This pair of photographs shows the difference filters can make. I’m not suggesting the final version will win any awards, but it’s so much better than the unfiltered one.
CAMERA: CANON EOS 1DS MKIII/LENS: 16-35MM/FILTERS: POLARISER AND 0.75 ND HARD GRADCAMERA: MAMIYA C220/LENS: 80MM/FILM: KODAK PORTRA 160VC
ISLE OF LEWIS, OUTER HEBRIDES, SCOTLAND
Overcast days are ideal for close-up shots. The soft light reveals fine detail and colours are well saturated.
CAMERA: MAMIYA C220/LENS: 80MM/FILM: KODAK PORTRA 160VC
2. Get closer
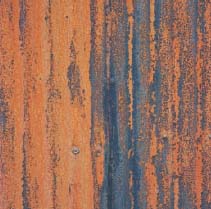
Part of the problem with flat, dull weather is that the sky’s usually washed out and featureless, and is just an endless blanket of grey. But if you exclude the sky from the shot altogether it can’t upset you, can it? In fact, while you’re at it, instead of just getting rid of the sky, why not ignore wider views altogether and concentrate on details? Look out for lichens on rocks, tree bark, patterns in sand, peeling paint or rusting metal. The soft light you get on dull days is perfect for shooting details, and once you start looking, you’ll find plenty to keep you occupied.

ISLE OF LEWIS, OUTER HEBRIDES, SCOTLAND
I had been on this beach for two hours or more, struggling to find a shot in ever-worsening weather. Then I noticed a rock revealed by the retreating tide and realized I finally had something to work with. A wide lens exaggerated perspective, a strong ND grad added drama to the grey sky and a slow shutter speed blurred the sea. Job done.
CAMERA: CANON EOS 1DS MKIII/LENS: 16-35MM/FILTER: 0.9ND HARD GRAD/EXPOSURE: 2 SECONDS AT F/22

BORROWDALE, LAKE DISTRICT, ENGLAND
Weather doesn’t get much flatter than this, but as you can see, it suits the scene perfectly and an incredible amount of detail has been recorded. The delicate colours look beautiful too. Bright sunlight would simply have destroyed them.
CAMERA: FUJI GX617/LENS: 180MM/FILM: FUJICHROME VELVIA 50
3. Use your filters
I’ve never been one for advocating the use of wacky filters to try to make a silk purse out of a sow’s ear. Purple grads and multi-image filters belong in one place and one place only – the trash. But technical filters such as ND grads, polarizers and warm-ups can offer you a welcome lifeline, so don’t ignore them. Soft-focus filters can also be used to add mood to drab scenes, while the 80 series colour conversion filters will turn a boring grey image into an evocative study in blue – ideal for those damp, misty mornings we know and love.
4. Work a location to death
Tell yourself there has to be a great shot somewhere – has to be – and don’t give up until you find it. Spend time exploring the location, and you may spot something you’d previously missed. Tap into all those creative techniques you’ve tried over the years. Take risks, experiment and see what happens. You could be pleasantly surprised, and you’ll be better equipped to deal with similar conditions the next time you face them.
5. Head for woodland
This may be a bit of a sissy option compared to the others. However, it is an effective one I’m happy to fall back on when all else fails because it almost guarantees great pictures. Woodland is actually easier to photograph on dull days because the light is soft and revealing. If you use a polarizer to cut through glare the colours will look amazing. Woodland is also a great place to find interesting details, and if it’s raining, the leafy canopy overhead will help to keep you dry. A win-win situation, if you ask me.
 ALSO CONSIDER…
• Shooting in digital infrared (see page 94)
• Trying long-exposure seascapes (see page 136)
• Buying a pinhole camera (see page 88)
• Going indoors (see page 152)
• Shooting rock art (see page 102)
EXTEND YOUR RANGE
If you’ve ever taken pictures in high-contrast situations you will be aware that both film and digital sensors have a limited capability when it comes to recording a broad brightness range. If you meter for the highlights, the shadows come out inky black and if you meter to record detail in the shadows the highlights blow. Exposing ‘to the right’ is the best compromise. In other words, expose to record as much shadow detail as possible without blowing the highlights, then pull the exposure back when the RAW file is processed. No matter what you do, however, there is a limit to how much detail you can record on a single frame.
Fortunately, there is a solution for digital photographers, known as HDR imaging. HDR stands for High Dynamic Range, and the idea is that you take several shots of the same scene or subject at different exposures so you have detail in the shadows at one end and detail in the highlights at the other then merge them.

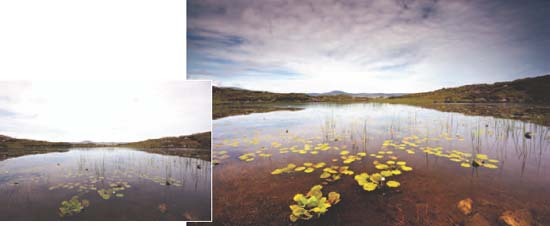
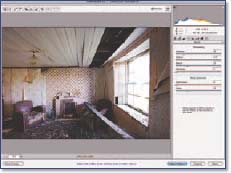
ABANDONED CROFT, ISLE OF LEWIS, OUTER HEBRIDES, SCOTLAND
This HDR image was created from five original source files, each shot at a different exposure, including -4 stops, -2 stops, Correct, +2 stops, +4 stops. You can see from the original correctly exposed image (right) how much detail is lost in shadow areas, but by merging a series of exposures, a much broader range of detail is recorded. The final tone-mapped image has a surreal look to it.
CAMERA: CANON EOS 1DS MKIII/LENS: 16-35MM
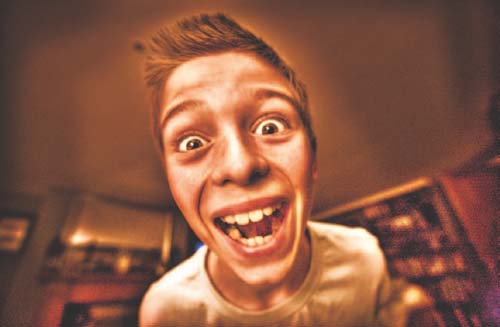
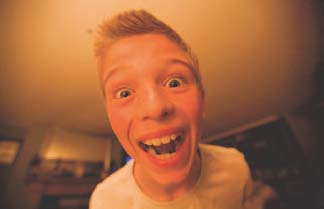
NOAH, NORTHUMBERLAND, ENGLAND
For this fun portrait of my son I made five copies of the original RAW file at -2 stops, -1 stop, Correct, +1 stop and +2 stops. After merging the Tiff files and tone mapping the HDR image, I made a duplicate layer and added a little Diffuse Glow so the final image looked even more unusual.
CAMERA: CANON EOS 1DS MKIII/LENS: 16-35MM
This technique was first employed in the 3D rendering of computer graphics. However, photographers are now beginning to embrace it and to see the immense creative benefits in being able to record a much greater brightness range. The latest version of Adobe Photoshop, CS3, has a Merge to HDR option, though HDR fans prefer to use purpose-made software, such as Photomatix Pro from HDRSoft.
Go forth and multiply
There are two ways to generate the images for an HDR merge. You can either shoot a series of frames at different exposures or take one RAW file and process it several times, adjusting the exposure for each one.
The latter approach is the quickest and easiest and means that you can create HDR images from shots already taken. It’s also the best choice if there’s any movement in the subject or scene you shoot, as ghosting or repetition will result if you merge separate source images where elements such as people have changed position between frames. The downside of generating source images from a single RAW file is that there will be more noise evident. If you decide to photograph a static scene with the HDR treatment in mind you’re better off mounting your camera on a tripod and shooting a sequence of images to be merged later.
The exposure increments you work to are really your choice. As a minimum, shoot three frames at metered, +2 stops and -2 stops (use your camera’s Auto Exposure Bracketing (AEB) to save time). I tend to shoot metered, +2, +4, -2, -4 stops if the subject is very contrasty, such as an interior lit only by light from a window.
Once you’re back at your computer it’s a case of downloading the source images, placing them in a folder, opening your HDR software and letting it perform its magic (see panel, page 35).
EASY HDR
To show you just how quick and easy it is to create stunning HDR effects, here’s a step-by-step guide to transforming a single RAW file using Photomatix Pro 3.0.
Step 1 Open your chosen RAW file. I used Adobe Camera Raw in Photoshop CS3, as well as the camera maker’s own RAW converter.
Step 2 Reduce the exposure to -4 stops, then open the file and save it as a 16-bit Tiff to your computer desktop.

Step 3 Open the RAW file again, adjust the exposure so it reads -2 stops, and then save it as a 16-bit Tiff as above.
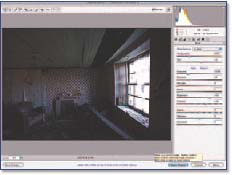
Step 4 Repeat this process twice more, creating Tiff files where the exposure is set to +2 and +4 stops. Then place the four files in a folder along with a fifth copy of the image where no adjustment has been made to the exposure.
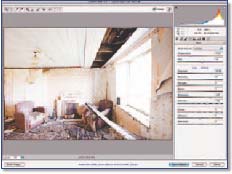
Step 5 Open your HDR software, in this case Photomatix Pro, and click on the Generate HDR Image tab. This opens a window so you can select the source images. Click on Browse.

Step 6 Locate the folder containing your Tiff files, then highlight them and click Select. When the file names show in the source window, click OK.

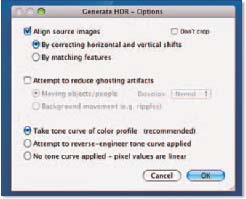
Step 7 In the next window you will be asked to specify the Exposure Value Settings. If the software hasn’t set the correct values, select 2EV from the dropdown menu, then click OK.

Step 8 A final window (Generate HDR Options) appears. Insert a check beside Align Source Images. Select ‘By correcting horizontal and vertical shifts’ and ‘Take tone curve of color profile’ by clicking the circle and then click OK.
Step 9 The HDR image will now be created from the source files. It can take a while, so be patient. When the image appears, click on Tone Mapping, which will open a window containing various options sliders.
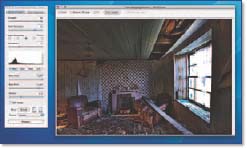
Step 10 Experiment using different sliders to see how the image transforms. There’s no right or wrong here, so play around and see what happens.

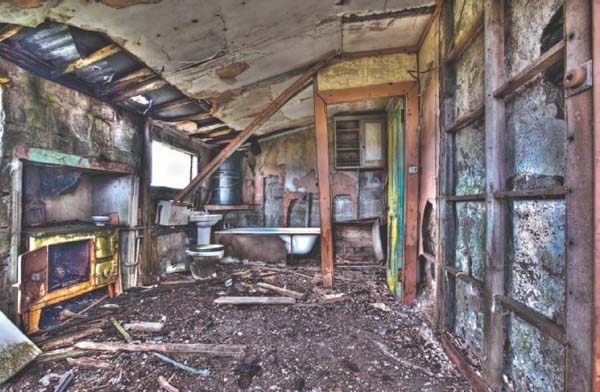
THE FINAL IMAGE

ISLE OF SCALPAY, OUTER HEBRIDES, SCOTLAND
And here’s the final tone-mapped HDR image. The amount of colour and detail captured is phenomenal compared to how it looked in the original – down to individual flowers in the fabric of the old curtain draped over the chair and cobwebs among the rotten timbers in the ceiling. There’s also a strong 3D feel to the image that makes you feel as though you’re actually in the room, rather than looking at a photograph of it.
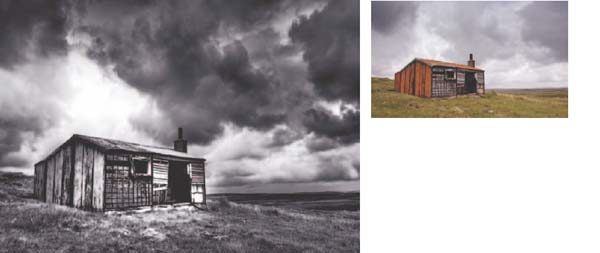
Original colour image
ISLE OF LEWIS, OUTER HEBRIDES, SCOTLAND
HDR imaging works just as well on black and white photographs as colour. You can see from the original image and the greyscale conversion of it that contrast was low and the tones rather flat. However, by creating source images with extreme exposure adjustment and then combining them using Photomatix Pro 3.0 the HDR version looks much more dramatic. Diffuse glow was added to a duplicate layer as a finishing touch.
CAMERA: CANON EOS 1DS MKIII/LENS: 24-70MM
Endless options
The great thing about HDR imaging is that you can use it for both technical and creative applications. For example, when shooting landscapes, instead of using a strong ND grad filter to balance the sky and foreground, take two shots, the first exposing for the sky and the second exposing for the foreground. Then merge them using HDR software.
Image quality will be higher because you’re not putting a filter in front of the lens and the merge will be far more accurate than a grad filter could ever be because the HDR software picks the bits from each image that it wants to merge. This means that if the skyline is detailed or there are important elements breaking into the sky, the software will work around them to give you a perfect blend. A grad filter is more heavy-handed and can’t do that.
At the other extreme you can use HDR technology to create images that are truly out of this world by revealing a level of detail way beyond what the human eye can resolve. Our brain is used to looking at a scene and seeing both light and dark areas, in other words, contrast. But HDR images are able to reveal detail in both the lightest and darkest areas at the same time so shadows disappear and our visual senses are bombarded with information. This effect works not only on static subjects such as landscapes, architecture and still-life but can also be used for portraiture, weddings, reportage, figure studies, action, or anything you like.
HDR software can also be used to increase the tonal range of black and white images, so don’t feel that you have to stick solely with colour. Try making several copies of the same RAW file but when you convert them to black and white during processing, adjust different colour slides so the tonal balance of each image is altered, then merge them all together using HDR software.
I have myself only recently started experimenting with HDR so I’m still very much a beginner. However, the software is so good now that you can’t really fail to create successful images that turn everyday subjects and scenes into spectacular surreal images from another world.
FACE VALUE
When I first started travelling in my late teens, the idea of walking up to a total stranger and asking if I could take their picture filled me with dread. Despite the fact that at every turn I seemed to spot a potential subject, and every day I set out determined to overcome my fear, when it came to the crunch I simply didn’t have the confidence to go through with it. What would I say to them? What if they made a scene and embarrassed me in front of everyone? How would I feel if a foreign tourist approached me in the street and wanted to take my portrait? Would I be flattered? Offended?
With so many thoughts racing through my head it was easier just to forget the idea and look for an inanimate object to photograph, because at least it couldn’t answer back.
Eventually, of course, I did pluck up the courage to ask. I forget when or where, but clearly, the experience wasn’t all that bad because whenever I travel now, I always return home with a collection of travel portraits. In fact, photographing local people is often one of the highlights of the trip.
What I quickly discovered is that the vast majority of people are flattered and intrigued when a stranger asks to take their picture. They may expect payment, or something in return for being so obliging, but I never assume this. I never offer payment unless it is specifically asked for because doing so could cause offence. In the case of children, paying for pictures is also tricky because in poorer parts of the world, where tourists are seen as wealthy strangers with money to burn, it can encourage them to beg.
Quick fire
The key is to act quickly. If I encounter a person who I think will make an interesting subject, I approach them and ask if they would mind being photographed. Usually, pointing to my camera then pointing to them gives a clear indication of what I want. If they shake their head or say ‘No’, I respect that and walk away. If they say ‘Yes’ or nod approval, which is most often the case, then I get to work straight away.
Different photographers have different ways of working, but over the years I’ve found that it isn’t necessary to spend ages chatting before taking any pictures, or stage-managing a situation.
I rarely ask my subject to change position because using a telezoom set to f/2.8 or f/4 reduces depth-of-field enough to render backgrounds a fuzzy, indistinguishable blur. And because I want to capture natural expressions I avoid asking them to do anything. Usually I just raise the camera, get their attention and start shooting. If they want to smile, I let them smile. If they want to look dignified and serious I let them do that too. Eye contact is the most important factor. If a person is looking at the camera, it means their portrait will engage the viewer. That’s why I always, always, always focus on my subject’s eyes. As long as they are pin sharp, it doesn’t matter about the rest of their face. Out-of-focus eyes, however, are a no-no.
It really is as simple as that, and more often than not it’s over in a matter of seconds. If you spend too long shooting, most people feel self-conscious and the spontaneity of the moment is lost. Expressions can quickly go from being natural to forced and it shows. Also, the people I encounter are often busy getting on with their lives rather than waiting for tourists with cameras to come along, so they don’t have time to hang around – and neither do I.
ALSO CONSIDER
• A digital SLR is ideal for travel portraiture because you can show your subject the picture you’ve taken. That said, all the portraits shown here were shot on film.
• A 70-200mm telezoom, or equivalent, is ideal for most portrait situations.
• A 50mm standard lens is ideal for hand-held portraits in low light.
• A wide-angle lens for environmental portraits captures your subject in their natural setting.
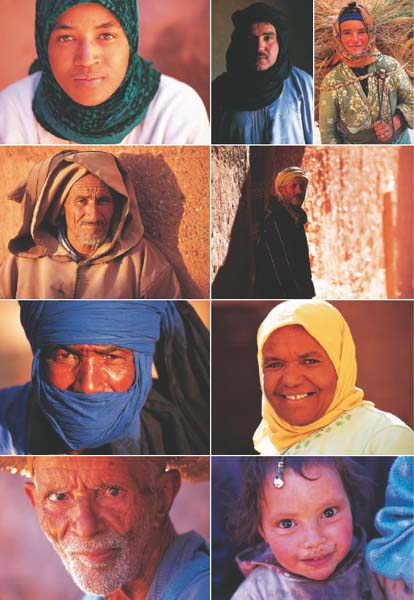
THE FACES OF SOUTHERN MOROCCO
I’ve travelled widely in southern Morocco over the last decade and find the people incredibly welcoming, friendly and obliging. Marrakech is becoming trickier due to a huge influx of tourists, and locals in the Medina almost always expect payment for pictures. Once you leave the big city and head south, however, it’s a different story. The pace of life is slower, everyone is more relaxed and photographing the local people is an unforgettable experience.
CAMERA: NIKON F5 AND NIKON F90X/LENS: 50MM AND 80-200MM/FILM: FUJICHROME VELVIA 50 and 100F
FESTIVAL SPIRIT
It’s 7.45 on a bitterly cold February morning, and I’m battling with a dozen other photographers to try to take pictures of a costumed figure posing under the arches of the Doge’s Palace in Venice. Stray elbows creep into the frame without warning; out-of-focus heads momentarily block my view; shadows from passersby move across the background as they cross the path of the rising sun.
Glancing over the square, I can see half a dozen similar scrums gathered around masked strangers vain enough to brave the cold. Some stand on the jetties that overlook the lagoon, others hang from ornate lampposts. More still drape themselves on benches bathed in golden sunlight. None of them says a word, movements are slow and graceful, and their masks, devoid of emotion or expression, lend an air of mystery to the whole spectacle.
This is the Venice Carnival, a colourful, crazy celebration that every photographer should attend at least once in their lifetime. There are many other flamboyant festivals around the world, from Rio to London, Trinidad to New Orleans, but the Venice Carnival is different. It’s set in one of the world’s most beautiful cities, the perfect stage on which to set a masked ball of epic proportions.
Best of all, everyone loves to be photographed. That’s why they’re there – to pose, pout and be noticed. Costumes range from the sublime to the ridiculous. Ornate medieval gowns compete with futuristic monstrosities while jesters rub shoulders with clowns. But it doesn’t matter who’s got the biggest and the best costume because they’re all there as one happy family, savouring their moment of glory.
HOW IT ALL STARTED
The origins of the Venice Carnival can be traced back to 1162, when the inhabitants of Venice marked victory in battle by celebrating in St Mark’s Square. However, the wearing of masks in Venetian culture was a separate issue altogether, and seems to have been adopted so the wearer could get up to no good without being identified.
This was first documented in the thirteenth century, when the Venetian Republic seemed to be slipping into moral decline, and a series of laws was gradually passed to halt it; one in 1458 specifically forbade men from entering convents dressed as women. Eventually, masks could only be worn during the annual carnival and the tradition has remained ever since.
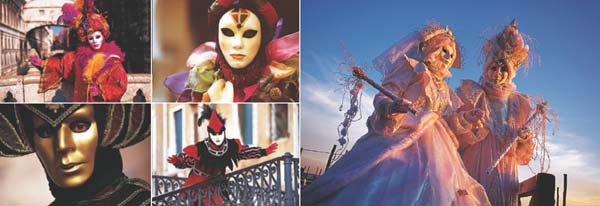
VENICE CARNIVAL 2005
Although I’ve visited Venice many times (it’s one of my favourite cities) I had never attended the Carnival until 2005. It proved to be an amazing photographic experience. Despite the crowds of other photographers – not all of them polite – and the general hustle and bustle, I enjoyed every minute, so much so that by the end of the first day I had to start rationing my film for fear of running out. The costumes were amazing, the weather remained dry and sunny and there were willing models at every turn. CAMERA: NIKON F5/LENS: 28MM, 50MM, 80–200MM/FILM: FUJICHROME VELVIA 50 AND 100F
Join the throng
Initially the hustle and bustle can be daunting, but it doesn’t take long to get into the swing of things. The key is to adapt your technique to suit the situation. If it’s crowded and busy, a long lens and wide aperture will allow you to isolate the subject and throw the background out of focus (I’ve never taken so many pictures at f/2.8 in all my life). Depth-of-field will be minimal though, so focus carefully and always on your subject’s eyes. At quieter times you can experiment, going in close with a 28mm wide-angle, using slow-sync flash to create sharp/blurred effects, and shooting into the light. Try tilting the camera to capture masqueraders from unusual angles or taking panned shots as they stroll by. You can also experiment with alternative equipment and techniques. I’ve used Holga toy cameras and pinhole cameras at the Venice Carnival, shot infrared images, cross-processed film…
That’s the great thing about the Venice Carnival. It inspires you to be creative and, with so many different subjects all waiting to be photographed, you really can’t fail to take great shots.
The hard part is knowing when to stop.
FOOD FOR THOUGHT
Is food just fuel to you, or culinary art? I guess I fall somewhere in the middle in that I like a good feast. However, when food is prepared with passion and skill it also deserves to be appreciated for its creative beauty as well as its amazing flavours. And what better way to do that than with a camera?
I tend to be more inspired to photograph food when I’m travelling, simply because it looks more exotic and unusual. I enjoy wandering around souks and markets, photographing not only fresh produce but also things like herbs and spices. They’re often arranged in a very neat, ordered way so patterns and colour contrasts are formed that make great found still-lifes. Not everyone is happy to have their wares photographed, but a polite enquiry will establish this – and is more likely to grant you a green light than if you start firing away without seeking permission first.
Use a telezoom lens to crop in tightly on an interesting arrangement, and use the foreshortening effect, where elements appear closer together, to add impact to the composition. A macro lens will also be handy for filling the frame with small subjects or for creating images that have a more abstract feel.
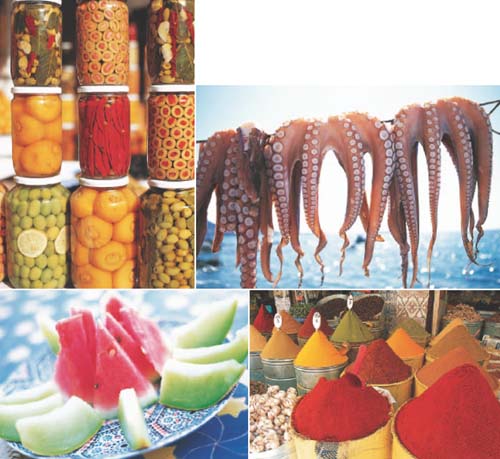
MOROCCO, CUBA, GREECE, ENGLAND
Food is central to every nation and culture throughout the world and provides an endless source of inspiration. The colours, shapes, textures and patterns attract photographers like a magnet, and whether you shoot fresh produce on a market stall or an elaborate feast prepared by an expert chef, great pictures are guaranteed.
CAMERA: NIKON F5 AND F90X/LENS: 28MM, 50MM, 105MM MACRO, 80–200MM/FILM: FUJICHROME VELVIA

FRESH FISH, STONETOWN, ZANZIBAR
I spotted these fish caught by a shaft of early morning sunlight as I wandered around Stonetown’s daily fish market. It’s one of dozens of such food photographs I’ve taken during my travels.
CAMERA: HOLGA 120GN/LENS: 60MM/FILM: FUJI PRO 160
SOMETHING FISHY
I hate to admit it, but I have a slight obsession with fish. Not only do I love eating them, I love shooting them.
Maybe it’s because they come in so many different shapes, sizes and colours, or the fact that they’re often found grouped together in boxes and crates and form eye-catching patterns. Who knows?
I’ve photographed fishy still-lifes all over the world, using all kinds of camera from 35mm SLRs to Holgas and Polaroid SX70s. There are no rules. Just move in close and fill the frame and the fish will do the rest.
More often than not I work in available light, which can be incredibly atmospheric but also in short supply, so use a tripod, increase the ISO setting on your camera or brace yourself and hold your breath to minimize camera shake.
Home cooking
Of course, you don’t need to travel to find interesting food subjects because there are plenty closer to home.
Markets and greengrocers are a good source of subject matter. Alternatively, take a trip to your local supermarket and buy some interesting specimens. Bright colours work well, so look for things like peppers and chillis or apples, oranges, strawberries and cherries. Exotic fruits such as lanternfruit, starfruit and lychees are becoming more popular and make great subjects. They’re not only colourful but also have unusual shapes and textures that will allow you to experiment with different compositions and lighting.
One technique I use is to place my chosen subject on a sheet of white card then use another sheet of white card as a reflector opposite the window to bounce light into the shadows and produce very crisp, even illumination. I then use a macro lens set to its widest aperture so depth-of-field is almost non-existent and focus on a specific area, such as the tip of a chilli pepper, so everything else is thrown out of focus. It’s a very simple technique but it works brilliantly, especially on items that have a bold shape and strong colour.
A slide projector is another handy source of illumination, producing quite hard, directional light that can be used to cast long shadows and reveal texture. The light it produces is very warm, but if you want more natural-looking results you can change the White Balance setting on your camera.
If you don’t have a projector, try using a torch. A small penlight torch is ideal for painting a foodie still-life with light in a darkened room. Use a paper or card tube to reduce the spread of light from the torch so you can direct it towards very specific areas. Getting the exposure right is a little hit-and-miss but if you’re shooting digitally you can check your first attempt and then increase or reduce the amount of time and light accordingly.
Finally, don’t forget the humble lightbox, which is another great light source for still-life photographs. It works rather like a flash unit placed inside a softbox and produces soft, even illumination. You can place translucent objects on the lightbox so they’re underlit, place the lightbox on its side and your objects next to it so they’re sidelit, or use it behind your subject matter so it acts as both background and light source.
And let’s not forget the most rewarding part of food photography: you get to eat all the props when you’re finished. It makes my mouth water just thinking about it.
FOUR TIMES MORE FUN
As you’ve probably gathered by the nature of this book, my photography has been going through an experimental phase over the last couple of years. I’ve dabbled in pinhole photography, toyed with plastic cameras, converted a digital SLR for infrared and played with old Polaroids. However, by far the most peculiar camera I’ve ever had the pleasure of using is the Lomo Actionsampler.
What makes this model different from all the other Lomo cameras is that it has four lenses. So, every time you trip the shutter it records four individual images on a single frame of film, rather than one. Even better, a rotating shutter inside the camera only allows one lens at a time to make an exposure, with 1/4sec delay between each. This means that if the subject is moving during exposure, or the camera, each image will be slightly different. For example, a person walking towards the camera will be closer on the fourth image than the first.
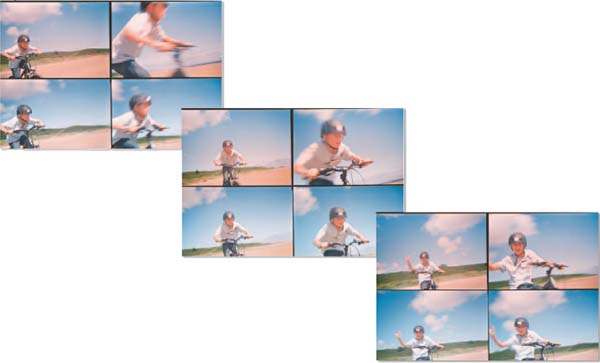
NOAH, NORTHUMBERLAND, ENGLAND
This series of three shots were all taken one after the other as my son raced up and down the beach on his bicycle. I tracked him towards the camera with the Actionsampler and tripped the shutter when he was roughly 2m (6½ft) away. The four individual exposures on each frame are made in an anti-clockwise direction starting top left and ending top right.
CAMERA: LOMO ACTIONSAMPLER
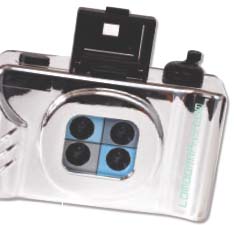
Here’s my shiny silver Actionsampler. A transparent version is also available if silver’s too boring for you. Both models can be purchased directly from the Lomography Society – at www.lomgraphy.com. You may also find the camera for sale in museum and gallery gift shops and on eBay.
Load and fire
Despite this ingenuity, the Actionsampler is far from sophisticated. The body and lenses are fashioned from plastic, there’s no metering and a pathetic flip-up rangefinder is all you have as a guide to what you’re actually shooting. I’ve got no idea what the effective aperture is, or even the shutter speed, but I don’t care. The simpler a camera is, the less you have to think about the technical side of photography and the more you can let your imagination run riot.
The only control you have with the Actionsampler is in the type of film that you load into it. Use negative rather than slide film so that you can take advantage of its wide exposure latitude to achieve well-exposed images. In sunny weather, ISO100 film will be ideal while for dull weather you’ll need to load ISO400. Indoors, try ISO800 or ISO1600 film. Experiment with black and white film as well as colour.
Slide film is too exposure-sensitive for a camera like the Actionsampler. However, you could shoot slide film, then have it cross-processed in C-41 chemistry. This way you get the exposure latitude of negative film but also increased contrast and unusual colours that will add impact to your unique shot sequences.

ALNMOUTH BEACH, NORTHUMBERLAND, ENGLAND
For this multi-image montage I took three different shots of the sky, three of the sea and three of the beach from the same position. Each image was then dropped one by one onto a new canvas using the Move tool in Photoshop. The images don’t line up correctly and the colours are rather weird, but it all adds to the effect.
CAMERA: LOMO ACTIONSAMPLER
SHOOT YOURSELF
Self-portraiture is the ultimate form of self-expression, and the Lomo Actionsampler is the ultimate self-portrait camera. So, if you can’t find any willing subjects to try it out on, you could always shoot yourself. Just hold the camera out in front of you and snap away while walking, jogging, jumping in the air, riding a bike or bouncing on a trampoline. Hold it at waist level and capture your reflection in a window or photograph your shadow when you’re out for a stroll. Moving the camera rapidly towards your face as you trip the shutter will also produce an eye-catching sequence of images, and if you’re wearing your outrageous sunglasses and pulling a funny face at the same time, so much the better.
If it moves, shoot it
In terms of subject matter, anything goes, but the Actionsampler really lends itself to moving subjects because that’s when the delayed action effect comes into its own. Use it to capture everyday action, such as your children racing around on their bikes, on swings in the park, leaping through the air or diving into a swimming pool. My own children soon lose interest when I try to photograph them using a normal camera, but when they see the Actionsampler they volunteer because they know the results will be fascinating.
The urban landscape is also an ideal environment for the Actionsampler. Stand in one spot and shoot away as people or traffic pass by. Alternatively, walk down a busy street and trip the shutter while you’re moving. Or, take pictures from a moving vehicle so you grab four different snapshots of the passing scenery.
There are so many creative possibilities with the Actionsampler. Once you’ve shot a roll of film and seen your first results you’ll be able to assess its strengths and weaknesses and then use them to your advantage.
Minimum focus is around 1m (3¼ft), but if at some point during the exposure your subject is closer to the camera than that, don’t worry. A little blur won’t do anyone any harm, and the transition of the image from sharp to soft may add to the effect.
So, what are you waiting for?
GO GRAPHIC
Striking photographs don’t have to be of anything in particular – it’s the way you compose them that counts. Bold shapes, strong lines, vivid colours and arresting camera angles can turn the most everyday subjects into exciting abstract photographs. And the further removed from reality they are, the more successful they tend to be, simply because the viewer is left wondering exactly what it is they’re looking at.
Digital cameras can be a great ally when it comes to this style of photography because the instant feedback will inspire you to experiment further and push the boundaries of your creativity. Once you have produced one successful shot it’s also much easier to see others and before you know it, a whole series of eye-catching photographs has emerged, literally out of nowhere.
I try to carry a camera with me wherever I go. Interesting subject matter is found in the most unlikely places where you would never dream of heading specifically to take pictures.
Shopping centres and retail parks are ideal hunting grounds for graphic, abstract images because modern architecture is full of striking features. Harbours and marinas are another favourite of mine. There you’ll find wonderful textures in old timber and peeling paintwork, colourful buoys and fish crates, piles of lobster pots, fishing nets and so on. Finally, don’t ignore your own neighbourhood. Everyday things like street signs or the apparatus in the local park can all be the source of great images.
Sunny days are best
The one thing that can make or break a great abstract image is the quality of the light. For me, nothing beats a bright, clear sunny day when the light is harsh and intense and casts short, black shadows. Such light is unsuited to such subjects as landscape and portraiture because it’s far too harsh and unflattering. However, when you’re shooting bold, graphic shapes and strong colours it’s ideal because it adds to the stark, graphic effect you’re seeking to create. Blue sky also makes an ideal background. Blue is a receding colour and it makes other colours in front of it stand out starkly.
To capture objects against the sky you will often need to shoot from a low viewpoint, so don’t be afraid to get your knees dirty. You may receive a few confused looks from passersby, but don’t let that bother you. They just don’t understand!
What you’re trying to do is create an image that lacks any reference to reality, so avoid including anything that suggests scale or is easily identifiable. Use your zoom lens to crop in on small areas of the main subject and exclude unwanted items. Try to keep the composition simple – one or two elements are all that you need.
Instead of holding the camera horizontally as you would normally do, try tilting it to an unusual angle and see how that changes the dynamics of the composition. And don’t worry about any of the so-called rules of composition. Put the main subject in the centre of the frame if you like, or over to one side so the composition is unbalanced. Objects breaking out of the frame will also add tension and impact.

BOAT DETAIL, NORTHUMBERLAND, ENGLAND ROAD MARKINGS, GATESHEAD, ENGLAND
Once you get into the habit of looking for them, abstract graphic images can be found pretty much anywhere. The left-hand photograph here is a close-up of the timber planking on an old fishing boat, while the photograph to the right shows the markings on a newly painted parking bay outside a store. CAMERA: SONY CYBERSHOT 6MP/LENS: FIXED 6.3-18.9MM ZOOM
Post production
Once you have downloaded the images to your computer you can proceed to improve things further by manipulating them in Photoshop. Use levels and curves to boost contrast so the shadows are black and the colours really sing. Hue/saturation can also be used to make colours even richer. Remember, reality doesn’t count here, so if the colours end up looking unreal that will only enhance the effect you are trying to achieve.
Finally, if a composition doesn’t hit you right between the eyes, try rotating and cropping it to make the image more exciting.

SHOP SIGN, GATESHEAD, ENGLAND
These colourful, abstract images were all taken within a few minutes of each other using a small digital compact camera. Each image features parts of a 3D sign outside a large furniture store, captured in bright sunlight against blue sky. I just wandered around, snapping dozens of frames from different angles.
CAMERA: SONY CYBERSHOT 6MP/LENS: FIXED 6.3-18.9MM ZOOM
HOUSEHOLD CHORES
The next time you’re stuck indoors on a rainy afternoon and can’t think of anything to do, why not set yourself a project to find interesting things to photograph around your home? Given the amount of clutter most people gather over the years there will be no shortage of subject matter, but because it’s so familiar you’ve probably never thought of it as possible photo fodder.
The easiest way to tackle a domestic project is by shooting anything you find that looks remotely interesting. However, with such an open brief it can be difficult to know where to start and you may find yourself wandering around scratching your head. To avoid hitting a creative dead end, why not narrow down your options and be more specific in your choice of subject matter?
Do you have a collection of interesting objects, such as stamps, coins or vintage cameras? These could form the basis of a photography project. Children’s toys are colourful and shapely and could be a good source of bold close-ups, while things like old silver cutlery will give you hours of fun as you try to abstract interesting shapes and patterns.
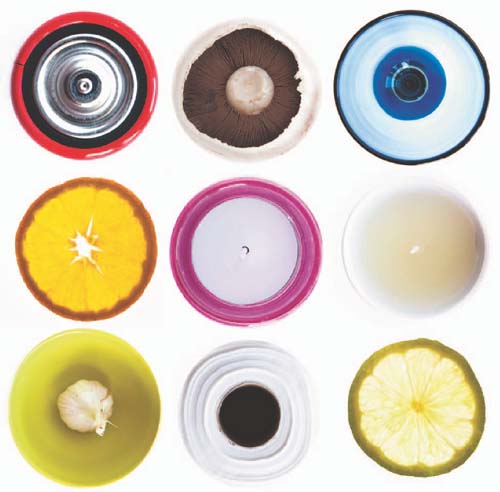
GOING ROUND IN CIRCLES
This montage was created from nine individual photographs of circular objects I found around my home. I raided cupboards, the fridge, the larder, the loo and the fruit bowl and gathered everything together. Then I spent half an hour photographing them one by one on white card using only light from the window, except for the orange and lime slices, which I placed on a lightbox and backlit. Once the images were downloaded to my computer I made copies, cropped and resized so they were all the same size. Then I used the Move tool in Photoshop to drag them one by one onto a new canvas. Just in case you’re wondering, the objects are, from left to right on each row, battery, mushroom, wine glass, orange slice, tealight, candle, garlic bowl, loo roll, lime slice!
CAMERA: CANON EOS 1DS MKIII/LENS: 24-70MM
Choose a theme
If that’s too obvious, concentrate on a specific colour such as red, green, yellow or blue, and then hunt high and low for it around the house. Once you start looking it’s surprising how many times you’ll see the same colour cropping up in clothes, book covers, drawing pins, clothes pegs, carpets, picnic sets, shoes, ties, toys or CD cases, but during your normal busy day you’re unlikely to take any notice.
Shapes are another option. Look for squares, circles, triangles, diamonds, or even numbers. What about the entire alphabet, letter by letter? By working to a theme like this you can photograph anything that fits the brief. So, even though you may have to hunt around much more, finding whatever it is you’re looking for will be fun and rewarding and I’m certain the pictures you produce will make the effort worthwhile.
How you shoot is up to you. You could set yourself a time limit to gather as many different objects together then photograph them one by one, or wander around the house with a camera and tripod and photograph things in situ. Both approaches can work well, though the latter will give you more control over lighting and composition. If you use the same type of lighting it will make the set of images more cohesive.
Light, camera, action
Light from a window is as good a source of illumination as anything else. Either use a tabletop by a window as your mini studio, or move one into position close to a large window. A large sheet of white card can be used as a background if you want to keep things really simple. Another sheet placed opposite the window will act as a fill light and soften any shadows. Ideally you don’t want direct sunlight, though. Because this is likely to be a rainy-day project there won’t be any sun anyway, and the light coming through the windows of your home will be nice and soft thanks to all that cloud.
If you’re shooting digitally and find that the images appear a little flat, give them a boost by adjusting contrast either when you process the RAW files or when you open the image in Photoshop. Other controls such as vibrancy, clarity and saturation can be adjusted to increase impact.
Once you’ve completed one project, chances are you’ll have enjoyed it so much that you’ll be wishing for bad weather so you have the perfect excuse to start another one. But that’s no bad thing, because when the sun does finally come out again, your eye for a picture will have improved no end, and you can take advantage of that when you head back into the great outdoors.

COD LIVER OIL CAPSULES
Once you start experimenting it’s surprising how the most obscure objects can be a great source of ideas and inspiration. These three images are of cod liver oil capsules I found in a bottle in our medicine cabinet. Initially I spilled them onto a lightbox and experimented with different compositions. I then arranged them on a sheet of white card and lit them with a slide projector, which cast long shadows and added an unusual glow to the translucent capsules.
CAMERA: NIKON F90X/LENS: 105MM MACRO/FILM: FUJICHROME VELVIA 50
IN ISOLATION
Isolating a single element in a scene so all attention is drawn towards it is a powerful tool that can produce simple, striking images. We tend to do this as a matter of course when shooting portraits: the background is thrown out of focus so the main subject stands out and becomes the centre of attention. But you needn’t just limit this technique to portraiture. It can work on any subject because what you see is what you get.
Differential focusing is the name given to the technique of using minimal depth-of-field to isolate a small area of a scene and make it stand out in bold 3D.
Achieving it is easy. All you need is a telephoto or telezoom lens set to its widest aperture. My first choice is an 80–200mm zoom set to f/2.8, which is ideal for landscapes, architecture and general use. I also use a 105mm macro lens at f/2.8 for close-ups and a 50mm f/1.4 for details and portraits.
Near and far
How little depth-of-field you end up with is dependent on the focal length of the lens, the aperture you set it to and, just as importantly, how close to the camera your subject is. If I use an 80–200mm zoom set to 200mm and f/2.8 and focus on an object 2m (6½ft) away, the fall-off in sharp focus will be almost immediate, with everything beyond that 2m (6½ft) point completely blurred. However, if I use the same focal length and aperture but focus on something 10m (33ft) away, the fall-off will be less obvious so the subject won’t stand out as clearly against the background. Differential focusing is therefore much more obvious when the point of focus is close to the camera and becomes less apparent as the focus point moves further into the distance.
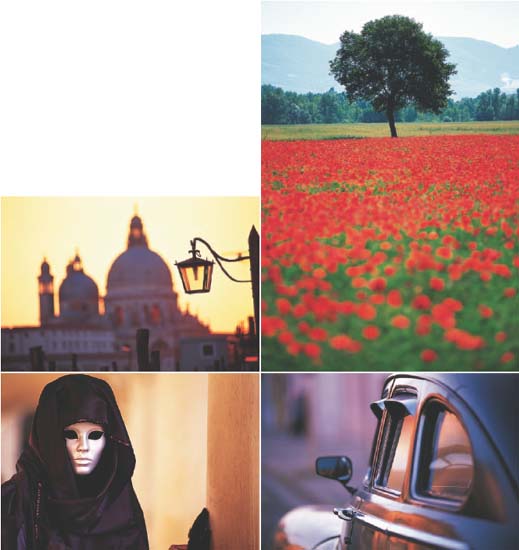
VENICE AND TUSCANY, ITALY
HAVANA, CUBA
Here are four different images that all show how differential focusing can be used to isolate a subject from its background or foreground, or draw attention towards a specific area. For the Venice shot I focused on the lamp but the church in the background is still clear enough to be identifiable. For the poppy field I focused on the tree in the distance so the foreground poppies were reduced to out-of-focus blobs of colour. When shooting the Cuban car I focused on the door handle and let everything else in front of and behind it drift out of focus. Finally, for the masked figure I focused on the mask, knowing that the wall in the background would be nice and blurred. All four shots were taken with the same lens at f/2.8.
CAMERA; NIKON F5/LENS: 80-200MM/FILM: FUJICHROME VELVIA 50

STARGAZER LILY
This dreamy close-up shows the petals of a lily photographed using the light from a window on a dull day. I was more interested in creating abstract images than flower portraits so I set my macro lens to f/2.8 and explored the wonderful shapes and colours the flower offered. Using minimal depth-of-field added a sense of mystery.
CAMERA; NIKON F5/LENS: 105MM MACRO/FILM: FUJICHROME VELVIA 50
Getting closer
Macro lenses take differential focusing to an extreme. Depth-of-field is always limited when shooting close-ups, even at small apertures such as f/16 or f/22. However, open up your lens to f/2.8 and it’s almost non-existent, down to just a few millimetres.
This dramatic fall-off can look stunning when used on colourful subjects like flowers. You can have hours of fun and take dozens of different dreamy abstract pictures of just a single bloom. This is because even slight changes of camera position and small adjustments in focus will completely change the look and feel of the image, blurring areas that were clearly defined beyond recognition and highlighting others. Elaborate flowers like lilies work well because the variations in shapes and colours give you lots of options.
If you’re using a single lens reflex (SLR) camera, it’s easy to gauge how the final image will look when shooting at maximum aperture. That’s because, no matter how the aperture ring is set, until you release the shutter the interchangeable lenses are always at maximum aperture so that the viewfinder image is nice and bright. So, when you look through the viewfinder, you’re also looking through the lens with the aperture at f/2.8, f/4.5 or whatever its widest setting is and the depth-of-field you see when you focus on your subject is the depth-of-field as it will look in the final picture.
INSTANT GRATIFICATION
Although digital technology offers the ultimate in instant imaging, the idea of being able to see a photograph moments after taking it isn’t new. In fact, it’s almost as old as photography itself, dating back to 1857 when Bolles and Smith of New York patented and produced the world’s first instant camera. Others tried to bring in-camera development to the masses, but it wasn’t until 1947 when American scientist and inventor Edwin Land (1909–1991), founder of the Polaroid Corporation, launched his first Land Camera that instant photography finally became a viable proposition.
From then on, Polaroid cameras took the world by storm and the Polaroid brand became synonymous with instant photography.
Over a period of 50 years, dozens of innovative Polaroid cameras were created that used both peel-apart and instant-integral film. Though they were designed primarily for mass production, many Polaroid materials were embraced by serious photographers and artists for their unique, fine-art characteristics.
The future of Polaroid at this time is in the balance. Production of Polaroid cameras ceased several years ago, and in February 2008, Polaroid announced that production of all instant film would end. Sadly, the meteoric rise in popularity of digital imaging and a huge drop in film sales have taken its toll. Soon, one of the biggest names in photography may be gone forever.
For the time being, however, it is still possible to get hold of various types of Polaroid film. Auction sites such as eBay will also continue to be a useful source for months or years to come. So, if you’ve ever thought about experimenting with Polaroid instant film it is still possible, but don’t think about it for too long.
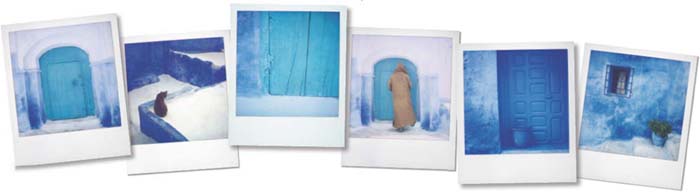
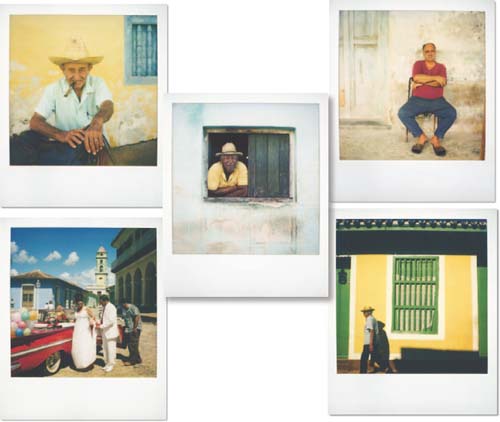
CHEFCHAOUEN, MOROCCO
These Polaroids form part of a larger collection that were all shot over a two-day period during a trip to northern Morocco in 2007. The town of Chefchaouen in the Rif Mountains is renowned for its blue walls and doors and I found my Polaroid SX70 perfect for capturing the soft colour and faded character of the town.
CAMERA: POLAROID SX70 SONAR AF/LENS: FIXED 116MM/FILM: POLAROID TYPE 779
Have camera, will travel
My love affair with the Polaroid began back in March 2007. I’d picked up a Polaroid SX70 camera a few months earlier for a bargain price and decided to take it with me on a trip to Cuba. Soon afterwards it accompanied me to Morocco and since then I’ve been hooked on instant photography.
Given the quality that can now be achieved with the latest digital SLRs, this may seem a strange choice of camera. However, over the last couple of years, as digital technology has advanced, I’ve found myself looking backwards rather than forwards and reassessing what it is that makes me so passionate about photography.
The answer, it seems, is simply the art of making pictures. I get a particular buzz out of doing that with low-tech equipment and traditional photographic processes simply because the results are harder won and the sense of achievement is greater.
Each and every image is a unique and complete work of art. There’s no need to play around with it in Photoshop because nothing you could ever do would make it more beautiful than it already is. SX70 prints have a wonderful quality about them that cannot be faked. The colours have a softness and delicacy that no amount of post production could replicate. Every picture looks as if it could have been shot in 1977, and the cross-hatched white border instantly identifies it as a Polaroid original.
To me there’s also a purity about working with cameras like the Polaroid SX70. They strip photography back to its most basic form where composition and subject mean everything. You point, focus and shoot and the picture either works or it doesn’t. There are no filters or fancy techniques to shore it up.
Also, success doesn’t have to mean pin-sharp, super-saturated, technically perfect pictures that you can enlarge to the size of a small house. Imperfections give a photograph character and expression. They make it uniquely yours. And there’s something quite special about an original Polaroid print, even if it does only measure just 82 x 108mm (3½ x 4¼in).
Who said small can’t be beautiful?
THE AMAZING SX70
The Polaroid SX70 was originally launched in 1972, years ahead of its time in terms of technology and innovation.
Not only was it the world’s first instant SLR (previous Polaroid cameras were all rangefinder models), it was also the first folding SLR. In addition, it was the first Polaroid camera to use instant integral film, where the print develops before your eyes. While earlier models were manual-focus, later incarnations of the SX70 also incorporated innovative sonar autofocusing, making them the world’s first AF SLRs available to consumers.
If that weren’t enough, you also got:
• A four–element 116mm f/8 glass lens
• Minimum focus of just 10.4 inches
• Electronic shutter with programmed automatic exposure.
• Shutter speeds from 10 seconds to 1/175 of a second
• Aperture range from f/8 to f/22
• Exposure compensation
• Auto-flash exposure with accessory flashguns
• A socket for electronic remote release
Later models had a tripod bush but earlier models needed an optional attachment so they could be tripod-mounted. No batteries were required as they were built in to each film pack.
Back in 1972, the original SX70 retailed at $180 while the Sonar OneStep cost $250, which was a lot of money then. Fortunately, today you can pick up a decent SX70 for next to nothing. Sonar AF models, which are more widespread than earlier SX70s, cost anything from £15 to £50 in full working order.
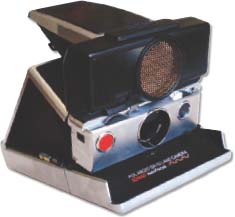

This is my 1970s Polaroid SX70 Sonar, open and ready for use (top) and folded (bottom).
FILM FOR THE SX70
All SX70 cameras were designed to use SX70 film or Time Zero film, neither of which are made today.
Polaroid Type 600 film is still easy to get hold of but to use it in an SX70 camera you need modifications.
• First, you’ll need to put a 0.6 neutral density filter over the lens to avoid overexposure because 600 film is rated at ISO640 and all SX70 cameras were designed for use with ISO125 film. You can buy a proper Polaroid ND filter from www.unsaleable.com, but I purchased a Lee Filters 0.6ND gel and cut a small circle from it with scissors, then attached it to the lens with small strips of double-sided tape.
• Second, the film cassettes for 600 type film have two small plastic ridges on the base, which make it difficult to load them into an SX70 camera. One solution is to slice these ridges off with a sharp knife. However, a safer option is to place a credit card or similar flat object inside the mouth of the film chamber to cover the grooves inside it. Push the film cassette into place, remove the credit card and close the film chamber.
HAVANA AND TRINIDAD, CUBA
Polaroid cameras are ideal for travel portraits because you can shoot one for yourself and one for your subject as a thank you for their co-operation. In countries where cameras are a luxury few can afford, this will be welcomed with open arms. Don’t be surprised if you find yourself surrounded by willing subjects.
CAMERA: POLAROID SX70 SONAR AF/LENS: FIXED 116MM/FILM: POLAROID TYPE 779
SCANNING AND PRINTING
The original SX70 prints are works of art in their own right. However, I tend to scan my favourites using a flatbed scanner so I can safeguard the originals, make copies and supply the images for publication.
I normally scan to an output size of around 70Mb, which allows me to print up to 41 x 30.5cm (16 x 12in) at 300dpi. The prints are best made on gloss or semi-gloss paper to replicate the finish of the original print. A great way to display them is sandwiched between sheets of acrylic or bonded to sheets of aluminium such as Dibond.
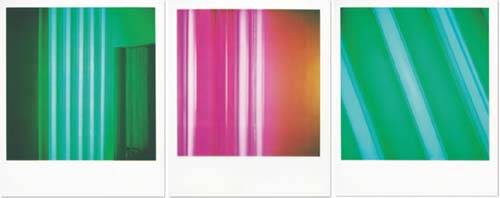
POINT HOTEL, EDINBURGH, SCOTLAND
The great thing about Polaroid cameras is you can take them anywhere and photograph anything. These three images were made while my wife and I were in Edinburgh for the night. I’d read that the hotel we were booked into had some colourful interior lighting, so I took my SX70 along to record them.
CAMERA: POLAROID SX70 SONAR AF/LENS: FIXED 116MM/FILM: POLAROID TYPE 779
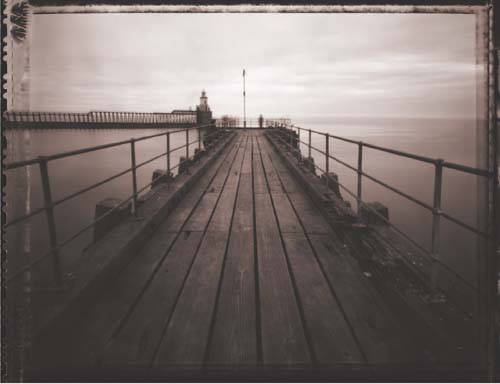
BLYTH PIER, NORTHUMBERLAND, ENGLAND
One of the most revered kinds of ‘fine-art’ Polaroid film is Type 55. This 5 x 4in black and white peel-apart material not only gives you a 5 x 4in glossy print, but a large-format negative that can be enlarged or scanned to produce prints with a wonderful tonality and unusual border. I mainly use Type 55 in a 5 x 4in pinhole camera, though I also have a modified Polaroid 95A camera that will accept Type 55 film.
CAMERA: ZERO IMAGE 45/FOCAL LENGTH: 75MM/FILM: POLAROID TYPE 55
IT’S IN THE DETAIL
When visiting new places there’s always a great temptation to seek out and shoot exactly the same scenes and subjects as everyone else. If it’s Paris it has to be the Eiffel Tower and the Arc de Triomphe. In London we make a beeline for Big Ben, St Paul’s Cathedral and Tower Bridge. In Venice, gondolas gliding along peaceful canals and the bustling Rialto Bridge are top of our shot list.
I’m as guilty of doing this as the next photographer. However, while bagging great shots of iconic scenes is always satisfying, it’s not exactly original. So, as well as taking the obvious pictures, I also make an effort to look for details that offer clues as to where I might be. From a creative point of view, this offers endless scope for experimentation and in interpretation and also results in images that are less clichéd and therefore visually refreshing.
BACK TO BLACK
Though your first instinct when shooting travel details is to work in glorious colour, don’t be misled into thinking that doing so is always the best option. Colour is realistic and reassuring, but realism doesn’t necessarily produce strong images. By switching to black and white you immediately strip the subject back to its bare essentials and produce simpler compositions that concentrate on shape and form. The quality of light also becomes less important with colour removed from the equation. I often find myself shooting in black and white on dull days when colours appear flat and muted, but the soft light produces a wonderful tonal range.

VENICE, ITALY
Gondolas are symbolic of Venice and unique to the city, so this shot couldn’t really have been taken anywhere else (other than Little Venice in Las Vegas, perhaps). Despite being a much-photographed subject, my treatment of it makes use of strong shapes and opposing diagonals to create a fresh, simple, graphic image.
CAMERA: HOLGA 120GN/LENS: FIXED 60MM/FILM: ILFORD XP2 SUPER
Draw up a hit list
One solution to help avoid the clichéd image is to make a list of the things that are characteristic of a location. In London it might be the Union Jack flag flapping in the breeze, black taxi cabs, red double-decker buses and Coldstream Guards in their distinctive red and black uniforms. In Paris, ornate Métro signs, street cafés, shop windows and model Eiffel Towers on souvenir stands have similar symbolic value. You could also photograph things that contain the name of the place, such as t-shirts and posters, graffiti, hoardings, toys, car number plates and so on.
As well as shooting these things in a literal way, think about how you can make your pictures more interesting artistically. Instead of capturing a London bus as it races by, shoot the reflection of one in a window or puddle. Instead of photographing a Coldstream Guard from eye-level, get down low with a wide-angle lens or concentrate on smaller details in his uniform, such as the black fur Busby, the polished belt buckle or the gleaming sword. It is the same subject, just a different interpretation of it. Alternative cameras, such as Holgas and Polaroids, can also be pressed into service to create images with an unusual look and feel.
If you can’t resist photographing the more obvious scenes and subjects, think about how you can interpret them in an original way.
Use a telezoom lens to home in on small areas that identify the subject but are much simpler. This is a handy technique with buildings and monuments. Rather than make your subject the main feature in the composition, relegate it to the background. Focus on something else closer to the camera and set an aperture that’s wide enough to throw the background elements out of focus but not so wide that they’re blurred beyond recognition. Look for reflections of the subject in windows, parked cars and puddles. Or, step inside a building that offers a good view of your chosen subject and shoot it through the window. By working in this way your subject becomes a secondary detail in the composition rather than completely dominating it and this makes the final image much more interesting.
Finally, don’t assume that the details you photograph have to scream out the destination. They can be subtle rather than obvious, but gathered together as a collection they will paint a fascinating picture of the place.
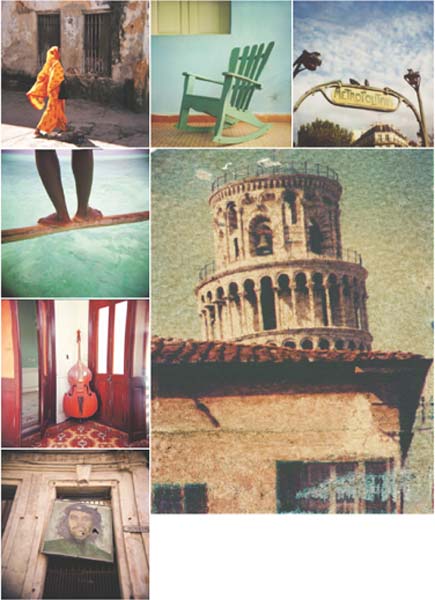
ZANZIBAR, CUBA, ITALY AND FRANCE
Can you identify the location depicted in any of these images? Some are obvious, such as the Leaning Tower of Pisa (Pisa, Italy) and the Métropolitain sign (Paris, France). Che Guevara’s wall-mounted portrait is also a fairly easy guess (Havana, Cuba) while the double bass also hints at Cuba (Cienfuegos). The chair (Vinales, Cuba) is more tricky but is very representative of the town, while the pair of feet (Jambiani) and the lady in orange (Stonetown) have a distinctly tropical, African look that reflects the character of the spice island of Zanzibar.
CAMERAS: VARIOUS