SANDS OF TIME
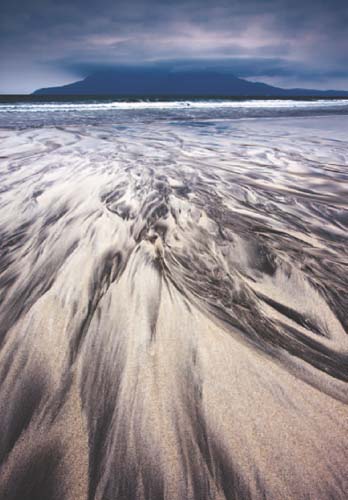
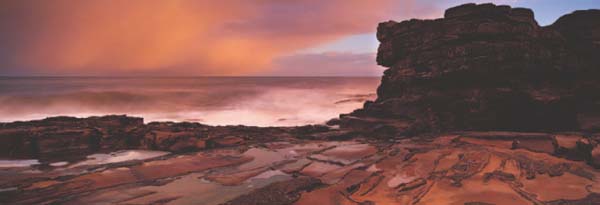
Beaches are great locations to find not only rock abstracts, as discussed in the previous chapter, but also intricate sand de tails that change minute by minute, hour by hour, in a never-ending kaleidoscope of patterns and textures. Outflow streams trickling gently towards the sea carve delicate filigree patterns as tiny rivulets of water fan out, shifting the sand grain by grain. Ripples left by the retreating tide form amazing desertscapes of miniature rolling sand dunes that are shifted and sculptured by the action of the wind.
I live just metres away from a beautiful sandy beach on the coast of Northumberland, and my view never stays the same for more than one day. With each cycle of the tide the canvas is wiped clean and a new, natural work of art is created.
This constant state of flux is both fascinating and inspiring. I know that at any given moment I can pick up a camera, head out and find something new and unique to photograph that will be gone forever in a matter of hours.
A retreating tide tends to be the most productive, mainly because the cleansing nature of the sea leaves everything looking new and pristine. Ripples are unmarked and perfect in their simplicity, and because the sand is wet they have a more obvious texture to them. If you head for the waterline you can also watch new patterns and details emerge for the first time and capture them in their virgin state.
Weather conditions play an important role in defining sand patterns. When the sun is low during the morning and afternoon it casts long, raking shadows that highlight the finest ripples and textures. Even individual grains of sand can be clearly seen, sparkling like tiny diamonds as the sunlight catches them. The colour temperature of the light is also lower, so the light is warmer and this enhances the natural warm colour of the sand to give it a healthy golden glow.
During the middle of the day when the sun is overhead, texture is subdued and sand ripples appear flat. However, in sunny weather the middle of the day is an ideal time to photograph outflow streams. The water appears clear and the patterns in the sand are more obvious. Using a polarizing filter will enhance them even more by removing unwanted reflections from the water’s surface.
I also find cloudy, overcast days to be productive, especially for black and white images that have a more abstract quality. Texture won’t be well defined, but the shapes created by sand ripples will be, so focus on them instead.
A standard or telezoom lens will be ideal for shooting sand details. Both tend to be capable of close focusing so you can fill the frame with small details, while a telezoom will compress perspective so ripples appear closer together and allow you to be more selective with your compositions.
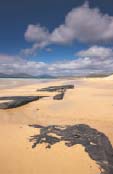
LAIG BAY, ISLE OF EIGG, SMALL ISLES, SCOTLAND
If you want to shoot amazing outflow streams, Scotland is the place to go. Burns flowing across beaches create amazing patterns as the water shifts and sifts the sand so that the grains from different types of rock are separated and scattered. I shot dozens of frames while exploring this stream. I used not only wide-angle views but close-up details as well. Weather conditions couldn’t have been more perfect.
CAMERA: CANON EOS 1DS MKIII/LENS: 16-35MM/FILTER: POLARIZER
Ripples come in a huge variety of shapes and forms, from gentle, sinuous shapes to bold repeated lines and long, meandering furrows. There is no right or wrong way to photograph sand details, so just go with your instincts.
Water adds another useful compositional element. Channels between large dunes are transformed into shallow streams to create a wonderful contrast between the glassiness of the water and the coarse texture of the sand, while in deeper pools the ridges of dunes break the surface like the backs of imaginary sea serpents.
These things may not be obvious when you first set foot on a beach. But give yourself a few moments to wander around and explore. Let the sea breeze de-clutter your head and, as familiarity drifts away on the retreating tide, your imagination and creativity will spring to life.
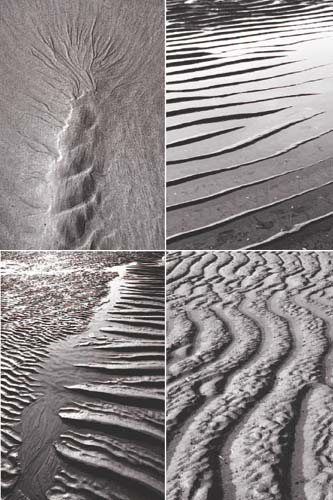
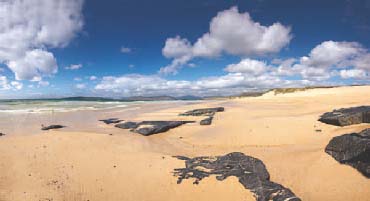
ALNMOUTH, NORTHUMBERLAND, ENGLAND
These photographs, and many others, were all shot within a one-hour period while I was testing a new digital camera for a photography magazine. I hadn’t planned on shooting sand details. I had set out to capture wider views of the coastline and see what the camera was capable of. However, when I started looking more closely at the beach I realized that the real interest was quite literally at my feet in the wonderful patterns and sculptured ripples. With one shot in the bag others quickly followed and before I knew it I had a whole collection.
CAMERA: CANON EOS 1000D/LENS: 18-55MM
SCALING DOWN
Although photography is a two-dimensional medium (images are flat, so they can only have height and width) it is possible to suggest depth (the missing dimension) by including something in the composition that gives a sense of scale.
Our brains are very good at remembering the relative size of things. Therefore if an object or element in a photograph appears small, but in real life it’s big, our brain tells us it must be far away, which in turn suggests depth.
This effect, known as size recognition, works even more effectively when several objects of known size appear in the same composition and thus seem to contradict reality. For example, if you photograph a person standing in the foreground of a scene, they will appear to tower over the mountains behind them, but we know mountains are much bigger than humans so those mountains must be in the distance. Similarly, if something in the scene appears to dwarf a person, you know it must be big or very close to the camera.
Including something in a composition to suggest scale is useful if you want to make the photograph realistic and reassuring. But taking the opposite approach and removing all scale markers can be even more effective because then the viewer has no idea what they’re looking at, or if they think they do, they can’t be completely sure and this creates a strong sense of intrigue as their brains try to figure it out. The same effect can also be achieved by exaggerating scale so that again what you see isn’t necessarily the way it is in reality. We like to think that the camera never lies, but of course it can and does – all the time.
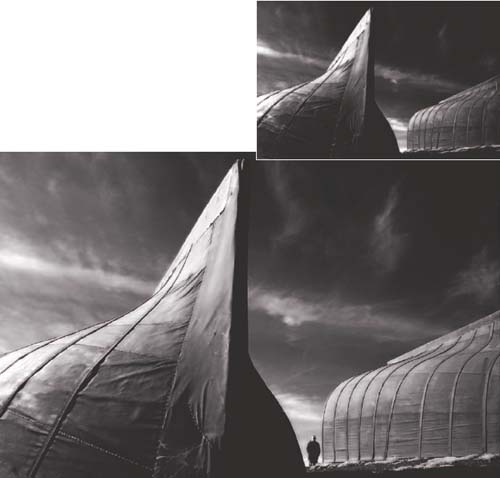
LINDISFARNE, NORTHUMBERLAND, ENGLAND
Here’s a good example of scale being exaggerated by the use of a wide-angle lens. The lone figure standing between the unusual structures (they’re actually huts made from the hulls upturned boats) appears totally dwarfed by them. In reality, they stand only 1m (3¼ft) or so higher than he does, but because I was using a wide-angle lens and shooting from a low viewpoint close to the nearest hut, perspective and scale have been blown completely out of proportion. That said, the impression of scale, even if it’s untrue, is very powerful because with the figure so small in the frame we automatically assume that the structure in the foreground must be enormous, when in reality it isn’t. As a direct comparison I have also included a shot of the same scene minus the figure. Although still a dramatic image, the lack of scale dilutes its impact.
CAMERA: INFRARED MODIFIED NIKON D70/LENS: 10-20MM
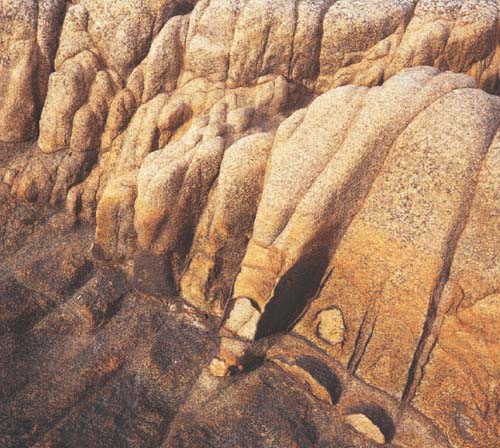
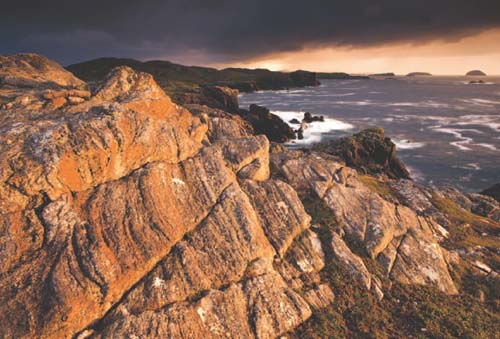
RUMBLING KERN, NORTHUMBERLAND, ENGLAND
What are you looking at here? Is it an aerial shot of towering petrified sand dunes rolling down to a rocky plain, or a close-up detail of weathered rock? With nothing in the composition to suggest scale it’s hard to tell, so a sense of mystery and intrigue is created. Actually, in this case the title gives the game away. We don’t have towering petrified sand dunes in Northumberland, but we do have lots of interesting details along the rocky coastline. In reality this photograph covers an area of no more than 1sq m (10sq ft). Who said the camera never lies?
CAMERA: MAMIYA C220 TLR/LENS: 80MM/FILM: FUJICHROME VELVIA 50
The long and the short of it
Different lenses can be used to exploit and exaggerate scale because of the way they record perspective.
If you place a wide-angle lens on your camera it can stretch perspective, and the truth, beyond recognition, making objects close to the camera seem much bigger than they really are and distant objects much smaller. The distance between those objects is also exaggerated.
Telephoto lenses do the opposite. They seem to compress perspective so the elements in a scene appear closer together than they are in reality and in doing so they play down the size difference between those elements.
I personally favour a wide-angle lens when it comes to exaggerating scale because they have the ability to turn the ordinary into the extraordinary. If you move close to an element in the foreground it looms large in the frame and dominates the composition while everything else seems to race away into the distance. The wider the lens, the more pronounced the effect, though don’t feel you need to take it to the extreme – a focal length of 24mm or 28mm will work well. Once you go any wider there’s a greater chance of the composition looking empty, and of the impact of the final image being diluted.
SCANTASTIC
Many photography enthusiasts own a flatbed scanner. This is because they are more versatile and economical than a dedicated film scanner, and allow the user to scan not only negatives and transparencies in all film formats, but also photographic prints, documents and other forms of flat artwork.
What few people realize is that even the most basic flatbed scanner can also be used as a large-format copy camera to scan and digitize 3D objects so they can be turned into high-quality images. It’s basically the same idea as creating a self-portrait by pressing your face against a Xerox machine – only better!
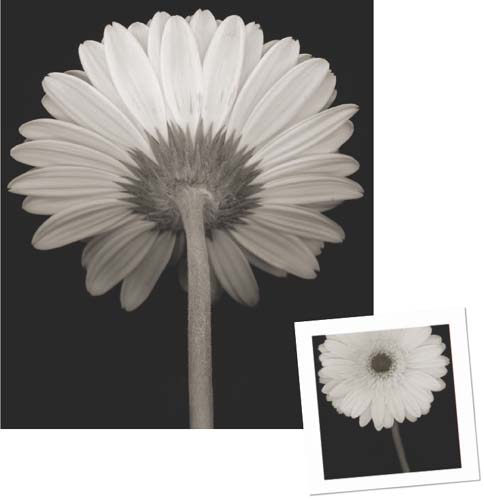
GERBERA
I bought this fine gerbera specimen from a local florist specifically to scan on my flatbed scanner. The amount of detail recorded is staggering. You can see individual hairs on the main image and grains of pollen on the front view of the flower. To achieve that degree of resolving power with a digital SLR you would need to spend 50 times the cost of a basic flatbed scanner.
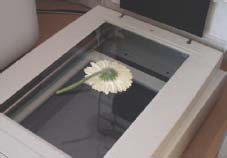
The technique is very simple to try. All you do is place your chosen object on the glass platen of the scanner, and then scan it in the same way you would a piece of positive reflective artwork such as a photographic print. I mainly work with natural objects, such as flowers, seed heads and leaves, but you could use it with anything, natural or man-made, provided it’s no bigger than the scanner platen.
Obviously, you need to take care if the object is heavy or abrasive because it could damage the platen, and any scratches or marks inflicted on it will appear on every scan you make subsequently, which will then require you to retouch them in Photoshop. An easy way around this is to have a sheet of glass cut to the same size as the platen to use as a protective cover that can be periodically replaced if it becomes damaged.
The lid of the scanner can’t be lowered when there’s a 3D object on the platen, so you also need to create some kind of hood that will cover and enclose it. I use an old box file sprayed inside with matt black paint. By cutting off the hinged lid I was left with a black box about 10cm (4in) deep, which is placed over the object to be scanned. Not only does it contain the light from the scanner, but it also creates a plain black background that shows off the scanned object really well.

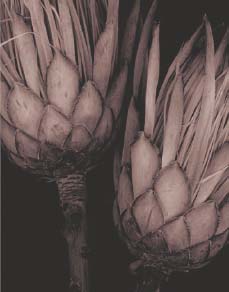
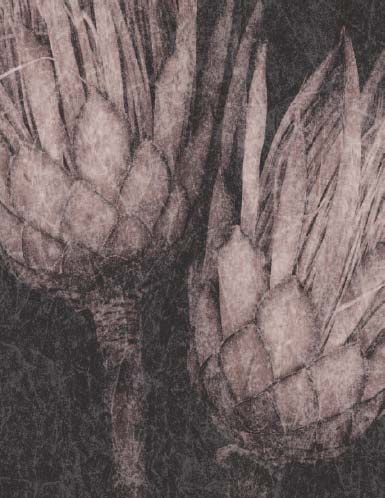
Leaf from a caster oil plant
HOW IT’S DONE
Step 1 Make sure the glass platen is clean. Place your chosen object directly onto the glass platen of the scanner.
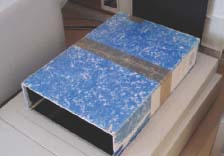
Step 2 Place your hood (in this case an old box file sprayed black inside) over the subject and platen.
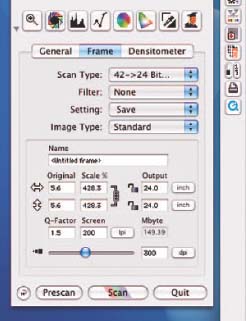
Step 3 Set the desired values in your scanner software. In this case the object is to be scanned at 300dpi to an output size of 24 x 24in (61x 61cm) and the file size will be 149.39Mb.
What’s really impressive about this technique is the amazing image quality that can be achieved. Even a basic flatbed scanner costing under £50 ($85.00) will have a resolution of 1200 x 2400dpi and with that you can create enormous files and output images as huge prints. This means a 150Mb file with an output size of 61 x 61cm (24 x 24in) is easily achieved. If you want to, you can go way beyond that.
I tend to produce files around 100Mb and, at that size, the detail recorded by the scanner is phenomenal when you enlarge the image on screen. The downside of this high resolving power is that the scanner picks up every speck of dust, especially on the platen, so you need to keep everything as clean as you can. Despite my best efforts, I usually end up spending 20–30 minutes removing dust spots from the scan with the Healing Brush or Clone tool.
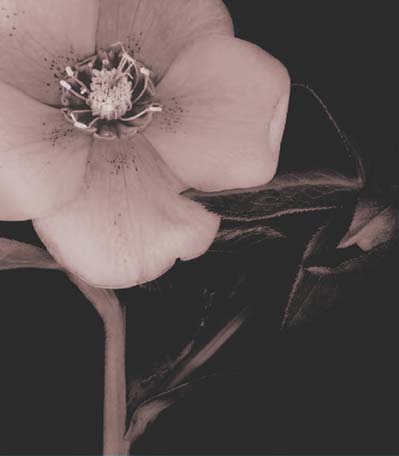
Helleborus are attractively spotted and mottled and the scanner brings out these details beautifully.
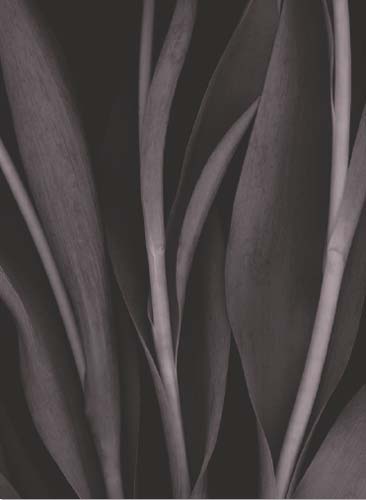
Tulip stems have strap-like leaves and sturdy, upright stems, making them very distinctive.
Manipulation in Adobe Photoshop
The initial scan is made in colour, so once you’ve cleaned it up you need to decide how you want the final image to look. I start with simple desaturation, using Image>Adjustment>Desaturation in Photoshop. From there I make adjustments in Levels, Curves, Channel Mixer and Brightness/Contrast to flatten and soften the image tones and create a delicate art feel. Finally, I tone the images. There are various ways to tone black and white images digitally, using Curves, Channel Mixer and so on, but I use Hue/Saturation. Select Image>Adjustments>Hue/Saturation, click on the Colorize box, and then move the Hue/Saturation sliders around until you’re happy with the effect. For the images here, I used a Hue value of around 25 and a Saturation value of 10, though this is purely down to my personal taste.
 LAYER UPON LAYER
Once you’ve got to grips with creating basic scanned images, try combining them with other scanned images using Layers in Photoshop. You could scan a wide variety of materials such as tracing paper, greaseproof paper, scuffed plexiglass, scratched film or fabrics to create textured images that you could then combine with the main image, for example. Use different Blending Modes to vary the way the layers are combined and adjust the Opacity to control how much of the texture layer shows through.
Original scanned image

Scan of greaseproof paper
The two images combined
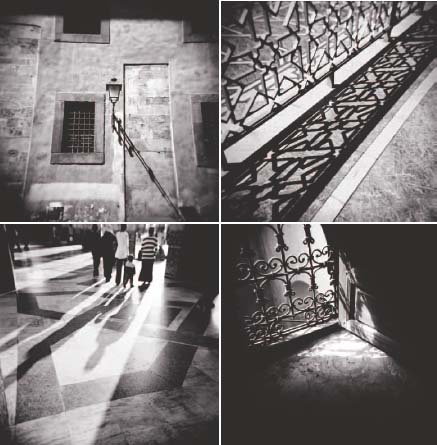
SHADOWPLAY
Shadows are formed whenever an object comes between a light source and a surface. The most common one we encounter is our own shadow. It follows us everywhere when the sun is shining, and then hibernates when it isn’t. But shadows are formed by pretty much everything, natural or man-made, big or small. Shadows possess a great power in photography, not only to reveal texture and form and to create a sense of depth but also to evoke moods. Shadows can even become the subject in themselves, rather than just a shady image of it.
Outdoors, shadows are created by the power of the sun. When it’s out in full force, shadows are crisp and dark. When the sun is obscured by clouds the light is softer and so are any shadows that are formed. Thus, when the sun is totally hidden behind cloud and the sky becomes one big, diffuse light source, shadows cease to exist because there’s no direction or power to the light. So, if you want strong shadows you also need strong light.
The angle at which light strikes an object is also significant because this dictates the size, shape and density of the shadow. When the sun is low in the sky during early morning and late afternoon, shadows are very long and thin because the angle between the sun and the surface on which the shadows are cast is acute. The shadows are also relatively weak because they are partially filled in by light reflecting from the sky overhead.
As the sun climbs higher in the sky, so the angle between it and the earth increases and the light becomes more intense. Consequently, shadows become shorter and darker until with the sun overhead – at its zenith – both the light intensity and shadow density are at a maximum but the shadows themselves are short. If you want to capture shadows at their most interesting, the key is therefore to be shooting during the morning and afternoon rather than the middle of the day. Texture and form are also enhanced when the sun is low in the sky and shadows are long, whereas with the sun high in the sky and shadows short, modelling is dramatically reduced and everything looks rather flat and featureless.

MESARIA, SANTORINI, GREECE
The shadow in this photograph creates a mirror image of the spiral staircase as a result of the angle at which the early evening sun was striking the building. Shadow density is high because the sun was still very strong, despite the late hour. The fact that the shadow was being cast on a whitewashed wall was a lucky bonus because it shows it off to full effect.
CAMERA: NIKON F5/LENS: 80-200MM/FILTER: Polarizer/FILM: FUJICHRIOME VELVIA 50
Keep the sun on one side of the camera if you want shadows to sweep across the scene and reveal texture, or shoot towards the sun so they race towards the camera. Flare can be a problem when shooting into the light, but you can avoid it by hiding the sun behind a building or a tree.
I find urban locations are a better hunting ground for shadows than the countryside. I do use shadows to bring my landscapes to life, but when it comes to shooting shadows for their graphic appeal, towns and cities offer more suitable subject matter. Buildings, doorways, windows, fences, lamp posts, stairways and steps can all be a source of great shots. Old buildings, such as churches, cathedrals and mosques, are also worth exploring because they have intricate detailing both inside and out that casts equally intricate shadows.
PISA, ITALY
RABAT, MOROCCO
CASABLANCA, MOROCCO
MARRAKECH, MOROCCO
These four images show the difference shadows can make, not only in terms of creating a feeling of depth but also by adding visual impact. They were all taken hand-held using simple plastic toy cameras and have a unifying theme running through them due to the striking use of light and shade.
CAMERA: HOLGA 120GN AND DIANA F/LENS: FIXED 60MM AND 75MM/FILM: ILFORD XP2 SUPER
INSIDE JOB
Shadows can be created indoors by shining a light source onto interesting objects. I use an old 35mm slide projector because the light is intense and can be controlled by adjusting focus on the lens. Slides can also be placed inside the projector to colour the light and cast patterns. Placed on a tabletop next to the props in the still-life, it produces bold side-lighting and casts long, sweeping shadows that bring the composition to life. Try it yourself. Any powerful light source could be used instead of a projector.

CLOCK COMPONENTS
I dismantled an old, broken alarm clock to source the objects in this still-life, arranged them on a sheet of white card, and then placed a slide projector behind and to the side to cast long shadows in front of every cog.
CAMERA: NIKON F5/LENS: 105MM MACRO/ FILM: FUJICHROME VELVIA 50
SHAPING UP
Everything, whether natural or man-made, has a shape, and photography is all about capturing those shapes to create images that are pleasing to the eye. Saying that, shape isn’t always something we actively think about when we take pictures. The quality of light is considered, as is the subject matter itself and the way a scene or subject is composed. We’re also aware of colour, texture and pattern. But when was the last time you thought, ‘Hmm. That’s a really nice circle. I think I’ll photograph it’?
While looking through some of my images recently, I came across several where it was the shapes formed by the subject, rather than the subject itself, that provided the visual appeal. They were almost abstract in their composition, so it was clearly the shapes that had captured my imagination because I had given them centre stage – subconsciously if not consciously.
I was rather surprised by this. I had seen something in my photographs, months, perhaps years after they were taken that I’d missed when they were originally composed. It got me thinking about shapes and their importance, and now they’re up there on the mental checklist that I work through when composing an image.
OIA, SANTORINI, GREECE
I spotted this arched window while wandering around the village of Oia early one morning. The window itself is of little interest, but the column framed through it against the blue sky makes all the difference. Careful positioning was crucial to get the composition just right.
CAMERA: NIKON F5/LENS: 80-200MM/FILTER: POLARIZER/FILM: FUJICHROME VELVIA 50
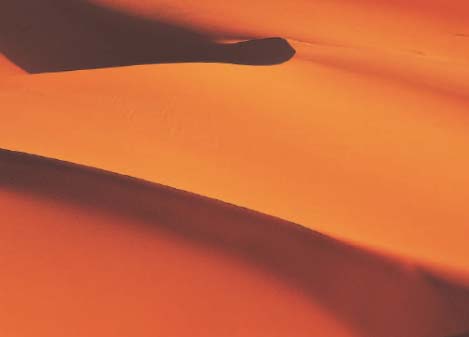
SAHARA DESERT NEAR MERZOUGA, MOROCCO
Deserts are full of wonderful shapes, created by the soft, sweeping curves of the dunes and the way sunlight casts shadows to highlight them. Early morning or late evening is the time to shoot them, when the sun is low and shadows are long. Find a high viewpoint so you can look down on the sea of dunes and use a telezoom lens to home in on the shapes.
CAMERA: NIKON F5/LENS: 80-200MM/FILTER: POLARIZER/FILM: FUJICHROME VELVIA 50
Emphasizing shape
The two main factors that determine how well shape is defined are light and colour.
Light creates contrast by casting shadows, which highlight texture and modelling in an object so it looks three-dimensional. This in turn reveals its shape.
If you take a round object and light it from the front it will look like a flat disc because shadows fall away from the camera and no sense of depth is implied. But move that light 90° so the object is sidelit and it will be transformed. One side will appear lighter in tone than the other due to the fall in intensity away from the light source itself, while shadows will sculpt and model the object so its shape is clearly revealed.
Colour works in a similar way by creating contrast. If you place a yellow vase against as blue wall, the shape of the vase will be emphasized because its colour is brighter than the wall behind it. In reverse (blue against yellow), the effect wouldn’t be as strong because the object colour really needs to be brighter than the background.
Cool colours (blues and greens) also make better backgrounds because they recede, whereas warm colours like red, yellows and oranges advance; they leap out.
A final consideration is how the photograph is composed. You need to keep things simple because, if there’s too much going on in the frame, the shapes will be lost. A telezoom lens is the best tool for the job because it allows you to adjust focal length until all unwanted elements are excluded from the frame. Additionally, the way telephoto lenses compress perspective can help to emphasize shapes, especially when they’re repeated. Using your feet to physically get closer can also make a big difference, as can slight changes in viewpoint, which alter the juxtaposition of the elements still left in the composition.

FIRA, SANTORINI, GREECE
The light was perhaps too frontal here to reveal the repeated church domes at their best, but colour came to the rescue. The dark blue of the smaller dome breaks up the relationship between the foreground dome and the sky. The cross also contrasts nicely with the smoothness of the domes and provides a useful focal point.
CAMERA: NIKON F5/LENS: 80-200MM/FILTER: POLARIZER/FILM: FUJICHROME VELVIA 50

YELLOW BEANS
This simple still-life was created by scattering a selection of bright yellow cod liver oil capsules on a slide-viewing lightbox so they were underlit. I then moved in close with a macro lens and filled the frame with the repeated shapes.
CAMERA: NIKON F5/LENS: 105MM MACRO/FILM: FUJICHROME VELVIA 50
MONOCHROME SHAPES
Shapes can be revealed as effectively in black and white as they can in colour, as the photograph here demonstrates. The same rules apply in terms of using light and shade to your advantage, but instead of having colour contrast at your disposal you have tonal contrast to offset a shape from its background.
I find that high contrast works best when shooting in black and white, to a point where the shape may appear as a silhouette. This means there will be no sense of depth (silhouettes are as two-dimensional as you can get) but the play of dark tones against light more than makes up for that, and the results can be truly striking.

FIROSTEPHANI, SANTORINI, GREECE
This photograph was taken during a family holiday. During the day in the full glare of the sun, the palm wasn’t worth a second look. But in the evening it was thrown into silhouette against the wall, kissed by the last of the rays, and its shape really stood out.
CAMERA:DIANA F/LENS: FIXED 75MM/FILM: ILFORD XP2 SUPER
SHOOT A THEME
One of the trickiest aspects of having photography as a hobby is that opportunities to get out and about with a camera are often few and far between. Then frustratingly, when they do finally come along, or you unexpectedly find yourself with a few hours to spare, and you can’t think of anything to shoot.
For this reason, I would always recommend that you have some kind of project either in the pipeline or in progress. That way, when the chance to pick up a camera comes along, you have a purpose and can maximize your time.
Several possibilities are explored throughout this book, such as photographing household objects (page 46) and developing long-term projects (page 72).
Another useful project is to shoot to a specific theme. This could be anything you like, and the time limit you decide to set yourself could be as brief as your lunch break or as long as the rest of your life. The point is that setting yourself a brief gives you a focus and helps you to get started, even if you deviate from it after a while and concentrate on something completely different that has captured your interest.
Many years ago I remember seeing a portfolio published in a photography magazine with the title ‘10 Minutes’. The photographer behind it had a busy career and little spare time, so instead of fretting about not being able to visit new and exciting locations, he decided to only take pictures within a ten-minute walk of his home. The results were fantastic because he managed to overcome familiarity and see everything through a stranger’s eyes. No doubt when he did manage to travel further afield his photographs were even more stunning because his eye had become so finely tuned.
Another photographer kept his creative inspiration alive by continually visiting new locations. Every weekend he would jump on a train, turn up in a town or city he’d never set foot in before, spend the day taking pictures, and then return home. As you might expect, the photographs he took were extremely good.
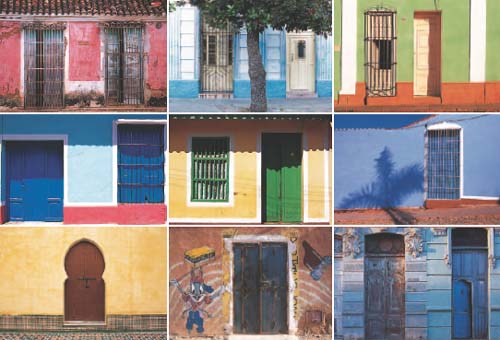
DOORS, CUBA AND MOROCCO
I’ve always found architectural features such as doors and windows interesting simply because they all perform exactly the same function and yet differ so much in terms of size, colour and design. It’s natural, therefore, that when I’m travelling I always manage to return with a few more images to add to my collection.
CAMERA: NIKON F5 AND NIKON F90X/LENS: 28MM, 50MM AND 70-200MM/FILM: FUJICHROME VELVIA 50
Safety in numbers
Setting a theme or brief is something I often do when leading photography workshops, because it helps to focus everyone’s thoughts and give them direction. It’s especially useful in bad weather when the shots we planned to take at a location don’t materialize and we need to move on to Plan B. Even something as open as, ‘Okay, you’ve got one hour to produce half a dozen photographs’ can work because it forces you to really look and dig deep into your creative reserves.
The images that result may not win awards and you may not want to hang them on your wall, but taking them will have taught you something and made your eye for a picture just that little bit sharper.
Being out and about with a camera must always be preferable to propping your feet up on the dog and watching TV, after all.
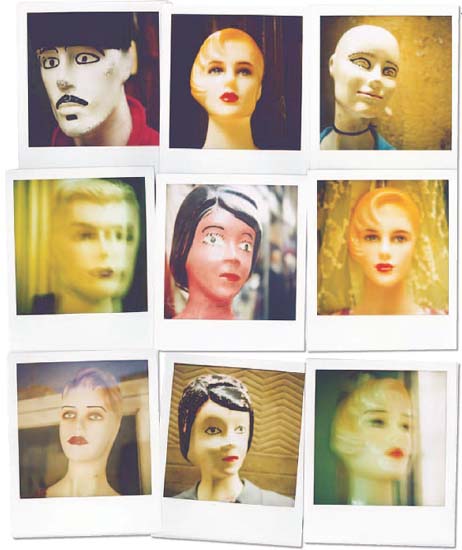
MANNEQUINS, MOROCCO
During a trip through Northern Morocco in April 2007, I was struck by the bizarre and rather scary mannequins used to display clothing, so I decided to photograph them with a Polaroid camera. I managed to find a few in every town and city I passed through and it added a fun element to my photography.
CAMERA: POLAROID SX70 SONAR AF/LENS: FIXED 116MM/FILM: POLAROID TYPE 779
PHOTO ADVENTURES
Not sure what to shoot? Then try one of the ideas listed below. Photo-sharing websites such as Flickr, Photoposts and Fotolog (see page 122) can also be a good source of ideas and inspiration.
• Numbers
• Windows
• Doors
• A specific colour
• Amusing signs
• Graffiti
• A specific word
• Arrows
• Stripes
• Circles
• Reflections
• Faces
• Shadows
• Squares
• Door knockers
• Torn posters
• Mailboxes
• Clouds
STANDARD BEARER
I’m standing in the shady interior of a mud building in southern Morocco when suddenly a young man breezes by. Instantly I’m struck by his proud features and before I know it, I’ve asked him if he would mind me taking his photograph. He hesitantly agrees, so I direct him to a nearby doorway where reflected daylight is flooding in. Despite the fact that it’s dazzling outside, light levels inside are still low and I’m shocked when the metering system of my Nikon F90x tells me the exposure is 1/4sec at f/4.

AIT BENHADDOU, MOROCCO
The 50mm prime lens is a versatile lens I find invaluable for travel photography. It suits all subjects from portraits to details and the stunning optical quality is better than any zoom you’re likely to find.
CAMERA: NIKON F5 AND F90X/LENS: 50MM F/1.4/FILM: FUJICHROME VELVIA 50
Had I been using a zoom lens I’d be struggling to get a shot at all because even if it opened up to f/2.8, which is as wide as any zoom lens will go, I’d still be looking at a shutter speed of 1/8sec. Holding the camera at that level would test the steadiest hand, even if the lens had vibration reduction.
But I’m not using a standard zoom. I’m using a 50mm prime lens, boasting a maximum aperture of f/1.4, a whopping two stops faster than an f/2.8 lens. Instead of feeling under pressure, I’m relaxed and in control. If I want to, I can open up to f/1.4 and work at a much safer shutter speed of 1/30sec. However, because the 50mm lens is so small and light it’s easy to hand-hold at slow shutter speeds without fear of camera shake. So I settle on a compromise exposure of 1/15sec at f/2, fire off half a dozen frames and the shot’s in the bag.
Since that day a 50mm lens has saved my hide many times. The best travel pictures are often taken in extreme conditions where you have to work quickly and confidently without the aid of a tripod, and for me the most versatile lens for that job is the 50mm prime.

HAVANA, CUBA
The 50mm prime standard lens is an ideal general purpose focal length and being small and light can be used handheld used in all types of lighting. This man made an irresistible subject as I explored the streets of Havana, and my 50mm lens came into its own yet again.
CAMERA: NIKON F5/LENS: 50MM F/1.4

HAVANA, CUBA
The perspective of the 50mm standard lens is similar to that of the human eye, so the picture it produces have a very natural look to them, rather than appearing stretched or compressed.
CAMERA: NIKON F5/LENS: 50MM F/1.4
The good old days
When I acquired my first 35mm SLR more than 20 years ago it was normal to buy it with a 50mm standard lens. Then, some time later, you bought either a 28mm wide-angle if you were into landscapes, a 135mm tele if you preferred portraits or, if you could afford it, both. These days, SLRs are sold with zoom lenses, so the 50mm prime has slowly faded into obscurity. However, despite using zooms myself, I still carry a 50mm standard lens as well, and when advising photographers on the gear they need for my photographic holidays and workshops, I always sing the praises of the 50mm standard as a versatile lens for all-round use.
It’s not just the fact that the 50mm prime lens is small, light and fast that makes it such an attractive proposition. I use it for hand-held shots in low light more than any other lens.
There’s also the angle of view. Wide-angle and telephoto lenses get much less into a picture than our eyes see and they stretch and compress perspective along the way. However, the 50mm lens shows the world as it really is and as our eyes see it. Some might suggest this makes the 50mm lens boring, but for me the opposite holds true.
Subject matters
The angle of view also makes the 50mm prime lens ideal for photographing a wide range of different subjects. It can be used successfully for portraiture provided you don’t get too close to your subject, which results in slight distortion of the facial features because 50mm is a little short for headshots. Saying that, on a digital SLR with a DX-sensor, the focal length will increase to around 75mm, making it perfect for frame-filling portraits.
Standard lenses work well for landscapes too. They offer enough depth-of-field at small apertures, such as f/16 and f/22, to produce strong compositions with foreground interest and front-to-back sharpness.
They are also suitable for architectural photography and close-range action. Their close-focus ability, usually 45cm (18in) or less, makes them ideal for capturing details, patterns, textures, abstracts and still-lifes, just the kind of thing that travel photographers love to shoot to capture the flavour of a place.
Finally, there’s the image quality. I’ve yet to see a picture taken with a 50mm prime lens that wasn’t pin sharp and able to knock the socks off anything produced by a cheap, slow standard zoom, which is what most SLRs come bundled with these days. You can forget about distortion because there won’t be any, and expect your shots to be as sharp at the corners as they are at the edges, across the aperture range.
I’m not suggesting that you ditch your standard zoom in favour of a 50mm lens, but what I am saying is that you shouldn’t dismiss acquiring one just because you already have a zoom lens that covers 50mm. The 50mm prime lens is a different animal altogether. It can open up creative doors that a zoom lens will simply slam in your face. It can make successful photographs possible in situations where, armed with only a zoom lens, you have to give up and walk away.
For all of the above reasons, the 50mm standard lens is worth every penny of the asking price.
START A PHOTO BLOG
So you’ve got this passion for photography that’s taken over your life. Every spare minute is spent behind a camera and your collection of images is growing – fast. The thing is, what are you going to do with them all? You can inflict your art on family and friends occasionally, but to anyone who isn’t interested in photography looking at someone else’s photographs can grow very boring very quickly, especially when you start pontificating about hyperfocal focusing and reciprocity law failure.
One solution that’s becoming increasingly popular is to create your own blog, a kind of photographic online diary where you upload images for all the world to see and invite people to comment. Not only will the feedback you receive be helpful and encouraging, but having a forum for your work will perhaps give you more of a purpose when you have the chance to pick up a camera and take pictures. You will also become part of a creative community of people around the world who exchange thoughts and ideas so, all in all, your photography is bound to benefit.
WEBLINKS WORTH CHECKING
As well as individual photographers publishing their photo blogs on the internet, there’s also a growing number of photo-sharing websites where you can become a member and upload your own work for all to see. Here are the most popular.
Join the club or DIY?
There are two main options you can take up when it comes to creating a photo blog. It can either be an extension of your own photography website if you happen to have one. Or, if not, there are numerous photo-sharing websites of which you can become a member.
The latter option is in many ways the easiest because membership is usually free, you can use the host’s web interface to create galleries so you don’t actually need any web or design knowledge, and you’ll be joining an instant community where hundreds, perhaps thousands, of other photographers will immediately have access to your blog. If you create a blog that’s linked to a personal website, building up a list of regular visitors will take longer because, initially, no one will know it exists.
The advantage of a personal website, however, is that you have carte blanche over design so you can really go to town with how it looks, which contributes significantly to the visual impact. Also, what tends to happen is that fellow bloggers search the internet for other blogs and when they find one they like, it’s added to a list of web links on their own blog. Other photographers check out those links, and before long your own blog will be receiving visits from photographers throughout the world – that is, if it’s any good.

PRIMARY – A PHOTO BLOG BY LEE FROST
The images here aren’t from a real blog but one I created for the purposes of this book. However, they do show a fairly standard photoblog format. There is a home page displaying the title of the blog. I chose ‘Primary’ because the underlying theme is colour. It is a random selection of images and offers access to a month-by-month archive of images that have been uploaded to the blog since it was started. Double-clicking a thumbnail image on the homepage or one within one of the archive folders displays an enlarged version of that image with the title, the date it was taken and, where relevant, some background information. Visitors are also given the chance to leave comments, and other images in the blog can be accessed using forward and backward arrows.
PHOTO BLOGS WORTH A LOOK
There are tens of thousands of photoblogs out there on the net covering all interests, subjects and levels of photographic skill. Many bloggers aren’t experienced photographers and use a camera simply as a visual diary so they can share their lives anyone interested logging on. However, more and more enthusiast and professional photographers are discovering the joys of blogging, and their sites will provide an endless source of inspiration. Here are a random few worth checking out that I discovered while surfing the net.
http://apparentlynothing.my-expressions.com
http://thatwasmyfoot.my-expressions.com
Pick a subject
The theme of the blog is up to you. Some photographers try to upload one photograph every day to create an online diary of their lives, but the majority upload images when they can. It really depends what your aim is. Blogging is a great way to show your work to a global audience so you might choose to upload only your best shots, the images that you’re really proud of. Equally, you could set yourself a blog project, such as documenting your neighbourhood, taking pictures in your lunch break, or photographing a specific subject. If you’re not sure where to begin, take a look at blogs by other photographers. What you’ll quickly realize is that anything goes.
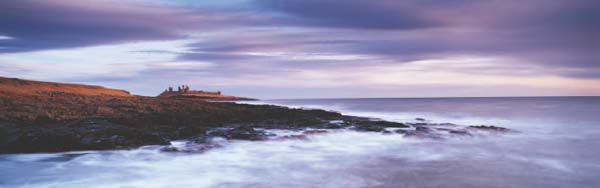
STORM CHASER
By the fourth evening I was ready to accept defeat. Once again I’d spent two hours or more waiting patiently on the bank of Warkworth’s River Coquet. I had been dodging downpours and praying for light that refused to come just so I could get the shot I wanted of the town’s magnificent castle bathed in golden sunlight.
I knew the shot was there for the taking. It was just a case of gambling with the elements and sitting out the weather until a break occurred. I hoped that when the break did come the light would hit the right spot. But I was seriously beginning to wonder if a break would occur at all and my enthusiasm was fading fast.

WARKWORTH CASTLE
Here’s the shot that took me four days to get. Was it worth the effort? Absolutely. I’ve been back to the same location 15 or 20 times since, but I’ve never seen light quite as dramatic. It was one of those magical moments when everything came together just at the right time, and I was lucky enough to be there and capture it. Though I am a firm believer in the old saying ‘The harder you work, the luckier you get’.
CAMERA: PENTAX 67/LENS: 165MM/FILM: FUJICHROME VELVIA 50
RUMBLING KERN, NORTHUMBERLAND, ENGLAND
This dramatic panorama shows a hailstorm blowing in off the North Sea. I didn’t realize it was a hailstorm at the time. I was too focused on capturing the scene on film before the clouds blew over. Minutes later I was racing for cover as the storm finally reached the coast and I was blasted with a million tiny balls of ice. Who says you don’t have to suffer for your art?
CAMERA: FUJI GX617/LENS: 90MM/FILTERS: 0.3 CENTRE ND AND 0.6ND HARD GRAD/FILM: FUJICHROME VELVIA 50
WILL IT? WON’T IT?
Accurately predicting changes in the weather takes knowledge and experience. However, there is a little trick, known as the Crossed Winds Rule, that you can try. Here’s how it works. Turn your back to the surface of the wind then turn 30° clockwise. If, from this position, the clouds appear to be moving left to right, weather conditions are likely to deteriorate. If they’re moving right to left, the cold front is receding so conditions are likely to improve in the next few hours.
I’d done all the usual stuff like asking the clouds very politely if they’d move for a few minutes, and doing a quick good-weather dance around my tripod. But that didn’t work. Neither did muttered expletives or threats of violence, and with sunset just a few minutes away there seemed little point in waiting any longer.
Then suddenly, without warning, the clouds parted, a shaft of golden sunlight broke through and the castle shone like a beacon. Hastily I took a spot meter reading from the sunlit walls of the keep and starting shooting. Frame after frame, I frantically bracketed exposures just to be sure, and tried to grab as many shots as I could of the amazing light. Then as quickly as it appeared it was gone again as the sun slipped behind another cloud. The panic was over, but after four days of waiting and watching I’d got the shot.
That’s bad weather for you. It’s just so unforgiving, so unpredictable – and at times so boring. If you head outdoors when the sun’s shining you can more or less guarantee what kind of shots you’ll end up with. They’ll be bright, colourful, easy to expose. But when the sky is a sea of inky black cloud, a gale is blowing and rain is falling, you really are in the lap of the gods. And that’s where the fun begins. The question is, are you willing to join in?
Tricks of the light
Bad-weather photography is all about harnessing light. It’s about waiting for the elements to collide and create something magical. You never know when or if that’s actually going to happen, but unless you make the effort to get out there, you’ll never be in a position to make the most of it when it does. Being in the right place at the right time is definitely the name of the game.
The most dramatic conditions tend to occur when the sun suddenly breaks through a storm, and sunlight illuminates the landscape. Sometimes it bathes the foreground of a scene; at others it acts like a spotlight and isolates just a small area in the distance. Until it happens, however, you just never can tell so you need to get yourself ready and stay alert.
Whenever I can, I prefer to be on location with a shot lined up then wait for a break to come, which doesn’t always happen. I mount my camera on a tripod, compose the scene, select the aperture I need to obtain sufficient depth-of-field (rarely anything wider than f/11 if I’m including foreground interest) and fit any filters I feel will be necessary.
An ND grad is a must to tone down the sky and emphasize the stormy effect. A 0.6 hard grad is usually strong enough, but sometimes I’ll use an 0.9 to make the sky darker in the shot than it was in reality.
Then I wait, peering up at the sky every few minutes to see how the clouds are drifting in relation to the sun and trying to predict when a break might come. If you do this wearing good sunglasses you can often see the sun lurking behind the clouds without actually dazzling yourself.
Early morning and late afternoon are prime times for this kind of photography, mainly because the light is warm. So, if the sun manages to break through you get a wonderful contrast of warm light against a dark sky, often with purple, pink and blue tones in it. This combination can look stunning.
In situations where the light keeps threatening to break but never quite manages it, another option is to shoot into the sun. Doing this can produce dramatic sunburst effects with light from the sun radiating from behind the clouds. That light may not be powerful enough to illuminate the landscape, but it will make the sky look amazing.

ISLE OF LEWIS, OUTER HEBRIDES, SCOTLAND
When I set out to walk to this location there was a greater chance of me getting a soaking than great pictures. In the end I got both, in reverse order. Just as I reached the clifftop the evening sun broke through and lit the foreground rocks with golden light. It looked amazing, though I could see that it wouldn’t last for long. I changed viewpoint when the sun dipped behind cloud and took the second shot as the sun began to set. Minutes later the heavens opened and by the time I reached the cover of my cosy cottage I looked like a drowned rat.
CAMERA: CANON EOS 1DS MKIII/LENS; 16-35MM/FILTER: 0.9ND HARD GRAD
Wet and wild
Rainy weather makes life more difficult because you have the added problem of keeping your gear dry. But don’t let this put you off. The landscape may not look particularly inviting, but there are plenty of other subjects out there.
How about photographing people hiding beneath their coats or rushing home after work in a downpour, clutching colourful umbrellas? To add interest to your pictures, combine a slow shutter speed of, for example, 1/30 or 1/15sec, with a burst of electronic flash, so any movement is blurred by the ambient exposure but frozen by the flash.
Actually showing rain in your pictures is a little trickier, but it is not a complete impossibility. One option is to include a puddle in the foreground so you can see the patterns created by raindrops as they hit the ground. Or, in a really heavy downpour, use a telephoto lens to home in on rain bouncing off a car, a windowsill or the surface of a street.
An even better technique is to wait for the sun to come out so that the rain is backlit. By using a shutter speed of 1/30sec or slower, each drop will record as a glistening streak falling from the sky. Try to shoot against a dark background if you can, so the rain streaks stand out. This works well on close-ups of flowers.
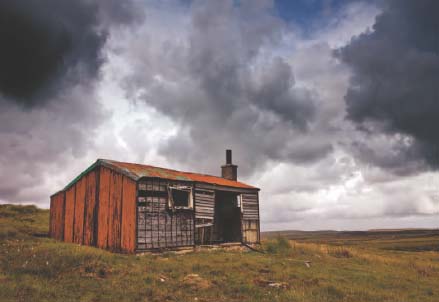
ISLE OF LEWIS, OUTER HEBRIDES, SCOTLAND
You don’t need direct sunlight to produce successful shots in stormy weather. Here the soft reflected light really brings out the rich colours in the rusting iron of the deserted shack while the brooding sky makes no secret of what the weather was like.
CAMERA: CANON EOS 1DS MKIII/LENS; 24-70MM/FILTER: 0.9ND HARD GRAD
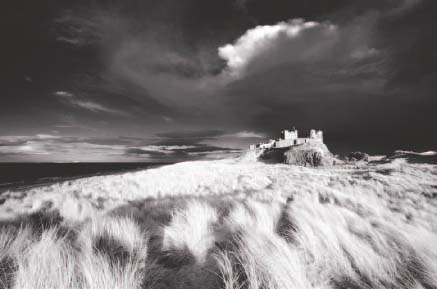
BAMBURGH CASTLE, NORTHUMBERLAND, ENGLAND
Storm light also looks great in black and white, so don’t always feel compelled to shoot in colour. I took this shot while strolling along Bamburgh Beach. I could see that the sun would eventually break through so I positioned myself on the dunes and waited. When the break did come it was amazing, and lasted for 20 minutes or more.
CAMERA: INFRARED MODIFIED NIKON D70/LENS: 10-20MM
PROTECTING YOUR GEAR
• Carry your gear in a waterproof backpack. Many models now have a waterproof cover that can be pulled over the pack.
• Place a skylight or UV filter on your lenses so the filter bears the brunt of the elements rather than the delicate – and expensive – front element.
• If you’re shooting in rain, place your camera and lens inside a polythene bag. With a hole cut and held around the front of the lens with an elastic band you’ll have a waterproof cover.
• Carry a special lens cleaning cloth in your pocket so you can wipe away any moisture that gathers on the front of the lens. Water droplets or spray reduce optical quality and cause flare. A piece of chamois leather can be used to soak up water on the camera body or lens barrel.
• If you get caught in a downpour or you’re waiting around for a shot during light rain, place a stuff sack over your camera and lens to keep them dry. These sacks are intended for sleeping bags but they’re lightweight and waterproof.
• Once you return home, allow the camera to warm up naturally to room temperature before removing lenses, film or lens caps. This prevents condensation building up on and inside the body.
• Never allow your camera or lenses to remain wet for longer than necessary. Once you are under cover dry them off.
STRETCH YOUR IMAGINATION
Panoramic photography has played a central role in my photographic life for more than a decade now. From the moment I first used a 6 x 17cm camera I knew it was the format for me, and wherever I travel in the world I often return home with more panoramic images than anything else. There’s just something about the panoramic format that appeals to my visual senses, and I find it much easier to capture the drama and beauty of a scene.
DUNSTANBURGH CASTLE, NORTHUMBERLAND, ENGLAND
When you’re shooting in low light using long exposures, shooting a sequence of images for stitching is less practical. In the time it takes to shoot the sequence the light can change, leading to inconsistencies in image colour and density. Movement in the sky and water is also difficult to merge accurately so joins may be visible in the final image. For these reasons, I still prefer to shoot film when working in low light.
CAMERA: FUJI GX617/LENS: 90MM/FILTERS: 0.6ND HARD GRAD AND 0.3 CENTRE ND/FILM: FUJICHROME VELVIA 50
In 2005 I wrote a whole book on panoramic photography, which gave me the opportunity to experiment with different cameras and explore the genre in much more detail.
Back then, panoramas were still being shot predominantly with film using cameras such as the fantastic Hasselblad Xpan, or my favourite, the Fuji GX617. Digital technology still had a way to go and though a few photographers were starting to stitch images together digitally to create panoramas, it was a complicated and time-consuming technique that demanded a degree of fairly in-depth knowledge.
Thankfully, all that has now changed, and with my own recent switch over to digital capture I’ve now embraced digital stitching myself while continuing to use a panoramic camera.
Given the choice, I’d rather shoot panoramic images with a single press of the shutter release, so if I can get the shot I want with my Fuji GX617 film camera I will always reach for it in favour of my Canon digital SLR. Familiarity has a lot to do with this. I’ve been working with the Fuji for a decade now and I know it like an old friend. The Canon has been in my possession for just a few months, so I’m still getting to grips with it.
PARALLAX ERROR AND THE NODAL POINT
If you mount your camera on a tripod using the tripod bush on the camera’s baseplate, as you rotate the camera between frames to shoot a stitching sequence a phenomenon known as parallax error occurs when the relationship between features that are close to the camera and others further away changes. Parallax error can make it tricky to stitch images accurately, though modern stitching software is very good at correcting any error.
If you want to eliminate parallax error, you need to position the camera on your tripod so that it rotates on its optical centre or nodal point. There are numerous brackets available for this purpose, and they also help you locate the nodal point for each lens as their positions do differ.
Some photographers swear by these brackets, others don’t. I’m in the latter camp and my images stitch together perfectly well. I also tend to shoot a lot of sequences hand-held and they work fine too. So, in my opinion you might as well save your money and spend it on something more useful.

THE MITTENS, MONUMENT VALLEY, UTAH, USA
My favourite camera for panoramic work is the Fuji GX617. I’ve been working with it extensively for the last decade and never cease to be impressed by the quality it achieves. That said, having recently invested in a Canon EOS 1DS MKIII I can see that it’s going to be a tough call, and for scenes where the Canon offers no practical disadvantage compared to the Fuji, the versatility of digital capture is likely to win favour.
CAMERA: FUJI GX617/LENS:90MM/FILTERS: POLARIZER, 0.6ND HARD GRAD AND 0.3 CENTRE ND/FILM: FUJICHROME VELVIA 50
Don’t move
In some situations, a single shot is also more effective than a stitched sequence. I shoot a lot of coastal landscapes in low light using long exposures, which means that motion is recorded in the sea and sky. If you try to shoot that kind of scene as a sequence, the images may be difficult to stitch seamlessly because the software can’t find a convincing join. With my Fuji GX617 film camera, however, I don’t have that concern and it doesn’t matter if the exposure is five seconds or five minutes.
The same applies when shooting urban scenes where people and traffic are moving through the scene. With a film camera like the Fuji or Hasselblad Xpan you capture panoramas in a single exposure. However, if you attempted to shoot a stitched sequence of the same scene your computer would blow a fuse trying to merge the images.
More for your money
Where digital stitching does win hands down over film is in its versatility. If I want to shoot two frames and stitch them I can, but if I want to capture a full 360° panorama I can do that too. I also have a much greater lens choice for my Canon digital SLR than I do on my Fuji GX617 and this of course gives me endless compositional freedom.
This is aided by the development of amazing stitching software. Gone are the days when you needed to make sure everything was perfect in order for the software to cope with it, or have in-depth knowledge of Photoshop so you could assemble the images manually, using layer masks and brush tools to blend images and paint away the joins. Today, the software is not only quick and easy to use, but it’s very clever. Distortion is automatically corrected and seamless panoramas are created by placing the source images in a folder and leaving the software to do the rest.
You’re not limited to stitching basic sequences of images on a single plane, either. It can handle random selections of images, so if you want to create massive files for mammoth prints you can photograph a scene bit-by-bit like a joiner, and then let the software do the work of blending all the images together.
Not convinced? Then give it a try. You can download free trials of most software packages, including Photoshop CS3. If you do, be prepared to spend some money though, because I guarantee that when the trial period expires you’ll be desperate to buy it.
SEILEBOST, ISLE OF HARRIS, OUTER HEBRIDES, SCOTLAND
Here’s the final stitched panorama in all its glory (see panel opposite). No matter how hard you look, there are no telltale joins to give the game away. Image quality is also exceptionally high due to six individual frames being combined and I would be happy to make prints more than 1m (3¼ft) long from this file. The sky looks polarized, but it isn’t – polarizing filters must be avoided when shooting stitch sequences because they can cause uneven banding across the sky.
CAMERA: CANON EOS 1DS MKIII/LENS: 24-70MM
BUTT OF LEWIS, ISLE OF LEWIS, OUTER HEBRIDES, SCOTLAND
I couldn’t capture a wide enough view of this scene in a single shot so instead I shot a sequence of five frames and stitched them together using Photomerge in Photoshop CS3. I didn’t even bother to mount the camera on a tripod, preferring to shoot hand-held to save time, but the images blended together perfectly.
CAMERA: NIKON D70 INFRARED CONVERSION/LENS: 10-20MM ZOOM
HOW TO CREATE A STITCHED PANORAMA
There are various software packages available that have been designed to stitch images together and create panoramas. Examples include PTGui (www.ptgui.com), PanaVue ImageAssembler (www.panavue.com) and Realviz Stitcher (www.realviz.com). I use the Photomerge option in Adobe Photoshop CS3, which is quick, simple to use and produces seamless panoramas with ease. Photomerge in earlier versions of Photoshop tended to get a bad press, but Adobe have ironed out any flaws and it’s now as good as proprietary stitching software. Here’s how to create a panorama using Photoshop Photomerge.

Step 1 Mount your camera on a tripod and make sure the tripod head is level so that when you rotate the camera between shots it doesn’t go out of square. I use a Gitzo levelling base, which allows me to level the tripod head even if the tripod itself isn’t level. Do a quick practice scan across the scene to work out how many frames you need to shoot. Each frame should overlap by 30–40% to help the software achieve a seamless stitch.
Step 2 Take a test shot from an average part of the scene (not the lightest or the darkest) and check the image and histogram. If it all looks fine set that exposure with your camera in manual mode so you use exactly the same exposure for each frame. If you don’t do this the exposure may vary and image density will differ, making a seamless stitch difficult. Note that the camera is on its side. This isn’t essential, but the pixel depth of the final pan will be greater if you turn the camera on its side so image quality will be higher and you can make bigger prints.

Step 3 Take a shot with a hand in front of the lens. This will help you identify where the sequence begins when you download the images onto a computer. If you don’t mark the start and end of the sequence you can easily get confused.

Step 4 Swing the camera to the far left or right of the view you want to capture, focus manually and take the first shot. Move the camera slightly to the left or right and make your second exposure. Keep doing this, overlapping each image by 30–40%, until you reach the other end of the scene.

Step 5 Take a shot of your hand again to denote the end of the sequence. All the frames between the two hand shots are the ones you need to stitch later. Some photographers shoot their left hand at the start with fingers pointing to the right and their right hand at the end, fingers pointing to the left.

Step 6 Download the images onto a computer. If you shoot in RAW, batch process the RAW files so they all receive the same adjustments and corrections, otherwise inconsistencies will creep in. Place those images in a folder on the computer desktop.

Step 7 Open Photoshop CS3 and go to File>Automate>Photomerge. Select the layout style you want to use. Auto is the default setting and usually works fine. I also use Cylindrical and Perspective. Next, click on the Use tab, select Folders then click on Browse.

Step 8 Click on the folder containing the images you want to stitch and they will appear in the Photomerge dialog box. Click OK and let Photomerge perform its magic. This can take several minutes if the source files are big.

Step 9 After several minutes the stitch should be complete and you’ll see something like this. In this case the image is upside-down simply because I didn’t rotate the source files through 90° before stitching them. You can also see that I need to crop the edges of the stitch to tidy it up. This is common, especially if you don’t use a nodal point bracket to eliminate parallax error (see panel, page 129).
Step 10 After saving the stitch, I rotate it through 180° and flatten the layers (Layer>Flatten Image). I adjust the Levels and Curves until I’m happy with the overall look of the image. I remove any distracting elements using the Clone Stamp tool. The stitch is complete and has an output size of over 85cm (33in) at 300dpi.