TAKE A BREAK
In the last decade, overseas travel has gone from being an occasional indulgence to a regular treat. Thanks to the enormous growth in budget flights from regional airports and affordable hotels, many of us think nothing of jumping on a plane and heading off to a foreign city for the weekend, and not just to tried and tested destinations such as Paris, Venice or Barcelona. Warsaw, Tallinn, Prague, Istanbul, Riga, Bucharest, Marrakech, Krakow and Tangier are among the cities now being frequented by adventurous travellers who want to explore different countries and experience different cultures.
Photographically, city breaks are also a great idea. They are just long enough for you to get to know a place and tap into its photographic potential but not so long that everything starts to feel familiar. Trying to fit photography into a busy life is difficult because there are always other tasks that end up taking priority. But if you get some dates in your diary and book your flights well in advance, when they’re nice and cheap, you can get away from it all and focus completely on one thing – taking photographs.
Do your homework
In the meantime, start doing some research so you have an idea what to expect when you arrive. This will enable you to plan the trip in such a way that makes the most of your time.
Where you stay is important. You might be able to save a bit of money by choosing a hotel that’s away from the main hub, but if that’s where all the interesting subject matter is you’ll waste a lot of time travelling to and fro. It’s worth spending the extra so that you’re in the heart of the place.
Get hold of a guidebook and check websites for information about tourist attractions, such as buildings, monuments, parks and gardens, or anything that could be a good source of pictures. Find out if there are any special events such as carnivals and festivals taking place while you’re there. These can be a blessing if you’re into that kind of thing, but a nightmare if you’re not because it could mean the city is overrun.
Make use of the internet. It’s an invaluable source of information and ideas. If you enter your chosen destination in the Google search window it will come up with dozens, if not hundreds, of web links. Even better, if you click on Images when Google has done its initial search you’ll be able to access hundreds of photographs of the place you’re planning to visit. Most of the images are likely to be fairly ordinary, but they will give you a fantastic visual guide to what you can expect. From there you can compile a hit list of things to photograph. Then, armed with a map of the city, put them into a logical order so you can go from one to the next.
Pay particular attention to classic viewpoints. Every city has one, and usually they’re best visited at sunrise or sunset so you need to know exactly where they are in relation to your hotel. As well as photographing the classic views and monuments, also make an effort to shoot smaller, less obvious details that capture the character of the place. Markets and souks are ideal for this. Photograph food, textiles, herbs and spices and local delicacies. And remember, it’s the people who make a place what it is, so be sure to shoot a few local portraits while you’re there to round off your city break photo essay.
Bon voyage!
 GOT THE GEAR?
Deciding what equipment to pack for your city break is important. Take too much and it will be a burden, too little and you’ll miss opportunities.
For many years my staple travel kit was a Nikon 35mm film SLR with 20mm, 28mm, 50mm and 80-200mm lenses. These days it’s a Canon digital SLR with 16-35mm, 24-70mm and 70-200mm zooms. Additional items include a polarizing filter plus 0.3, 0.6 and 0.9ND grads, a remote release, a lightweight tripod, half a dozen 4Gb memory cards, lens cloths and an antistatic brush.
Because I enjoy experimenting with alternative techniques I will also pack one or two other cameras, taking my pick from various Holgas and Dianas, Polaroid SX70s, a pinhole camera, a Lomo LC-A compact, a Lubitel twin-lens-reflex camera or, more recently, an infrared-modified digital SLR, all of which are covered in this book.

MARRAKECH, MOROCCO
Although only four hours’ flying time from London, Marrakech is a different world. It’s exotic, mysterious, slightly menacing and totally mesmerizing. I’ve been visiting the city for almost 15 years, and though it has changed dramatically in that time, it’s still an amazing place to explore and photograph. The colours, sounds, smells and textures will leave you spellbound. It’s well worth visiting over a long weekend.
CAMERA: NIKON F5/LENS: 50MM AND 80-200MM/FILM: FUJICHROME VELVIA 50
THREE OF A KIND
When we take a photograph it’s usually considered in isolation, as a stand-alone piece of work that lives or dies on its own merits. However, when it comes to presenting images, perhaps in an exhibition or a portfolio, for example, partnering them with other images is commonplace, and the visual impact they offer is usually much stronger.
One way of doing this is by creating a triptych, where three images are displayed as a united group or one image has been divided up into three sections. The term triptych (pronounced trip tick) has its roots in the Ancient Greek word triptychos, which means three-fold. Artists have used the concept since early Christian times, when the triptych was a common format for altar paintings, where a large central panel was flanked by two smaller, related works. More recently, however, photographers have embraced the idea, as have publishers of art posters, canvases and prints, and they are becoming quite common. There are three basic ways to create a photographic triptych.

ONE, TWO, THREE
The idea for this triptych came to me while I was experimenting with Polaroid still-life shots. I initially set up and photographed the three pebbles. Then as I was dismantling the pile of stones I realized that I could shoot a progression of three images, the first featuring just one stone, the second featuring two and the third featuring all three, and then present them together. Recently this image was requested for possible publication as a large stretched canvas so my fingers are crossed.
CAMERA: POLAROID SX70 SONAR AF/LENS: FIXED 116MM/FILM: POLAROID TYPE 779
• One is to take a single photograph and divide it into separate images. Panoramics work well because you end up with three square images and the finished triptych looks balanced and pleasing on the eye. One of my own panoramic landscapes was turned into a triptych by a poster publisher and went on sale in a renowned Swedish retailer as a pack of three square prints ready to frame. I wasn’t sure about it myself initially, but it went on to sell thousands of copies around the world. (My opinion changed.)
As well as horizontal panoramas, verticals also work well, the main difference being that the three image panels are placed one above the other rather than side by side. Some portrait photographers have adopted this idea, shooting a full-length studio portrait of their subject then turning it into a life-sized block-canvas triptych. Mounted on a wall, the effect can be stunning.
Of course, you don’t have to start out with a panoramic image. Any format can be used as the basis of a triptych, even an upright photograph, which would end up as three long, thin images when divided into three. It’s really up to you. Whichever format you work from, the final result will be impressive and certainly turn heads.
• The second approach is to take three separate photographs of a scene, moving the camera as required between frames so there’s no overlap. This is obviously more involved because the three images must be identical in terms of exposure and colour balance, so camera controls have to be locked to ensure consistency.
That said, you may feel it’s a more artistic and honourable way of creating a triptych and therefore worth the extra effort. After all, anyone can slice up one photograph into three.
• The third option is to produce three separate images that are closely related, but not in such a way that if you joined them together they would look like one continuous image. This is where your imagination can run riot. How about taking three disjointed images of the same scene, or uniting photographs of three subjects shot in different places at different times but with a common theme running through them? It could even be three different shots of the same subject, three portraits of the same person but with different facial expressions, or three shots that show the evolution of a composition, like my pebbles triptych opposite. There are no rules here. Just experiment and see what happens.
The great thing about creating a triptych is that it works with landscapes, architecture, still-life, portraits, close-ups, animals, sport, nature or just about any subject you can imagine.
That said, when choosing images for this treatment you need to ask yourself if they will work, especially if you intend to divide a single image into three panels. Simple compositions tend to work better than those that are detailed and cluttered, and you need to make sure that the dividing lines don’t cut through important areas or the composition will be compromised.
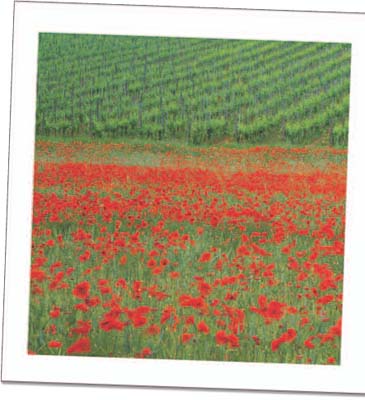

POPPIES, TUSCANY, ITALY
The easiest way to create a triptych is by taking a single image and dividing it into three separate panels. I prefer to do this with panoramic images because the 3:1 format means I end up with three square panels and the final triptych has a balanced, harmonious feel about it. I might even print this one and hang it on my wall.
CAMERA: FUJI GX617/LENS: 300MM/FILM: FUJICHROME VELVIA 50
TIME AND TIDE
Despite shooting a diverse range of subjects and continually experimenting with new ideas and techniques, one specific area of photography I find myself being drawn back to time and time again is low-light coastal landscapes.
I can’t imagine a combination of elements more conducive to successful image-making than waves washing over a deserted beach or crashing against a rocky shore in the soft light of dawn or dusk. Slowly drifting sky is transformed into delicate sweeps of colour, almost as if it were painted by hand, while the sea itself, ebbing and flowing, continuously repositions itself on the image as a series of layers that represent the passing of time, each one subtly different from the last. By contrast, stationary elements stand out in stark 3D against the soft swirl of light and colour.

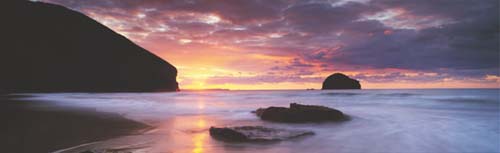
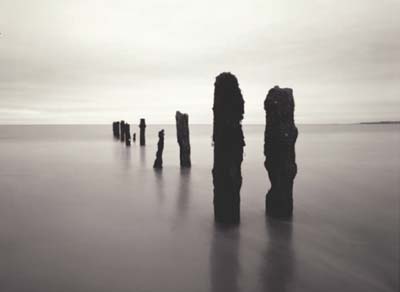
SANDYMOUTH, CORNWALL, ENGLAND
At dawn and dusk the light is soft and atmospheric. Light levels are low so you have no choice but to shoot at long exposures.
CAMERA: FUJI GX617 PANORAMIC/LENS: 90MM/FILTERS: 0.9 ND HARD GRAD AND 0.3 CENTRE ND/FILM: FUJICHROME VELVIA 50
The technique required to capture this effect involves nothing more than opening your camera’s shutter and then standing back to let nature take its course. That said, there are various steps you can take to put the odds of success in your favour.
First, you need to find the right location. There are no hard and fast rules here, other than making sure there is something stationary in the scene for the tide to wash around or against. All manner of natural or man-made structures – rocks, jetties, walkways, piers, steps, mooring posts, wind turbines – can be used. I find it pays to explore potential locations during the daytime when visibility is good and there’s no time pressure, and then return later to take the shots.
Whether a location works better at dawn or dusk will depend on the direction it faces. You can use a compass to establish that. However, don’t assume that if you’re on the east coast you need to be there at dawn, or similarly that dusk is the only time to shoot on the west coast. Even if you’re on a west-facing beach it can still be possible to take successful dawn shots because colour from the eastern sky can creep westwards. The same applies to east-facing locations at dusk. I’ve taken long exposure seascapes at both dawn and dusk in the same locations and they were equally effective.
Watch the time
More important than the time of day is the state of the tide, because this can make or break a great image. You can buy tide tables for any region in the UK, but when I know I’m going to visit a certain area I check tide times online using a website such as http://www.bbc.co.uk/weather/coast/tides.
Whether high tide, low tide or somewhere in between is the most suitable will depend on the location. Features such as groynes and jetties tend to be most photogenic at or near high tide as you want the sea to wash around them to optimize the blurred/sharp contrast, whereas rock formations on a beach may be totally submerged at high tide and only visible when the tide is lower.
There’s a lot to be said for returning to the same location time after time so you learn where the tide needs to be in order to work with certain features. Local knowledge, combined with tide tables and the high and low water marks on Ordnance Survey maps, will then help you decide where you need to be and when. You may have to wait before the tide is at just the right level at the right time.
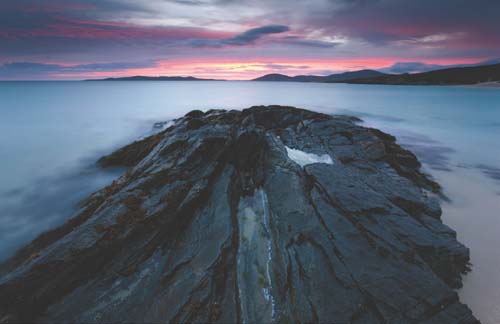
VIEW FROM SCARISTA, HARRIS, OUTER HEBRIDES, SCOTLAND
To emphasize the effect of the sea recorded with a long exposure, include solid objects such as rocks in the composition, so they contrast with the softness of the blurred water. Here the bold shape of the rock outcrop also adds impact to the composition and helps to lead the eye into the scene.
CAMERA: CANON EOS 1DS MKIII/LENS: 16-35MM AT 16MM/FILTER:0.9 ND HARD GRAD/EXPOSURE:20 SECONDS AT F/16
Weather or not
Prevailing weather will have a big impact on the mood of the final image, but don’t be misled into thinking that you need perfect conditions. Yes, it’s great if the dawn or dusk sky lights up with vibrant colour because that colour will also reflect in the sea and the effect can be truly wonderful. But it’s surprising how much colour both film and digital sensors can detect and record using long exposures, even when, to the naked eye, everything seems rather muted.
Dull, grey weather can also be hugely successful because long exposure images taken in such conditions tend to come out with a deep blue cast. This is partly due to the colour temperature being quite high in bad weather, which means the light has a greater content of blue, but also because reciprocity law failure brought on by the use of long exposures causes colour shifts.
Digital cameras seem just as able to record this effect as film, though if you find that your digital images are a touch on the grey side, setting the camera’s white balance to Cloudy or Tungsten will make them bluer. Or, you can simply adjust colour temperature when processing your RAW files. Blue 82A cool or 80 series blue filters can be used with film to achieve the same effect, though I find them unnecessary because Fuji Velvia is more than capable all by itself. One type of filter you will need for film or digital is the good old ND grad. Shooting at dawn or dusk, the contrast between sky and foreground is high so unless you ‘grad’ the sky down it will overexpose and wash out, ruining the final image.
With film I find a 0.9ND grad the most suitable and I also use ‘hard’ grads as the neutral density part of the filter is more consistent down to the central zone where it fades to clear. That said, I’ve worked alongside digital shooters before and found that they need to use a 0.9ND grad plus a 0.3 or 0.6 to get the same result.
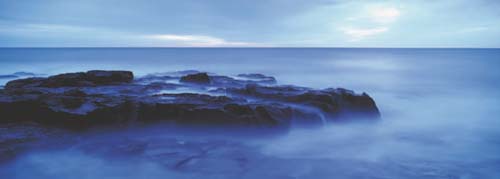
NEAR CRASTER, NORTHUMBERLAND, ENGLAND
On cloudy days the light has a distinct blueness that long exposures record far more vividly than the naked eye can ever detect. This photograph was taken at dawn and is unfiltered. The rich blue hue is courtesy of the film’s vibrant colour rendition, the high colour temperature of the light and reciprocity failure brought on by an extreme exposure.
CAMERA: FUJI GX617/LENS:180MM/FILM: FUJICHROME VELVIA 50/EXPOSURE: 3 MINUTES AT F/45

PORTH NANVEN, CORNWALL, ENGLAND
As well as wide views, look also for interesting details on the shoreline. On the evening this photograph was taken the tide was coming in fast and quickly submerging granite boulders on the beach. I used a short telephoto lens to fill the frame with an interesting arrangement of boulders, then waited for waves to wash over them before tripping the camera’s shutter.
CAMERA: BRONICA SQA/LENS: 150MM/FILM: FUJICHROME VELVIA 50/EXPOSURE: 8 SECONDS AT F/22
TREBARWITH STRAND, CORNWALL, ENGLAND
When the tide is coming in and you’re shooting from beach level, you need to act fast and be careful. If waves wash around your tripod legs there’s a danger that they will sink into the wet sand mid-exposure, resulting in a blurred image. More importantly, you need to make sure you’re not left stranded by the incoming tide, which can be highly dangerous. Always be aware of what’s going on behind as well as in front of you.
CAMERA: FUJI GX617/LENS: 90MM/FILTERS: 0.9ND HARD GRAD AND 0.3 CENTRE ND/FILM: FUJICHROME VELVIA 50/EXPOSURE: 16 SECONDS AT F/32
HOW TO ENSURE PERFECT EXPOSURE
I use a hand-held spot meter as my Fuji GX617 and Mamiya 7II lack integral metering. Readings are taken from mid-tones in the foreground, such as wet sand or rocks, and then I bracket. If the metered exposure is 30 seconds at f/22, I’ll make one exposure at that, a second at 45 seconds and a third at 60 seconds. Alternatively, if the metered exposure is longer, instead of bracketing by extending the exposure time I open up the aperture. For example, if the metered exposure is 60 seconds at f/22 I’ll make one exposure at that, a second for 60 seconds at f/16.5 and a third for 60 seconds at f/16.
Bracketing is necessary to compensate for reciprocity law failure, which causes film to lose speed during long exposures and this results in underexposure. I find that at exposures of 10 seconds or less it’s not so crucial, but at 30 seconds and beyond an exposure increase of ½–1 stop is necessary.
If you’re shooting digitally, of course, you have instant feedback so what I’d suggest is that you compose the shot, put any ND and ND grad filters on the lens, set the camera to aperture priority AV mode and make your first exposure, leaving the camera’s multi-zone metering to sort out the correct exposure time.
The only limitation to this method is that the longest programmed exposure time most SLRs can achieve is 30 seconds, and if light levels are really low or you want to record more motion, you may need to expose for a minute or longer, which means setting the camera to Bulb (B) and making the exposure manually. If this is the case, set the lens to a wider aperture, take a meter reading in AV mode, and then double it for every f/number you stop down by. For example, if the metered exposure is 20 seconds at f/11, it becomes 40 seconds at f/16 and 80 seconds at f/22. Make one exposure at 80 seconds, check the preview image and histogram and if necessary make a second exposure at 120 seconds (an extra half stop) and so on until you get it spot on.
OLD PIER SUPPORTS, BLYTH, NORTHUMBERLAND
This photograph was made using a pinhole camera which, by its very nature, makes long exposures unavoidable even during the middle of the day (see page 88). I set up the camera and tripod close to the old timbers, opened the shutter and let nature take its course.
CAMERA: ZERO IMAGE 45/FOCAL LENGTH: 75MM/FILM: FUJI ACROS 100/EXPOSURE: 30 SECONDS AT F/216
The longer the better
Solid neutral density (ND) filters are also handy for increasing the exposure time. I generally find that with ISO50 film and a lens aperture of f/22 or smaller I don’t need them because exposures are long enough. In clear conditions, 30–60 seconds is commonplace, and several minutes will work in cloudy weather. However, if your lens only stops down to f/16 and the lowest ISO your camera can manage is 200, you may find that the longest exposure you can use is only four seconds, say, which is too brief to record sufficient motion in the sea and sky because you need a minimum of 30 seconds to do that.
By using an ND filter you can force an exposure increase. If the metered exposure is four seconds, for example, with a 0.6ND filter on the lens it becomes 16 seconds, with a 0.9ND it will be 32 seconds and with a 1.2ND it becomes one minute.
What I find most satisfying about this technique is that until you see the final image you have no idea quite how it will look. But one thing’s for sure: it’s never a disappointment. Colours seem richer than you remembered them, familiar views are transformed and the wonderful atmosphere created by the blurring of the sea and sky is truly magical.
TOY STORY
Back in March 2006 I flew out to Cuba to lead a photographic holiday. As usual, I packed my preferred travel kit of two Nikons, a Hasselblad Xpan panoramic camera, various lenses and 50 rolls of Fujichrome Velvia. But just as I was about to close the equipment cupboard, I noticed something lurking in the shadows.
It was my Holga 120GN toy camera. I’d bought it a year or so earlier, shot a few rolls of HP5 then forgot all about it. So, feeling slightly guilty, I blew off the dust and chucked it into my backpack, along with a few rolls of outdated Fuji NPS Pro160 120 colour negative film.

HAVANA, CUBA
This image was made on my first trip with a Holga and is responsible for my obsession with toy cameras. I love everything about it – the sharpness at the centre and gradual softening towards the edges, the rich colours, the vignetting, the fact that the man walked into the scene just as I was about to fire … I couldn’t have dreamt it up.
CAMERA: HOLGA 120GN/LENS: FIXED 60MM/FILM: FUJI NPS PRO 160
Two weeks later, the trip was over, the processed films arrived back from the lab and I excitedly rushed to my office for a first look. As always, the Velvia slides looked great. But the Holga images astounded me. I only used the camera as an afterthought as I didn’t expect to get much from it, but the results stopped me in my tracks. For the first time in years I had an epiphany. I couldn’t believe how amazing the Holga shots looked. They were quite unlike anything I’d seen before. They captured the crumbling character of Cuba perfectly, far better than super-saturated, super-sharp Velvia. Ever since then, the Holga has been a constant companion.
You might be thinking, ‘So what?’ But what I haven’t mentioned is that the Holga 120GN is a cheap, plastic, mass-produced 6 x 6cm rollfilm camera that costs just £20 ($35.00). Brand new. Boxed. Guaranteed. (Well, I’m not sure about the guarantee.)
The Holga was developed in China in 1982 so that people with little money could still own a camera. But in the photographic world you tend to get what you pay for and something had to give. In the Holga’s case, it was everything.
The result is plastic and flimsy and more likely to squirt water into your face than take pictures. But take pictures it does.

CAPITOLIO, HAVANA, CUBA
This is what happens if the film doesn’t wind tightly onto the take-up spool. Light creeps behind the backing paper and fogs the edges of the film. Do I care? Absolutely not. The fogging helps to frame the building and also makes it a unique image. Try achieving that in Photoshop.
CAMERA: HOLGA 120GN/LENS: FIXED 60MM/FILM: FUJI NPS PRO 160
TOY SHOP
There are three different Holga models available, all producing 12 6 x 6cm images on 120 rollfilm. There is the basic 120GN, the 120GFN, which comes with a built-in flash, and the 120GCFN, which has dial-in coloured filters for the flash. The ‘G’ on the name denotes that the camera has a glass lens. Earlier Holgas bearing the ‘S’ or ‘N’ badge have a plastic rather than glass lens, though this doesn’t seem to make much difference to image quality.
The most sought-after classic toy camera is the Diana. Made in China in the 1960s by the Great Wall Plastic Factory, it was originally intended as a cheap promotional camera and funfair prize. It takes 120 film but has a 4 x 4cm image format and records 16 frames per roll. You can often find original Dianas on eBay, or one of up to 50 Diana clones, such as the Hi-Flash, Banier, Arrow and Great Wall.
Dianas have just one shutter speed of around 1/100sec, plus three apertures (f/16, f/6.3 and f/4.5), which are formed by holes in small metal discs. Dianas also have three distance settings. Like the Holga, they’re prone to light leaks and one of my Dianas is so bad that I have to cover every seam and joint with gaffer tape so that the camera itself is completely unrecognizable. But then, that’s all part of the fun of toy camera photography.
The original Dianas ceased production in the 1970s, but a new version of the camera, the Diana+, is now being manufactured and sold by the Lomography Society (see pages 66–69).
Among the other vintage cameras that fall into the toy camera category are the Fujipet, Kodak Brownie Hawkeye, Falcon Junior, Mercury Satellite and Agfa Clack.


HONEY SELLER, TRINIDAD, CUBA
It’s possible to take successful portraits with toy cameras like the Holga, but you need to make sure your subject’s face is positioned in the centre of the frame where the lens is reasonably sharp. Getting the focusing distance correct can be hit and miss. I usually take three or four shots at slightly different focus settings to put the odds of success in my favour.
CAMERA: HOLGA 120GN/LENS: FIXED 60MM/FILM: FUJI NPS PRO 160

GRASMERE, LAKE DISTRICT, ENGLAND
Light leaks are common in toy cameras, especially old Dianas. However, it isn’t necessarily a bad thing because when the leaks work to your advantage, the results can be out of this world. I have a range of toy cameras that suffer from specific problems but rather than trying to solve them, I try to harness them creatively, as shown here.
CAMERA: DIANA F/LENS: FIXED 75MM/FILM: FUJI NPS PRO 160
TOY CAMERA PANORAMAS
Because film inside the Holga – or any other toy camera – is manually advanced and the shutter can be fired regardless of whether you wind on or not, it’s possible to create unusual panoramic images by only partially advancing the film after each shot so you make a series of exposures that slightly overlap. You can do this for an entire roll if you like, to create one long image.
With care it’s possible to move the camera after each frame so the final panorama looks convincing, except for the obvious joins. However, I prefer to take a more random approach so parts of the scene are captured more than once. Sometimes, I’ll actually wander around and shoot overlapping frames from different positions to give the image a sense of time. It’s totally hit and miss, but great fun.

CHEFCHAOUEN, MOROCCO
Here’s a Holga panorama. I took a series of shots as I scanned across the courtyard but didn’t worry about some parts of the scene, or some people in the scene, appearing more than once.
CAMERA: HOLGA 120GN/LENS: FIXED 60MM/FILM: FUJI NPS PRO 160
Okay, Holgas are not very sharp. Except for a sharpish sweet spot in the centre of the picture everything blurs away as if you’ve gone mad with a jar of Vaseline. The corners vignette and, if you’re unlucky, your camera may leak light, or the back may fall off mid-roll.
Optics? They offer a fixed, slightly wide-angle 60mm lens. The latest Holgas boast a glass lens, but that doesn’t seem to have made much difference to image quality.
Exposure and metering? Well, it’s either 1/100sec at f/11 or bulb at f/11, which means that correct exposure is reliant on the wide exposure latitude of negative film. Load a Holga with slide film and you’re going to be disappointed.
Focus? No predictive AF, I’m afraid. It’s all manual with four dubious distance settings denoting 1m, 2m, 6m and 10m–infinity. Generally these aren’t very accurate, so it’s worth taking each shot at two or three different distance settings to ensure your subject is sharp in one of them.
To take a picture you depress a lever on the side of the camera, which activates the spring shutter. Film is wound onto the next frame manually and a red window on the back of the camera tells you when you’ve got to the right frame number. Alternatively, you can create multiple exposures (even if you don’t want to) by re-firing the shutter without advancing the film.
I admit that things aren’t sounding very good so far, but ironically, all these unsophisticated characteristics are what make the Holga and other toy cameras such a joy to use. The lack of control frees you to just wander around, snapping away without a care in the world. I found using my Holga to be a real breath of fresh air and a complete creative release – the perfect antidote to this digital age.
Toy camera photography is so casual. You don’t need light meters, tripods (though you can mount a Holga on a tripod for bulb exposures), filters, separate lenses or any of the paraphernalia normally associated with serious photography. You just sling a Holga over your shoulder – it’s so light you won’t even realize it’s there – stuff a few rolls of 120 ISO400 black and white or colour negative film in your pocket, and away you go.
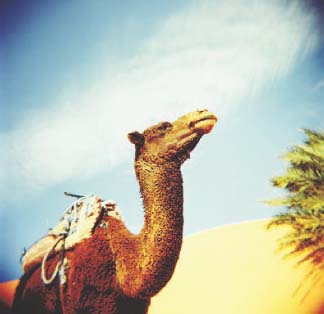
SAHARA DESERT NEAR MERZOUGA, MOROCCO
If your toy camera images aren’t unusual enough in their naked state, why not try cross-processing your film? The weird and wonderful colours combined with coarse grain and increased contrast will really make them stand out from the crowd.
CAMERA: HOLGA 120GN/LENS: FIXED 60MM/FILM: FUJI PROVIA 400F
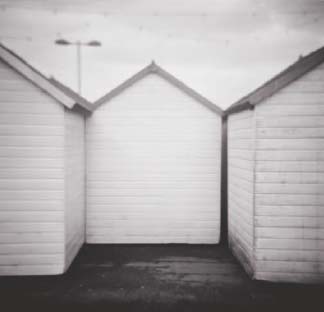
PAIGNTON, DEVON, ENGLAND
The Diana camera differs to the Holga in that its images have an overall softness rather than a sharp centre and soft edges. That said, Dianas are also like snowflakes in that no two are the same, so that characteristic could be unique to mine. What I like about the Diana is the 4x4cm image size, which not only means I get 16 frames per roll of 120 film but also that unexposed areas of film around the image can be used to create a border.
CAMERA: DIANA F/LENS: FIXED 75MM/FILM: FUJI NPS PRO 160
With the technical side of photography removed from the equation, you can concentrate solely on the art of seeing. In fact, I’ve found that the images I take with my toy cameras are totally different from those produced with more sophisticated equipment. They have an innocence and simplicity about them, and a wonderful dream-like quality that feeds the imagination and allows you to create your own narrative, instead of hitting you between the eyes with sharpness and detail.
Lack of perfection also encourages the user to break the so-called rules of composition. It no longer matters if the horizon is slightly wonky or the main subject is breaking out of the frame. Blur, whether mild or severe, can add to the magic and mystery of toy camera images.
Not convinced? Then why not try one for yourself? With such a low price tag you’ve got nothing to lose. However, like me, you will probably find that your perception of what makes a great photograph will be changed forever, and for the better.
TOY CAMERAS ON THE WEB

CAMERA: HOLGA 120GN AND DIANA F/LENS: FIXED 60MM AND 75MM/ FILM: ILFORD XP2 SUPER

TWO FOR ONE
The first medium-format camera I owned was a Mamiya C220 twin lens reflex camera. It was the late 1980s, I was just getting seriously into photography, and though I hankered after a Hasselblad, a secondhand TLR was all my meagre budget would stretch to so, grudgingly, I bought one.
It wasn’t a happy union. TLRs were cheap because they were no longer fashionable, and as soon as funds allowed I upgraded to a Pentax 67. This was a camera with street cred, a camera to be proud of. But age does strange things to the mind, and 20 years later I suddenly started to think a TLR might be a useful addition to my kit. I never really gave it a chance the first time round. I was more bothered about my image than those coming from my camera. It was time to set things straight.
Several weeks and much eBay-bidding later, my camera arrived to a much more enthusiastic welcome this time round.
Notwithstanding the bargain price I managed to acquire the camera for, around one-third of what I’d paid two decades earlier, the main attraction of the C220 was the format. After 20 years of shooting rectangular pictures and criticizing the square format, I suddenly realized that I really liked the square pictures. Rather than simply crop 6 x 7cm images to a square, however, I decided to do the job properly and buy a square-format camera.
What really appeals to me about the twin-lens reflex design is that you see with one lens and take the picture with another. The taking lens is directly beneath the seeing lens, which means that the viewfinder never blacks out as it does with an SLR, so you can see exactly what’s going on in the frame even while the film is being exposed. This is why TLRs were so popular for weddings and portraits – you never lost sight of the subject. It’s also invaluable when using long exposures in low light as you can see if anything strays into the picture area mid-exposure and also assess if things, such as breaking waves, are entering far enough into the picture area.
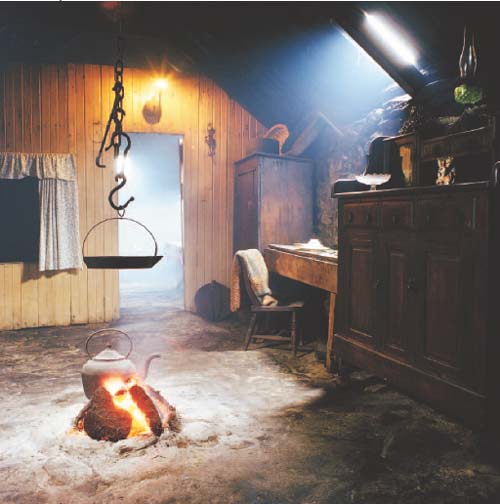
ARNOL BLACKHOUSE, ISLE OF LEWIS, SCOTLAND
This was a tricky subject to shoot. Not only was the room filled with acrid smoke from a peat fire, but there were mixed light sources to contend with (firelight, tungsten light and daylight) and contrast was very high. Nevertheless, the Mamiya C220 coped with it admirably, producing a balanced, high-quality image that would hold its own against any digital SLR, despite the Mamiya costing next to nothing in comparison.
CAMERA: MAMIYA C220 TLR/LENS: 55MM/FILM: KODAK PORTRA 160 VC

SHIEILING DETAIL, ISLE OF LEWIS, SCOTLAND
Despite its low cost, the image quality that can be achieved with the lenses for the Mamiya C220 (and its big brother the C330) is surprisingly high. Working with the waist-level viewfinder is also a pleasant change if you’re used to having a camera pressed against your face.
CAMERA: MAMIYA C220 TLR/LENS: 80MM/FILM: KODAK PORTRA 160 VC
WHAT CAN I DO?
The Mamiya C220 offers the same level of specification you’d expect from any traditional medium-format camera. The basic camera is non-metering and comes with a waist-level finder, though I’m sure a prism finder is available if you look hard enough.
The 6 x 6cm film format produces 12 images on 120 rollfilm and 24 on 220 rollfilm, and the camera can be fitted with the following interchangeable lenses: 55mm, 65mm, 80mm, 105mm, 135mm, 180mm and 250mm. All these lenses have leaf shutters, which means that you can synchronize electronic flash at any shutter speed, and the range of shutter speeds offered by each lens is 1–1/1000sec plus bulb (B).
Focusing is manual and works by means of a bellows system, which enables you to focus very close (down to around 20cm/8in with the 80mm lens) without using attachments. There are also scales on the side of the camera for exposure compensation and depth-of-field with the different lenses.

Looking down
Working with a waist-level finder seemed rather strange at first, as did the fact that the image on the focusing screen is back-to-front. However, I now see both these factors as an advantage. The waist-level finder makes the image more remote, more detached, so being able to assess it objectively is easier. And I also work on the basis that if the composition looks good back-to-front, it’s bound to work the right way round.
To me, one of the biggest attractions of TLR cameras, however, is the fact that they use bellows to focus so you can focus very close without the need for special attachments. My Mamiya 7II rangefinder camera has a minimum focus of 1m (3¼ft), which is fine for landscapes, but not so fine for close-ups and portraits. My Mamiya C220, on the other hand, which costs around 15 times less than the 7II, will focus down to about 20cm (8in) with the 80mm lens attached, making it much more versatile. I love using it to shoot such details as the patterns and textures in rock in a landscape. I also often keep it loaded with black and white film so I can alternate between colour and black and white.
What you see
The one thing that you have to watch out for with a TLR camera is parallax. Because you see the subject with one lens and photograph it with another, what records on film will differ slightly from what appears on the focusing screen. It’s not an issue for distant subjects or wide views as parallax is minimal, but when you are shooting at close-focusing distances it’s much more evident and can spoil your composition.
Markings on the focusing screen help to avoid problems and with practice you learn how to adjust the composition to overcome parallax. Alternatively, you can pick up a handy attachment on eBay called a Mamiya Paramender, which fits between the camera and tripod head and allows you to compensate for parallax.
Image quality on the whole is superb. In addition to the 80mm standard lens that came with the camera body, I also purchased a 55mm wide-angle lens and, despite the fact that both are more than 20 years old and lack the fancy multi-coating you expect on modern optics, they turn in a fantastic performance. The images are crisp and sharp from corner to corner and I can make hand-prints from the negatives or inkjet prints from scanned negatives as large as 61 x 61cm (20 x 20in).

TARANSAY, OUTER HEBRIDES, SCOTLAND
With a minimum focusing distance of just a few centimetres you can use the C220 to shoot small details in the landscape, though make sure you adjust the composition to account for parallax error, otherwise the final picture will look rather different to how you expected.
CAMERA: MAMIYA C220 TLR/LENS: 80MM/FILM: FUJICHROME VELVIA 50

GRASMERE, LAKE DISTRICT, ENGLAND
The square format of the C220 is ideal for landscapes. It produces quiet, balanced compositions that are perfectly suited to simple scenes like this. CAMERA: MAMIYA C220 TLR/LENS: 55MM/FILM: FUJICHROME VELVIA 50
Time for change
If you’ve already made the switch to digital, the idea of reverting to film may seem like an alien concept. However, if you’ve taken up photography in the last few years, chances are you never used a film camera seriously before and went straight for a digital SLR instead. If that’s the case, I’d consider buying a camera like the Mamiya C220 because you’ll be surprised at just how different and satisfying the process of taking pictures is when you load actual film into your camera instead of a memory card. I’m not suggesting one is better than the other. Frankly, we’re all bored with that argument. What I am saying, though, is that they’re different disciplines. As a dyed-in-the-wool film shooter I even find that switching from a rectangular format such as 6 x 7cm to the square of the C220 changes the way I see and think and that in itself results in different work.
Just because you have embraced new technology, there’s nothing to stop you dabbling with the old as well. And at the kind of prices you can pick up old film cameras, like the Mamiya C220, it’s not as if you’re having to make a huge financial commitment. However, the benefits to your photography could be huge.
FROM RUSSIA WITH LOVE
A much cheaper, simpler alternative to the Mamiya C220 is the Russian Lubitel TLR. The makers of this multi-million-selling camera ceased production in the late 1980s but it has achieved cult status around the world thanks to its crude, plastic design.
Lubitels can be picked up at secondhand stores or on auction websites for the price of a few rolls of film. However, in capable hands they can produce surprisingly good results. I’ve owned one for a while now and I’m more than happy with the images produced. Some compare the fixed 75mm lens to the early Carl Zeiss lenses used on vintage Hasselblads.
The Lubitel’s features are fairly basic. It has apertures from f/4.5 to f/22, shutter speeds from 1/15–1/250sec plus bulb (B), flash sync at all shutter speeds, manual film advance and focusing, waist-level viewfinder and minimum focus of 1.3m (4¼ft). It’s compact and lightweight, measuring just 125 x 95 x 90mm (5 x 3¾ x 3½in), and produces either 12 6 x 6cm images on 120 rollfilm or 15 6 x 4.5cm images if you insert an accessory mask.


MURANO, ITALY
I took this photograph while waiting for a waterbus back to Venice. I was attracted to the symmetry of the scene, but the more I looked at it, the more I was convinced I could see a face with one eye winking at me.
CAMERA: LUBITEL 166 UNIVERSAL/LENS: FIXED 75MM/FILM: ILFORD XP2 SUPER

CARNEVALE, VENICE, ITALY
Despite the crude quality of its build and basic features, the Lubitel 166 is relatively quick and easy to use and capable of producing high-quality images with a beautiful tonality.
CAMERA: LUBITEL 166 UNIVERSAL/LENS: FIXED 75MM/FILM: ILFORD XP2 SUPER
VACANT POSSESSION
Whenever I find myself standing outside an abandoned old building, I’m suddenly gripped by a desperate urge to leapfrog fences, crawl through broken windows and tip-toe across rotting floorboards just to take a look inside.
It’s the sense of mystery and intrigue that draws me in. Old buildings are the guardians of so many secrets. They have been witness to laughter and tears, good times and bad. History has taken place behind their walls. When a building that was once home finds itself empty, its atmosphere is also tinged with sadness. Who were the last people to live there? And why did they leave?
It’s not uncommon to enter abandoned homes in remote areas and find such personal possessions as furniture, clothing, cutlery, pots and pans, books, toys or cans of food still inside. It’s almost as though the former inhabitants simply walked out one day and never came back.
In the town of Kolmanskop in Namibia, southern Africa, that’s pretty much what happened. The town sprang up in the early 20th century when diamonds were discovered in the area. However, 30 years later it was deserted and has been left to the ravages of nature ever since.
At the height of the diamond rush there were 300 Germans and 800 Namibian labourers living in Kolmanskop and life there was downright lavish for some of the inhabitants. Grand German houses were constructed for the managers and key workers. There was also a casino, a hospital, a furniture factory, a lemonade and soda plant, four skittle alleys, a swimming pool and a grand hall complete with a theatre and an orchestra that played at tea dances.
Walking through the town today is a surreal experience. Kolmanskop was built on the edge of the Namib Desert, and for the last 50 years, the desert has slowly been claiming it back. Some buildings are gone forever, buried deep beneath the shifting sands, while several of the grander houses cling on hopelessly. Broken windows and shattered doors no longer hold back the wind-blown sand and, over the years, this has accumulated so that some rooms are already half full, the sand banked high in one corner where the wind has been brought to an abrupt halt. Exotic wallpaper, bleached and tattered, still adorns walls. Heavy roll-top baths sit in bathrooms, along with porcelain hand basins that haven’t seen a drop of water for decades.

KOLMANSKOP, NAMIBIA
The old diamond-mining town of Kolmanskop is slowly being consumed by the Namib Desert. I took this photograph five years ago. By now, the room, even the whole house, may have been buried forever.
CAMERA: HASSELBLAD XPAN/LENS:30MM/FILTERS: 0.45 CENTRE ND/FILM: FUJICHROME VELVIA 50
Closer to home
But you don’t have to go all the way to southern Africa to witness this. During a trip to Tuscany in May 2008, I was amazed how many imposing farmhouses lay abandoned and crumbling. The odd one or two were clearly in the process of being renovated, but the majority stood empty and forlorn, windows and doors boarded and ‘No Entry’ signs warning off nosy photographers.
Eventually, curiosity got the better of me and I decided to enter one of the houses. This was not an easy proposition because it was surrounded by a high fence, but when I get an idea in my head …
It soon became clear that the interior was in a bad state, but there were still some fascinating finds, such as an old chair propped against a pink wall in a room where the floor was scattered with books and children’s toys. An old wine bottle sat on a windowsill, covered in cobwebs and dust. I must have spent at least two hours inside taking photographs, and could have stayed much longer.
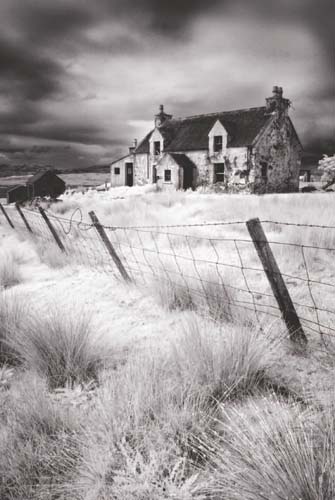
Remote, sparsely populated areas tend to be where these abandoned homes are still found. In such areas, economic hardship or natural disaster have driven people away, never to return.
In the far reaches of the Scottish mainland and outlying islands, deserted houses are widespread. You can see them in almost every village. Many are ruined blackhouses, abandoned in favour of more modern dwellings in the 1920s and 30s. However, a large proportion of vacant dwellings appear to have been occupied until recent times and most likely were abandoned when the last owner or tenant passed away. With depopulation still widespread in the Highlands and Islands, often there are no family members left in the area willing to take the property on, so it’s left to fall into disrepair.
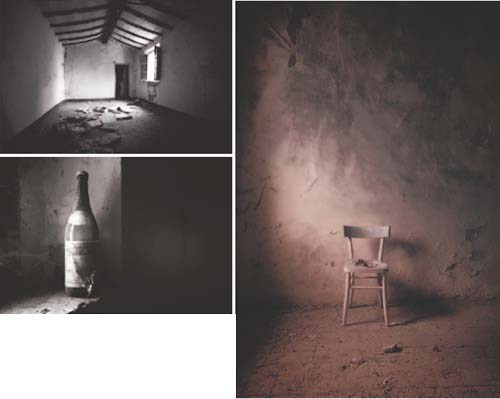
COSONA, TUSCANY, ITALY
This old farmhouse was like a photographic Aladdin’s cave. Not only could I take great wide-angle shots of whole rooms, but also close-ups of smaller details, such as the old chair propped against a wall and the cobweb-covered wine bottle. I must have spent two hours inside, but barely scratched the surface of its photographic potential.
CAMERA: NIKON D70 INFRARED CONVERSION/LENS: 10–20MM/ISO:200
All the same
Wherever the building happens to be, the ravages of time tend to have the same effect. I have photographed interiors in Scotland that looked no different from interiors in Namibia thousands of miles away. They have a unifying look and feel about them. The doors fall off their hinges, windowpanes are smashed, thick layers of dust cover every surface, paintwork blisters and cracks and wallpaper hangs off the walls.
Another factor that unites abandoned old buildings is the quality of light you find inside. With no electricity to provide artificial lighting, the only illumination available is daylight streaming in through doorways and windows or, in many cases, through the holes in the roof.
Direct sunlight acts like a spotlight, picking out specific areas while all around is plunged into deep shadow. This is ideal for shots of details such as an old chair propped against a wall or to highlight the texture in peeling paint.
I prefer non-direct light because it’s much softer and full of atmosphere. In sunny weather, such illumination is created by light reflected from the sky or exterior surface, while in dull, overcast weather, all light entering is reflected because the sky acts like a giant diffuser over the sun.
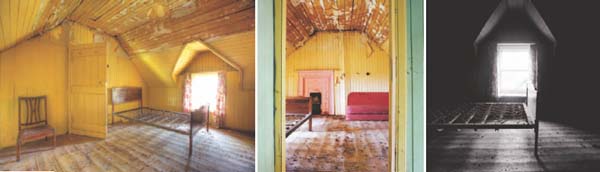
ISLE OF LEWIS, OUTER HEBRIDES, SCOTLAND
I’ve photographed this deserted croft on two occasions now and noticed a definite deterioration in its condition in the two years between visits. The bleak, isolated location and somewhat drab exterior offer no hint of the surprises hidden inside, including walls painted bright yellow and lurid green. There’s even a shocking pink fireplace. Old chairs and bed frames still in situ provide further interest, and the delicate light of a dull day really brings everything to life.
CAMERA: MAMIYA C220, CANON EOS 1DS MKIII AND CANON 20D INFRARED CONVERSION/LENS: 55MM ON MAMIYA, 16-35MM ON CANONS/FILM: KODAK PORTRA 160 VC IN MAMIYA
ENTER AT YOUR OWN RISK
A building may be abandoned, but it’s still private property. Don’t assume you have a right to enter at will. Trespassing is against the law and in some countries can result in prosecution.
Where possible, I try to speak to someone living nearby and enquire if they think it would be okay to go inside and take photographs. If they advise against it, I respect their advice and move on.
Safety must also be taken seriously. Old buildings are often dilapidated and unstable. Staircases and floorboards could collapse under your weight, or the ceiling could fall in. If there are signs displayed warning ‘Danger. Do not enter’, think twice before you proceed. And if you decide to enter anyway, always exercise extreme caution. No picture is worth serious injury, or worse.
Usefully, you get this wonderful soft light on rainy days, which is an ideal time to head for an old building because you can get under cover to keep dry and continue shooting in light that’s just right for the subject. Most of my own photographs of abandoned buildings are taken in dull or wet weather because if it’s dry and sunny outside that’s generally where I will be. It’s only when the weather takes a turn for the worse that I start looking for alternative subject matter.
The type of pictures I take depend on the state of the interior and what’s left inside. For example, if the rooms are empty shells then I tend to use a wide-angle lens and shoot the whole thing. I check out the view from one room to the next because doorways can be used as a compositional frame. In addition, if the light outside is intense I usually exclude any windows as they will overexpose and blow-out. However, that said, old interiors make ideal subjects for HDR images where the extreme contrast is merged into a single image (see page 35). Where furniture and personal possessions have been left behind you can really go to town, shooting a series of ‘found’ still-lifes. The patterns and textures found inside old buildings also deserve attention.
Finally, let’s not forget the exterior itself, which frequently offers as much photographic potential as the interior does. Shoot a general view to show the building in its environment, then move in closer and start looking at smaller details. This might include the colours and textures in old window and door frames, rusty roofing materials and weathered timber. Once you have got started, it’s very difficult to stop, but when you eventually do you should have a set of images that paint a fascinating portrait of a building nearing the end of its natural life.
VERTICAL LIMIT
The panoramic format has become increasingly popular in recent years as more photographers use purpose-made cameras such as the Hasselblad Xpan or digital stitching software to create dynamic images. I’m a great fan of the 3:1 format myself, as many of the images in this book demonstrate. I find it easy to compose using the narrow rectangular shape, and the resulting images have great visual strength because they draw the viewer into the scene.
What few photographers ever do is turn a panoramic camera on its side to shoot vertical images. However, I have found this to be a really effective technique because it produces much simpler, almost abstract results. And, by excluding so much of the scene on a horizontal plane, it jars the senses and leaves the viewer wondering what was going on outside the frame.
The key is to choose the right kind of scene. Whereas horizontal panoramas minimize the amount of foreground and sky in a composition, vertical panoramas do the opposite as they rely on there being an interesting foreground to lead the eye into and through the scene, and an attractive sky to top it off. This is because the images are read differently by the viewer. Horizontal panoramas are scanned from left to right so they don’t rely on foreground interest, while vertical ones are viewed from bottom to top, so they do.
Coastal scenes are ideal for vertical panoramas. Rock-strewn beaches offer many opportunities. You can use the rocks as visual stepping stones to carry the eye in leaps and bounds from the foreground and into the heart of the scene. Ripples on a sandy beach do the same thing.
In the urban landscape, use the lines created by things like road markings, railings and pavements to draw the eye into the scene. Look for strong vertical lines in buildings, monuments, sculptures and structures such as bridges, and optimize their impact by shooting vertical panoramas. It’s best to move in close with a wide-angle lens on the camera so perspective is exaggerated and the lines are emphasized.

SANDYMOUTH, CORNWALL, ENGLAND
Having shot a number of horizontal panoramas of this scene, I suddenly realized that it would also work well as a vertical and promptly turned my camera on its side. The foreground rocks lead the eye nicely towards the pyramid-shaped rock offshore while the clear sky adds a sense of openness to the composition.
CAMERA: FUJI GX617/LENS: 90MM/FILTER: 0.3 CENTRE ND/FILM: FUJICHROME VELVIA 50
Front to back
When shooting from ground level you’ll need to maximize depth-of-field to make sure everything in the scene records in sharp focus. This is especially the case when using a wide-angle lens that will capture everything from your toes to infinity. Stopping down to f/22 or beyond if you can will be necessary with a panoramic camera. Alternatively, if you shoot a series of images to stitch together you can adjust focus as you move the camera between frames.
High viewpoints are beneficial in this respect because everything in the scene is far off, there’s no near foreground to worry about and you don’t need extensive depth-of-field to contend with. You will also have a much clearer view of everything, especially in towns and cities. Try shooting from a tall building (in an area with a lot of high-rise architecture, you may be able to find a tower that stands taller than the surrounding buildings and enables you to look down on them). You’ll be able to capture everything from ant-like people on the ground below, up to the buildings opposite you, and then beyond to the open sky.

MARRAKECH, MORCOCCO
Shooting from a terrace café above the main square in Marrakech, I had a clear view down and across to the Koutoubia Minaret in the distance. Heavy gradding of the sky was required to hold that intense colour but still record detail in the foreground.
CAMERA: HASSELBLAD XPAN/LENS: 90MM/FILTER: 0.9ND HARD GRAD/FILM: FUJICHROME VELVIA 50

SALFORD QUAYS, MANCHESTER, ENGLAND
This suspension bridge was ideal for a vertical panorama as part of the extravagant structure was passing overhead. Turning my camera on its side enabled me to make the most of the dramatic lines it created.
CAMERA: HASSELBLAD XPAN/LENS: 45MM/FILTER: POLARIZER/FILM: FUJICHROME VELVIA 50

KOLMANSKOP, NAMIBIA
Exploring one of the deserted houses in this former diamond-mining town, it suddenly struck me that standing in one room I could see through to several others. The repetition of the open doorways and the changing colours from one room to the next created an eye-catching scene that I decided was best captured as a vertical panorama.
CAMERA: HASSELBLAD XPAN/LENS: 90MM /FILM: FUJICHROME VELVIA 50
EQUIPMENT CHOICE
If you like the idea of shooting vertical panoramas with a panoramic camera, there are numerous options. In 35mm format the Hasselblad Xpan is the main contender and though no longer manufactured, it’s easy to pick up on the second-hand market. The 45mm standard lens is the best choice for general use, though the wider 30mm is a fantastic option; the 90mm allows you to shoot more selectively.
Rotational panoramic cameras such as the Noblex 135 series and Horizon 202 are other alternatives. They use a fixed lens with a rotating slit shutter to create wide-angle panoramic images with an angle of view of around 120–140°.
Rollfilm panoramic cameras are more numerous, but also bigger and more expensive. I use the Fuji GX617 system, which can only be purchased second-hand now. There are comparable 6 x 17cm models available from Horseman, Widepan and Fotoman.
Failing that, shoot a sequence of digital images and stitch them together. Turn to page 128–131 to find out how it’s done.